Repair

Headlamp restoration

Headlamp restoration.jpg

I hate plastic headlamps.

Mind you, I’m delighted with the output and beam pattern of most modern headlamp* assemblies, which are as far ahead of sealed-beam technology as sealed beams were ahead of acetylene. But plastic is plastic, and while you might argue that polymer headlamp lenses are more resistant to stone chips than glass lenses, they eventually will discolor, renedering them semi-opaque and compromising their otherwise excellent performance—and also making them look like crap.

Our 2002 Tacoma Prerunner’s lamps were already well into the jaundiced phase when we took it over from my brother, and I recently decided to do something about it. So I went to the Griot’s Garage site.

I remember the early days of Griot’s, when most of their offerings were exotic and superb tools not available at Sears. My first exposure to Facom and USAG tools were through Griot’s. However, as time went on, Richard Griot (pronounced gree-oh) obviously discovered that the real money was in boutique car-care products such as cleaners, waxes, polishers, clay bars, and a myriad of accessories down to the level of oversize Q-tips for cleaning those pesky crevices in your alloy wheels. Only a few token mechanic’s tools remain among the latest offerings, but you can choose from among no fewer than five power buffers.

Still, any product I’ve bought from Griot’s has been first rate, so I ordered their headlamp restoration kit and set out one afternoon to see how it worked.

Screen Shot 2017-10-24 at 2.27.02 PM.png

And it did, excellently. The entire process—masking the surrpunding trim, wet-sanding the headlamp lenses until the slurry turned from yellow to white, drying them off and prepping with an alcohol pad, and spraying on the new coating—took less than 30 minutes, and it was satisfying to watch the lenses, alarmingly cloudy-white from the wet sanding, turn sparklingly clear under the coating (said to be good for 24 months).

Was it worth $29.95? In terms of sheer results and ease of application, sure. Yet I found myself bemused by the contents of the box, which totalled:

One two-sided sanding pad, helpfully labelled “driver side” and “passenger side”

A couple of lint-free paper towels

Three alcohol prep pads

One 1.5-ounce spray can of the magic coating, good for exactly one set of headlamps

Coating aside, it would be stretching it to claim there was a dollar’s worth of material in the box. That leaves twenty nine bucks for an ounce and a half of coating. It works, but I suspect Griot’s is printing money on this kit.

*As an aside, technically the correct term for the device that lights the road in front of your vehicle is headlamp, not headlight. 

Griot's Garage is here.

Building a zero-hour F engine

If you’re only going to rebuild an engine every 20 years or so, you might as well do a thorough job. That’s been the guiding principle for both me and my master Toyota mechanic and friend Bill Lee, as he disassembled and inspected the six-cylinder F engine and transmission of my FJ40 (see this post for background). Actually it wouldn’t have mattered whether or not it was my guiding principle—Bill would have refused to do it any other way.

The engine had been showing distinct signs of power loss, although oil consumption was not unusual. Teardown revealed one certain cause: the camshaft was badly worn, and on a couple cylinders was clearly not producing much lift on the intake valves. Bill’s explanation for this was illuminating. Apparently on start-up of an F engine, the cam is the last part to receive oil from the pump. Generally this is no problem as residual oil provides plenty of lubrication—unless the vehicle is parked for long periods, in which case the oil will drain away from the cam lobes. The cam will then be without oil for the first 10 or 15 seconds after starting. And—surprise—for several years my FJ40 has seen long periods of idleness while we were traveling overseas, using the Tacoma and Four Wheel Camper for journeys in North America, and putting miles on various long-term review vehicles. Shame on me. (Bill suggested changing to an oil from Joe Gibbs Racing that displays cling properties superior to standard oils. And driving it more.)

Once Bill had the engine disassembled entirely, he called and we had a chat. The cylinders were in excellent condition, still within specs, even still showing factory cross-hatch honing marks. The pistons came right out, Bill reported—no wear ridge at all. 

However. The bores showed vertical scoring, and Bill and I were pretty sure where this originated, as I’d discovered a surgical-strike rodent intrusion in the air cleaner last year, the cleaner itself chewed through and remnants of comfortable rodent accommodations in the housing. I cleaned everything out, but it’s likely some debris had been sucked into the engine in the meantime. (Mystery: After the incident I put hardware cloth over the opening, but Bill found the air cleaner chewed again. Either one got in during the day or two before I installed the screen—likely—or I had the Harry Houdini of mice.) 

The consensus from the machine shop was that the scoring could not be completely honed out while keeping the bore stock, so we decided to bore the cylinders and install new pistons, Japanese-made units from ITM (Toyota pistons are no longer available for the F engine).

The main bearings were in good shape, but given the need for machine-shop work anyway we decided to turn the crank and install one size over bearings. Bill also suggested balancing the components—not a huge deal given the inherent primary balance and even firing order of an inline six-cylinder engine, but every bit helps. The machine shop matched the weight of all the connecting rods to the lightest one by judiciously grinding away material on the caps. (Hey! Less weight means more horsepower!)

Meanwhile, the head has been given a valve job, and equipped with new OEM valve guides and springs—which Bill had to source piece by piece from several dealers around the country. Factory parts such as these are becoming more and more rare. The replacement cam is an aftermarket item; however, it’s a brand Bill has used before with good results. The lifters as well are aftermarket Japanese manufacture. (The last few new OEM F cam/lifter sets sold for near $1,000; this set totalled about $400.)

What else? Bill wisely recommended replacing the oil pump, even though it was working fine. Toyota no longer makes the F oil pump, but the (improved) model from the 2F is still available—however, installing it requires a 2F oil pan as well, so that is in hand. New OEM timing gears will ensure precise cam timing.

Once everything is put back together (with a one-of-few-remaining factory gasket kit), we’ll have an essentially zero-hour engine. It should in fact be better nick than when I bought the vehicle from its original owner in 1978, with 24,000 miles on it.

The header was in good shape, and so ceramic-coated for re-installation.

Next up for attention will be the H41 transmission and transfer case.

Battery welding done right

The magic of battery welding has been known to field mechanics for years now, and one of the most popular classes at the Overland Expo is the hands-on introduction to the skill, taught by experts such as welding wizard Tim Scully. Briefly, by combining several standard automotive batteries in series—that is, positive terminal to negative terminal, in a chain—you create in effect one large 24V (with two batteries) or 36V (three batteries) cell, and this produces enough power to weld a lot of things that can be prone to breaking on vehicles used in rugged conditions: shock and spring mounts, motor mounts, ancillary brackets, roof racks—the list is endless, and full of items that can bring a trip to a sudden halt.

Until now, most impromptu battery welding has been jury rigged with standard jumper cables. While this works, it is far from ideal. Jumper-cable wire is cheap stuff designed for a few second’s starting duty at a time; its coarse strands are inefficient at conducting the power produced by series-connected batteries. And the toothed clamps, although adequate for attaching to battery terminals, are poor for gripping slender welding rods. In addition, you need a way to connect the batteries to each other, which either requires another set (or two) of jumper cables, or yet more jury rigging with your existing battery leads.

All that just ended, thanks to the Trail Weld kit, developed by Tim Scully himself. Tim evaluated the compromises that go into the normal battery-welding setup, and fixed them all. 

  • The cables are now fine-strand, four-gauge Temco welding wire, with 360-degree crimps on all fittings. A 12-foot length on positive and negative leads allows you to put a safe distance between the batteries and sparks. The flexible cable makes controlling the clamp and rod much easier.
  • The positive lead ends in a proper welding-rod clamp, and the negative lead ends in a dedicated ground clamp.
  • Two short leads of Temco wire make quick work of connecting batteries, and reduce voltage loss.
  • All battery connections are high-quality terminal clamps, greatly enhancing conductivity and thus efficiency.
  • All connections are color-coded with heat-shrink wrap.
  • A selection of correctly sized welding rods is included in a plastic protective case.
  • A pair of self-powered auto-darkening goggles is also included.
  • Available containers range from a simple bag to a .50-caliber ammo can to a Pelican Case.

The complete system is so efficient that Tim reports two batteries are sufficient to weld material that requires three if using jumper cables. As he told me, “If you are using three batteries you’d better be welding at least quarter-inch-thick stock.” Since an increasing number of overland vehicles these days are equipped with two batteries, that means you can be completely self-sufficient for field-welding repairs.

For welding amateurs such as myself, the auto-darkening goggles make all the difference when welding with rod, as there’s no pre-positioning the rod at the correct gap and then fumbling with a standard goggle or, worse, a jury-rigged square of welding glass taped to a cardboard face shield, as I’ve always carried. (Of course you’ll still want face, arm, and hand protection.)

For more information, visit the Trail Weld site, here. At the upcoming Overland Expo WEST, Trail Weld kits will be on display during the welding classes, and available for purchase at the 7P booth. Highly recommended.


A Marv in the palm of your hand

I once knew a mechanic named Marv. (Could there be a better name for a mechanic? Picture him: Brylcreemed black hair combed back in a bit of a pompadour; grey trousers and shirt with “Marv” on a shoulder patch, oil-stained loafers, and perfect white socks. That’s Marv.)

Marv had a shop in which he built hot rods for fun while doing ordinary mechanical work to pay bills. He had the contract to maintain J.C. Penney’s furniture-delivery trucks when I was driving them after high school.

The thing about Marv was, vehicles talked to him. I don’t think I ever saw him have to do more than listen to a truck or car for a few seconds before perfectly diagnosing its issue. “Throwout bearing,” he said into my window when I pulled up in a truck that was making a strange noise during shifts—before I even parked or mentioned the specific complaint. “Front U-joint,” “Water pump,” “Burned exhaust valve”—those are Marv diagnoses off the top of my memory. I once brought in a truck that had started running rough, and he said, “The timing’s slipped.” Did he go fetch his timing light? Nope—he pulled out a half-inch wrench, loosened the nut on the V8’s distributor, turned it with his head cocked to the side, revved it a couple of times, tightened the nut, and said, “There you go.” That time, one of my co-drivers (Vern—could there be a better name for a furniture-delivery man?) was with me. He knew Marv well, but not well enough. 

“What’s the timing supposed to be?” Vern asked. 

“About seven degrees before top dead center.”

“And how close do you think you got to that?”

Marv said nothing, just fetched his timing light and, well, I bet you can guess the rest by this point. Some time after that I was summarily fired for rapelling off the J.C. Penney warehouse roof (just for fun—a story for another time), and I lost track of Marv and his preternatural skill.

Today? Today any rookie with 20 bucks, an Amazon account, and a smart phone can enjoy a near-Marv-like mind-meld with an OBDII-equipped vehicle two days after clicking “Add to cart.” I know, because I finally ordered a KingMansion ELM 327 wi-fi-enabled OBDII reader that sends all sorts of interesting and useful information to my iPhone, including stuff even Marv couldn’t have determined (although I doubt it could identify a faulty throwout bearing). The only catch is, you’ll also need a compatible app for the phone—cheap if you buy something like the $10 OBD Fusion in the iTunes app store, more expensive if, like me, you don’t pay attention and wind up with one that also synchs with the phone’s accelerometer to record 0-to-60, G-force, and lap times. If I ever decide to try for a new Tacoma/Four-Wheel-Camper lap record at Riverside, I’m all set.

In case you don’t pay attention to such things, OBDII (for On Board Diagnostics) is a standardized system and port (in the U.S.), mandatory on all passenger vehicles since 1996. It allows the vehicle’s CPU (central processing unit) to communicate information about the engine’s emissions (the original intent), instantaneous fuel usage, actual engine temperature, engine load, air intake temperature, and much more, depending on what the vehicle’s manufacturer chooses to make available.

Most useful for owners, however, is the ability to read trouble codes when the dashboard energizes that annoying and oh-so-vague “Check engine” light, which could indicate anything from imminent disaster to something utterly harmless such as a failed reverse lockout switch (this happened on our old Tacoma). 

I followed the instructions on the absurdly inconsequential-looking ELM, and within minutes the Tacoma was assuring me all was well fault-code-wise. Other functions such as instantaneous fuel mileage (full throttle in first gear with a camper = 7.142 mpg) also popped up and worked perfectly.

If you do hook up an OBD scanner in response to the check-engine light, don’t expect a little pompadoured Marv to pop up on the screen and tell you what’s wrong and how to fix it. All you’re going to see is an alphanumeric code (or perhaps several). You need a guide to tell you which of a mind-boggling array of faults you are experiencing. It might be, say, code P0812, indicating a reverse switch malfunction, which you can ignore if you’re in the middle of nowhere, or, say, P0304, indicating a misfire in cylinder four, which you would not want to ignore. Codes that begin with a P0, P2, or P3 are universal codes; those that begin with P1 are manufacturer-specific. Many websites have been created solely to list and explain OBDII codes. (Toyota has a professional site here that caters mostly to mechanics, but you can apparently buy a temporary subscription to retrieve current technical bulletins and OBD codes. I write “apparently” because it’s only compatible with PCs—and only using Internet Explorer, for God’s sake. C’mon, Toyota.)

By far the most likely scenario is that even after you look up the code you’ll be presented with some utterly incomprehensible diagnosis, such as P0608, “Control Module VSS output A malfunction.” The reason for this is that, when the people in charge were programming what the standardized OBDII sensor would monitor and flag, they decided they wanted it to be the equivalent of the most hypochondriac human being on the planet—just to be safe, and to give car dealers plenty of work. So—I have no proof of this yet, but I’ll get to the bottom of it—I’m virtually certain they kidnapped my mother, hooked up electrodes to her in a secret research facility in Detroit, and remarked admiringly, “Wow—we need at least 360 potential fault codes.”

Whatever the case, you’ll have to decide whether one of these obscure codes is reason to abandon a trip and head to a mechanic. My own reaction, if the truck were running well with no outward signs of trouble, would probably be to mutter, “Yes, mom, whatever you say,” and keep right on driving.


The amazing ClampTite

I know, I know—I’m starting to sound like Ron Popeil. But it’s been some time since I used a tool as cunning as this little device, which can do everything from replacing a broken hose clamp on a fuel line or seizing a rope end to repairing a stress-fractured luggage rack on a motorcycle or splinting a broken tie rod on a Land Rover. 

But wait, there’s more! The ClampTite uses ordinary safety wire you can buy with the tool, or almost any on-hand substitute in a pinch, including fence wire and even coat hanger wire, to securely wrap just about anything that needs to be fastened or immobilized. And the size range it will handle is essentially limited only by the length of the wire. 

You might think you could approximate what the ClampTite does with a pair of pliers and some twisting, but trust me, you wouldn’t be able to apply the amount of tension available through the tool’s threaded collar. Look at this sample of both a single and double wrap on a length of rigid PVC pipe. I tried and failed completely to get that much compression with an ordinary hose clamp.

The ClampTite can make either a single-wire or double-wire clamp (see above). With a single wire you can use as many wraps as necessary, although, depending on the material, friction will start to overcome the ability of the tool to adequately tighten the wire if you overdo it. On a radiator hose like I used for the test, a single wrap of doubled wire is more than stout enough; if you were repairing, say, a split axe handle you could use several wraps of a single wire, then repeat in several places along the split to completely secure it. The same procedure could secure a Hi-Lift jack handle along a broken tie rod, or . . . you name it. The potential applications are endless.

Begin a hose clamp by doubling a length of wire and wrapping it like so.Wrap it again and through the loop.

Attach the ClampTite, secure the ends of the wire, and screw in the bronze nut to tension the clamp.Flip the tool to lock the wire.Release the tension on the tool, clip the wires, and . . . . . . you're finished.

I found the ClampTite easy to use. My biggest challenge was keeping the wire lined up correctly while installing a double-wrap clamp, to keep it from overlapping—although that probably wouldn't affect the seal on a radiator hose.

While it’s impressively compact (a larger model is also available), there will be places you simply can’t use the ClampTite. You need to be able to access the trouble spot to wrap it with wire, attach the tool at the spot, and have room to flip it (double wire) or twist it (single wire) 180 degrees to anchor the clamp once you’ve tightened it. But with ingenuity you can overcome many obstacles. Looking around our vehicles, I found a fuel line fitting on a carburetor that would be inaccessible if its hose clamp broke. However, by removing the fitting from the carburetor first and taking off the other end of the fuel line, one could clamp the line to the fitting, screw the fitting back in with the line attached, then re-attach the other end. 

I think the ClampTite would be at least as useful on a motorcycle as in a four-wheeled vehicle, if not more so. I’ve seen many more parts fail on bikes due to the higher intrinsic vibrations and necessarily harsher ride. We had Tiffany Coates’s legendary BMW R80GS, Thelma, parked at our place for nearly a year some time ago. Thelma has seen long (200,000 miles), hard use and it shows. Thinking back, I’m sure I could have used up at least a hundred yards of safety wire reattaching various dangling bits on that bike.

ClampTite tools start at just $30 for a plated steel and aluminum model, which would be ideal for a motorcycle. The stainless and bronze unit I tested is $70.

Final note: Unlike the Ronco 25-piece Six Star knife set, ClampTite tools are made in the U.S. And you won’t get a free Pocket Fisherman with your purchase. Sorry.


ClampTite tools are here. Thanks to Duncan Barbour for the tip!


The one-case tool kit, part 1


It would be pretty easy to bring along all the tools you’re likely to need on even an extended overlanding trip, covering virtually any repair not involving a new long block. What’s that? Oh—you also want room for, like, food? And maybe a tent and sleeping bags? Hmm . . . now that’s a problem. 

The size of tool kit you carry (or should carry) is subject to a bunch of variables. The length of the trip and the remoteness of the route are two obvious considerations. The age of the vehicle is certainly a factor—even reliable vehicles need more attention as they get older. If you can just go out and write a check for a new Land Cruiser every time you leave on a major trip, your need for tools should be minimal. On the other hand there are people like, well, Roseann and me. A brief survey and some arithmetic established that the average age of all the four- and two-wheeled vehicles currently in our fleet—1970 Triumph Trophy, 1973 FJ40, 1974 Series III 88, 1981 BMW R80 G/S, 1982 Porsche 911SC, 1985 Mercedes 300D, and a practically spanking-new 1987 Honda NX250—is 33 years. All solid vehicles, but inevitably in need of attention now and then, especially the . . . (Ha! you were ready for a facile brand quip here, right? Not this time.)

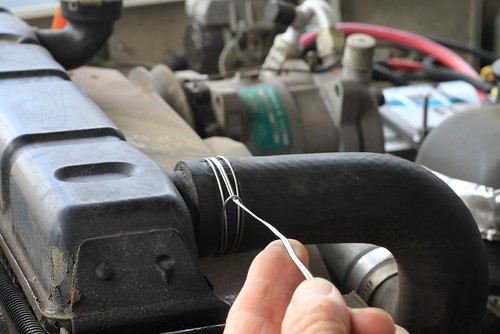
You might think, if you’re utterly mechanically ignorant, that it makes no sense to waste money and space on tools you don’t know how to use anyway. Au contraire—if something goes wrong and you need the assistance of strangers, the least you can offer them is the tools to render that assistance. At a minimum, even on a brand-new Land Cruiser you should carry enough to make what I call generically “rubber repairs,” involving the replacement of pliable things such as fan and serpentine belts, and radiator and heater hoses. These are items that can fail or be damaged even on a new vehicle. A set of standard and Phillips-head screwdrivers, a socket and ratchet set, and a set of combination wrenches will suffice to start (note that for our purposes I consider tire-repair tools a separate subject). But if you want to cover more than first base, you'll need a few additional items. 

Okay, so you’re going to buy some tools. You take a look around the web and find, for example, one set of metric combination open/box-end wrenches, from 10mm to 19mm, for $14.95, and another set of the exact same number and size wrenches, from a different manufacturer, for $298 (I am not making up these prices). You’d be forgiven if your brain texts to itself, WTF? We’re not talking about the difference in value between a Corvette and a Carrera here—this is more like Tata Nano versus Aston Martin Vantage. At least with the cars it’s easy to spot a few differences besides the fact that they’re both designed to go from point A to point B. The wrenches don’t even have any moving parts, and appear more or less identical. What gives? 

Three factors contribute to the discrepancy: quality, reputation, and pure status. 

Quality on even something as simple as a wrench can vary tremendously. Consider what goes into its manufacture:

  • What is the alloy used in the steel—plain carbon?  Chrome molybdenum? Chrome vanadium? 
  • How is the tool formed—is it machined, cast, or drop-forged? Drop-forging helps align the internal grain in the steel, increasing strength.
  • How is it finished? If chromed to resist corrosion and dirt, what process was used? 
  • How precise are the tolerances? This is a critical factor in how well the wrench performs—sloppy tolerances increase the chances the wrench will strip a tight bolt or nut. 
  • Does the box end of the wrench employ the superior “Flank Drive” system pioneered by Snap-on and now copied everywhere? Look for rounded rather than sharp teeth; these bear on the stronger flats of the nut rather than the corners. (The Flank Drive Plus system on new Snap-on wrenches adds the same capability to the open end of the wrench via grooves on the flats. This has been copied by other makers as well.)
  • What about ergonomics? Is the wrench long enough to provide adequate leverage (unless it's a shorty designed to fit in tight spaces)? Fully chromed and polished tools don't just look nice and resist corrosion; they're easier to keep clean as well. 
  • Finally, how socially responsible is the tool? Was environmental protection a factor in the mine-to-maker-to-consumer chain? Do workers in that chain earn a fair wage? 

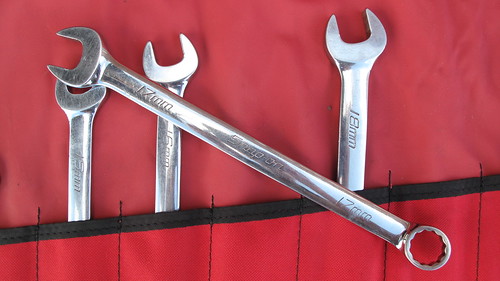
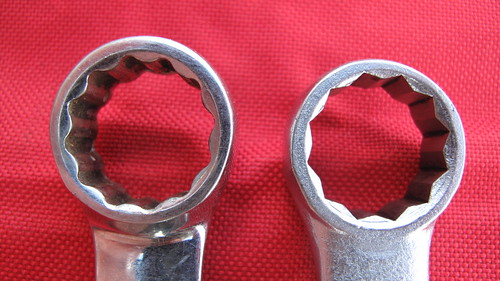
Flank Drive wrench head on the left, standard head on the right

It’s nearly impossible for a consumer to evaluate many of these parameters accurately. A tool marked “drop-forged” could be forged to low tolerances with poor-quality steel. One has to wonder if the wrenches in that $14.95 set were made by a laborer in his or her 60th hour of work that week, and if the smelter or factory do anything to reduce their emissions. It’s sheer common sense that for ten wrenches to be produced in Asia, shipped across the Pacific Ocean, trucked to a Harbor Freight store in Topeka, and sold at a profit for 15 bucks, something along the line had to give: quality, ethics, or both. 

That’s where reputation figures into the equation. Although it’s not a guarantee, buying tools from manufacturers with solid reputations for quality at least makes it far more likely you’ll be getting a good product either produced in the U.S. or under decent conditions elsewhere. I’m referring here to such makers as Sears Craftsman, Kobalt, Proto, S-K, and Husky. A set of wrenches from those makers will cost more than $14.95, but it’s very probable the extra expense will be worth it on several levels.


Finally, there’s status. The “boutique” tool makers such as Snap-on (the producer of that $298 set of wrenches), and to a lesser extent Mac and Matco, have transcended reputation and moved on to the level of status symbol. There’s little doubt that that set of Snap-on wrenches (which are, just to be clear, certainly the best on the market) could be duplicated in every detail and sold for much less, but the Snap-on (or Mac or Matco) label adds a premium eagerly paid by both professional mechanics and well-to-do (or savvy, see below) amateurs. The reason is that, tool snobbery aside, these companies have stayed at the very forefront of tool development and quality. If you pay the premium prices for tools from these manufacturers, you can be absolutely certain you're getting the best tools with the most advanced features. 

What to buy then? I’ll continue to repeat it for as long as it takes to make it into one of those 1001 Famous Quotes books: If you’ve brought out the tools, something has already gone wrong. Why risk compounding the situation by using cheap tools to try to fix it? I recently read an article on bush repairs in a respected Australian four-wheel-drive magazine, in which the writer opined, “Your tools don’t have to be good, just good enough.” And how, exactly, do you identify that fine line of “good enough” except when one breaks at the worst possible time and you’re left holding a handle and thinking, Hmm . . . not good enough. 

So, fine—just go stop a Snap-on truck, hand the driver your AmEx card, and say, “Tool me.” Except that very few of us can afford that option. Instead, I suggest prioritizing. 

The most critical component of an automotive tool kit is the ratchet and socket set. This is what you’ll be using for any serious repairs, and its various pieces are the most susceptible to poor quality control. The ratchet head encloses a lot of very small parts that can be put under enormous strain. It’s easy to make a strong ratchet head with a coarse (i.e. 24 or 36) tooth count, but such ratchets need to be turned many degrees to engage the next tooth—a real issue in tight spaces. The best ratchets these days have 72, 80, even 84-tooth heads, yet are immensely strong. The sockets themselves need to be as thin-walled as possible to fit over nuts in tight spots, yet stout enough not to split. That mandates the very best steel and the tightest tolerances. 

If you’re putting together a complete tool kit, you’ll probably want one socket set in 3/8ths-inch drive, and another in 1/2-inch drive. The 3/8ths set is for general use; when something big needs fixing or replacing the 1/2-inch stuff will come out, so that’s the most critical in terms of quality. 

Next are the wrenches, which do many of the same tasks as sockets but have the advantage of no moving parts. Nevertheless, quality is key—in many situations you’ll need a socket on one side of a fastener and a wrench on the other. I’ve only broken one wrench in my life, but I’ve used many that fit poorly. 

So my advice is to spend until it hurts on your ratchet/socket sets, a bit less so on the wrenches. Next on my list would be a really good set of screwdrivers. After that, you can economize on many pieces with little risk of failure in the field.

A good place to compare quality in one spot is a Sears store. Take a look at ratchets. Their new, green-handled Evolv series (what’s with the cute missing “e” anyway?) represents the price-leader, and it shows. Pass. Move up to the standard Craftsman stuff—non-polished, coarse tooth count, but smoother. Now look at the fully-polished, thin-profile handles. Nicer and more comfortable, easier to keep clean, although the tooth count still feels fairly low. Finally, look at one of the Premium Grade products: Sealed head to keep out grime, industry-leading 84-tooth ratcheting mechanism that goes snicksnicksnick instead of click click click. My only complaints are the lack of a socket-release button, and the fact that the feel of several I tried seemed to vary slightly, as though manufacturing consistency wasn’t quite spot-on. 

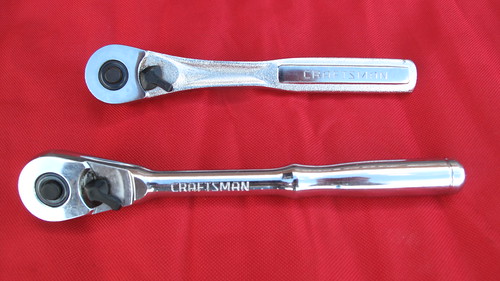
Standard Craftsman ratchet, top, fully polished, bottom. Both unfortunately have plastic selector levers, but are solid tools. The standard ratchet is now made in China.

For several decades I relied on Craftsman ratchets and wrenches, with only a scant few split sockets to their discredit during field repairs (replaced with no questions asked at Sears . . . after I got home of course). Recently I decided to up the ante. I started haunting eBay, looking at Snap-on socket  and wrench sets. There were a few decent deals, but nothing spectacular—until I realized that the sets on offer that were missing a piece or two went for much less than the complete sets. Soon I snagged a lot of current-production 1/2-inch sockets, from 12mm all the way up to a giant 36mm, missing only a 19mm, which I quickly added on an individual auction. Same thing with a wrench set from 6mm to 30mm, missing the 14 and 17, again easily replaced. 

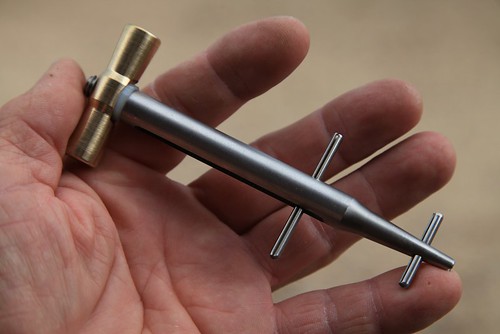
My one retail splurge was the 1/2-inch ratchet handle. I consider this the single most critical tool in my kit. If I break out the 1/2-inch sockets, it’s usually because something significant has gone wrong with either my own vehicle or someone else’s. And if your ratchet handle breaks removing the 21mm bolts from a transmission bell housing, you can bet you won’t be getting them off with a pair of Vise-grips. So I went to the Snap-on website and plunked down $164.95 for part number SF80A: an 18-inch-long, flex-handle ratchet with a Swiss-watch-smooth 80-tooth mechanism—astonishing on a ratchet with a foot and a half of leverage, but Snap-on uses the same head on a 24-inch handle, so they obviously have confidence in it. The locking flex head gives this ratchet great flexibility, the length makes it an effective breaker bar for the tightest bolts, and the fine-toothed mechanism requires only 4.5 degrees of swing to engage the next tooth, a boon in restricted quarters. Every time I use it I’m impressed, and swear it makes me a better mechanic than I really am. It certainly makes me look like a better mechanic than I am.

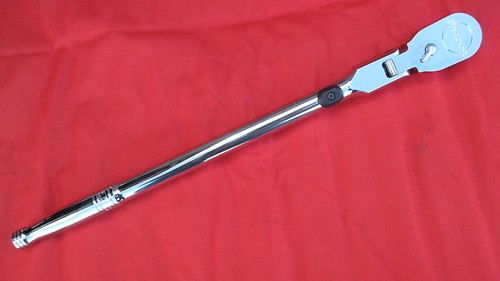
Worth every penny: The Snap-on SF80A 1/2-inch ratchet.

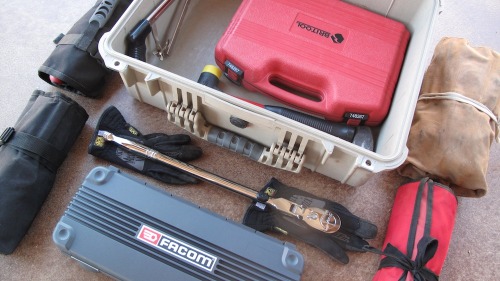
With these two fine sets in hand, I began contemplating my entire traveling tool kit. Specifically, I started musing on a question that had been at the back of my mind for some time: Would it be possible to assemble a high-quality tool kit that could handle virtually any field repair up to and including such things as clutch or differential replacement, suspension work, hub disassembly, or cylinder-head removal—in other words, the types of repairs one might expect on an extended overland trip in remote areas—yet still fit inside one manageable case? 

Interesting idea. Time to look at some Pelican cases. 

Next: a compact, high-quality 3/8ths-inch socket set. Read part 2 HERE.


Historic bodge fixes: T.E. Lawrence

T.E. Lawrence, on right, enters Damascus in the Blue Mist.

Here’s a bit of history David Lean left out of his epic film Lawrence of Arabia: In addition to the camels T.E. Lawrence and his Bedouin allies used on their spectacular raids against Turkish outposts and railroads in what is now Saudi Arabia, Jordan, and Syria, Lawrence employed a fleet of automobiles. 

An unabashed romantic, Lawrence was nevertheless also an utterly practical (and brilliant) military strategist, despite having no training whatsoever beyond the written accounts of historic campaigns he had devoured since childhood. He was the first battlefield commander to recognize and fully exploit the value of aircraft used in support of ground troops, and he pioneered aerial mapping techniques. His guerrilla tactics are still studied today by insurgents as well as counterinsurgents, yet at Tafileh in January of 1918 he proved himself equally capable of commanding a pitched conventional battle. 

Lawrence also quickly realized that on the wide, flat deserts he had to cross with heavy loads of explosives and weapons, an automobile could cover ground much faster than a camel. After his stunning victory at Aqaba, he had the clout to request and receive a small detachment of armored cars, accompanied by automobile “tenders.”

But these weren’t just any automobiles. Lawrence’s desert raiding machines comprised nine Rolls Royce 40/50 Silver Ghost motorcars, including a personal vehicle he named the Blue Mist. 

At the beginning of the war, Rolls Royce was already established as a maker of the finest automobiles, catering to the upper crust of society. But in those early days, such a reputation had as much to do with reliability and durability as it did luxury. In 1907 the company had entered one of its 40/50-horsepower models in the grueling Scottish Reliability Trials, and followed up the performance by driving the same car between London and Glasgow—27 times. The Autocar magazine declared it “the best car in the world”—still Rolls Royce’s motto a century later.

A Rolls Royce 40/50 Silver Ghost in more genteel surroundings. (Image courtesy www.ritzsite.nl) 

That tremendous strength served Lawrence well in terrain and conditions far removed from what even Henry Royce had envisioned. In one passage from Seven Pillars of Wisdom Lawrence describes an exploratory excursion: “Their speedometers touched 65 mph; not bad for cars which had been months ploughing the desert with only such running repairs as the drivers had time and tools to give them.” 

Alas, even the mighty Rolls Royce proved not completely immune to damage from constant, crushing abuse. 

On September 16, 1917, Lawrence and a small team set out to demolish a railway bridge south of Amman, in what is now Jordan. The Blue Mist was “crammed to the gunwale” with explosives and detonators. While his companions, who had followed in another tender, engaged the Turkish post guarding the bridge in a brief but ferocious firefight, Lawrence coolly placed 150 pounds of charges in the bridge’s support spans, ignoring desperate signals from the two British officers supervising the cover fire that Turkish reinforcements were on the way. The explosion sent twisted shards of the bridge plunging into the ravine below, and further enraged the pursuing Turks. 

And at that moment, as the group raced away from the rising smoke, one of the Blue Mist’s rear spring brackets snapped, dropping the body onto the tire and instantly halting forward progress. It was, as Lawrence later described it, the first and only time a Rolls let him down in the desert. 

Anyone else would have simply abandoned the car, but Lawrence was loath to lose not only his faithful Blue Mist (“A Rolls in the desert was above rubies,” he wrote), but the extensive explosives kit inside. With the Turks perhaps ten minutes away, he and his driver (who was nicknamed “Rolls”) jacked up the car, and untied a length of wood plank kept with each car for deep sand recovery, with the idea of wedging it between the axle and chassis. It was too long, and “Rolls” estimated they’d need three thicknesses of the wood to support the car. They had no saw, but Lawrence solved the problem by simply shooting crosswise with his pistol through the plank several times in two places, until the board broke in three pieces. The Turks heard the firing and paused their pursuit, which lent Lawrence and “Rolls” time to rope the planks in place, using the running board as a mounting point, and make good their escape. Lawrence wrote: 

“So enduring was the running board that we did the ordinary work with the car for the next three weeks, and took her so into Damascus at the end. Great was Rolls, and great was Royce! They were worth hundreds of men to us in these deserts.” 

So, if you don’t already have them on board your own Rolls Royce, I suggest adding to your recovery kit one (1) wooden plank and one (1) pistol. 

Touring tip: When it's tool time on the road

Published with the permission of RoadRUNNER Motorcycle Touring & Travel Magazine for Overland Tech & Travel / Overland Expo only. Not for sale or distribution.If you’re like most adventure motorcyclists, you don’t want any type of mechanical problem to deal with during a motorcycle tour. And, of course, the best way to keep that from happening is a heavy dose of preventative medicine before your bike ever leaves the garage. But unforeseen mechanical malfunctions can and do happen out on the road. So, taking selected tools with you and knowing how to use them are sensible precautions for any touring rider.

Key Assumptions: If you ask 10 different riders for their list of necessary tools to have along, you may get 10 different lists. That’s probably because of the assumptions each person is making in several key areas:

  •  Length of Trip: The longer you expect to be on the road the more likely it is that something on the bike will need repair. If your trip involves going around the globe, then many more tools and spare parts will be needed than for a weekend jaunt to the mountains.
  • Type of Bike & Riding: All other things being equal, dual-sport riding and adventure touring are more likely to result in something coming loose or a bike going down than while street riding.
  • Riding Environment: Riding in remote locations usually requires riders to be more self-reliant in fixing whatever needs repairing. 
  • Number of Riders in the Group: The solitary rider must carry all of the tools and spare parts he or she might need. In group riding situations the load can be spread amongst the riders. 
  • Mechanical Expertise of Rider(s): There’s no point in carrying a lot of tools and spare parts if you don’t know how to use them to make the repairs. Riders traveling long distances in remote areas, however, should have the requisite mechanical expertise and equipment to repair most any type of mechanical malfunction.