#overlandreview

23,000-mile review: Klim Latitude jacket and pants

by Alison DeLapp, www.AlisonsWanderland.com

 Pockets galore! (on the Altiplano in Peru) Pockets galore! (on the Altiplano in Peru)

As a female motorcyclist, choosing a viable suit for long-term riding is met with limited options. Despite the growing industry for women’s gear, what was available in October of 2012 did not equate to the durability and versatility of men’s gear. I looked at comparable manufacturers such as Rev-it and Alpinestars (I rode a KLR, so the BMW brand was not even considered), but neither of those held up to what I wanted out of a suit I was going to live in for six months. So, while preparing for a motorcycle journey from Los Angeles, California to Ushuaia, Tierra del Fuego, I decided on Klim’s Men’s Latitude jacket and pants.

In my initial review after six days of test riding around California before I left, my response was, “Yay! Klim is so great!” But just like any new relationship, I was excited at the potential of what could be, not scrutinizing what I had in front of me. So now, 15-months and more than 23,000 miles later, it’s time to break down the long-term, grime-covered, down and dirty results...


Latitude 0 (at the Equator in Ecuador) Latitude 0 (at the Equator in Ecuador)

 Continue reading full article here.

JATAC gets an outdoor kitchen


by Roseann Hanson (co-director, Overland Expo)

There's a lot I love about having a stove, sink, and fridge inside a truck camper—all-weather cooking, protection from mosquitoes, and the convenience of a full kitchen (see this article, about our "Just a Tacoma and Camper" setup). But I miss cooking outside. It's more social, and enjoying the views is why we explore and camp. Nothing like sipping a cool drink, tending some thick pork chops, and gazing out over the Grand Canyon while a condor soars overhead . . .

To facilitate outdoor cooking, we sorted out a camp table and awning. Jonathan rigged us a sleek and easy mount for the sturdy stainless steel table from Frontrunner Outfitters (see story here). And although it was initially a tough decision ($800), we invested in a high-quality, quick-deploying Fiamma awning for the starboard side. Importantly, this is also the side for access to the Four Wheel Camper's dual 10-pound propane tanks, since I settled on a propane grill, for convenience and when local fire restrictions or wood availability obviates our Snow Peak portable fireplace grill. My idea was to leave one tank hooked up to the inside stove and hot water heater, and the second tank rigged with a portable grill hose so all we had to do was hook it up and start cooking.

Now all I needed was a portable propane grill that was powerful, not too bulky, high-quality, and functional.

Easier said than done. I looked at many name brands, including Coleman, Char-Broil, Weber, and NexGrill (a sister brand of Jenn-Air). Some had great BTU ratings (the NexGrill boasts 20,000 and has 2 burners with separate controls). Some were clever (the Coleman Road Trip has an integrated stand that scissors down, so you don't need to use up valuable table space). Some were cheap (the Char-Broil at $30 via Amazon—with the savings you could buy a lot of top sirloin . . .). Some were compact (the Fuego Element closes like a sleek clamshell and is just 9x12).

But in the end my eye was caught by the Napoleon PTSS165P portable grill ($189 MSRP), built for the demanding marine environment (you can order very pricey sailboat cockpit mounts for it). Runner up was the NexGrill (model 820-0015, $180 at Home Depot) but reviews on Amazon indicated the finish quality was poor, with some users claiming not all parts are stainless, or were flimsy with sharp edges. The quality of the Napoleon looked so good, I decided to take a gamble on its 9,000 BTUs (compared to twice that for the NexGrill) and single burner control.

The finish quality of the Napoleon is beyond reproach: folded and riveted corners, smoothly finished vent holes, and sturdy (not at all "tinny") 304 stainless throughout.

Details like the high-quality latch and rivets won me over.

The four-inch legs are anchored with stainless bolts, and pivot flush to the bottom for storage. Only complaint: they do scratch the tabletop, so we're going to coat the bases in Plasti-Dip.

The handle stays cool even after long periods of cooking. However, it's on the wrong side for a right-handed person (when grilling, you usually hold a utensil in your right hand and would use your left to open the grill to check cooking progress). The pietzo-igniter stopped working after the first night. The propane regulator is also on this side. The Napoleon only comes with a mount for small 1-pound canisters; we had to buy a 5-foot hose to connect it to our 10-pound tank.

Cooking area is 17.25 x 9.25 and just about perfect for two people. For more food than that, cooking in shifts would be recommended. To get searing temperatures, the instructions recommend lighting the grill and pre-heating for 10 minutes. This did produce temperatueres just right for searing the pork chops. I do wish it had two burners so I could turn one off to create a cooler location for finishing things like vegetables.

The slightly domed lid is vented but very windproof (we cooked two dinners in 10-15 MPH gusts), and its height would allow cooking a small whole chicken or something in a deep-dish pan; you could even bake a cake or low-top bread. There is a slide-out grease trap tray on the bottom, which made clean-up super easy.

The carrying case fits well but its quality is not commensurate to the grill: the fabric is thin Cordura and is poorly sewn (on ours, the inside pocket for the gas regulator pulled out at the bottom), so I'm not expecting it to last as long as the high-quality grill.

We've now used the Napoleon half a dozen times on a 2,800 mile trip, and are overall extremely pleased with the quality. It's also transformed our camping by doubling our "living area" to include a spacious, convenient, shaded outdoor kitchen where we can easily grill salmon steaks, cook lasagna, bake a cake, or turn out bacon and pancakes on a griddle for a small group.

NapoleonGrills.com

(Awning: Fiamma.com; table: FrontrunnerOutfitters.com or a similar version from K9 racks and Equipt Expedition Outfitters, available in three sizes)

The amazing ClampTite

I know, I know—I’m starting to sound like Ron Popeil. But it’s been some time since I used a tool as cunning as this little device, which can do everything from replacing a broken hose clamp on a fuel line or seizing a rope end to repairing a stress-fractured luggage rack on a motorcycle or splinting a broken tie rod on a Land Rover. 

But wait, there’s more! The ClampTite uses ordinary safety wire you can buy with the tool, or almost any on-hand substitute in a pinch, including fence wire and even coat hanger wire, to securely wrap just about anything that needs to be fastened or immobilized. And the size range it will handle is essentially limited only by the length of the wire. 

You might think you could approximate what the ClampTite does with a pair of pliers and some twisting, but trust me, you wouldn’t be able to apply the amount of tension available through the tool’s threaded collar. Look at this sample of both a single and double wrap on a length of rigid PVC pipe. I tried and failed completely to get that much compression with an ordinary hose clamp.

The ClampTite can make either a single-wire or double-wire clamp (see above). With a single wire you can use as many wraps as necessary, although, depending on the material, friction will start to overcome the ability of the tool to adequately tighten the wire if you overdo it. On a radiator hose like I used for the test, a single wrap of doubled wire is more than stout enough; if you were repairing, say, a split axe handle you could use several wraps of a single wire, then repeat in several places along the split to completely secure it. The same procedure could secure a Hi-Lift jack handle along a broken tie rod, or . . . you name it. The potential applications are endless.

Begin a hose clamp by doubling a length of wire and wrapping it like so.Wrap it again and through the loop.

Attach the ClampTite, secure the ends of the wire, and screw in the bronze nut to tension the clamp.Flip the tool to lock the wire.Release the tension on the tool, clip the wires, and . . . . . . you're finished.

I found the ClampTite easy to use. My biggest challenge was keeping the wire lined up correctly while installing a double-wrap clamp, to keep it from overlapping—although that probably wouldn't affect the seal on a radiator hose.

While it’s impressively compact (a larger model is also available), there will be places you simply can’t use the ClampTite. You need to be able to access the trouble spot to wrap it with wire, attach the tool at the spot, and have room to flip it (double wire) or twist it (single wire) 180 degrees to anchor the clamp once you’ve tightened it. But with ingenuity you can overcome many obstacles. Looking around our vehicles, I found a fuel line fitting on a carburetor that would be inaccessible if its hose clamp broke. However, by removing the fitting from the carburetor first and taking off the other end of the fuel line, one could clamp the line to the fitting, screw the fitting back in with the line attached, then re-attach the other end. 

I think the ClampTite would be at least as useful on a motorcycle as in a four-wheeled vehicle, if not more so. I’ve seen many more parts fail on bikes due to the higher intrinsic vibrations and necessarily harsher ride. We had Tiffany Coates’s legendary BMW R80GS, Thelma, parked at our place for nearly a year some time ago. Thelma has seen long (200,000 miles), hard use and it shows. Thinking back, I’m sure I could have used up at least a hundred yards of safety wire reattaching various dangling bits on that bike.

ClampTite tools start at just $30 for a plated steel and aluminum model, which would be ideal for a motorcycle. The stainless and bronze unit I tested is $70.

Final note: Unlike the Ronco 25-piece Six Star knife set, ClampTite tools are made in the U.S. And you won’t get a free Pocket Fisherman with your purchase. Sorry.


ClampTite tools are here. Thanks to Duncan Barbour for the tip!


Tire review: Big Block Adventure


by Bret Tkacs, for Adventure Motorcycle Magazine 

In early 2012, Kenda released the Big Block Adventure tire to compete in the emerging big-bike knobby market. ADVMoto put a set of Big Blocks to the test on the back trails of Baja, Mexico, and then continued north up the west coast to Washington state. Back then, the Big Blocks were good performers, and on par with the competition, but lacked mileage and shed their skins faster than other big-bike knobbies we’re accustomed to, such as the TKC80 and Metzler Karroo. Kenda took note of this and their engineers worked over the Big Block with a revised tread pattern and new compound.

The casual eye won’t see the difference, as the tread pattern looks very similar. The only way we could tell they were the new tires was by measuring the space between the tread blocks. The newer tires have a block pattern slightly tighter, which puts more rubber to the road/trail. 

We recently mounted up our fresh set of tires and headed off to Moab to put them to the test. After riding 800 miles of jeep trails and gravel roads, as well as over 2,000 miles of pavement on our loaded test bike, the Big Blocks were still holding out.

The bottom line is that Kenda has a winner with good off-road performance, good street manners, and mileage that equals the competition. Highly recommended. 

Pros:

  •  Still a top performer off-road
  •  Performs well for a knobby on the street
  •  Improved mileage over earlier version
  • Price point winner 

Cons:

  • Less prestige than big name brands (ego)
  • Like all big bike knobbies it has a short life span (equal to other knobbies, though)

KendaTire.com

Bret Tkacs works for PSSOR Training

For more adventure motorcycle equipment reviews, interviews, and adventure stories, visit Adventure Motorcycle Magazine , available in print and digital formats.

The blue vinyl table is dead!

A few years ago on a long road trip, Roseann and I opted for convenience over our usual preference for solitude, and stopped for the night in a developed campground: picnic tables, barbecues, flat sites, perfectly symmetrical pine trees—actually quite nice as such places go. That evening an enormous motorhome inched carefully into a nearby slot. The driver emerged just long enough to open a side panel and pull out a remarkably colon-like corrugated hose, which he plugged into his deluxe site’s sewage receptacle. Another umbilical fed electricity to the behemoth. The man then scurried back inside, and soon I heard the sound of some TV program on what I assumed had to be at least a 40-inch flatscreen. And that was the last we saw of either him or his wife. 

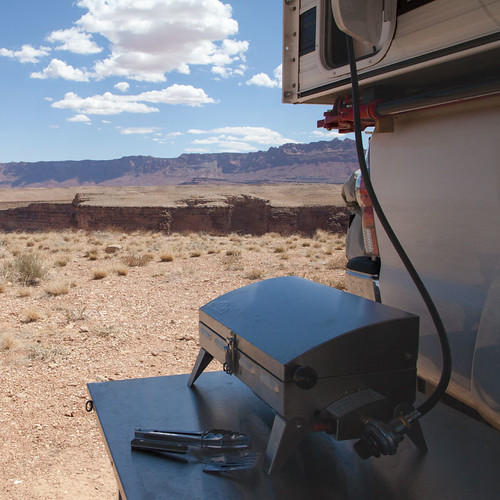
I try not to judge fellow travelers on the size or splendor of their vehicles. After all, to someone in a CJ5 with a Eureka A-frame tent our Four Wheel Camper must seem pretty posh. But, while the camper provides us a cozy, stormproof home away from home, holing up inside is not the goal when we’re traveling—even in Jellystone Park. In good weather we like to be outside as much as possible. With the camper’s excellent Fiamma awning deployed, and a table and chairs set up, we can lay out snacks and drinks, then tackle some weighty biological issue like seeing how many bird species we can document while sitting down. “Nine species in one martini!” Roseann is likely to announce (although identification skills wane somewhat after the second, and we're likely to record birds never seen in this hemisphere . . .).

Where was I? Right: Until recently we relied for our outdoor table on one of those ubiquitous roll-up blue-vinyl-covered things with the screw-in aluminum legs. It was ugly and wobbly, but perversely durable despite my best attempts to “accidentally” destroy it. A Maasai shuka used as a tablecloth improved its looks immeasurably, but I still knew what was underneath . . .

Then, a few months ago, Roseann emailed me (from across the room) a link to the Front Runner camp table, designed to slot under the company’s roof rack. We'd used a version of it in Tanzania and Kenya several times and had been very impressed. Here was a proper outdoor table: welded and braced aluminum legs that folded flat under a top formed and welded from a single sheet of stainless steel. At 29 by 45 inches, the table was large enough for food prep, eating (it seats four snugly), or work, and it weighed a reasonable 23 pounds. She also linked to the Z brackets designed to attach to the Front Runner rack—and then asked, “Could we mount this under the front overhang of the camper?”

I emailed back, “Great idea,” then did some measuring on the camper—plenty of room. Tom at FWC said no problem drilling the composite sheet that forms the bed area of the camper as long as I sealed it well, and certainly no problem with the extra weight: the FWC’s overhang is tested to 1,100 pounds (or, as he and I quipped at the exact same time, “Two average Americans.”).

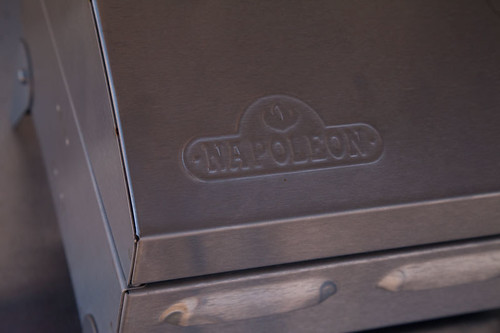
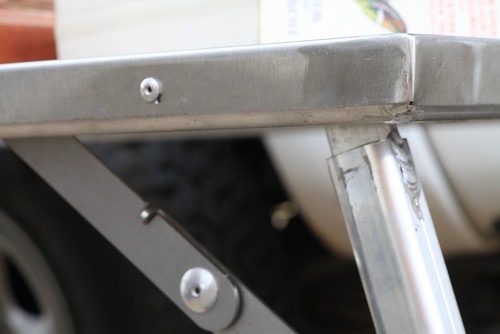
The table's top is formed, welded at the corners, and riveted to the aluminum frame.

When the table arrived it met my expectations and then some. Compared to its cheesy roll-up predecessor it was the Rock of Gibraltar. All the hardware was cadmium-plated and secured with nylocks. The stainless top would be impervious to spills or heat. True, at $285 such features should be taken for granted. Nevertheless it was a relief to consign the blue vinyl table to the Cemetery of Obsolete but Kept Around Forever Camping Gear down in the storeroom.

Exercising due measure-thrice-cut-once caution, I marked and drilled, then veeery carefully countersunk (so the bed’s top section could slide over the bolt heads) three holes for each of the Front Runner Z-brackets from inside the camper. They are designed to hold the table on its narrow ends, but I needed them to hold it on the longer sides, meaning the table would protrude about a half a foot each way.

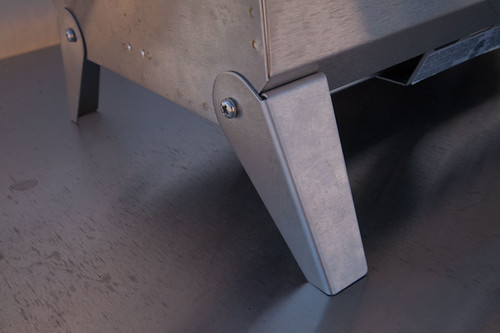
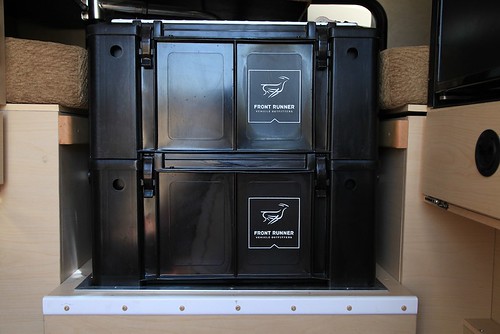
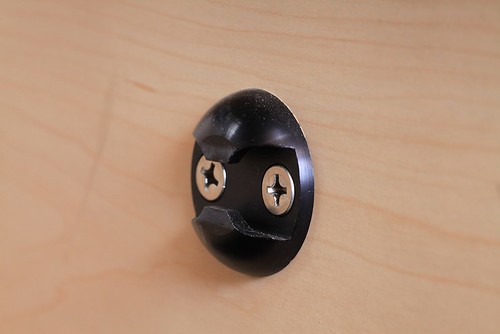
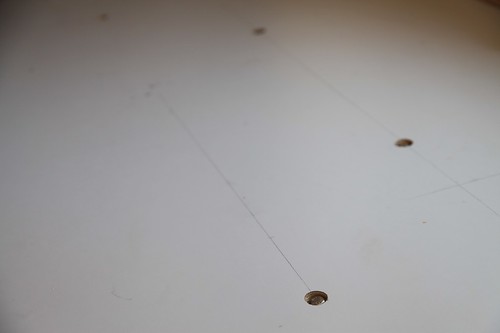
The bolt heads are countersunk just enough to allow the bed extender to slide over them.

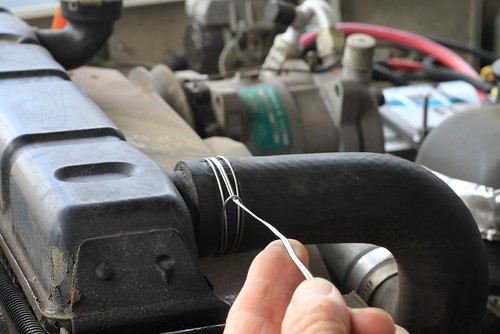
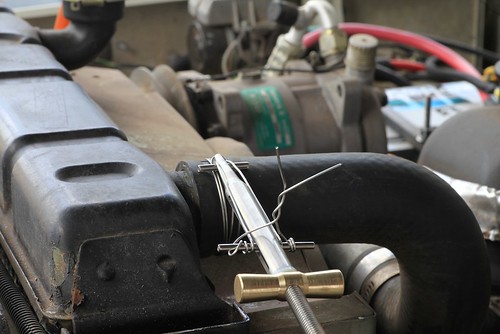
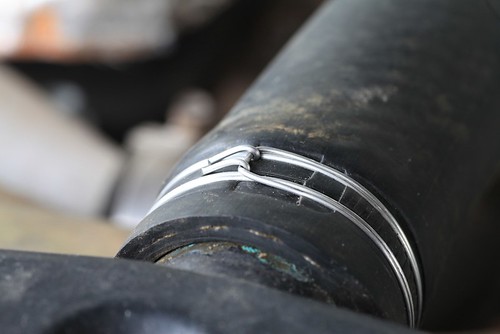
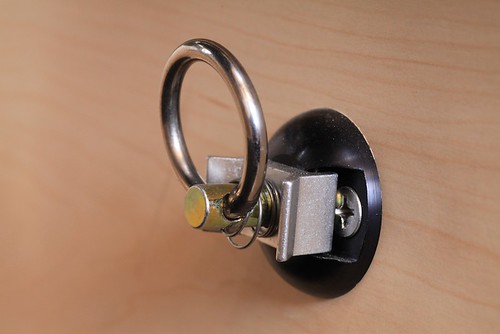
The latch mechanism included with the brackets wouldn’t work in our application, so I used a 24-inch-long piece of 1.25-inch aluminum angle iron as an end stop on the passenger side of the truck. I drilled two holes sideways through the frame and top of the table, and inserted a pair of two-inch-long 1/4-inch-diameter clevis pins through them. A pair of hairpin clips holds the pins to the table:

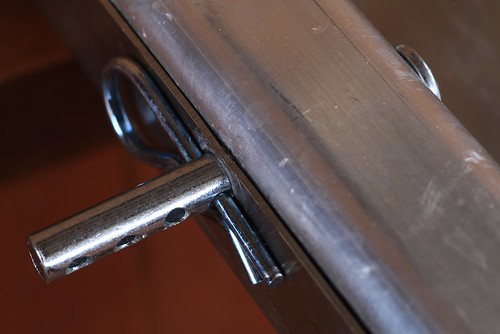
The pins extend through two holes in the end bracket and are secured with two more hairpin clips backed by a rubber washer and a metal washer. I also glued a couple of furniture bumpers on the back of the end bracket, and two flat pieces of rubber gasket on the insides of the Z brackets where the table slides in from the driver’s side of the truck.

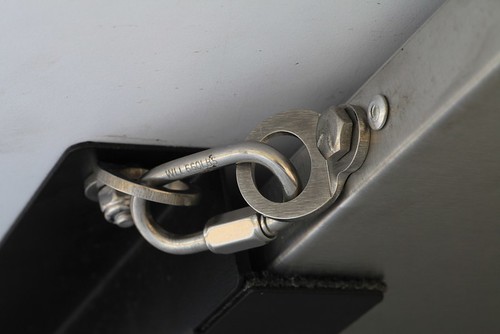
The Z brackets came with carpet strips glued along the bottom, so I hoped all the rubber and carpet would minimize any rattling directly over our heads. My last step was to install a backup latch at the other end, using two of the cunning little Expeditionware Transport Loops sold by Expedition Exchange, plus a Quicklink. (My plan is to try to find a small padlock that will fit through these loops.)

Twelve hours after I finished up, the installation got a good test when we left for a biological survey in the Sierra Aconchi in Mexico, which involved a 230-mile paved approach, then a rough ten-mile climb up a four-wheel-drive trail. On the highway the table created no noise at all. On rough slow pavement with the windows open we could very infrequently hear a barely perceptible oilcan effect over sharp bumps as the table top flexed. On the trail there was zero sound from the table or mount, at least none we could hear over the tire and drivetrain noise.

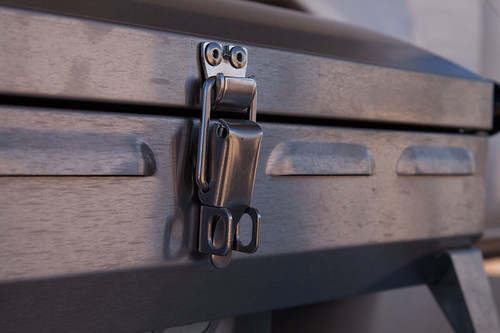
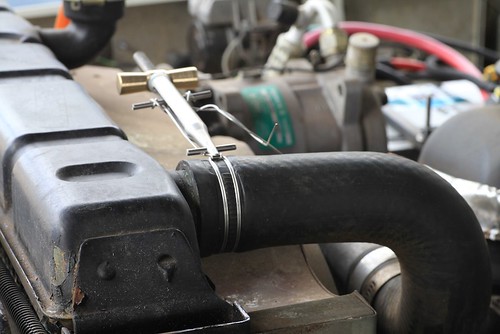
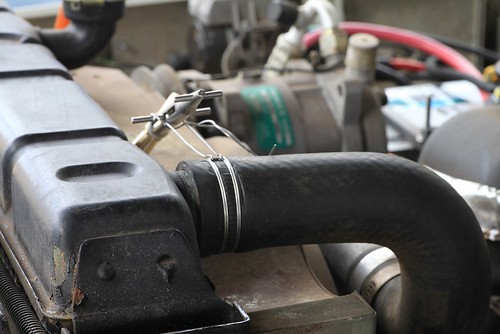
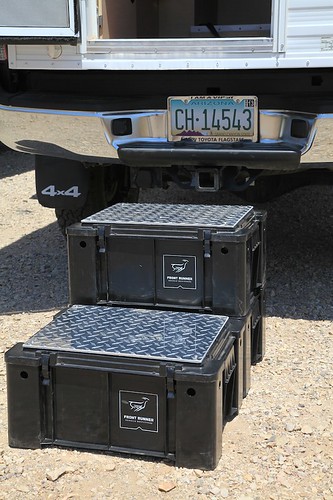
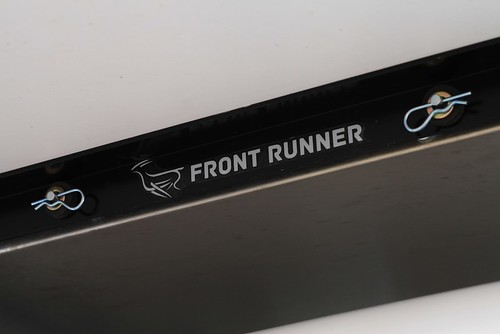
The completed bracket assembly.

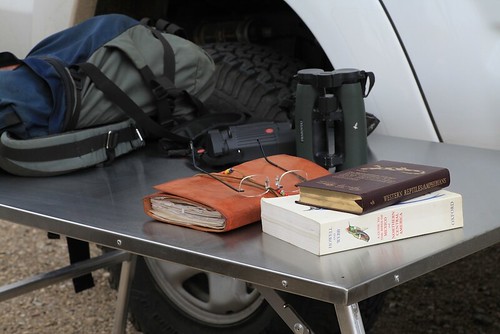
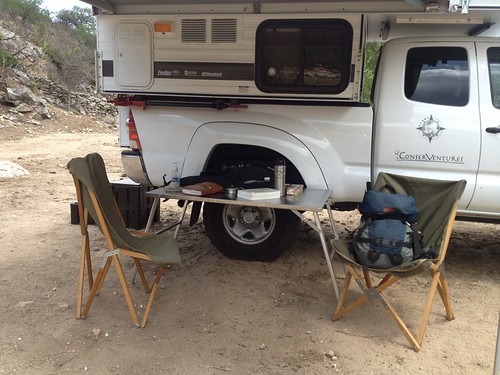
Once in camp the table proved just about perfect. There was plenty of room to spread out plant samples, notebooks, bird guides, and binoculars; at a group dinner we covered it with chips and salsa and vegetables, then served the outstanding pizzas Roseann somehow managed to make on the camper’s stove top. One night delivered a torrential rain which bothered the table’s aluminum and stainless steel not at all. Total time to set it up on the first day and stow it on our last morning: about two minutes each. 

So, not only did we gain a big upgrade in the quality of our outdoor table, we also gained storage space inside the truck. If you have an overhead camper—or a roof rack—I can recommend the Front Runner approach.

On the other hand, if you have a fondness for blue vinyl, email me.

Addendum: A forum member on Wander the West suggested that the Front Runner brackets could be set up to carry a solar panel in the same spot. Brilliant.

Equipt Expedition Outfitters also carries similar tables from K9 racks, in three sizes. 

 Front Runner Outfitters is here.

The Transport Loops are available here.

New VDEG imminent . . .

I just received this cryptic note from an unnamed source somewhere in the U.K.:

"Desert Winds Publishing (i.e. Tom Sheppard) is pleased (relieved) to announce to its patient, faithful customers and enquirers – some of whom started the list last July – that VDEG3 (otherwise known as the new, third edition of the 500-page Vehicle-dependent Expedition Guide), has been proofed and should soon be available. At the same price as before (36 GB pounds) – and not through Amazon, or ‘used’ at four times that figure. (Postage: UK £5.85; EU £9.50, elsewhere, inc US, £16.00) 

‘Relieved’ because the techno-gremlins chose the 11th hour to attack the layout software, calling on the true spirit, tenacity and ingenuity of overlanders  to get things back on track. Desert Winds Customer Service Department (i.e. Tom Sheppard) quotes their Chief Proof Checker (i.e. Tom Sheppard) as saying, ‘Yes, quite a few of the pictures are now the right way up and most of the text has been back-translated from the Indo-Iranian zabani-tadjik calligraphy’. 

 On stage, smartly dressed in a black turtle-neck, Desert Winds’ CEO (yes … ) thanked the small distinguished army of back-order e-mailers for their patience and asked them to keep an eye on the www.desertwinds.co.uk  website which Desert Winds Webmaster (you guessed it … ) will be updating very soon."

A Desert Winds spokesman, questioned by a lady with a clip-board, said, "No, the actual book won't be as large as the sheets on the table in the foreground."Just in case you've been living under a rock in the Sahara (or are new to the overlanding world, in which case you're forgiven), Tom's Vehicle Dependent Expedition Guide is the bible of overlanding, and a copy should be in the library of anyone remotely interested in vehicle-dependent travel. It is, quite simply, superb in its authority, scope, and humor (i.e. humour), and is the standard by which all other books on the subject are and always will be judged. The fact that it can (and can only) be purchased directly from the writer/publisher/proof checker/customer-service representative is a lovely bonus in this day of Amazon.com facelessness. Of all the high-quality and/or indispensable items I try to discover and recommend on OT&T, you'll thank me for none more than this one. In case you missed the link in the text, it's available HERE

A versatile storage box: the Wolf Pack

A pair of Wolf Packs holds tools for a Defender 110 in Tanzania.I have yet to meet the perfect overlanding cargo box. Pelican cases are nearly perfect when contents absolutely, positively must be kept dry and dust-free, thus they are the box of choice for, say, photo and video equipment. But Pelican cases are quite heavy for their volume, and pretty expensive for everyday cargo. Zarges (or the similar Alu-Box) aluminum cases are strong, lightweight, and boast excellent interior to exterior volume, but are even more expensive (although you can consider the expense an investment as they last forever with reasonable care).

But more economical alternatives always have some fatal flaw. The affordable Rubbermaid Action Packers are excellent for home storage, but their volumetric efficiency is abysmal and they leak if rained on, so you can’t leave them outside the vehicle when camped unless they’re under cover. If strapped down too tightly (i.e., properly . . .), they collapse. Lower-priced alternatives are even worse.

Several years ago in Tanzania I discovered the plastic ammunition cases used by the South African military, now commercially produced and known widely as Wolf Packs. They’re moderately sized and so easy to arrange in a cargo bay, completely rainproof and reasonably dustproof, and vertical-sided to avoid wasted space (except for hollow corner pieces). They stack securely for convenient storage at home. The Wolf Packs suffer from poorly designed latches—those familiar with them will call that a hilarious understatement— and the lids flex more than I’d like when called upon to do duty as a step, but otherwise they are sturdy, versatile, and sport a certain exotic flair given their origins. Front Runner Vehicle Outfitters is now a U.S. distributor, and for $40 each you can justify several—trust me, you’ll find uses for all you get. We have six, and just glancing around the shop I can see uses for another six. Or ten.

We found that a pair of Wolf Packs stacks and straps down perfectly in the shower grate of the JATAC, under the dinette table. Another rides near the door, and holds all the items we use for pitching camp: drain hose for the galley sink, leveling blocks, guylines and stakes for the awning, etc. I sourced some 1/4-inch thick aluminum diamondplate and fabricated steps for the lids of two of them, attached with small stainless bolts; the three now form a perfect staircase to access the camper when we’re parked.

I also keep two in the back of my FJ40. One holds recovery gear; the other contains a small stove and cook kit, water, and other odds and ends to make an emergency camp or an impromptu picnic.

A pair of Mac's Tie-Downs anchor plates and rings, bolted through each side of the dinette seat box, provides anchors for the ratchet strap that secures the boxes.When not needed, the ring detaches instantly.

Front Runner's website is here. They also sell improved steel latches.  

The analog iPhone

Ready for the bio-apocalypse: a steel-framed handgun and the amazing Pocket Ref

In the speculative-fiction novel Directive 51, author John Barnes postulates an alarmingly plausible near-future in which all plastics, synthetic rubbers, and oil-based fuels have been destroyed by maliciously created self-replicating nanobots and bioengineered microorganisms. All modern communication, transportation, and just about everything else is brought to a halt, and the world is plunged into chaos. The most advanced technology possible peaks at steam engines and vacuum tubes. The book is so believable that Roseann, normally a both-feet-on-the-ground skeptic, mentioned casually after reading it, “You know, it wouldn’t hurt to have a few cases of canned vegetables stored here . . .”

Given our remote home site, dependable well, and abundant wildlife (not to mention free-ranging cattle), we’d be in better shape to survive a bio-apocalypse than 99 percent of the U.S. population. And I feel about 99 percent better equipped to do so since my friend Bruce handed me a copy of Thomas Glover’s Pocket Ref.

I’ve used various one-subject pocket references before (wiring, plumbing), but this tiny 864-page book covers an array of subjects that is simply stunning. Look through the index and pick an uncommon letter—say, W. Now pick one entry out of the 31 listed under W—say, weather. Glover’s Pocket Ref will tell you the following things about weather: Beaufort wind scale; cloud types; cold water survival time; dew points; Fujita-Pearson tornado intensity scale; heat/humidity factors; hurricane intensity scale; ice thickness safety; weather map symbols, and wind chill factors. Over in the Fs, under formulas, you’ll find a staggering 105 entries, from Ohm’s law to antenna length to load on a wire rope or sling to sound intensity to voltage drop vs. wire length, diameter, and current.

Knots will still work - but better stock up on sisal rope.Other entries: knots—lots of them—treatment for a sucking chest wound; steel tubing specifications; maximum floor joist spans; simple and compound interest factors; area formulas, solvent types; and I could go on for another 863 pages. Need to calculate how much water is left in a cylindrical tank of known diameter and length? No problem. Need to know the rank of the uniformed military personnel who show up after the apocalypse to declare martial law? No problem. Do you have a hard time remembering the geologic time scale (did the Miocene or the Pliocene come first?)—no problem. I can now quickly figure the BTUs available in a cord of Douglas fir, or the clamping force possible with a 15mm 8.8 bolt, or the proper hand signals for a crane and hoist operator. Amazing. 

A reference book such as this shouldn’t be entertaining—its mission is to promulgate information. But it’s fascinating to simply browse through the Pocket Ref and see what you can learn. Take my advice: Buy one and just toss it in your glove box—if you come out one morning and find your tires have melted into blobs of bio-slime, you’ll be ready to face the future.

If someone in the New World wants to sell you a firkin of home-brew, you'll want to know just how much that is.

Available on Amazon—as long as Amazon still operates . . .