#overlandtech

A stove with character

The SVEA 123 (Courtesy Spiritburner.com)

My first proper backpacking stove (not counting cans of Sterno here) was called a SVEA 123 (pronounced like a word: “Sveyah”). It was a lovely thing of solid brass that ran on white gas and needed no pumping—once primed, a loop in the fuel system atomized the gas picked up from the tank and produced a pressurized flame, accompanied by a distinctive roar that, while comforting, effectively drowned out any sounds of nature one might otherwise be enjoying. Turning off a SVEA was always as pleasurable as lighting it.

The priming procedure was intimidating at first. You were instructed to pour a bit of gas (I eventually hit on using an eye dropper) into a depression at the base of the burner tube, and apply a match—whereupon a jolly little fire would engulf the entire burner assembly. Just as the fire was dying you were to insert the little key into the stove’s control valve and open it. Timed correctly, a fine hot blue flame sprouted under the burner plate. Timed wrong, a foot-high flare of yellow fire indicated insufficient priming. Once going, the SVEA would boil water in a jiffy. Simmering béchamel—not so much. And woe to the user who neglected to remove the key from its fitting in between adjustments—I’m convinced I can still make out the burn scar on my thumb and index finger from repeated failures to do so.

Nothing wrong here; normal starting procedure . . .

If all this sounds a bit dodgy, the SVEA did have a valve in the filler cap that was designed to pop if the internal pressure exceeded safety margins. Just once I had this occur—fortunately when I was making coffee next to a stream in the open, because the result was a foot-long jet of flame that just happened to be pointed away from me. I stood up and kicked the entire stove into the water, instantly dousing both the burner flame as well as the “safety” one. Incredibly, once dried the stove fired up again as if nothing had happened.

That SVEA cost $12.99 if memory serves. I used it for a decade, augmented by a Sigg Tourist cook kit that substituted a much better wind screen for the nearly useless factory number, and included lightweight but thin aluminum pots that did not help the béchamel. Eventually I moved on to more modern and efficient stoves, but I still have that SVEA, and every decade or so I’ll fire it up just to prove it’s ready to go to work again if needed. Every time I do so I'm flooded with visual, olfactory, and auditory memories of trips taken, coffee brewed, and meals enjoyed in beautiful settings accessible only with effort and commitment, and the more splendid for that. 

I was reminded of the stove recently while browsing an outdoor store in Boulder, Colorado. Because, you see, you can still buy a SVEA 123, although it’s now made by Optimus. The price has gone up by precisely an order of magnitude:

And some time ago I had another delightful reminder of how an inanimate object can have a personality and become a powerful repository of memories. My friend Ken Swanstrom purchased a SVEA on eBay—normally an anonymous and sterile way to buy something, right? Except for the note that accompanied the stove:

The note is poignant, yet one suspects Bonnie smiled as she wrote it. Had she become too old or busy to ever contemplate using her "trusty" stove again? Whatever her reason to sell, it's clear she is placing some responsibility on its new owner to treat it with the respect it deserves. If I ever sell mine, I'll do the same. 

The amazing ClampTite

I know, I know—I’m starting to sound like Ron Popeil. But it’s been some time since I used a tool as cunning as this little device, which can do everything from replacing a broken hose clamp on a fuel line or seizing a rope end to repairing a stress-fractured luggage rack on a motorcycle or splinting a broken tie rod on a Land Rover. 

But wait, there’s more! The ClampTite uses ordinary safety wire you can buy with the tool, or almost any on-hand substitute in a pinch, including fence wire and even coat hanger wire, to securely wrap just about anything that needs to be fastened or immobilized. And the size range it will handle is essentially limited only by the length of the wire. 

You might think you could approximate what the ClampTite does with a pair of pliers and some twisting, but trust me, you wouldn’t be able to apply the amount of tension available through the tool’s threaded collar. Look at this sample of both a single and double wrap on a length of rigid PVC pipe. I tried and failed completely to get that much compression with an ordinary hose clamp.

The ClampTite can make either a single-wire or double-wire clamp (see above). With a single wire you can use as many wraps as necessary, although, depending on the material, friction will start to overcome the ability of the tool to adequately tighten the wire if you overdo it. On a radiator hose like I used for the test, a single wrap of doubled wire is more than stout enough; if you were repairing, say, a split axe handle you could use several wraps of a single wire, then repeat in several places along the split to completely secure it. The same procedure could secure a Hi-Lift jack handle along a broken tie rod, or . . . you name it. The potential applications are endless.

Begin a hose clamp by doubling a length of wire and wrapping it like so.Wrap it again and through the loop.

Attach the ClampTite, secure the ends of the wire, and screw in the bronze nut to tension the clamp.Flip the tool to lock the wire.Release the tension on the tool, clip the wires, and . . . . . . you're finished.

I found the ClampTite easy to use. My biggest challenge was keeping the wire lined up correctly while installing a double-wrap clamp, to keep it from overlapping—although that probably wouldn't affect the seal on a radiator hose.

While it’s impressively compact (a larger model is also available), there will be places you simply can’t use the ClampTite. You need to be able to access the trouble spot to wrap it with wire, attach the tool at the spot, and have room to flip it (double wire) or twist it (single wire) 180 degrees to anchor the clamp once you’ve tightened it. But with ingenuity you can overcome many obstacles. Looking around our vehicles, I found a fuel line fitting on a carburetor that would be inaccessible if its hose clamp broke. However, by removing the fitting from the carburetor first and taking off the other end of the fuel line, one could clamp the line to the fitting, screw the fitting back in with the line attached, then re-attach the other end. 

I think the ClampTite would be at least as useful on a motorcycle as in a four-wheeled vehicle, if not more so. I’ve seen many more parts fail on bikes due to the higher intrinsic vibrations and necessarily harsher ride. We had Tiffany Coates’s legendary BMW R80GS, Thelma, parked at our place for nearly a year some time ago. Thelma has seen long (200,000 miles), hard use and it shows. Thinking back, I’m sure I could have used up at least a hundred yards of safety wire reattaching various dangling bits on that bike.

ClampTite tools start at just $30 for a plated steel and aluminum model, which would be ideal for a motorcycle. The stainless and bronze unit I tested is $70.

Final note: Unlike the Ronco 25-piece Six Star knife set, ClampTite tools are made in the U.S. And you won’t get a free Pocket Fisherman with your purchase. Sorry.


ClampTite tools are here. Thanks to Duncan Barbour for the tip!


The ins and outs of airing down

Airing down in Egypt

My early four-wheel-drive experience was strictly trial and error, heavy on the error. A friend owned a beat-up mid-60s FJ40 shod with skinny Armstrong True Tracs and equipped with a Ramsey winch wrapped with a rusty steel cable. We took that thing everywhere, including trails around southern Arizona that I’d later learn were rated 4+ and even 5 on the vehicle-based system. When we got stuck or couldn’t drive up some ledge, which was frequently, we’d simply unspool the winch cable, wrap it around a big rock and hook it to itself (I know, I know), and pull ourselves out. The rocker panels on that poor 40 eventually got battered into gentle arcs (call it a “redneck body lift”). But we had fun and learned a lot—enough that when I got my own, much nicer, FJ40 I was able to keep its rocker panels the way the ARACO body plant meant them to be.

This do-it-yourself approach explains why I came late to the concept of airing down tires on off-pavement trails and four-wheel-drive routes—I simply didn’t hear about it until well into the 1990s, when I began subscribing to magazines that included articles by expedition travelers such as Tom Sheppard. It never would have occurred to me on my own that deliberately letting air out of one’s tires could be a good thing.

Now, of course, the benefits are well-known to anyone who has read anything about overland travel: Reducing tire pressure to suit the conditions allows the tire to more effectively mold itself to the terrain. That increases traction, which reduces wheel spin. That in turn reduces trail damage as well as stress on the vehicle’s drivetrain and wear on the tire itself. In soft sand the enlarged footprint (which comes mostly from lengthening of the tire carcass, rather than widening) provides hugely increased flotation. It’s basically a win-win-win technique, as long as one is circumspect about mixed terrain: You might choose 14 psi for soft sand unless that sand is interspersed with sharp rocks likely to puncture a sidewall (as we encountered in Egypt with the dreaded kharafish—razor-edged lumps of limestone). Airing down even enhances ride comfort on rough roads, as it allows the tire to conform to small obstacles rather than bouncing over them.

If the benefits of airing down are so well-known, why don’t more people practice it? It boils down to two issues: sheer laziness, and lack of proper equipment. And the former is often caused by the latter. If you have to deflate each tire one at a time using the awl on your Swiss Army knife or the button on the back of a tire gauge, and if re-inflation is a 45-minute process tackled with a $29.95 compressor (“with flashlight!”) better suited to blowing up volleyballs, you’re just not likely to do it unless you actually get stuck first.

Since tire failure—whether a simple puncture, losing a bead, or damaging a sidewall—is still the number one cause of vehicle breakdowns, a high-quality compressor should be part of your kit anyway. In fact, after the most basic upgrades on any 4WD vehicle—tires, for example—a proper compressor comes near the top on my list. Maybe even before a fridge. 

With a good compressor to handle re-inflation, your next goal is to avoid prolonged genuflecting in front of each tire, letting air hiss out slowly though the valve. There is a dirt-cheap way to accomplish this: Buy a valve-core removal tool. Although it seems drastic, removing the valve core is the absolute quickest way to deflate a tire, yet it’s not so quick as to be difficult to control. Your pressure gauge will still work, and you just need to be ready to reinsert the valve core when the pressure gets close to your target.

The big problem with this technique—besides the fact that it’s a manual, one-at-a-time procedure—is that the tire pressure will do its best to wrest the tiny valve core out of your grasp just as you’re removing (or reinserting) it, and send it flying ten feet over your shoulder. By the time you find it (assuming you can), you’ve got a flat tire.

A safer and more stylish approach to the VCR technique can be had with the ARB E-Z Deflator. This tool comprises an elegantly complex brass fitting with a hose and gauge. The fitting screws on to the valve stem, and a separate knob then unscrews the valve core but contains it securely within the mechanism. Pulling back on the collar attached to the air hose and gauge then allows air to escape with a satisfying whoosh. Push back in to stop the flow and check the pressure. It appears to be just as fast as the riskier method—I deflated a 235/85 R16 BFG All-Terrain (my reference tire for the entire test) from 40 psi to 18 in 33 seconds flat.

However fast it is, the ARB still requires full operator attention—which brings us to automatic deflators. While not as quick individually as valve-core removal, you can be doing other things, such as chatting to your friends, getting a snack, or checking the vehicle, while the tool does its work, and if you have multiple deflators the total process can be quicker than the fastest one-at-a-time technique. In fact, with two of the types of deflator reviewed here, you can drive off while they’re attached and working, thus reducing the time stopped to a couple minutes, and pretty much eliminating your last excuse not to do so.

Left to right: Staun II, Trailhead, and CB Developments automatic deflators

The mechanics of an automatic tire deflator are deceptively simple. Essentially the device comprises a plunger with a seal, and a spring calibrated to compress at a certain psi to allow air to flow past the seal and out of the tire. By using a screw-in cap as a base for the spring, its tension can be altered to allow multiple settings in one deflator. The engineering feat is to produce a device that will do this accurately and repeatably over a broad range of pressure. 

Coyote Enterprises Staun II $80 (set of four)

Staun is the grandfather of deflators, designed in Australia in 1998. I had one of the early sets, and while they were convenient, I found the target pressure to vary by as much as two or three psi—potentially critical if you’re airing down to the low teens (below one bar) in soft sand. Go too low unintentionally and apply too much welly or steering lock and you can pop the tire bead off the rim. So I was curious to see if the newer style would be more accurate.

The second-generation Staun (made in the U.S., and covered by a lifetime warranty) benefits from a number of modifications. The claimed range is now an astonishing 3 to 50 psi—the original Stauns needed three part numbers to cover this span. Two sets of springs are included to adjust the limits. Also, there is a manual start ring, which among other things allows you to initiate deflation if there is insufficient pressure difference to trigger it otherwise—say, if your tires are at 21 psi and the Stauns are set to 18, or if you want to bump the pressure back down after airing down on a cold morning and driving until the tires warm up (they regain a bit of pressure when hot). The new Stauns also take only two or three turns to lock onto the valve stem. Finally, the maker now sanctions driving off with the Stauns in place and letting them work en route.

Made of solid and confidence-inspiring brass, the Stauns come with a clear set of calibrating instructions. First, manually deflate a tire to the nominal pressure at which you want to set the Stauns. Turn the hex locking nut and the top of the deflator all the way down (clockwise). Now screw the deflator on the tire until it’s snug, and slowly turn the top of the deflator counterclockwise until air is released. Immediately turn it back clockwise until the air just stops, then turn the lock nut up until it locks the body in place. That’s it. If you prefer different pressures on the front and rear of the vehicle, you can set two to each, and file a notch in the edge of one pair to identify them.

I used 18 psi as my target—it’s a good rough-trail pressure for my FJ40 and many similar-sized vehicles. If you’re quick you can calibrate all four deflators on the reference tire without adding air, but I bumped it back up with the compressor after two (the 235/85s don’t have a lot of volume). With the tire reinflated to 40 psi, I screwed on one of the Stauns and clicked a stopwatch. Three minutes and 19 seconds later, the device snapped closed, and my calibrated gauge confirmed that the shutoff pressure was dead on 18 psi. Reinflating to various pressures and trying the remaining three produced nearly identical results: None was more than a half pound off. Furthermore, with the manual-start ring I found I could initiate deflation even when the tire pressure was only two or three psi higher than the set pressure. 

You can estimate a new setting on the Stauns in the field by loosening the lock ring and turning the cap. One turn either direction (clockwise to increase, counterclockwise to decrease) equals “three to four” psi according to the instructions. Mine seemed to do about three per turn, but it’s definitely a rough guide.

Given its accuracy and additional features, the Staun II is clearly a worthy upgrade to the original.

Trailhead $75 (set of four)

Trailhead (originally Oasis) deflators pioneered the “drive-away” function, which made stopping to air down a two-minute procedure. While the Stauns now offer the same capability, I have to admit I was hesitant to do so given their relatively weighty brass construction. Not so with the Trailheads—each slim anodized-aluminum unit weighs barely ten grams, compare to 25 for a Staun.

The procedure for calibrating the Trailhead deflator is a contrast as well. Using the included 5/32 hex key, you unscrew the internal cap until it is perfectly flush with the body. This represents the lower end of the range (5 psi on my 5 to 20 psi model; a 15 to 40 model is also available). From there, each full turn back in supposedly represents an increase of 1.5 psi. To get to my target of 18, I counted up—6.5, 8, 9.5, etc.—until I got to 17, and then added about two-thirds of a turn to estimate 18. I screwed on the deflator and hit the stopwatch, and it shut off just two minutes and 19 seconds later. However, when I checked the pressure in the tire it was at 20 psi. I gave the cap a full turn back out and tried again. This time, after two minutes and 31 seconds, it was within a half pound of 18. I tried the same procedure with the other three units, and each one stopped around two pounds short of the target pressure. So setting the Trailheads precisely required more fiddling. Once finished, however, they remained accurate.

The Trailhead deflators have no manual start function, and the instructions caution that initial tire pressure must be roughly twice the set pressure for them to self-initiate. I found that a bit pessimistic—mine would all initiate at 32 psi when set to 18. But trying again at 30 produced only silence. So if you drive a vehicle that takes that 30 psi on the road, you’ll have to air down to 16 or below for the Trailhead deflators to work. 

The Trailheads can be bought in mixed colors —aluminum, red, or blue—making it easy to identify when you set them up differently for front and rear tires. They are made in the U.S. and come in a pouch with instructions, the hex key, a tire gauge, and a handy tire deflation guide.  

CB Developments Mil-Spec Tyre Deflation Valve $100 (each)

Compared to the lengthy calibration sequence necessary to set up the Staun and Trailhead products, the procedure for CB deflators couldn’t be more different: There isn’t one. Push and turn the knurled knob so the pin indexes with the target psi on the body of the deflator, and screw the assembly on your valve stem. That’s it. No need to deflate a reference tire, and no need to use math and a wrench if you want to change settings for differing conditions (or different vehicles) in the field—just turn the knob to the new target. I set one of the CB deflators to 18 psi, screwed it on my 40-psi test tire, and just two minutes and 22 seconds later it was finished, beating out both the Staun and, by a slim margin, the Trailhead. Furthermore, every setting I tried, all the way down to 10 psi, was within a half pound of my calibrated gauge. And the deflator would initiate with as little as two pounds of difference between the tire’s pressure and the target. An excellent performance.

Of course, you pay for that convenience, speed, and accuracy. A single CB deflator costs significantly more than an entire set from Trailhead or Staun. A full set of four would be a frightening chunk of cash. And you cannot drive with the bulky CBs in place, so are tied to the time it takes for however many you own to do their work. The CB deflators also lack the upper range of the Stauns or Trailheads—the highest range model carried by Extreme Outback Products, the U.S. distributor, stops at 20 psi (CB Developments makes another that extends to 24). That means those of you with Sportsmobiles and other heavy rigs, who consider 40 psi to be “aired down,” are out of luck. In fact 20 psi might be marginal for our Tacoma and Four Wheel Camper in anything but soft sand; on the road we keep 50 psi in the rear E-rated BFGs.

Conclusions

All these deflators worked as advertised, and all were very accurate once calibrated. So in a way you can’t go wrong. But in the end I did have preferences.

The Trailhead deflators boast the lowest cost—I’ve seen street prices under $60 for a set—and they were significantly faster than the Stauns. The multi-color option is a nice feature. Their single-hex-key adjustment makes them easier to manipulate than the two-piece adjusters on the Stauns—although as we have seen, the Trailheads take more fiddling to arrive at the target setting. But their biggest drawback is the lack of a manual-start function, and the significant difference in pressure necessary for them to self-initiate. I can recall many situations I’ve been in where they simply would not have worked.

The Staun II deflators run roughly $10 more per set than the Trailheads. However, for that you get a much wider pressure range in one part number, faster calibration, and the ability to initiate deflation with just a few psi difference between the tire and your target. Their sole downside was the slower speed, if the difference between two and a half minutes and three and a quarter minutes is critical to you. I’ll be curious to see how a potential “Trailhead II” deflator responds to the Staun II challenge.

The CB deflators are in a league of their own, in performance, convenience, and price. As long as the psi settings you require lie within the range of the device, there is no easier or more accurate deflator. I keep a pair in my FJ40, and their versatility more than makes up for the fact that I have to deflate tires a pair at a time. If I need to reduce pressure from my nominal 18 to, say, 14, it’s the work of an instant to change the setting—no guesswork needed.

Among the automatic deflators, then, the CB Development Mil-spec product wins if price is no object and the range fits your vehicle. If you baulk at the thought of a $400 set of deflators (or even $200 for a pair), an $80 set of Stauns will serve admirably—and suit a wider range of vehicles to boot.

As to the ARB EZ Deflator, while it is a manual tool, it is in many ways the most versatile of the bunch. If you have a Global Expedition Vehicle* at one end of your garage that you only air down to 55 psi, and a rock buggy with beadlocks at the other end that you take down to four, the ARB is the only tool here that will handle both—and anything in between. At $40 it is the least expensive of all these options. (*That is, ahem, if you didn’t order the GXV’s optional central tire inflation system, which makes this entire article a moot point for you . . .)

Searching for a bottom line, I ran a series of back-to-back double-blind experiments controlled for temperature, humidity, and elevation, and determined that the mean time to stop the truck, deploy a set of Staun deflators, let them finish, and pack them away again is six minutes 37 seconds—which happens to be the exact time it takes to retrieve a cold Coke from the fridge of the JATAC and finish it while sitting in the shade.

Staun deflators at work in the Rift ValleySource links: ARBTrailhead, Staun (Coyote Enterprises), CB Developments (Extreme Outback Products)

A compressor for the Boss air bags


The bottom switch adds air to both bags simultaneously. The two buttons above bleed air individually to level side to side.

The Boss air bags I installed to level the JATAC (see HERE) have been working perfectly so far. We recently drove into Mexico’s Sierra Madre to retrieve some trail cameras we had set up to survey mammal populations on a remote property owned by the Catholic Church. The last 12 miles requires four wheel drive, and several sections flexed the suspension past its limit so we wound up with one wheel in the air. The Boss bags took it in stride.

When I installed the bags I temporarily hooked up a simple manual-fill arrangement. But the kit came with a very fine compressor and a remote switch and gauge, so last week I installed the complete system to give us push-button control of the bags.

We decided to install the switches and gauge in the camper rather than the cab of the truck, since it’s easier to check the level back there. It also gives us the capability to quickly tweak both the fore and aft and side to side level of the camper when parked. The question was, where to mount the gauge/switches, as well as the fairly bulky compressor. I located what seemed to be a perfect spot for the controls just inside the camper’s door on the left, above the two switches that control the LED interior footlights and the exterior floodlamps. Since the battery compartment is right behind this spot, that would simplify wiring.

Pilot holes prior to cutting the opening. Painter's tape prevents scratching.

The compressor was more problematic, but eventually I located a spot I thought would work, inside the access port for the left rear turnbuckle that secures the camper to the truck. At the back, inside the hatch, the compressor barely fit vertically against the outside wall of the battery compartment—again minimizing the wiring run. 

The Boss controls come mounted in a steel panel designed to be attached to the underside of a dash, and that wouldn’t work for this application. I had some 1/4-inch-thick high-density plastic sheet lying around, so I cut a panel from that, drilled it for the gauge and switches, and painted it black with Krylon formulated for plastic. Then I trepidatiously took a jigsaw to the camper’s cabinet and opened a spot for the assembly. The result looked decent and is effortless to access for adjustment.

The compressor took much more winkling, especially because I wanted it secured properly so we’d never have to worry about it vibrating loose. With the help of a sidewinder drill and a bit of blood loss I was able to mount it to the plywood battery compartment wall with stainless bolts and fender washers. I ran the air lines down through a hole I drilled in the bed inside one of the stock little storage compartments. (Doing so confirmed that the fiber-reinforced material Toyota uses on their composite beds is tough stuff indeed; it felt and smelled like drilling through thick fiberglass.)

With everything hooked up, adjusting the level on the truck is as simple as pushing a switch. The way the system is designed, both bags fill at once, and you then use individual buttons to deflate one or the other bags to even them side to side. The clever gauge has two needles, one red and one green. You hook them up so nautical running-light rules apply: red for port (left) and green for starboard.

I won't say having to climb under the truck with a compressor to fill the Boss bags manually was exactly . . . hell . . . but the complete system sure makes it easy.


A Hi-Lift jack mount for the JATAC

The Hi-Lift jack is a useful tool, but it’s also a pain to carry securely on a vehicle, especially if you want to keep it reasonably accessible. I’ve seen many mounts that achieved one but not the other—and too often, safety loses out to convenience. Sadly I had neither a camera nor a cell phone with me a few years ago when I spotted a Hi-Lift mounted horizontally on top of a bull bar on a truck, just above hood level—and secured with a pair of tightly wrapped bungee cords. The imagery of what could happen if that truck were smartly rear-ended was . . . colorful, not to mention what could happen to an innocent person if Mr. Thatoughttaholdit rear-ended someone else. For reference, a 30-pound Hi-Lift mounted on a vehicle that comes to an abrupt halt from 30 mph exerts a force of 903 foot-pounds of energy on whatever is holding it to that vehicle.  

I see a lot of Hi-Lifts bolted to roof racks—secure, safe but for the modest impact on CG, and more likely to stay free of road grime, which can quickly foul the Hi-Lift’s mechanism. It’s not a bad spot if you can access it without climbing. Also good are dedicated mounts on rear tire carriers (as opposed to the ones that bolt behind the spare tire, which are a pain). I suppose a properly engineered mount atop a bull bar is okay; it’s certainly handy there. But I’ve never seen one that didn’t impede forward vision and access to the engine compartment. And on a strictly personal note, it looks just a little too, well, Moaby, if I may coin a word. 

Mounting a Hi-Lift on the JATAC presented its own challenges. The roof is out of reach and devoted to solar panels. We’ll be installing a Hi-Lift-compatible winch bumper up front soon, but that was rejected for the reasons stated above. And we’ve also decided not to install a rear bumper with big swingaways, to hold down mass at the back of the vehicle. What did that leave us?

I asked Tom Hanagan at Four Wheel Campers about fabricating a mount that would bolt to the rear wall of the camper, directly through the vertical aluminum frame members, to hold the jack vertically to the right of the door. He thought it could work, but was hesitant to sanction the idea unequivocally. And that location would still hang the mass off the back of the vehicle.

Then, while walking around the truck stroking my chin and pondering, I noticed the area where the camper overhangs the truck’s bed on each side. I held up a Hi-Lift to the spot, and it tucked in as though designed to ride there. The location would be completely out of the way yet quickly accessed, and while the weight would still be toward the back, it was significantly forward of a rear wall mount. I decided to mount it on the passenger side, to compensate for the weight of the truck’s fuel tank and the camper’s water heater, both of which are on the driver’s side.

I used two short lengths of two-inch-square steel tube for the brackets. First I located the spots I’d drill through to hang the brackets—one in the propane tank compartment, one behind the fridge inside the camper. I used two 1/4-inch grade 8 bolts with fender washers to anchor each bracket through the plywood (which fortuitously is double thickness in the propane compartment, where the heaviest part of the jack would be). To secure the jack to the brackets, I used a 3/8ths-inch grade 8 bolt on each one. The bolt was too long to slide into the tube and down through the hole I drilled, so I drilled an adjacent hole and made a slot to get the bolt through. I tack-welded each bolt in place, and welded a short piece of thicker steel under each bolt as reinforcement. On the rear mount I extended the reinforcing strip forward and drilled a hole through it, to secure a padlock through the mount and the standard of the jack.

Positioning the mounts laterally was tricky. I wanted the jack tucked all the way under the camper, but needed clearance to drop it free of the mounting bolts without scraping the sheet metal of the truck’s bed. With a bit of winkling, I got them just about right. One needs to be cautious and not just yank the jack free; it must be twisted slightly to get in or out without hitting the lifting mechanism on the back of the bed, but it’s easy to do single-handed. To secure the jack to the bracket I use a grade 8 nut to hold the weight, and a nylock wingnut to keep it snug.

 The next issue was to ensure the jack’s operating handle stayed secure while driving. I have a stock rubber handle keeper, which slides over the handle and the standard, but it can migrate when subjected to vibration. So I fabricated a modified version from some half-inch-thick polyethylene I had around, and cut two polyethylene pieces that lock the keeper in place via a spring clevis pin. Done.

With the jack’s base plate in place, the right turn signal is just slightly obscured from above and behind the truck. It would only be an issue if someone in a semi was close behind us, but we’ll keep the base plate in our recovery kit anyway, and thus avoid potential legal issues as well. With that gone, one needs to be absolutely certain that the selecting lever of the jack is in the “lift” position, otherwise the entire lifting mechanism could migrate off the back of the standard while driving (or be propelled off it in an accident). Not good. I’ll use some sort of secondary arrangement as backup, likely a short bolt and wing nut. (Note here: A Hi-Lift should always be stored with the lever in the lift position anyway.)

So far the arrangement works perfectly. The jack is totally out of the way, yet easy to retrieve. In terms of safety, the mount should be secure through any but the most catastrophic impact: The force applied by the brackets to the floor of the camper would be in sheer; with four grade 8 bolts securing the assembly I’m sanguine. 

Next task: to mount a front bumper on the JATAC that will properly accept a Hi-Lift jack for recovery purposes.


The one-case tool kit, part 4


(Please read part 1 here, part 2 here, and part 3 here)

I've finally wrapped up my project to assemble a comprehensive one-case field tool kit—and I’m really glad I restricted myself to a Pelican 1550. 

It’s absolutely axiomatic when assembling a tool kit that it will expand to fit the available space, and it would have been effortless to fill a much larger container with Oh-I-should-have-this items, to the point where any notion of portability went out the window. As it is, the case and contents had nudged above 55 pounds by the time I was satisfied.


But after over a year of playing stump-the-tool-kit, I have yet to come across a task the contents couldn’t handle. It’s been employed successfully for jobs ranging from repairing a Honda generator in Mexico’s Sierra Madre (used, critically, to power UV lights for an insect survey) to replacing the dreaded trap oxidizer on our old Mercedes 300D at home (which incidentally resulted in a good 20 percent power increase). One fiendishly positioned nut on that device eventually required the Snap-on 18-inch ratchet, two extensions, a universal joint, and a socket to access—all there in the case. The closest I came to being stymied was removing the 10mm allen-head bolts on a Porsche 911SC anti-roll bar. The swiveling allen key in the kit baaarely got those loose; I’ve decided to add a set of 1/2-inch-drive allen-head sockets, which will take up scant room.

So: What’s in it? Here is the complete list (see previous installments for the justification for each): 

  • Britool 748267 3/8ths-inch socket/ratchet set (1/4” to 1” SAE sockets; 6mm to 24mm metric sockets, Torx sockets T8 to T16, assorted driver bits)
  • Facom S.200 DP 1/2-inch socket/ratchet set (10mm to 32mm metric sockets)
  • Snap-on SX80A 18-inch flex-head ratchet
  • 1 1/2-pound sledge-head hammer
  • Craftsman replaceable-head soft-faced hammer
  • Combination wrenches (7mm to 25mm plus 27 and 30)
  • Facom torque converter
  • Facom Pro-Twist Shock screwdriver set
  • Assorted Craftsman screwdrivers including stubbies
  • Snap-on replaceable-bit ratcheting driver
  • Brass drift
  • Three cold chisels
  • Two punches
  • Small pry bar
  • Knipex and Channel-Lock pliers
  • Two pairs needle-nosed pliers
  • Vise-Grip pliers
  • Small self-adjusting plier
  • Side cutter
  • Electrical stripping/crimping tool
  • Hemostats
  • Six-inch adjustable wrench
  • Three snap-ring pliers
  • Adjustable hacksaw
  • Combination flat/half-round file
  • Round file
  • Tin snips
  • Two LED flashlights
  • Box cutter
  • Spark-plug puller
  • Radiator-hose pick
  • Feeler gauges
  • Power Probe voltage/resistance tester
  • Continuity tester
  • Swiveling hex-key set
  • Small wire brush
  • Mechanic’s gloves
  • Tube of hand cleaner
  • Safety glasses

So—while the selection is meager compared to what I have available in the rollaway chest in the shop, even I, who had high hopes, have been surprised at how effective it is. Yes, if I need a hammer at home I can choose among nine or ten to get exactly the right weight and head, while in the case I must make do with two—but so far I’ve been able to make do nicely.

Believe it or not, there’s a bit of room left over in the Pelican. If I were to embark on a really long journey, I could still fit in, say, a hand drill and bits, a pickle fork to separate ball joints, a hub socket to fit the Land Cruiser, and a couple other more obscure items.

I don’t consider this selection definitive. I have absolutely no doubt that sooner or later I’ll run into a situation I can’t handle (although I’d allow myself a pass on true special tools required for certain specific tasks on many vehicles). But for now I’m convinced I have put together a pretty good one-case tool kit. Is it "The Ultimate One-case Tool Kit?" I guess that's open to a challenge . . .

At the Overland Expo, May 17-19 2013, I'll be demonstrating the one-case tool kit for Overland Experience package holders on Friday at 2:00 PM and Saturday at 4:00 PM. Overland Experience attendees can also attend my class on assembling a basic tool kit, Friday at 1:00 PM and Saturday at 3:00 PM. Find out more about the Overland Expo HERE. 

The JATAC: A self-contained, solar-powered expedition vehicle

It's just a Tacoma—affordable, capable, reliable.There’s absolutely nothing exotic about our new Toyota Tacoma and Four Wheel Camper—that’s exactly why we chose the combination.

Our 1993 FWC Eagle and Toyota truck in Mexico.Our first Tacoma/FWC proved to be very nearly our ideal traveling arrangement, combining a capable, comfortable, and reliable truck with a compact home-away-from-home camper that deployed in 60 seconds, subtracted almost nothing from the off-pavement ability of the Tacoma, and provided everything we needed for long journeys away from civilization.

As I said to Roseann, the new combination is familiar, but feels like our old rig had won a spot on Xtreme Truck and Camper Makeover. The 2012 Tacoma is bigger and more powerful than the 2000 model, yet looks on track to deliver equivalent fuel economy, thanks to modern computer engineering. The camper is larger as well, and has been upgraded extensively since our 1993 version. Pressure water (totalling 26 gallons including the, heh, water heater), a cunning interior shower arrangement, a vastly more efficient compressor-driven fridge, and a front-mounted dinette that leaves the entire galley free for the cook are just a few benefits. It retains the gargantuo bed, sink, two-burner stove, and a tucked-away porta-potti for occasional use in crowded campsites or villages.

However, our needs and plans have evolved somewhat in the last decade, so we have several projects in mind or in process to suit our requirements:

  • Since we work in electronic media now (laptop computers, cameras, video), we wanted an electrical system that would be essentially self-sufficient, able to handle the demands of the fridge and lights in the camper, power the laptops with 120-volt AC, and also do recharging duty for the cameras. 
  • Since we often travel as a solo vehicle, we wanted a truck that was not only capable in four-wheel-drive terrain, but completely self-sufficient in terms of recovery equipment and accessories.
  • Lastly, we frequently combine camping with work, which can mean meetings in cities. We expect to be able to present ourselves properly—dressed well and not trailing an odor like, well, people who’ve been camping for a week. 

Just a Tacoma . . . and a camper. Newly installed Fleet at Four Wheel Campers.The solution to the first challenge will involve designing and installing a comprehensive solar-power system, a suitable battery bank and charge controller, and a reliable inverter to provide 120V AC when needed. It also entails ensuring the electrical systems in the camper (lights, etc.) are as efficient as possible.

Addressing the second issue will include adding traction control in the form of a rear locker, ensuring the suspension retains compliance while carrying the extra load properly, and adding a winch and recovery points, along with the tools and accessories needed to augment the winch and allow for such needs as tire repair.

The third issue has been resolved—the shower and hot water system are brilliant for such a small unit.

We will be debuting the JATAC at Overland Expo 2013, and in the meantime I'll be posting updates on the modest modifications we have planned, including suspension from BOSS and ICON, new tires, front and rear bumpers, and mounting points for Hi-Lift and other tools.

[Special thanks goes to project co-sponsors Findlay Toyota of Flagstaff and Four Wheel Campers; we will be naming other sponsors as they join our project.]

The inspiration for the new project: Tom Hanagan's 2012 Tacoma and earlier Fleet model. Ours has a newer configuration.

Warn M8000—ultimate overlanding winch!

I wrote that title deliberately. One of my eye-rolling pet peeves as a reader and editor is the ubiquity of magazine headlines and cover blurbs that begin with,  “Ultimate”—followed by an utterly non-ultimate product—followed by a “!” Firearms periodicals seem especially obsessed with the term. I’ve forgotten how many times I’ve been breathlessly introduced to the “Ultimate Compact .45!” or the “Ultimate Tactical 9mm!” (And don’t get me started on the “tactical” lunacy.)

Of course there is very rarely such a thing as an “ultimate” anything (although Fuller’s 1845 might come close in the bottled beer category). There is only, at best, the ultimate compromise—and this applies universally to the equipment we add to our vehicles. High quality or low price? Strength or light weight? Multi-function operation or ease of use?

If you’re looking at winches for an overlanding vehicle, there’s an additional question to ponder: Do you really need one at all? I addressed this issue some time ago (click here to go to article), but now we’re going to assume you’ve decided that the advantages outweigh the disadvantages, and are planning to install one. (Either that, or you’ve simply succumbed helplessly to winch envy.) In either case, how do you minimize those disadvantages?

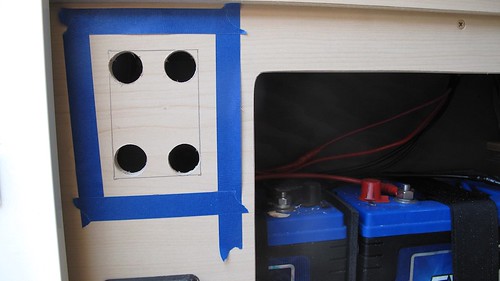
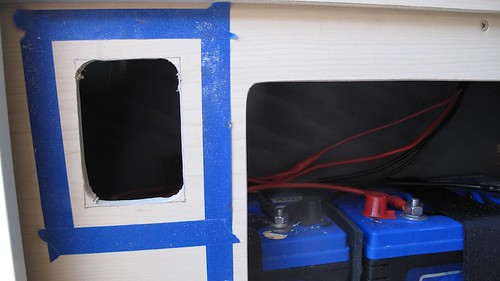
Aside from cost, the salient drawback to a winch is weight. Not just the weight of the winch and line and fairlead, but also a properly constructed bumper on which to mount it, and perhaps the dual battery system you’ll install to make sure you don’t run your only source dry during a long, maximum-amperage pull. And that weight is in the worst possible spot, way out in front of the vehicle where it applies leverage on the suspension. Aside from spending yet more money on suspension modifications, an obvious solution is a very light winch, but then we run into a compromise: light weight equals low power.

It’s axiomatic that a winch should be rated at around 1.5 times the loaded weight of the vehicle on which it is mounted. Why 1.5 times? Shouldn’t a 6,000-pound winch be perfectly adequate for a vehicle that weighs 6,000 pounds all up? Theoretically, yes, but several things complicate matters. First is the simple fudge factor inherent in the rating of many products. Second, and more universal, is the fact that all winches are rated with just a single layer of line on the drum. More layers equal less rotational leverage for the winch and less pulling power (roughly ten percent per layer)—and it’s not always possible or practical to arrange a winch recovery so that most of the line is pulled out first. Additionally, substrate makes a difference: For example, deep, sticky mud adds significantly to the effective weight of any stuck vehicle, and a large boulder in the middle of a steep uphill pull can spike the effective weight well past its actual mass. Finally, off-center pulls and other awkward situations add to the load on the winch. So the 1.5 factor is a wise generalization.

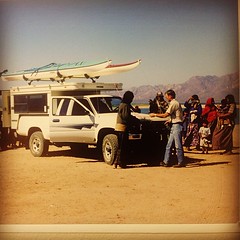
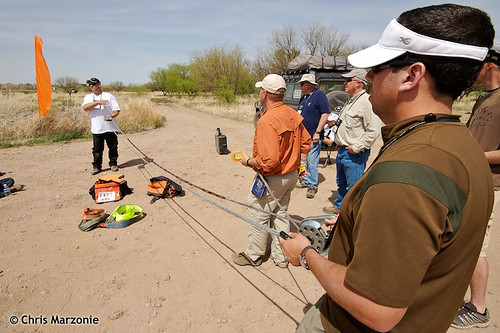
Rigging a winch line with a pulley block at Overland Expo 2010. Photo by Chris Marzonie

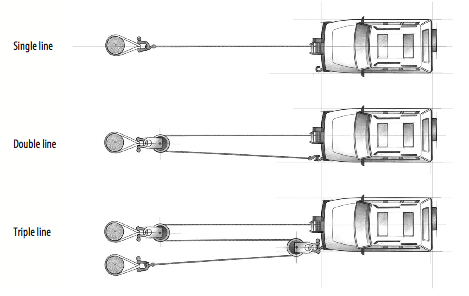
On the other hand, technique can optimize the power of a winch. First is making sure you have as much line out as possible, either by backing up the anchor vehicle or picking an anchor tree that’s farther away. You can also use a redirected pull to get more line out, for example by attaching a pulley block to a nearby tree, and running the line though that to another anchor tree back closer to you. You’ll lose a bit to pulley friction, but if you can get a couple of layers of line off the drum it will be worth it.

However, the best way to maximize a winch’s capability is to rig a double-line pull: from the winch of the stuck vehicle through a pulley block on a fixed anchor vehicle or tree, then back to the stuck vehicle (or, if you’re rescuing a stuck vehicle with your winch, to a pulley block attached to the rescuee and then back to your vehicle). This setup halves the line speed of the winch but doubles its power, in addition to getting out more line and reducing the layers on the drum. Obviously, relying on this technique also halves the reach of your winch, but, at least in my experience, in the vast majority of overlanding situations (with the glaring exception of tropical-rainy-season mud), 45 feet of usable line is enough to access a natural anchor or another vehicle—and if not, a winch line extension will give you the reach you need. You can gain even more power by adding another pulley block and rigging a triple-line pull, at the expense of even less reach. (Remember to always leave at least five full wraps of line on the drum if you get down to the first layer.) 


With the limitations of reach accepted, the 1.5 factor becomes somewhat flexible. Which brings us to the Warn M8000 (and its new brother, the M8000-s).

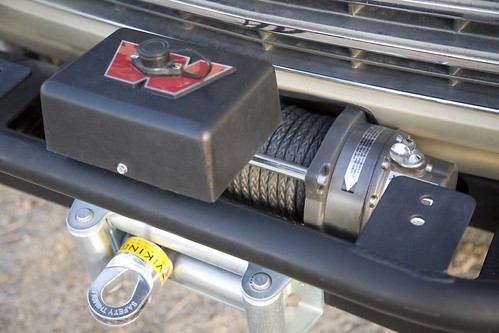
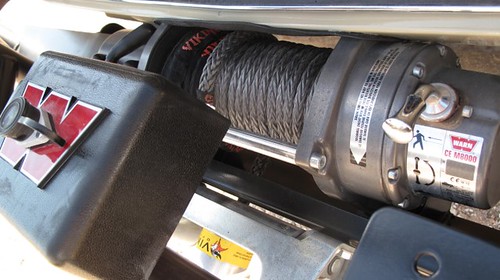
The M8000 is rated at—surprise—8,000 pounds, which, for example, is a bit under the 1.5 factor for our FJ60 when it’s fully loaded with gear, fuel, and two people. A lot of later full-size SUVs would blow past it before a single sleeping bag was tossed inside. On the other hand, it’s right in the ballpark for many compact pickups and small SUVs. And the M8000 is very light. I recently had ours off while the vehicle got a full repaint, and put each component on a scale. The bare winch, with no line or solenoid box, weighs only 35.6 pounds. The solenoid box and 1/0 cables to the battery total 7.2 pounds. The steel roller fairlead is 11 even, and 100 feet of Viking synthetic winch line adds a hardly-worth-measuring 2.8 pounds with a safety thimble (the standard steel cable is 13.2 pounds without a hook or thimble).


That’s a total of just 56.6 pounds—and we could reduce that to under 50 pounds with an aluminum hawse fairlead. Interestingly, the Warn M8000-s comes with synthetic line and an aluminum fairlead, and its advertised weight is 55 pounds. Mount it to an Aluminess bumper—which can be ordered without the bull bar so few of us really need—and you’ve got a complete system for around 125 pounds.

The M8000 might be light, but it’s also built to last. I’ve seen, either in person or in photos, disassembled examples of three “different” discount-brand winches (all of them most likely built in the same factory, the Ningbo Lift Winch Manufacture Company in Ningbo Mingzhou Industrial City, China). All appeared to be virtual clones of the M8000—until you looked inside, where compromises in motors, gear trains, and wiring were apparent.*

The motor is the heart of the winch, and it consists of two main components: a central set of wire coils wrapped around the shaft, called the rotor (or armature), and an outer assembly called the stator. When current is supplied to the rotor and stator it produces opposing magnetic fields, which cause the rotor and its attached shaft to turn via the attracting and repelling forces of the fields. The rotor is called an electromagnet because it only becomes magnetized when current passes through it. The stator can also comprise a wire coil magnetized by current, in which case the assembly is called a “series-wound” motor. Alternatively the stator can be constructed with standard metallic magnets that are thus always “on,” as it were. This is then known, logically, as a “permanent-magnet” motor. 

Permanent-magnet motors are cheaper to make and use slightly less current (since none is needed to magnetize the stator). However, they overheat more easily than series-wound motors, and the magnets can lose their field strength over time (and temporarily in very cold weather). Permanent-magnet motors work very well in light-duty situations, but for high-stress applications series-wound motors—such as that found in the M8000—are superior. However, not all series-wound motors are the same. Hidden differences in wiring, bearings and bushings, and tolerances mean that in a winch (or any other electrical appliance) the standards demanded by the manufacturer still determine the final quality of the assembled product.


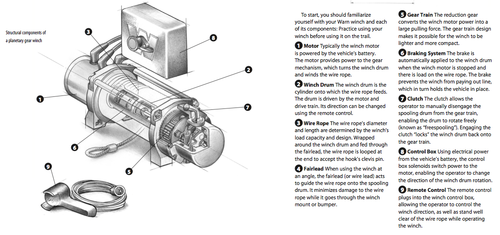
Click on image to open in larger window.

The other major electrical component in a winch assembly is the switch gear that controls power to the motor, typically housed in a plastic box attached to the winch. Traditionally, these have been relays (commonly called solenoids). A relay in our application is essentially a mechanical on-off switch capable of handling large amounts of current, controlled by a smaller-capacity switch elsewhere—the winch’s remote in this case. A relay thus shortens the length of heavy-duty cable that would otherwise be necessary to insure adequate amperage to the winch (the same holds true for other high-draw devices, such as driving lights, that use a relay and a remote switch). Winches usually employ relays in multiples—one or two to handle power-in switching, one or two to handle power-out.

Since relays utilize moving mechanical contacts to transfer current, they are subject to wear and corrosion. Often the result will be that the relay simply stops working, but very rarely a worn relay will stick in the “on” position—with predictable ramifications if you’re operating a powerful electrical device which you need to be able to turn off right now.

In the last few years, solid-state devices known as contactors have begun to replace relays in many winches, including the M8000. A contactor employs a high-capacity semi-conductor to route current; thus there are no moving parts to wear out or corrode. Contactors can still fail, but it’s virtually impossible that they would do so in the “on” position.

The last link in the winch assembly is the gear train by which the motor turns the spool and pulls in (or lets out) the line. Since the motor turns at a high speed, its revolutions per minute must be reduced considerably, both to gain mechanical advantage and to keep the line speed to a manageable level. There are three main types of gear train: worm, spur, and planetary. The latter is the type found the M8000 and most consumer winches these days. Planetary gears are so called because the central gear, driven by the motor, is literally orbited by the secondary gears that drive the spool.

Planetary-gear systems are very compact, inexpensive to manufacture, and reasonably efficient. Their salient drawback is that they have no intrinsic braking capability when the winch is spooling out under power, so an internal brake is required, usually inside the spool. This brake will transfer heat to the drum, and subsequently the inner wraps of the line, if, for example, it’s necessary to lower a vehicle’s weight against the winch on a long downhill recovery. This can be an issue with synthetic winch line, which loses strength if it is heated too much. According to Thór Jónsson at Viking, current Dyneema winch line will begin to lose strength if it reaches 150ºF while under load, and will begin to melt in the high 300º range. While the latter point is unlikely during any normal single-vehicle recovery, the former isn’t. For this reason, planetary-gear winches should always be set to free-spool when you are pulling out line to rig the recovery, and should be powered out under load for no more than 20 seconds at a time, then allowed to cool. No such precaution is necessary when powering in, the normal mode for the vast majority of winch recoveries.

(An interesting characteristic of synthetic winch line is that, even if heated to over 150º, it will regain the strength it lost once it cools. At first glance, the bottom layers of synthetic line might appear to be melted after any load, but they’re really just compressed. However, if you exceed that critical 300º-plus point, you’ll be left with a chunk of melted plastic. Thór once had a customer complain after he melted the Viking line on his M8000. Questioning revealed that he’d been lowering all his friends’ trucks down a steep incline one after the other. Further questioning revealed that he’d also melted the winch’s motor.)

Four-wheel-drive overland travel is different than trail running. My early experiences with the latter involved a friend with a beat-up 1964 Land Cruiser FJ40 equipped with a Ramsey winch and an alarmingly frayed steel cable. We took that vehicle over some ridiculous trails, getting stuck numerous times a day and hooking the winch to whatever was nearby to pull it out. I’m still amazed we both survived with limbs intact, but that Ramsey did yeoman duty time after time.

However, on a long overland journey, it’s vital to minimize stress on the vehicle. The aim is to avoid becoming stuck, to take the easy route when possible. Challenging conditions are tackled only when there is no other way through. Thus, on most overland trips a winch is rarely needed, which leads some to argue, why not buy a cheap winch since you’ll hardly use it anyway? While it’s a valid question, my response is the same one I give people who argue for cheap hand tools: If you need the tools—or the winch—something has already gone wrong. Why risk compounding the situation by relying on substandard equipment? A knock-off winch built with inferior materials might well simply seize up after a long period of non-use. Before I get a raft of responses: I’ve known several people who bought new 8,000-pound Chinese winches for $350 or less and have had absolutely stellar service from them. And I know several others who bought similar winches and had them fail quickly or perform poorly. That crapshoot factor is the scary part, even if you’re unoffended by companies willing to reverse-engineer someone else’s work simply to cheapen it and sell it for less.

The final aspect of installing a winch, of course, is learning how to use it properly. You can take the trial-and-error approach my friend and I did, but a far better (and infinitely safer) way is to get professional instruction. Even a basic course such as that taught at the Overland Expo will increase your knowledge and confidence immensely; full classes can be taken from competent schools such as High Trails Expeditions or Overland Experts. Once you have the basic techniques in hand, it’s vital to practice them until every move is instinctive and firmly planted in your long-term memory.

That way, when your truck goes frame-deep in Tanzanian black cotton soil you’ll handle the situation with—dare I say this?—ultimate proficiency.

 * * * * * * * * * *

Diagrams are from an excellent Warn manual, available online as a PDF; click here to download.


* Sadly and ironically, Warn now offers a line of cut-price winches, the VR series, built to lower specs than the M series, to compete with the brands that copied and undercut Warn in the first place. I’m not sure whether I’m more disappointed in Warn, for not simply redoubling their efforts to convince customers that better quality is worth the investment, or with consumers who are blinkered to everything but price. In their defense, I’ll note that Warn furnishes the same warranty with the VR series winches as they do with their high-end lines; nevertheless, my advice is, if you can’t afford a new M8000 or another top-quality winch, buy a used one—you’ll still be better off than compromising on internal quality.