Recovery

New from Antigravity . . . the ultra-performance Micro-Start XP-20HD

The original Micro-Start XP-1, the first lithium-powered compact jump-starting system on the market, gained instant legend status at the Overland Expo when Tim Scully and I daisy-chained three of them and welded two quarter-inch slabs of steel together, both impressing and horrifying Scott Schafer, the company’s founder. While emphatically not an endorsed application (and probably a deal-killer for any warranty claim), it demonstrated the resilience of the product.

Those same three units went on to do yeoman service at the Expo and on a dozen group trips, jump-starting I have no idea how many SUVs, trucks, and motorcycles, in addition to running our portable devices at the show and other events. We’ve never been without one in each of our vehicles since, and when the heavy-duty XP10 was introduced I put that one in our 6.0-liter diesel Ford F350.

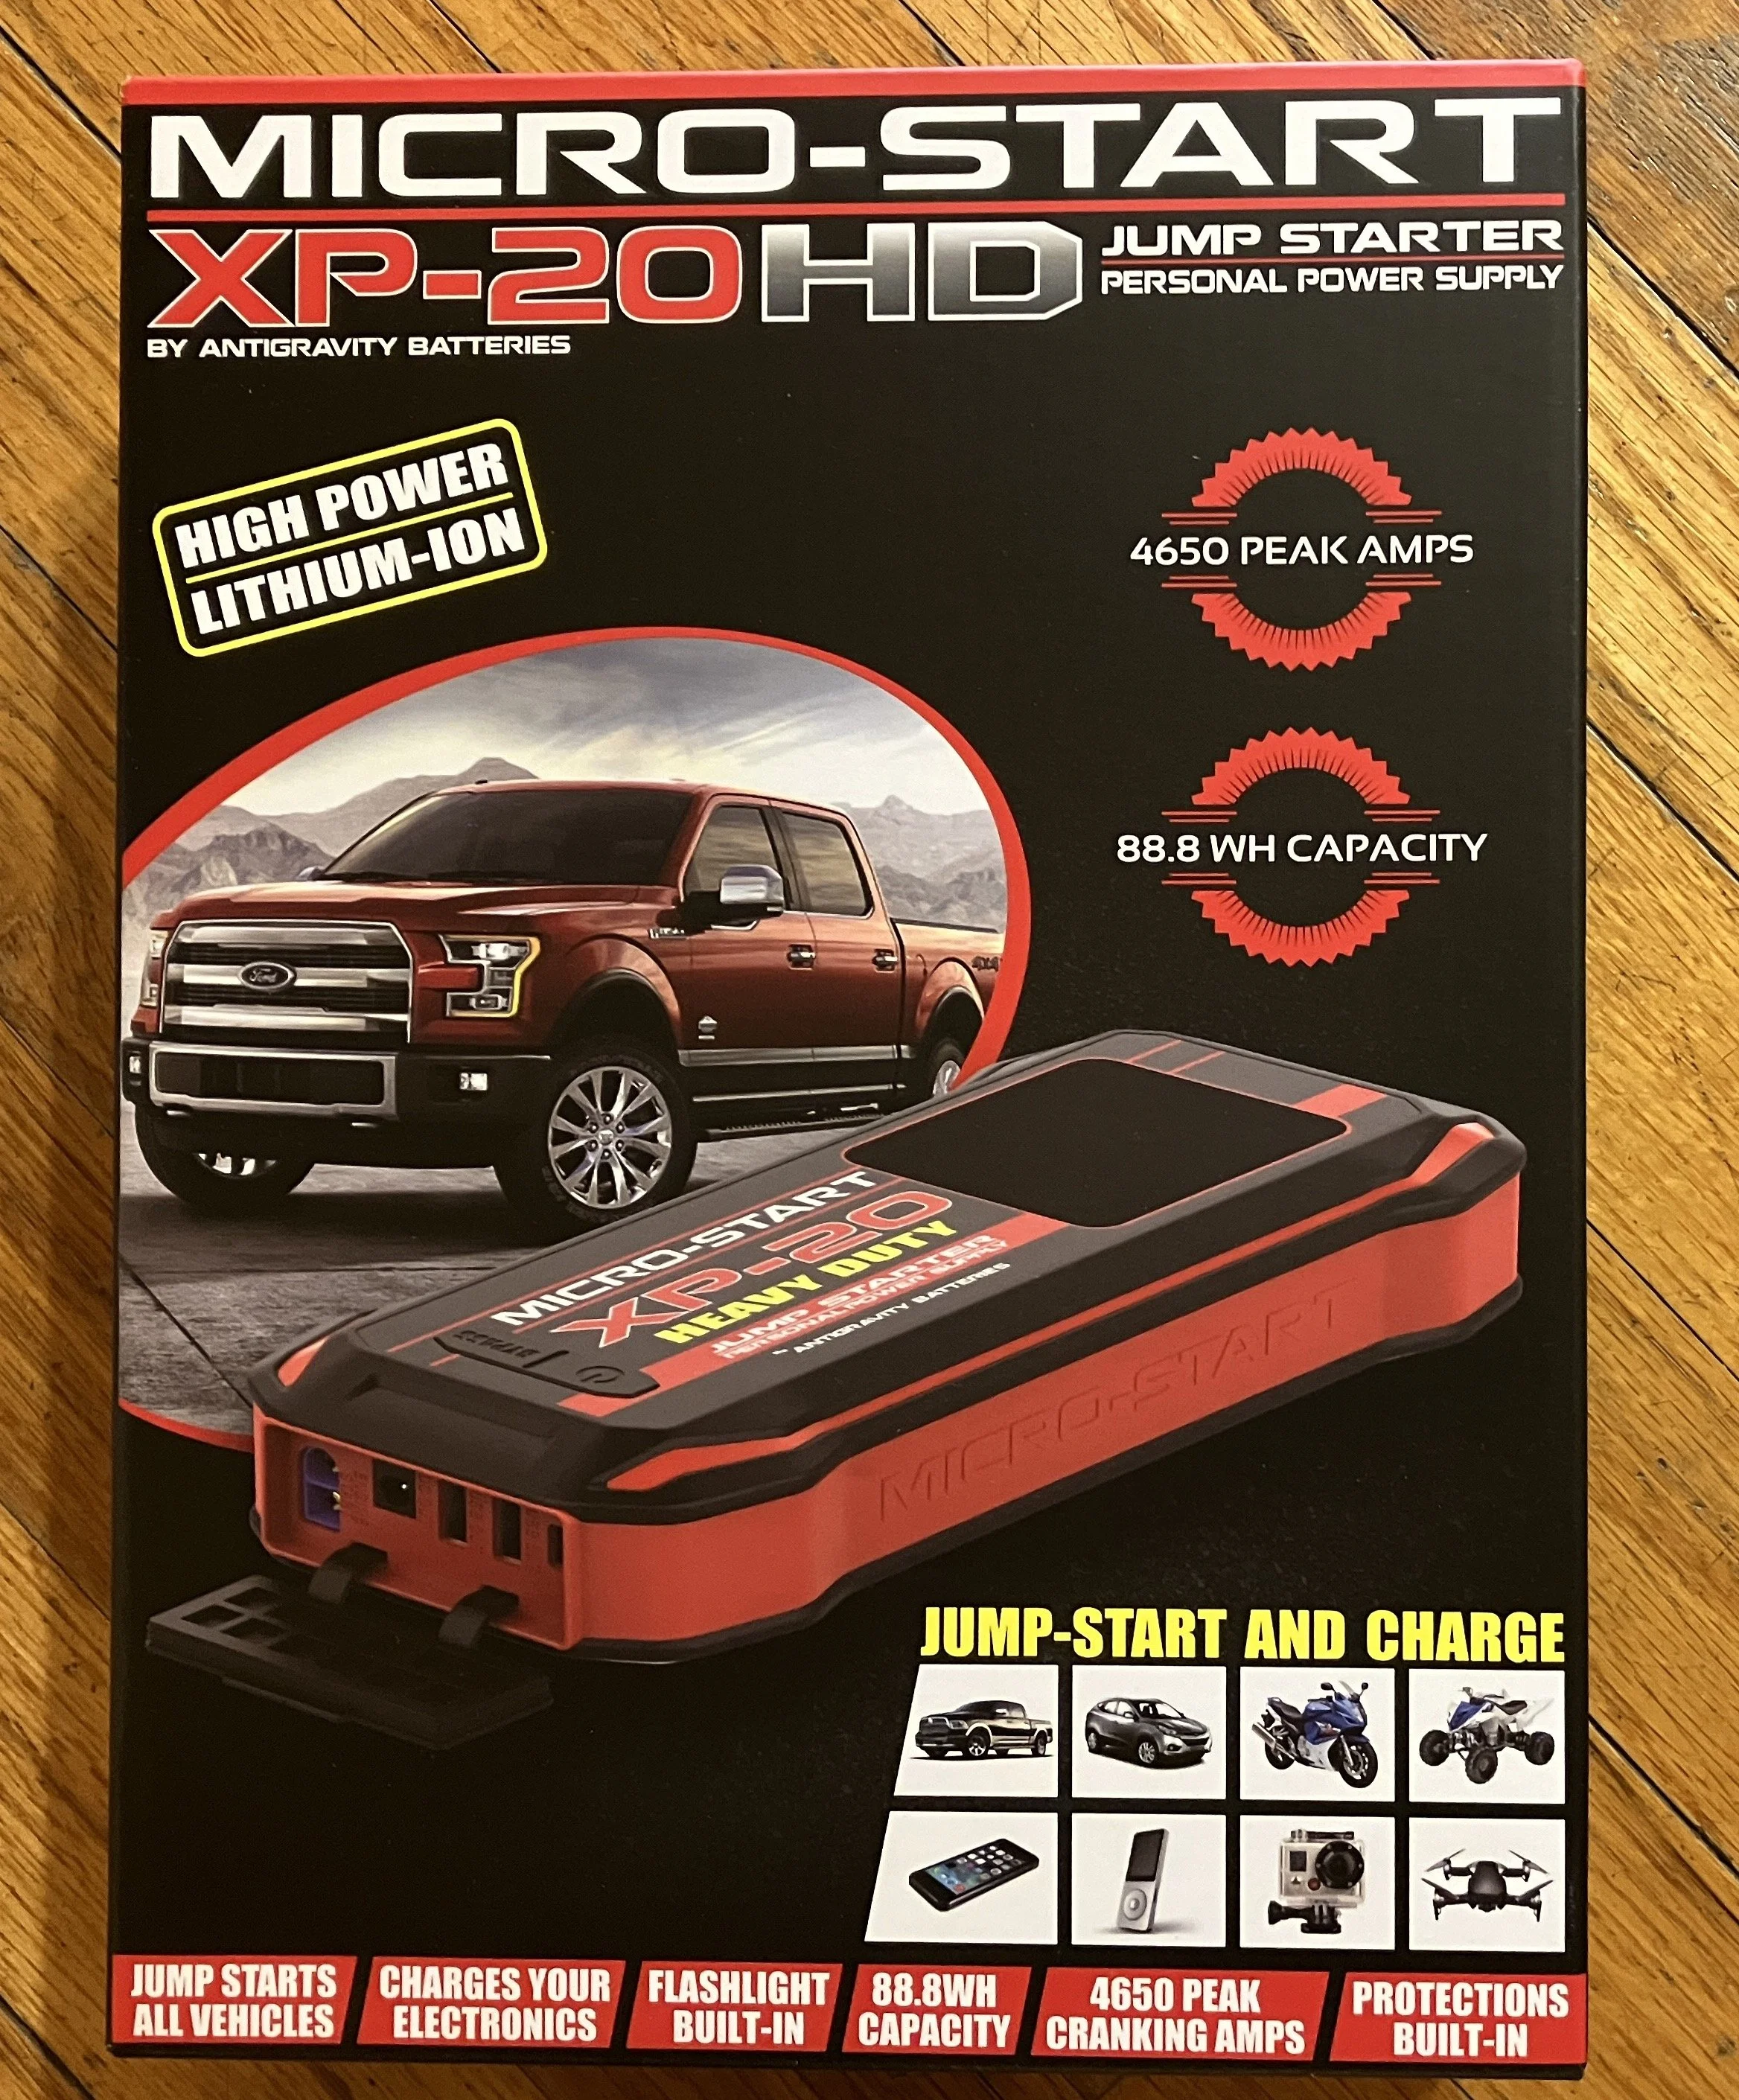
Recently, at long last, two of our original XP-1s began to swell slightly, a sign of impending failure even though both still functioned. So I went to the Antigravity website to see what was new—and found quite a lot. There’s now an economical—and super-compact at three by six inches—XP-3 model, just $120, nevertheless suitable for gasoline engines up to 5.7 liters. The XP-10HD exceeds the capabilities of our already stout XP-10. But what caught my eye were the XP-20 and XP-20HD, the new top-of-the line models with seriously enhanced specifications. So I had the company send me an XP-20HD ($249).

And impressive specs they are. For comparison, the XP-10, which as I mentioned is suitable for starting big diesel engines, offers 300 amps of starting current with a 600-amp peak and a total capacity of 18,000 mAh (milliamp hours). The XP-20HD puts out a massive 930 amps of starting current with a 4,650-amp peak, and total capacity is 24,000 mAh.

That’s not all. Both XP-20 models employ USB-C PD 100-watt charging capability, and will fully recharge in one hour from either a 12VDC or 120VAC source. Each also incorporates a large LED screen that reads out percentage of charge and the power draw of whatever device is connected to it (or the input wattage when charging). When I first used the XP-20HD, to power an iPad at a book festival for taking credit-card payments, the output reading alerted us to the fact that the iPad was running a background program that was drawing excess power. Nice. The XP-20 models will also power/recharge laptop computers via the USB-C output/input port.

Large LED screen shows percentage of charge, and input (or output) wattage.

Oh—incidentally—the XP-20HD will start diesel engines of up to 8 liters and gasoline engines of up to 10 liters. That should take care of most of the overlanding vehicles I know . . .

In the years since the XP-1 first came out the concept of compact jump-start systems has exploded in popularity, and you can now find a dozen or more brands you’ve never heard of on Amazon at discount prices. Personally, my experience with the Antigravity units is enough to retain my loyalty, but I thought I would do a comparison, and so took a look at a friend’s Amazon-sourced unit from GOOLOO, the GP400, which sells for a very tempting $130. (I studiously subsumed my editorial annoyance at the ALL-CAPS brand name and did not let that sway my opinion.)

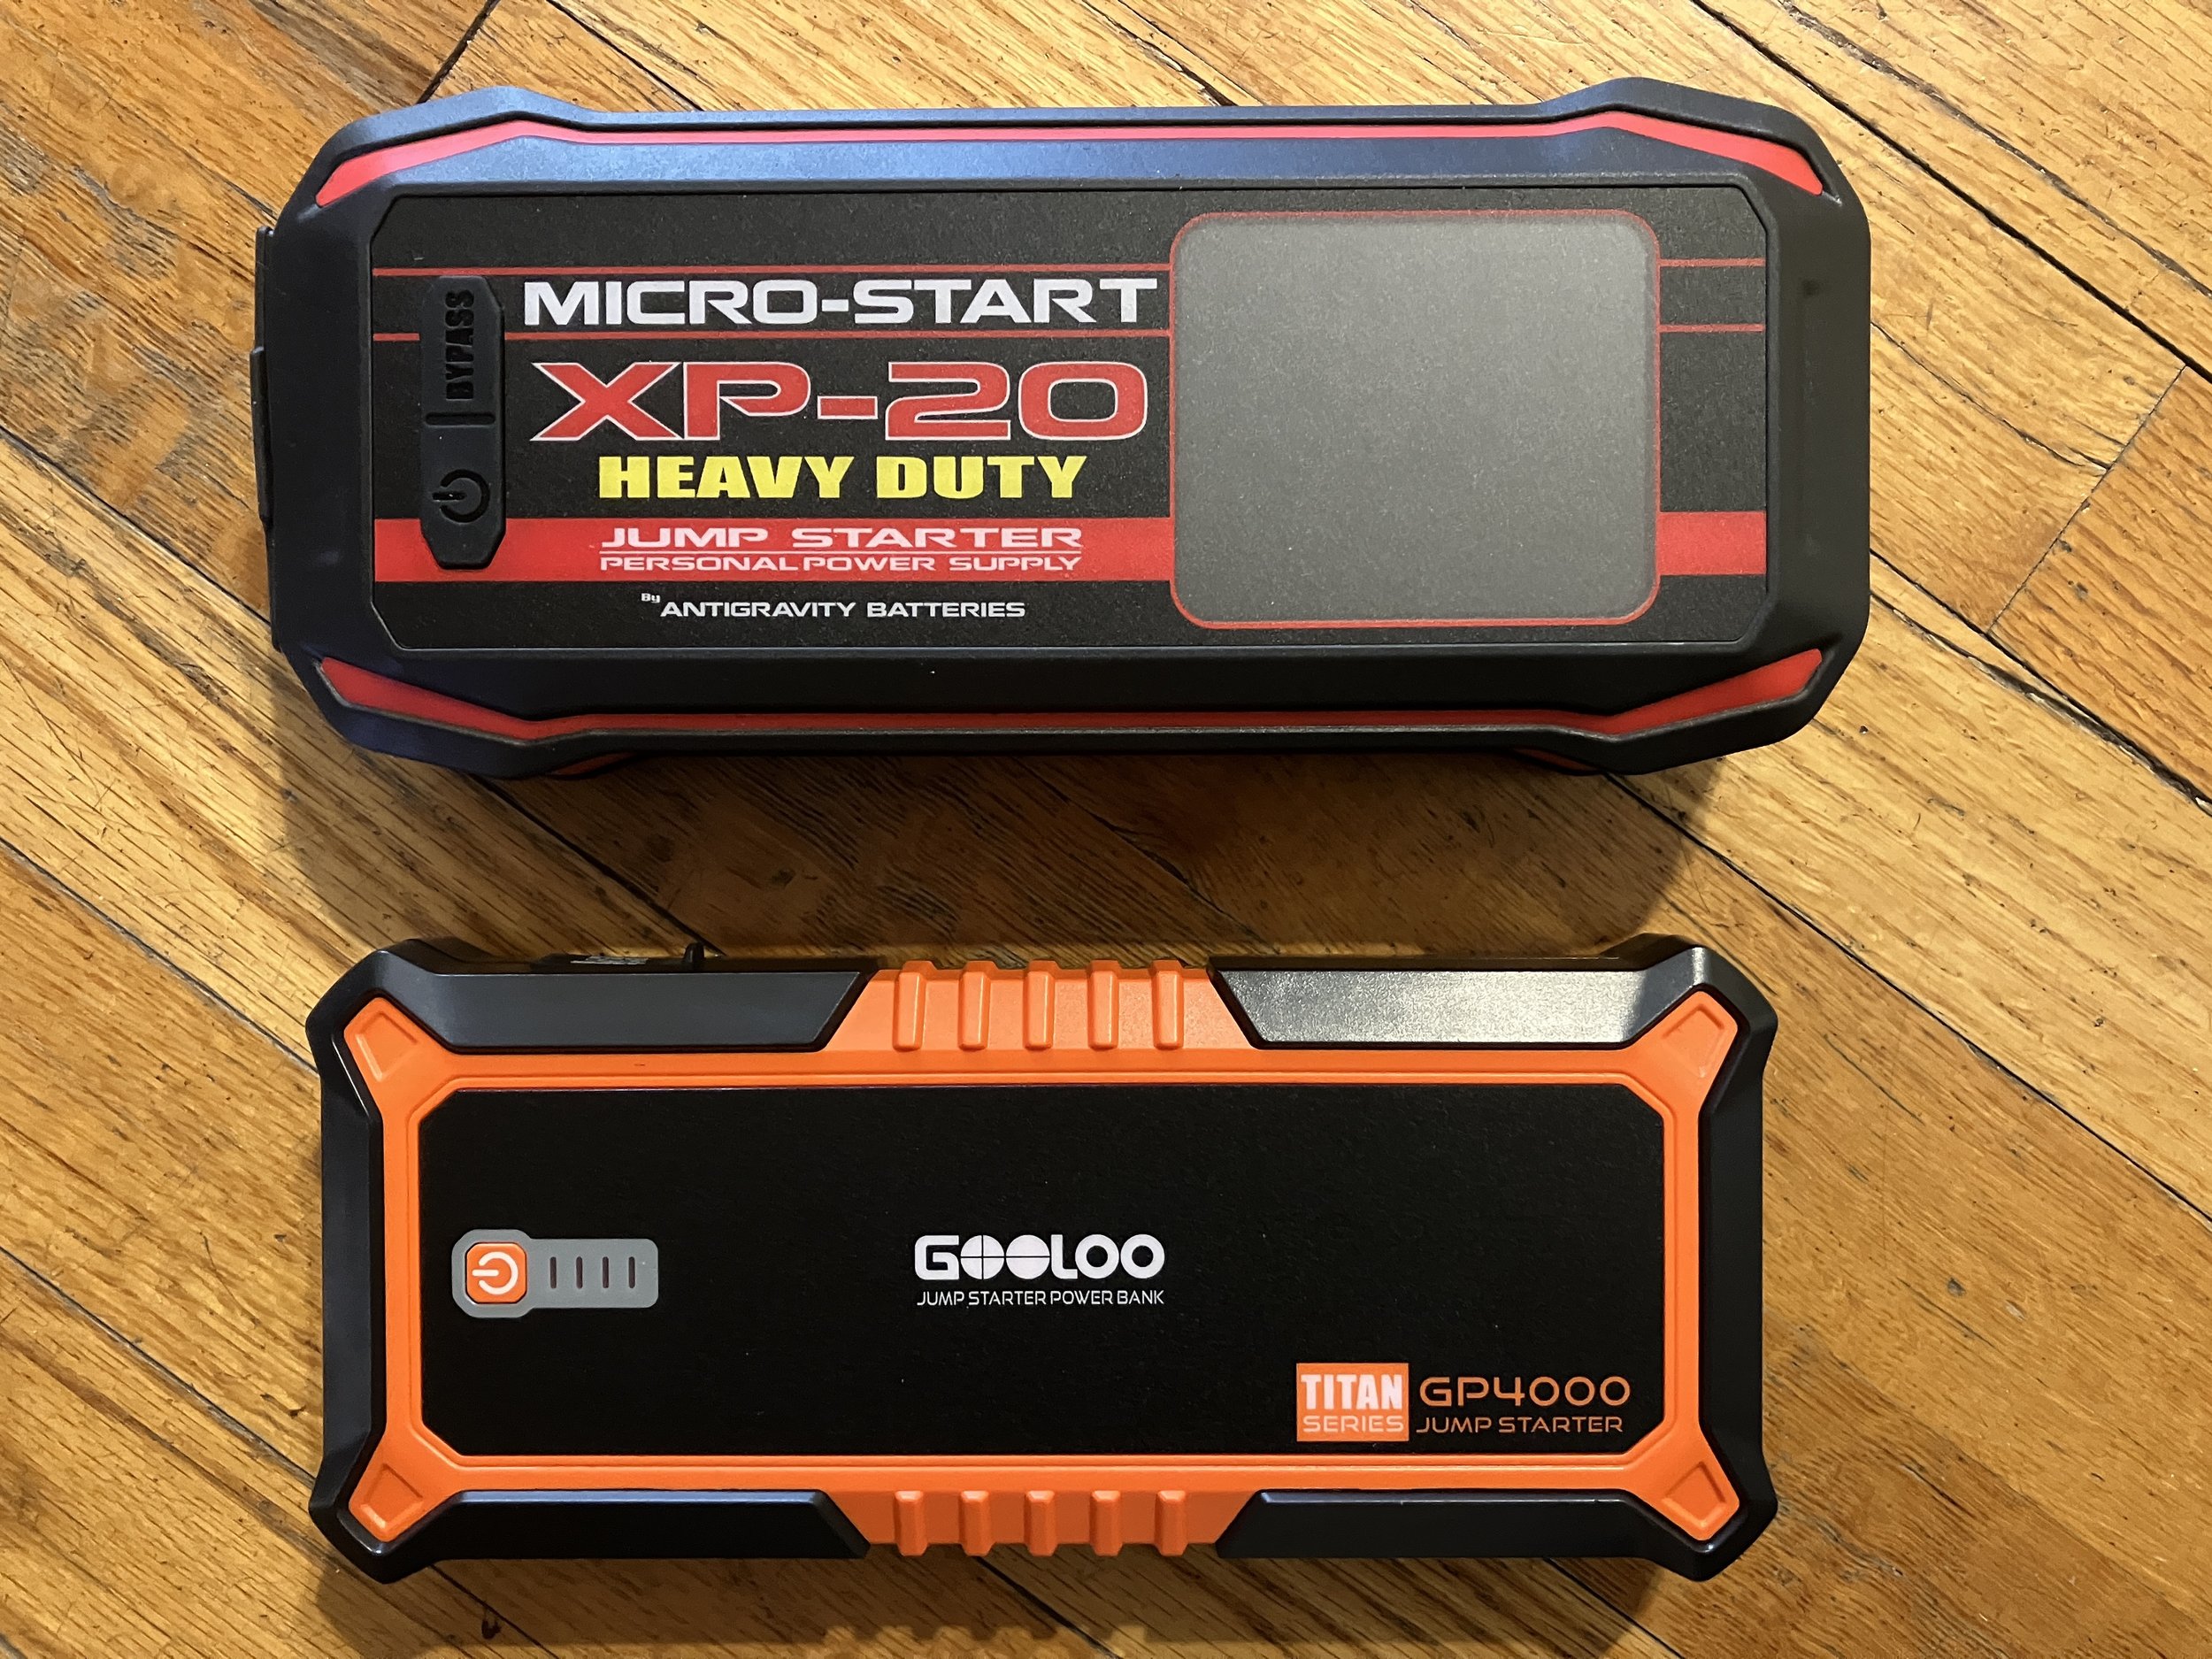
The GP400’s starting specifications are impressive, if about 15 percent below those of the XP-20HD: 800-amp starting current and 4000-amp peak compared to 930 and 4,650 amps. Much more notable is recharge time: five hours for the GOOLOO versus one for the Micro-Start, thanks to its USB-C PD connection and 100-watt capability. That same capability also allows a topped-up XP-20HD to completely recharge a dead MacBook Pro in about an hour—the GOOLOO could theoretically charge the same MacBook, but at a much slower rate. (With a USB-C cord you can even use the MacBook’s Powerbrick to recharge the Micro-Start from a 120/240V source. Got that?)

Other bits: The battery clamps on the GOOLOO are described as “all-metal,” while the clamps on the Micro-Start are solid copper. And the GOOLOO lacks the extremely useful digital readout of remaining capacity and power draw. I actually liked the GOOLOO’s semi-hard case better than the Micro-Start’s semi-floppy case, and the GP400 does offer a lot for the money; however, taken altogether I think the XP-20HD more than justifies its price premium, especially considering Antigravity’s stature and reputation.

Even if, like many of us, you have a dual-battery system in your vehicle, a Micro-Start offers additional peace of mind against the possibility of a no-start situation—not to mention numerous opportunites to be a hero helping out others. The advanced device-powering and fast recharging capabilities of the XP-20 and XP-20HD models catapult them even further beyond the original brilliant Micro-Start concept. Impressive.

That reminds me . . . I’ve got a bit of welding I need to do on the FJ40’s rear rack.

Kidding, Scott. Kidding.

The Sherpa Box Air compressor system . . . initial review.

I consider myself the ARB Twin compressor’s number one fan. No other compressor I’ve used displays as much quality, versatility, and speed, either as a built-in unit—the configuration we have on our Land Cruiser Troop Carrier—or as the cased portable we also own, with its included air tank.

However. No one, including me, ever called the Twin a screaming bargain, at $600 for the stand-alone compressor or an eye-watering $990 for the portable unit. If you can afford it, it’s worth every penny. But what if that’s simply too much for your budget?

Recently I found what might be a legitimate alternative in the Sherpa Box Air system. At a glance it seems to be a close copy of the ARB Twin Portable, incorporating a twin-cylinder compressor with an air tank inside a Pelican-style case. The price of the Sherpa Box Air, however, is $629 including free shipping from Australia. (Astonishingly, the unit I ordered arrived on my doorstep just four days later, thanks to DHL.) The Sherpa also includes a trigger-style air chuck with a built-in pressure gauge, which the ARB does not.

That sounds like an open-and-shut case, so to speak. However, there are a couple of significant differences between the two units. The ARB Twin is fan-cooled, which in addition to its high-quality internals lends it a superb 100-percent duty cycle. The Sherpa, by contrast, is not fan-cooled and has a 33-percent duty cycle. Otherwise, factory specs regarding air flow and amperage draw are remarkably similar.

On balance I strongly prefer a 100-percent duty cycle; however, a 33-percent duty cycle is not necessarily a deal breaker as long as the unit can air up a full set of tires—or yours plus a friend’s, say—before needing a rest.

I plan to do a side-by-side comparison soon. In the meantime, Sherpa is here.

Edit: I just discovered that Sherpa has updated the Box Air with a slimmer twin compressor that is fan cooled and more closely resembles the ARB design. See below. The duty cycle remains at 33 percent, however.

There are chocks . . . and chocks (I needed the latter)

Inadequate . . .

Now and then it’s good to be reminded of the laws of physics.

A few weeks back I conducted a training weekend for a lovely couple who had recently purchased a very well-optioned Sportsmobile. They wanted to become familiar with its capabilities (and theirs), to learn recovery techniques, and especially to learn the use of their winch, an accessory new to them both.

We spent the first day, Friday, driving and marshaling, and I think hugely improved the confidence of both of them, in addition to opening their eyes as to just how capable a Sportsmobile can be despite its size.

Saturday was winching day. I’d picked a dead-end bit of trail where we wouldn’t be in anyone’s way who happened to pass. It was a hill steep enough to actually work the winch, but not so steep as to be intimidating. The Sportsmobile was equipped with a Warn 12,000-pound winch and synthetic line. For an 11,000-pound vehicle that’s marginal if one applies the standard one and one-half times GVW formula for speccing a winch’s capacity, but we discussed ways to ameliorate this by running out more line and, especially, rigging a double-line pull whenever possible.

The only trees available were both marginal in size and behind a barbed-wire fence, so I set up my FJ40 as an anchor, facing down the hill at the top of the slope.

It was then I realized I’d forgotten my set of Safe Jack chocks, the substantial ones I normally use for winching. All I had with me were the smaller folding chocks I keep in the vehicle for tire-changing duty and the like. No problem, I figured—I set the folding chocks in front of the front tires of the Land Cruiser, and we lugged a couple substantial rocks to put in front of the rear tires. I was in low range, reverse selected, engine off and parking brake pulled out stoutly.

The first, single-line pull proceeded without drama. The winch did not seem to be working over hard (although I remarked that it was one of the loudest winches I’d ever heard). So we re-rigged for a double-line pull, running the Sportsmobile’s line through a 7P recovery ring linked to one of the 40’s front recovery hooks, and back to the Aluminess bumper of the van. I stood to one side and directed while Emmett sat in the Sportsmobile’s driver’s seat and operated the winch remote. He began to spool in and the van crept slowly up the hill.

For about five feet. Then a front tire happened to hit a bit of a rock ledge I’d failed to notice, perhaps eight inches high. The Sportsmobile came to a halt—but the winch, of course, didn’t.

Even as I was raising my fist to give the “stop!” signal, I turned to see my 40 pulled gently but inexorably over the folding chocks, which collapsed as if they’d been soda cans. Behind them the rocks in front of the rear tires had held, but were themselves being dragged with the vehicle.

The winch stopped, and I signalled Emmett to apply the brake and shift to park, then let out some slack in the winch line.

The Land Cruiser had only moved about eight inches. Had we for some reason continued to power the winch, it would simply have kept on being dragged slowly across the ground; there was no chance of it careening out of control. Nevertheless, it was a good lesson in the force an 11,000-pound vehicle and a roughly 24,000-pound-equivalent double-lined winch can put on a 4,000-pound vehicle, even on a moderate incline. The math is pretty simple.

These would have been better. From Safe Jack.

What could I have done differently? Having the larger and sturdier chocks would have made a difference, as might using big rocks instead of the little chocks. Even putting the rocks we used in front of the front tires, and the small chocks under the rear tires, might have made a difference, as the front of the Land Cruiser was being pulled slightly downward in addition to forward. However, a more secure option would have been to daisy-chain the 40 by its back bumper to the base of one of the trees on the other side of the fence with the endless sling I had on hand, then pull forward until the sling was tensioned, then chock.

A good lesson that there’s no such thing as “enough” experience, and there’s never a time to stop learning.

For much more on the forces involved in winching, please read this.

Safe Jack’s heavy-duty folding chocks are available here.

So a hitch ball is okay as a recovery point? (But I saw it on the Internet!)

IMG_7077.JPG

A couple weeks ago Gigglepin 4x4, a UK company that specializes in high-quality 4x4 recovery gear, especially for competition, posted a video on Facebook that showed someone attaching one of their rapid-deployment Hook Link recovery hooks to . . . a hitch ball.

The reaction was swift. Several people, including me, posted replies saying any suggestion to use a tow ball for recovery was inconceivably irresponsible. One of the first inviolable lessons any 4x4 training school with which I’m familiar teaches is to never, ever use a tow ball as a recovery point. 

The next day the company responded . . . by reporting my post (and, I presume, others as well) as spam and having it removed.

Then something interesting happened. The original video, as far as I can tell, was taken down. Instead, the company posted another video on their website explaining “what we actually meant” in the first one. In it, the spokesman first demonstrates attaching a Hook Link and strap to a proper recovery point on a Discovery, and notes that it is, “Much safer than placing the strap or rope over the tow ball.” He then says that using the Hook Link and strap on a tow ball is “ideal for recoveries on the road and light duties around the workshop,” and adds that it’s “not ideal” for extreme recovery situations. Confused yet? He then says, even more confusingly, that the MSA (Motorsports South Africa) rule book allows some UK-style tow balls—which, unlike typical U.S. versions, are usually flanged and fastened with two M16 bolts—to be used for recovery in racing.

Contradictions aside, let’s look at this. First, as far as I recall (since I can no longer find it), the original video contained no such explanations or caveats; it simply showed the Hook-Link being snapped over a hitch ball, quite clearly as a suggested application. The opportunities for this to be interpreted as a universally acceptable practice by inexperienced 4x4 drivers/Facebook users are rife.

Second, a friend who called my attention to the first video followed up and contacted a well-known supplier of  this type of tow ball in England, to ask for their stance on the use of such balls for recovery.

The response:

Towbars are designed to pull the safe rated load that they were tested and type-approved at in a smooth and controlled manner. They are not designed to be subjected to any sharp impact or snatch, using them for this purpose is most likely to overload and cause damage, possibly invisible to the naked eye, that may not become immediately apparent but weeks or months later may cause failure and pose a danger to other road users. Using a towbar in this manner would be classed as outside of their intended use and would invalidate any warranties.

There’s another potential factor at work in such a scenario. I couldn’t find any specs of the Hook-Link that listed the width of the neck of the hook. It appears to be around two inches or more. If the neck is larger than the tow ball over which one hooks it, a sudden jolt and slack could pop the hook off the top of the ball. In the U.S. standard tow balls start at 1 7/8 inches in diameter.

I noticed one more confusing aspect to the Hook Link. The spokesman noted there are two  versions of the product, identical in size but employing different aluminum alloys in construction. The model made from 6082 is rated at 4.5 tons, the one in 7075 to 6.5 tons. I assumed he was referring to a metric ton (2,204 pounds) and, indeed, the Hook-Link shown on the website is stamped “Break strain 4500kg”—which is 9,920 pounds, and 4.5 times 2,204 equals 9,918 pounds.  But . . . “break strain?” That doesn’t sound like our familiar working load limit (WLL) with a 2X or 3X (or greater) safety factor; that sounds like the point at which things might come apart precipitously. Perhaps it’s a matter of cross-Atlantic nomenclature, but here we like to see both a WLL and a separate minimum breaking strength (MBS).

I’m going to restate the rule: Don’t use a tow ball—any tow ball—as a recovery point. Period.

What about alternative methods for employing a receiver hitch as a recovery point? Many articles and trainers suggest inserting the loop of a recovery strap into the receiver tube and fastening it with the hitch pin. This has the advantage of securely anchoring the end of the strap or rope.

However, look at the diagram below, from Dougal Hiscock, a mechanical engineer at at Engen Consulting in New Zealand, which shows the relative stresses exerted on a tow ball and a hitch pin subjected to a 5,096 kilogram (11,235 pound) steady pull. The stress is three times higher on the pin due to its smaller diameter. The pin is also subjected to a three-point bending load, from the strap in the middle of the pin and the through-points on the side of the receiver. When towing a trailer using a hitch insert the pin is subject only to sheer loads, as the square receiver insert rides closely against the wall of the tube. A wide strap or rope, such as the one illustrated, might reduce the focus of this bending stress, but it will still be much higher than that exerted by a receiver tube under the same load.

The only acceptable way to employ a receiver for recovery is to use a receiver shackle insert and shackle to attach the kinetic strap or rope. Even then, I much prefer a dedicated shackle mount on a bumper designed for recovery duty, or a chassis-mounted recovery ring.

IMG_7075.JPG

The world's best recovery shovel . . .

IMG_6728.JPG

If you want to start one of those 47-page debates on an overland forum, just type, “What’s the best recovery shovel?” in the topic line.

On one end you’ll be assured that a $20 folding entrenching tool is all you need. On the other you’ll learn that you absolutely must carry a full-length garden shovel so you can reach under to the middle of the vehicle with it. And you’ll hear everything in between. 

I’ve tried and owned a lot of them, including oddities such as the WWII Wehrmacht entrenching tool, which is awesome for its size, indestructible, and has one sharpened side edge to use as a semi-effective hatchet. Much superior to the folding U.S. entrenching tool in my opinion. There’s an interesting history of them here.

Screen Shot 2021-05-27 at 1.42.10 PM.png

I also have a factory Land Rover T-handled shovel (half of their “Pioneer Kit,” the other being a pick), which is excellent:

Pioneer Kit.jpg

Also an all-steel Wolverine (review here), which is also excellent, if heavy and decidedly crude in construction (I know, it’s not a fly rod, but still . . .).  Being all-metal, the Wolverine also gets blisteringly hot if left in the sun.

I sampled one of the Krazy Beaver shovels . . .

Screen Shot 2021-05-27 at 1.53.27 PM.png

. . . and managed to bend one of the teeth my first time out, in addition to which I didn’t like the pinned plastic handle. Not many people realize that you should occasionally sharpen your shovel, and doing so on the Krazy Beaver would be a real pain.

I also tried a Hi-Lift Handle All, which comprises a shovel, sledge hammer, axe, and mattock all in one, and, as typical with such things, performs poorly as any of them. It was indubitably versatile, but utterly awkward and uncomfortable to use.

Screen Shot 2021-05-27 at 1.57.23 PM.png

And before you ask: No, I’ve not tried one of these because I do not live in fear of a Zombie Apocalypse:

Screen Shot 2021-05-27 at 2.01.06 PM.png

I briefly tried an early example of the DMOS Collective folding/collapsing shovel, which felt a bit rickety to me, and full of moving bits begging to be jammed with mud. However, I’ve not tried one of the later models, which I understand are sturdier. They are available with a very nice mounting bracket, and will store easily inside the vehicle, a boon unless you’re into ostentatious exterior displays of all the recovery gear you rarely use. However, I still I can’t imagine that a folding shovel with a collapsible handle held by numerous spring pins could possibly be as strong or last as long as a single-piece model. Also: $239 for the Pro model? Even my broad latitude for equipment elitism blanched at that. The bracket, incidentally, adds another $239 . . .

Through all this experimentationI learned that I strongly prefer a mid-length wood shaft with either a T or D-shaped handle, as on the Land Rover Pioneer unit. Why wood? I live in southern Arizona and most of my foreign travels have been in warm countries. And even when wearing gloves, the steel shaft and handle of the Wolverine were uncomfortably hot if I set down the shovel for a few minutes when the air temperature was above 90ºF and the ground temperature 40º higher. And it was just as uncomfortable in freezing weather. Fiberglass is better, but then the question of aesthetics arises, and what can beat a wood shaft? Its only disadvantage is weathering if left exposed to the elements, but I’m willing to keep the shovel stored in the garage except when I’m on a trip. Judicious re-varnishing would reduce the issue as well. Technically a steel or fiberglass shaft might be stronger, but I can count the broken wood shafts of mid-length shovels I’ve seen on a closed fist. 

I like a T or D handle because it’s often necessary to punch the shovel into the substrate (not just when doing a recovery but for many camp tasks), and a T or D handle is way more comfortable for this, and produces more power as well.

IMG_6729.JPG

Finally, the mid-length shovel is just the best compromise for length. It allows you to reach far under the vehicle yet retain sufficient power, and is of course a lot easier to store than a full-length garden shovel. (Also, I have seen long wood shovel shafts break if abused.) 

All this, the world’s longest lede (the correct spelling for the introduction to an article), is leading (leding?) up to my nomination for the world’s best recovery shovel—and I’ll bet it’s one you’ve never encountered in those 47-page threads. Plus it has the coolest name ever for a tool.

It’s called a poacher’s spade. Told you.

Originally—according to tradition—cut down from an old full-size spade, the poacher’s spade was used by poor rural tennants in Britain to dig out rabbits to supplement their meager diets (also to dig out the ferrets and terriers sent after the rabbits). This hunting was illegal since all game was the property of the estate owner—thus, poacher’s spade (or rabbiting spade). It was ideal for the task because the blade was no wider than necessary to unearth a rabbit burrow, and lighter than a full-size shovel if you wound up needing to flee from a shotgun-wielding gamekeeper. The relatively small blade area enhanced rigidity and cut more easily into tough substrate (does England even have tough substrate?).

So, you’re asking, how does this translate to efficacy as a recovery shovel? Why would you want a small blade when you might have a half a cubic yard of sand to get out from under a bogged vehicle in order to be able to insert MaxTrax or other recovery aids?

The answer dawned on me over the course of many, many scenarios digging out vehicles deeply bogged in sand or mud, whether genuinely stuck or put there for training purposes: I realized that a good portion of my digging time and effort was wasted just making room for the shovel itself. When the vehicle was buried to within a few inches of the bodywork, I spent my first couple of minutes at each wheel just scooping out a ramp so I could get the shovel in to where it actually needed to be to dig out the tire without risking gouging the bodywork with the edge of the blade. I theorized that a smaller blade—perhaps no larger than that on an entrenching tool but with a longer, solid handle—might actually be faster than a larger shovel that frequently got in its own way.

I tested the theory with an old trenching (as opposed to entrenching) spade I had, with a D-handled wood shaft and a narrow but square-cornered blade made for cutting nice neat trenches. The blade shape wasn’t ideal but the narrow width immediately showed its superiority in extracting deeply sunk vehicles. There was noticeably less prep work to begin actually uncovering the tires. To my surprise, I found that it wasn’t even at a disadvantage in removing sand, since I typically hold the shovel sideways like a canoe paddle and sweep out sand from the tires. The long, narrow blade scooped out just as much sand as a fat blade.

Experiment complete and successful, I had no doubt what kind of shovel I wanted to get.   

I  knew about poacher’s spades thanks to a long fascination with the 18th, 19th, and 20th century practitioners of the time-honored pursuit, who elevated the skill of winkling out food from under the noses of estate owners and gamekeepers to a high art. In addition to spades, poachers employed guns, traps, snares, nets, ferrets, terriers—they even developed a particular breed of dog called a lurcher, a cross between a coursing dog and a herding breed such as a border collie. The result was both intelligent and fast—the perfect companion for a poacher (the name comes from the Romany word lur, meaning thief or bandit). I have several books written by legendary poachers such as Brian Plummer, Ian Niall, and Jim Connell, and the tales they tell of close calls are wild indeed.

Screen Shot 2021-05-28 at 11.15.42 AM.png

I also knew where to go to get a proper poacher’s spade: Bulldog Tools in Wigan, Greater Manchester, founded in 1780 and still forging tools at the same location. Bulldog made entrenching tools for the British military in WWI and does so today. Bulldog tools are available from several outlets in the U.S., and are sometimes sold under the name Clarington Forge here. I ordered their Premier 28” Rabbiting Spade, which is equipped with an ash shaft ending in a beautiful split and steam-bent D (or Y) handle. The blade and handle socket are forged in one piece, and the socket extends nearly halfway up the shaft. (Strangely the steel part doesn’t seem to get as hot as the Wolverine’s hollow steel; I suspect the wood core might bleed off some heat but I don’t know.)

IMG_6732.JPG

And . . . it’s perfect. The blade is thick and rigid but not heavy thanks to its size. The length is just right. And despite being forged in England in a 240-year-old factory, it was only $66.

Let me be clear: A $20 folding Chinese entrenching tool will dig you out if the alternative is staying put. For that matter, your bare hands will dig you out if the alternative is staying put. But for me, having the most suitable tools for a particular job enhances my enjoyment while traveling. And if something has gone wrong—even something as inconsequential as a bogging—those suitable tools take all the stress and a lot of the work out of the situation.

There’s another reason to carry a recovery shovel made in Britain: It will lend you a proper British attitude toward getting bogged, which usually involves saying, cheerfully, “Bugger,” then relaxing and having a brew-up before tackling the problem. And while you’re doing that you usually figure out the easiest and safest way to solve the issue, in contrast to the normal American Oh-shit-we’re-stuck-we-need-to-get-out-now! panic attack.

Cheers.

Comprehensive jack review for Tread magazine

DSC00648 copy.jpg

I just finished a comparison of the major types of recovery jacks available now. From left to right they are the Pro Eagle Off Road jack, the Hi-Lift, the Safe Jack bottle jack kit, the ARB Jack, and the surplus HMMWV scissors jack with the Agile Off Road axle and chassis adapter. It should be published in a couple of months, but in the meantime if you have any specific questions feel free to email me.

Neoprene Hi-Lift cover: Don't waste your money

IMG_5936.JPG

Anyone who’s used a Hi-Lift knows that its otherwise bombproof lifting mechanism is surprisingly prone to jamming when impacted with seemingly minor amounts of dirt and mud. It’s usually easy to get the jack back into operation with a quick dousing of WD40 or virtually any other liquid, but it would be better if you could keep the dirt out in the first place.

One way to do so is to mount the jack inside the vehicle—rarely practical with the 31-pound many-edged beast that is a Hi-Lift. And what about after you use it and it’s muddy? You won’t want to put it back inside dripping goo.

Another approach that helps is mounting it high on the outside of the vehicle. When I had a roof rack on my FJ40 I did this, and indeed it seemed to stay reasonably clean. But retrieving and replacing it was a bit of a pain, and 31 pounds added to the already considerable weight of a ConFer roof rack didn’t help my center of gravity. (As an aside, ARB’s new Base roof rack system offers as an accessory a brilliant one-person Hi-Lift mount that cradles the jack underneath while you’re removing or attaching it.)

Although we drove for one trip in Australia with a Hi-Lift mounted crosswise on the front ARB brush guard, I hate that position (and can now answer, “Yes, I’ve tried it.”). It hampered visibility and hampered access to the engine compartment, and added, yes, 31 pounds in another poor spot to add 31 pounds—right above a heavy bumper and winch stuck way out front. (Finally—and perhaps this is strictly my own prejudice—it had too much of a poseur air about it, as though I was broadcasting that I frequently ventured to places where I’d undoubtedly need it, which is far from true. All it needed as an accent was a pair of limb risers.)

Crossing dunes.png

The mounts I see directly under the windshield of Wranglers are better in terms of weight distribution, I suppose, but can’t be very convenient for one person to access; the chances of slipping and gouging the hood must be fairly high. And I worry about the strength of those mounts in the event of a crash—say if you’re rear-ended and that 31-pound jack really wants to come back through the windshield at you.

All this brings me to another way to keep the mechanism clean: simply cover it. This would seem to be axiomatic, yet it took me 30 years before I finally bought one of those zip-on neoprene booties that “protect” just the mechanism.

Why did I put “protect” in quotes? Because I zipped this cover over one of our Hi-Lifts, which then sat on the truck for about a half year without being used. In the course of doing some electrical work on the vehicle I removed the jack, and out of curiosity took off the cover. Of course the plastic zipper (who thought that was a good idea?) took a pair of pliers to undo.

IMG_5932 2.JPG

I was astonished to see not only more impacted dirt than I’d ever accumulated in an uncovered jack, but also some significant rust on bare metal parts. It appeared—at least in my impromptu experiment—that the jack cover did an excellent job of containing all the gunk that filtered past the necessarily imperfect seal, as well as holding in whatever moisture our southern Arizona climate let in. I can’t imagine what it would have looked like after the same period in a damper climate.

The cover went in the trash. I’ll just go back to WD40, because I’m not mounting a jack on the brush guard again.

IMG_5937.JPG

Pinnacle product? The Land Rover Coram bottle jack

IMG_5840.JPG

This photo could spawn a lot of really bad jokes: a jack for a Land Rover, made in Italy, sitting in a Land Cruiser.

Let me explain.

Few manufacturers pay much attention to the jacks they include for changing a flat tire. No salesman is going to pull one out during his pitch, and a lot of people these days simply call AAA if they have a flat, and surf the web on their phone until the truck shows up.

The typical jack on small to medium-sized 4x4 vehicles these days is a scissors jack, barely adequate for an unloaded vehicle and nearly impossible to use for some people if there’s a good load.

My FJ40 came with a bottle jack—a mechanical screw type. It was stronger, but limited in its rise to one extension of the shaft, and still a beast to operate if the Land Cruiser was loaded. Its top post was a simple circular disk and thus lacking in stability.

Land Rover took a different approach with the early Range Rover. Its jack was a bottle type as well—but hydraulic, made by Coram in Italy, with a 2,000-kg rating, which made lifting even a loaded vehicle much easier. In addition, they equipped it with two extra-long operating rods so you didn’t have to be stuffed sideways under the vehicle to work it. It had a double-extending ram for extra lifting height. Finally, the post incorporated a curved top piece that securely cradled the front or rear beam axle of the Range Rover.

IMG_5843.JPG

The same jack came in early Discoveries as well, and possibly Defenders. However, I have heard that at some point (1995-ish?) the steel body was replace with . . . plastic? And later on a similar-looking jack was substituted, but made in China. All of these I’ve seen were black rather than the ketchup red of the Corams.

I found a nice one on eBay for $40, and it’s been my FJ40 jack ever since. They’re still easy to find, but beware—the downside to hydraulic jacks is that seals can wear and leak, rendering the jack useless (possibly why Toyota stuck with the screw type). If you buy one try it immediately; if it doesn’t work the first thing to do is check the hydraulic fluid level through the rubber plug. If filling it doesn’t help it will need rebuilding, which I understand many hydraulic specialty shops can do but have not confirmed. If at all possible, store the jack upright.

The Coram jack fits into ARB’s excellent jack base, which also accepts either a Hi-Lift or an ARB Jack.

The Coram jack fits into ARB’s excellent jack base, which also accepts either a Hi-Lift or an ARB Jack.