Travel, Food

The new ARB Earth Camper

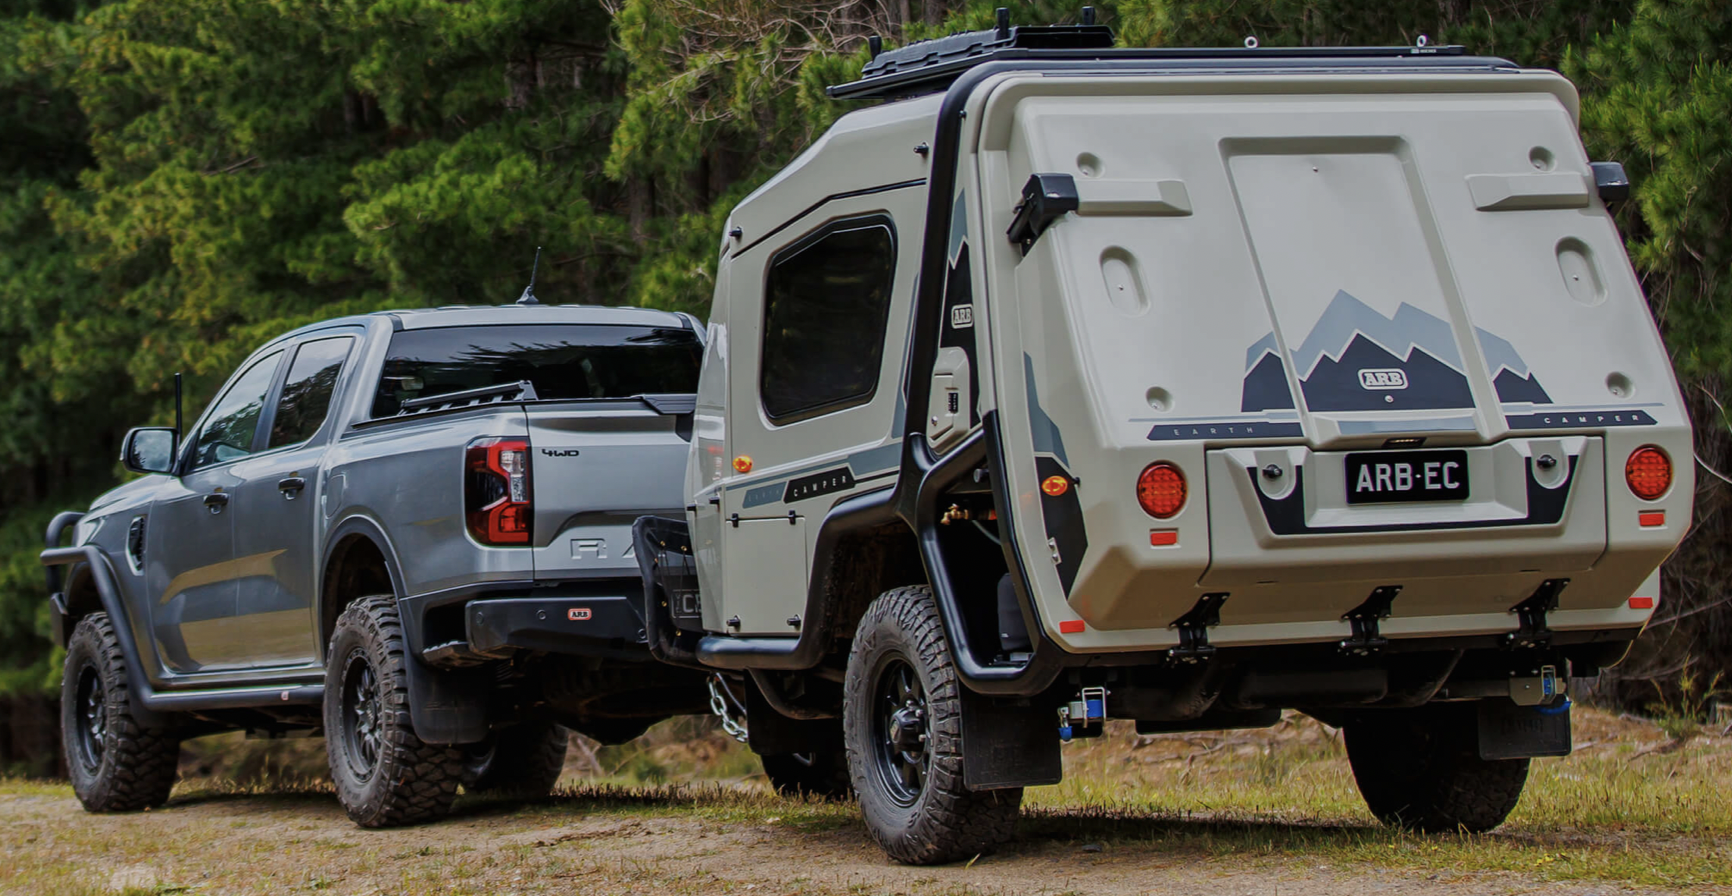
In what is surely a natural progression, ARB has just announced its very own “adventure” trailer, which they’ve named the Earth Camper. At first glance, it seems to live up to the ARB reputation in terms of build quality and innovation.

It’s built around a massive, mandrel-bent and welded tubular chassis, which should provide absolutely flex-free support to the composite body panels. The trailer is supported by long-travel independent suspension employing, of course, Old Man Emu shocks. Electric brakes, alloy wheels (with Toyota lug spacing), and Maxxis all-terrain tires with spare are standard.

The salient feature of the trailer is the enormous clamshell back, which folds down at the push of a button to provide a raised, hard floor. A door then provides access to a queen-size bed. For quick overnight stays you can be tucked away inside a couple minutes. For a full camp, a tent erects around the floor to provide a completely sheltered dressing, sitting, and eating space. A dining table unfolds from the base of the bed area.

On the left side of the trailer is a full-pull-out kitchen, including a 96-liter dual-zone fridge freezer, a three-burner stove, and sink. There’s plenty of storage above and to the side. Internal tanks provide a full 140 liters (36 gallons) of water, and an additional storage nook holds a 20-liter jerry can. That’s more water than most full-size trailers and campers provide. Well done ARB.

Electrical power is provided by a 120-watt solar panel and a 100-amp-hour lithium battery—that’s right: standard LiFePO4 power. Again, well done—and there is room in the battery compartment for a second 100AH battery. You can also easily plug in portable solar panels for extra input. Charge control is via a high-quality Redarc system.

On the opposite side of the camper is an optional en-suite toilet and shower enclosure of luxurious proportions, and a Hot Tap water heater and shower system.

There are numerous other features, and optional awnings and side curtains that will transform the Earth Camper into the full epic Aussie quarter-acre encampment. The versatility—from two-minute crash pad to let’s-stay-a-month homestead—will be one of the trailer’s most attractive features.

I have no word yet on price or weight, but I suspect ARB will sell every one of these they can produce. find out more here.

Plano cargo trunk

If you know me you know I’ve been a huge fan of Pelican and Zarges cases for years. In their respective applications, nothing matches either for durability or security. However, Pelican cases are heavy for their volume, and Zarges cases are expensive for their volume.

So when we needed a couple of pretty large trunks to regularly ship business materials such as books, plus personal possessions, back and forth via airline between Tucson and Fairbanks, we looked for an alternative, and Roseann found it. Plano (which I remember from fishing tackle boxes owned as a kid) produces this trunk, which boasts conservative interior dimensions of 31 by 13 by 14 inches. That’s 5,600 cubic inches of space—or 108 quarts if you’re used to 12V fridge sizing. The trunk uses four latches, so the lid comes off entirely for easy loading, and it has molded-in carrying handles and wheels. All for around $60. I can stand on it with no signs of stress. We loaded two up with enough stuff to barely squeak under Alaska Airlines’s 50-pound limit each, and have now made two trips with zero issues. Well recommended.

The homely, perfect chuck box

As a contributor to somewhere around two dozen magazines over the past three-plus decades, I’ve been lucky enough to sample and own a wide variety of camp kitchens, from simple Coleman stove stands to the excellent Kanz Kitchen and the over-the-top, multi-component Iron Grill system from Snow peak.

Despite all that, the one you see above is still my favorite.

Why? Not because it’s the “best,” although it functions exactly how it’s supposed to. Certainly not because it’s the most expensive—in fact it is undoubtedly the cheapest camp kitchen I’ve owned. It’s my favorite because I made it back when Roseann and I were penurious college students, exploring the southwestern U.S. and northern Mexico in our FJ40 and, later, an FJ55. Thus, even though subsequent kitchens saw far more exotic destinations, this one contains more precious memories than all of them put together. Like the night we were camped in Mexico’s Pinacate volcanic region when a meteor streaked overhead and its smoky trail covered half the sky. Or any one of several trips to the Sonoran coast of the Gulf of California recording nesting territories of least terns. Or leading sea kayak trips to that same coastline, towing boats and everything needed for excursions out to Isla Tiburón. Or a cross-country skiing trip to the Grand Canyon’s North Rim, when a blizzard hit and our trip leader got hopelessly lost next to a 4,000-foot chasm in ten feet of visibility.

I built the chuck box long before Youtube videos on such things, and so simply used my decent grasp of carpentry and Roseann’s concept to form it out of a single sheet of half-inch plywood. No fancy dovetails; it was simply glued and screwed together (and hasn’t loosened a millimeter since). I made sure to apply four or five coats of varnish, so the finish is still intact as well, despite numerous nicks and scratches. A drawer held utensils, matches, and can openers, the drop-down front created a table, and cork lining reduced rattles.

In recent years, with a succession of fancier kitchen systems from with to choose—not to mantion built-in kitchens in our Four Wheel Campers and Land Cruiser Troop Carrier—the chuck box got tucked away in a high corner of the storage building at our desert cottage, like the forgotten Velveteen Rabbit. When thieves broke in while Roseann and I were in Alaska last fall (by the simple expedient of hot-wiring our Ford truck and driving it through the wall), they took nearly everything . . . but left untouched the plain plywood box in the corner.

And, happily, just like the Velveteen Rabbit, the old chuck box came to life again. When we bought a 2014 Tundra to use as our Alaska vehicle, we decided—for the moment, anyway—to keep the camping setup simple. So when I hauled a trailer full of household goods to Fairbanks, I strapped the chuck box in the bed of the truck, and found that it worked just as well as it did 30 years ago. I didn’t miss those fancier kitchens one bit.

Be your own optics expert

_MG_2054 copy.jpg

What could be more magic than an invention that brings the world seven, eight, even ten times closer? A shy bird, a dangerous animal, the moon and planets, a distant and questionable 4x4 route (or, in the above photo, a possible poacher): a thousand things can be enjoyed, evaluated—or apprehended—with binoculars.

I’ve used binoculars for fun for many decades, and I never tire of simply sitting and looking through them at anything that catches my fancy. However, I’ve also used them professionally, as a sea kayaking, natural-history, and birding guide, and the latter experiences in particular have taught me a lot about both choosing and using them the most efficient way. Like many products, to a large extent you get what you pay for—but there are ways to ensure you get the best instrument for your needs regardless of how much you plan to spend.

(I’ll note here our weird misuse of the term “binocular,” which means, of course, two oculars. So technically we look through a binocular, rather than a “pair of binoculars,” which would be something both you and a friend could look through at the same time. However, the term is so ingrained you’ll probably catch me using it in the next paragraphs.)

Binocular anatomy

Binocular anatomy

The single most visible diagnostic component of a binocular is the front, objective lens. All other aspects of construction being equal, the diameter of this lens determines, 1) how much light the binocular gathers and how bright the image appears, 2) how much magnification the binocular can effectively deliver, 3) how bulky and heavy the binocular will be to carry and use, and 4) how much it will cost. Small—e.g., 20 or 25mm—objectives equal low light-gathering, low power, light weight, and lower cost. Larger—30 to 60mm—objectives gather more light, allow higher magnification, are heavier and bulkier, and cost more.

Objective lenses. Left to right: 20mm, 32mm, 42mm

Objective lenses. Left to right: 20mm, 32mm, 42mm

Remember that as objective diameter increases linearly, objective area increases geometrically. The 32mm objectives in the middle in the photo above have two and a half times the light-gathering power of the 20mm objectives on the left.

Binoculars are referred to by their magnification factor (the number of times they make an object appear closer) followed by the objective diameter—6x20, 8x42, 10x42, 10x50, etc. The compromise between objective-lens size and magnification is one of the main decisions you’ll need to make when selecting a binocular. So let’s look at the relationship.

Hold a pair of binoculars a foot or so from your face. See the little circle of light in the eyepiece? That’s called the exit pupil.

The diameter of that exit pupil is a function of the objective lens diameter and the magnification of the instrument: objective diameter divided by power gives you the exit pupil diameter—in any binocular, regardless of construction or cost. A 10x40 binocular has a 4mm exit pupil; so does an 8x32 binocular. An 8x40 binocular has a 5mm exit pupil, in a compact 8x20 binocular it is 2.5mm.

Why is this important? It has to do with the variable diameter of your own pupils as they react to light. In bright sunlight your pupils will contract to just 2mm or so, but near dusk they will expand to 5, 6, or even 7mm, depending on your age (as we age our pupils cannot expand as much). Consider that compact 8x20 binocular and its 2.5mm exit pupil. Looking through it in bright sunlight, with your own pupils constricted to 2mm or so, you’ll see a full, bright view. But look through it near dusk, when your pupils have expanded to 5mm or more, and you’ll see dark clouding around the central image, because your pupils are larger than the exit pupil. This vignetting means that binoculars with small exit pupils don’t perform well in low light (which can also include a shaded forest, for example). Thus binoculars with larger exit pupils are better for viewing near dawn and dusk. Years ago I had a pair of 7x50 binoculars with a stupendous 7mm exit pupil. Despite otherwise modest optical quality they excelled at low-light viewing.

Comparison of the exit pupil of an 8x50 binocular with an 8x20.

Comparison of the exit pupil of an 8x50 binocular with an 8x20.

So, all else being equal, a larger exit pupil equals better low-light viewing. However, magnification has an effect as well. Note the 10x40 and 8x32 binoculars I listed above. Despite identical 4mm exit pupils, the 10x40 will perform better at dusk due to the greater magnification. (As we’ll see, many other factors also contribute to brightness.)

Herewith my first guideline: For all-around use I do not recommend a binocular with an exit pupil smaller than 3mm, and 4mm is notably better. Those 10x25s in a company’s catalog might seem like a wonderful combination of high power and compact size, but their 2.5mm exit pupil will be a serious hindrance in low light.

The same binoculars, showing relative size. These are all roof-prism instruments—note the oculars in line with the objectives.

The same binoculars, showing relative size. These are all roof-prism instruments—note the oculars in line with the objectives.

Now let’s look at the next most important feature of binocular construction: the prisms.

All modern binoculars except a few toys and cheap opera glasses employ prisms as part of their optical system. There are two reasons for this. The first is to correct the image orientation, which as it comes through the objective lens is turned upside down and reversed. The second is to allow the binocular to be shorter than it otherwise would be to gain sufficient magnification.

You can make a simple telescope—as Galileo did—with nothing but a convex objective lens and a concave eyepiece that can be moved back and forth to focus. The image will be erect and the right way round with this simple arrangement, and those toy binoculars and opera glasses are made this way. But the Galilean telescope and binoculars are extremely limited in magnification, and the image blurs quickly toward the edges.

Screen Shot 2021-03-21 at 5.11.46 PM.png

The Keplerian telescope (for Johannes Kepler) was an improvement in that it used two convex lenses, allowing longer focal lengths and much higher magnification. However, the image in the eyepiece or ocular was reversed and upside down—not an issue for astronomy, but definitely so for terrestrial viewing. Adding an additional convex lens rights the image, and the classic collapsible “spyglass” of pirate movies and highland stag hunts is made this way. They are, however, necessarily long for their magnification. A binocular made this way would be unwieldy to say the least—thus the prism.

Screen Shot 2021-03-21 at 5.13.25 PM.png

Prisms can be used to do different things. We’ve all seen dispersive prisms—the triangular versions that break up white light into its lovely constituent colors. Binoculars employ reflective prisms, which at their most basic work on the principle of internal reflection—light entering perpendicular to one surface is reflected and redirected off the angled surface behind it. As long as the light hits the back surface at what’s called a critical angle, no mirrored surface is needed; perfect reflection is achieved at the glass/air interface. You can see this effect by looking up at the surface of an aquarium at an angle that turns it into a mirror.

Prisms.001.jpeg

The first prisms used in binoculars (by a smidgen) were porro prisms, named after their inventor, Ignazio Porro; they’re still employed today. In binoculars, two porro units are cemented together at right angles to each other in each optical tube, which gives binoculars in which they are used the classic offset configuration, where the objective lenses are set outboard of the oculars (or, in some compact binoculars, inboard). The advantage to porro prisms is that they obtain perfect internal reflection using nothing but glass—no mirrored surfaces are needed. This gives them intrinsically better light transmission and clarity than Schmidt-Pechan roof prisms (see below). Additionally, porro-prism binoculars with objective lenses set outboard of the oculars can render a slightly better three-dimensional view. Disadvantages include poor close focusing ability ( also an artifact of the wide-set objectives) and more difficult weather sealing, along with greater bulk and, frequently, weight.

A porro prism unit as used in a bincocular

A porro prism unit as used in a bincocular

Roof prisms overcome those bulk and weight issues. The most commonly used roof prism configuration in binoculars, the Schmidt-Pechan, comprises two prisms separated by a minuscule air gap. In part because incoming light rays are “bounced” more times in a tighter space than in a porro-prism instrument, roof-prism binoculars are more compact. Note in the diagram how the incoming and outgoing rays are in line; thus roof-prism binoculars can be configured as straight tubes, saving the weight as well as the bulk of the offset tubes. 

But there are downsides. Collimation—that is, the internal alignment—of roof prisms is critical and expensive to replicate consistently and durably. Also, every time light is reflected it loses a tiny bit of brightness, and one of the prism surfaces in the Schmidt-Pechan design reflects at less than the critical angle, so it must have a reflective coating applied. Finally, the internal reflections of the Schmidt-Pecan design first separate the light beams, then recombine them, which causes slight polarization of the beams, reducing contrast. Manufacturers counter these issues with phase-correction coatings, which porro prisms do not need, and by using either a silver or, much better, dielectric coating on the reflective surface. Schmidt-Pechan prisms employing phase-correction coatings and a dielectric reflective surface come very close to the performance of a porro prism. Nevertheless, making a high-quality roof-prism binocular is more complicated and more expensive than making a high-quality porro-prism equivalent.

Abbe-Koenig vs Schmidt-Pechan.jpeg

Another type of roof prism, the Abbe-Koenig, does boast perfect internal reflection and has no need for reflective coatings (although it still requires phase correction). However, as you can see in the diagram here, Abbe-Koenig prisms are significantly longer than Schmidt-Pecan prisms, and are rarely used except on large binoculars such as an 8x56, where light weight and compact size are less important than ultimate light-gathering power.

The two binoculars on the left employ Schmidt-Pechan roof prisms; the two on the right, Abbe-Koenig roof prisms.

The two binoculars on the left employ Schmidt-Pechan roof prisms; the two on the right, Abbe-Koenig roof prisms.

So far this sounds like an open-and-shut case for porro-prism binoculars. However, if you’ve ever carried full-size binoculars around your neck for an hour or two, or looked through them for more than a few second at a time, you’ll be well aware of how much difference a few ounces can make in preventing fatigue and image shake. A roof-prism binocular of the same objective and magnification can weigh several ounces less than an equivalent porro-prism instrument, in addition to its reduced bulk. Roof-prism binoculars are generally easy to use one-handed when necessary—often impossible with porro-prism instruments. For this reason (in addition to their easier weather-sealing and close-focus capabilities), virtually all ultra high-end field binoculars are roof-prism models. And manufacturers have developed roof prism technology to the point that the differences between high-quality examples of each type would be difficult, if not impossible, for a casual viewer to detect. In fact, given the relative lack of development in porro-prism technology in the last couple of decades, I’d wager that the best current roof-prism binoculars are equal or superior in terms of light transmission and clarity to the best available porro-prism binoculars.

With that said, do keep in mind that manufacturing a bright and durable pair of roof-prism binoculars is significantly more difficult than doing so with porro prisms. If you are on an extremely limited budget, you might find you can get noticeably better quality out of the latter than the former, for the same price.

Not all prism glass is equal. The very best we have today is called BaK4, for BaritleichKron or Barium Crown, a glass made by the German company Schott AG. It has a very high refractive index (1.569 if you want to know, which is, like, really high, to be technical). Many cheap binoculars claim to be made from this glass when in fact they are not; there is essentially zero enforcement of such marketing lies. The manufacturer’s reputation—and price—is nearly the only way to be sure you’re getting Schott BaK4. And even given that, manufacturing tolerances, coatings, and a dozen other parameters will make or fail to make a high-performing prism.

The next critical aspect of binocular design is the lens coatings. Look at the objective lenses of your binoculars and you’ll notice a definite tint—purplish, greenish, reddish, more or less of each depending on the brand. Why is this?

Lens coatings.jpg

All glass reflects some light—look at a piece of window glass and you’ll see this. Furthermore there is a reflection both when the light enters the sheet of glass—or a lens—and when it exits the back of it. This reflection can reduce the amount of light making it all the way through a lens by ten percent or more. Multiply that by the several lenses in a binocular and the light fall-off is severe. In 1886 the 3rd Baron Rayleigh, John William Strut (who would win the Nobel prize in physics in 1904), found to his surprise that old, slightly tarnished glass he tested transmitted more light than new, clear glass. This led to the development of specialized anti-reflection coatings, introduced by the Carl Zeiss company just prior to WWII. In one leap of technology, the total light transmission through a typical 8x30 binocular increased from 50-60 percent to 70-80 percent. Today’s high-end binoculars are fully multi-coated—that is, every glass surface has an anti-reflection coating comprising up to seven layers—and total light transmission is well over 90 percent. However, like BaK4 prisms, “fully multi-coated” can mean a lot or not very much at all. Simply put, a $150 Chinese binocular with “fully multi-coated optics and BaK4 prisms” will not have the same stuff inside as a $2,000 binocular with “fully multi-coated optics and BaK4 prisms.”

Next in line is the clarity and contrast of the image controlled by the objective lens or lenses, the focusing lens behind it, any field-flattening lenses behind the prisms, and the lenses comprising the ocular. Careful grinding/polishing of high-quality glass will ensure a crisp image, but color rendition raises its own issues.

Remember the dispersive prism and its colorful rainbow of colors? To some extent this happens with light passing through any lens. The different colors of the spectrum bend at slightly different angles, and if they are not brought together somehow by the time they reach the eyepiece, the image will display a fringe of spurious color around it—almost invariably blue, because blue light is more sharply diffracted then yellow or red.

Chromatic aberration, as this is known, can be reduced using an achromatic objective lens, comprising two layers of different types of glass that together reduce diffraction, and/or with aspheric lenses, which accomplish the same thing by altering the shape of the lens, and/or with extra-low-dispersion (ED) glass, which doesn’t diffract as much to begin with. As with everything we’ve discussed, this adds to the cost of the binocular as well as the quality of the image.

ED glass.001.jpeg

The best binoculars in the world can be ruined if any moisture is allowed inside. Fogging obscures the image and damages coatings, and fungus or mold will completely destroy the instrument, necessitating a complete disassembly and restoration at best. For this reason good binoculars are fitted with O-rings to seal out moisture, and then purged of air with pure nitrogen (sometimes argon) at slightly higher than atmospheric pressure. These gasses are dry, cannot fog, and do not support mold or fungus. Better binoculars incorporate better seals yet retain ease of focusing (the focusing mechanism is one of the most vulnerable entry points for moisture).

Weather sealing.001.jpeg

Many high-end binoculars now incorporate a field-flattening lens behind the prism, designed to increase edge-to-edge sharpness. This is especially useful for those who use binoculars on a tripod for long periods, scanning the entire field of view rather than moving the binocular around.

Is there anything else? Oh yeah, a lot of it. Proper internal baffling to prevent flare; shielding and blackening of the sides of the prisms to prevent spurious light entering them; reinforced housing of the prisms to prevent de-collimation; proper size of the prisms to capture all available light; grooving the hypotenuse face of the prism to control abaxial rays. Construction of the housings—aluminum, or lighter and more expensive magnesium? Hydrophobic objective-lens coating? You get the picture, and perhaps begin to see why the price of two binoculars that are to outward appearances identical might have price tags that differ by an order of magnitude.

Construction.001.jpeg

The best binoculars available today offer brilliant, sharp, true-color views comfortable for hours of viewing without eye strain; complete weather sealing; shock-proof construction; light weight, and a lifetime guarantee—often transferable. A premium binocular represents a considerable investment that will repay itself every time you use it, and continue to do so for decades.

Next up: Choosing the best for your needs.

Companion workshop: View our Field Arts workshop on optics, with Swarovski’s Ben Lizdas joining us for a Q&A, here or view below.

Leicas and Swarovski scope.jpg

Mountains and Mesas Overland Trip

P1010170-1920px.jpg

Jonathan and Roseann will be joining the team at 7P Overland to help lead their Mountains and Mesas overland trip this September 20 – 26.

This self-drive, self-catered adventure is a great opportunity to experience the desert and the mountains in a single trip – not to mention that “Colorful Colorado” really lives up to it’s reputation in late September when the Aspen burst into their golden autumn hues. A true overland adventure not too far from home, amongst some of the most spectacular scenery in the world.

This overland trip starts at a basecamp near Moab and ends in Aspen, CO. We’ll comply with safety guidelines for COVID by wearing face masks and enjoying socially distanced campfires. This trip includes a mix of camping, with a hotel finish.

Throughout the trip the team will host overland skills mini-workshops, and we’ll bring a range of Swarovski optics for wildlife spotting and star-gazing.

Swarovskis 4.jpg

Roseann will be field-sketching throughout the journey and will work with anyone who is interested in keeping a field notebook or nature journal.

P1010776.jpeg

For fee information and to sign up, contact 7P Overland.

World's most exclusive used overlanding vehicle?

1952-Chevrolet-Pickup-3800-1493-12.jpg

Of course one could make an argument for John Steinbeck’s Rocinante—but that’s in a museum. You can actually buy Steve McQueen’s 1952 Chevrolet 3800 and camper from the Legendary Motorcar Company. Note that “can” is highly subject to your financial status. The company doesn’t list the price; you have to “enquire.” From their description—which I’ve edited for grammar, ahem:

This special 1952 Chevrolet 3800 Pickup with custom camper was purchased by the legendary Hollywood actor Steve McQueen from a migrant farmer he passed on the side of the road in the late ‘70s when he resided in Trancas Beach, north of Malibu, California. An avid collector of vintage cars, trucks and motorcycles throughout his lifetime he owned more than 60 rare vehicles including a 1951 Hudson Hornet, a 1956 GMC Suburban, a 1931 Lincoln Club Sedan, a 1946 Willys Jeep, and a 1935 Chrysler Airflow Imperial Sedan. This 1952 Forest Green Chevrolet 3800 series is a one-ton step-side long-bed. Powered by the original 235 cu in Loadmaster 6-cylinder engine with a 4-Speed manual transmission.

Screen Shot 2020-05-06 at 3.54.58 PM.png

McQueen understandably used the truck for cross-country camping trips as this Chevrolet pickup truck features a custom camper known as "Dust Tite.” The custom camper was built by Harold Van Hoosen, a sheet metal fabricator from Yreka, California, in October 1952.

Screen Shot 2020-05-06 at 3.53.55 PM.png

Made of galvanized metal and aluminum, the camper includes a double-size bed, storage cabinets, drawers, shelves, and a heavy-duty diamond-plated rear bumper. Inside the famous Chevy 5-Window cab design, complete with sun-visor, the two-tone green bench seat is in wonderful condition. The interior has a pretty high trim level for a truck of this era and has an AM radio and Chevy heater. It also has a platform on top, making it a prime viewing location for auto and motorcycle racing events. Other features of this wonderful truck include five-gallon gas tanks on the running boards, driver's side spotlight and two toolboxes.

Screen Shot 2020-05-06 at 3.54.28 PM.png

In case you’re in the market, LMC is here.

The big question: roof tent or ground tent?

The sleek but expensive Autohome Columbus in carbon fiber

The sleek but expensive Autohome Columbus in carbon fiber

Of all the requests for advice I receive, only choosing a vehicle seems to create more angst than the question of whether to buy a roof tent or a ground tent.

In simple economic terms this makes sense, since—especially if you decide on a roof tent—the outlay will likely be second only to the vehicle in terms of the hit on your overlanding budget. In fact I know people who have accomplished major journeys in vehicles that cost less than several roof tent models I can name.

But it’s also an important “lifestyle” choice, if you will, since carrying, deploying, and living with and in a ground tent is an entirely different proposition than doing so with a roof tent—even a roof tent with an add-on ground-floor room (or “mullet,” as a friend nicknamed the dangling appendage). So let’s look at the pros and cons of each.

Cost. Easy win for the ground tent here. The least expensive, made-in-China, soft-shell roof tents nudge $1,000. Premier products from Eezi-Awn, Tepui, iKamper, and others frequently top $3,000. And the size medium carbon-fiber hard-shell Columbus from Autohome will set you back a palpitation-inducing $5,600. By contrast, a 10’x10’, made-in-the-U.S. Springbar Traveler ground tent, one of the finest portable cabins on earth, costs $950. The 8’x8’ Turbo Tent Pine Deluxe 4 (from China), one of my favorite standing-headroom ground tents, is $495. And if you’re on a budget and don’t need standing headroom, there are dozens of options starting at under $200 from companies such as Slumberjack and Sierra Designs.

Classic, comfortable, and durable: the Springbar

Classic, comfortable, and durable: the Springbar

Weight. Another win for the ground tent—with a couple of footnotes. That $5,600 carbon-fiber Autohome Columbus still weighs 92 pounds—and you’ll need a roof rack sturdy enough to support that weight while in motion and another 250-300 pounds when occupied. The soft-shell Front Runner “Featherlight” weighs 88 pounds. Larger and more feature-laden soft- and hard-shell roof tents typically weigh between 150 and 200 pounds. On the other hand, the 10’x10’ Springbar ground tent, made from substantial canvas and supported by substantial poles, weighs 62 pounds including poles and stakes. The 8’x8’ Pine Deluxe Turbo Tent weighs 42 pounds. Many other ground tents with as much interior volume as a large roof tent weigh less than 15 pounds. It’s true that roof tent weight includes a mattress, but that’s a matter of, at most, ten pounds.

The footnotes? Obviously the 62 pounds of the Springbar, or even the 42 pounds of the Pine Deluxe 4, is weight you’ll have to wrestle every time you pitch it—not so with a tent attached to the roof. Mount it once and forget it (unless you need to remove it between trips, either for handling and fuel economy or to avoid looking like an OVERLANDER every time you go grocery shopping). Importantly, the added weight of the roof tent is positioned in the worst possible place to add weight. Trust me that a 150-pound roof tent on an 80-pound roof rack will result in a noticeable difference in the on-road handling of even a substantial vehicle, and will make side slopes on trails more interesting.

Room. A runaway win for the ground tent. Even the most humongous roof tent is no larger than a good-sized backpacking tent. There are no roof tents with standing headroom for anyone taller than a four-year-old. Even a “mullet” only adds what is essentially a changing room. By contrast that Springbar Traveler will accommodate two full-size cots, plus a table and chairs or two smaller kid’s beds. You say you’re six foot five? You’ll still be able to stand up inside. The Pine Deluxe 4 is actually even taller at the peak.

In inclement weather, when you might be stuck inside during daylight hours, the contrast is even sharper (unless you’ve masochistically confined your ground tent to a backpacking model). Inside the 100 square feet of the Springbar you can walk around, sit across from your tentmate at a table to play cards or work, or catnap. Your luggage is out of the way under your cot. Cooking inside is easy. You can warm the space with a portable propane heater.

A Pine Deluxe 6 Turbo Tent, 10 feet square

A Pine Deluxe 6 Turbo Tent, 10 feet square

Pitching. This is not as simple a question as it seems. Ground tents are intrinsically more involved to pitch, given unpacking and unfolding them, staking, running guylines, installing a fly, assembling cots or inflating mattresses, etc. Some are faster than others—the canopy of the Turbo Tent, for example, with its integral frame structure and spring-loaded joints, goes up in a flat minute. But you still need to add the fly and stakes. The Oz Tent is hyped for its rapid pitch, but it still requires stakes and guylines too. I got the pitching time for a Springbar down to a leisurely 15 minutes solo, or 10 with help.

Roof tents are universally marketed for their simple and rapid pitch, and for some models this is so. Hard-shell clam-shell models (hinged at the front), for example, are absurdly easy to deploy: You simply undo the latch(es) and hydraulic struts raise the roof. Done in five seconds. Some hard-shell box-style tents have the same system. Closing is just as simple and quick.

Soft-shell roof tents, however, vary widely in ease of deploying and, especially, stowing. The transit cover can be easy or difficult to remove before deploying the hinged floor and watching the canopy bloom. Window awnings need spring struts installed from inside, and if you’ve added a changing room you essentially have a ground tent to deal with as well, which must be attached to the frame of the tent at the top and staked out at the bottom. But it’s the process of stowing a soft-shell tent—and especially re-installing the transit cover—that can be the most time-consuming. I’ve done a lot of cursing while trying the stretch Velcroed covers back over several models I’ve reviewed. Nevertheless, on balance a ground tent will most likely take more time to pitch and stow than a roof tent.

A Technitop soft-shell roof tent with annex (or “mullet”)

A Technitop soft-shell roof tent with annex (or “mullet”)

Wind and precipitation resistance. This is more a function of the individual model rather than the type. A roof tent, of course, has the advantage of being bolted to a two or three-ton ground anchor, so there’s scant chance of it blowing away. And hard-shell roof tents, both the clam-shell and box style, tend to be superbly wind resistant. Soft-shell roof tents, on the other hand, can be okay or really bad. I’ve seen few that have adequately strong supports for the window and door awnings, and in general rain flies tend to be very poorly secured and prone to maddening flapping. Whether or not the tent itself is wind-resistant, it’s perched atop a vehicle with suspension and acts as an effective sail, so boat-like rocking can be a factor in getting a peaceful night’s sleep.

Any ground tent must be staked to be secure, and if possible I stake out guylines as well—I’ve never experienced a tent that was too wind-resistant. Staking can be problematic if not virtually impossible in several substrates: sand, mud, or slickrock, for example. The Springbar is the only big ground tent I’ve ever tried that comes with adequate stakes. Buy big ones; you won’t be sorry.

I’ve slept in roof tents that leaked and in ground tents that leaked, so again this is more a function of quality control than one style or the other.

You can’t beat the space in a ground tent

You can’t beat the space in a ground tent

Sleeping comfort and bedding storage. Unless you suffer from claustrophobia, as my wife does (she once nearly knifed her way out of a smallish clam-shell tent after a midnight attack), actual comfort could be considered a tossup. Most roof tents come with thick, comfortable mattresses, on which you can use sleeping bags or standard bedding and pillows—which in many models can also be stored inside. Ventilation is generally excellent, and you’re up where breezes are unhindered and more free from dust than at ground level. 

For any ground tent you must separately arrange (and store) cots or mattresses plus sleeping bags. With that said, a good cot topped with a thick Thermarest and a flannel-lined sleeping bag provides one of the most transcendent sleeps on the planet—right up there with being partway to the sky in a roof tent, like a kid in a tree fort. Take your pick. (One P.S.: With cots as your beds, it’s much easier to sleep outside on clear nights than it is to extract the mattress from a roof tent.)

Fuel economy/cargo space. Even the sleekest hard-shell roof tent will add significant aerodynamic drag, and with one of the big soft-shell designs on your rack you might as well be towing a drogue parachute. Clearly a ground tent stored inside the vehicle presents no such issues—but then a big ground tent might take up so much space you’ll be tempted to strap other gear to a roof rack. Win to the ground tent as long as you can avoid a roof load.

Roof tent on Defender.jpg

Other trade-offs. A roof tent is nice if the substrate is muddy, when a ground tent would wind up slimy outside and possibly in. Climb the ladder to the roof tent, remove your muddy shoes and store them in the pocket provided for just that purpose on many models, and your little home stays spic and span. On the other hand (you knew there’d be one), if the ground is muddy it means it’s been raining and is likely to rain more, and we’ve already discussed how much nicer it is to be holed up in a spacious ground tent. Take your pick.

In some situations, a ground tent can be left in place to reserve your campsite while you go exploring in the vehicle. A roof tent obviously needs to be put away completely to do so.

Rather counterintuitively, leveling the tent is easier when it’s attached to the vehicle, as you can use blocks or even rocks under the tires. A ground tent needs actual level ground. Also it’s usually easier to reorient a vehicle and roof tent than it is a staked and guyed ground tent, to account for shifting breezes.

A ground tent is way easier to move between vehicles, or to loan out to a friend.

Much has been made of the safety factor of a roof tent in regions with large mammalian predators, especially Africa. Honestly, after quite a few nights spent in both roof and ground tents on the continent, I find this a weak argument. Predators very, very rarely mess with tents, much less try to gain entrance. Yes, I’ve seen the YouTube video of the lions pawing at the ground tent, but I’ve also seen the one of the elephant disassembling the roof tent. Either is an extremely unlikely situation. And if you’re worried about creepy crawly things like snakes sliding into your ground tent and cozying up to you in the middle of the night, keep the door zipped shut.  

So there you have it, and I’m sure there are other arguments for each. If you’re already a fan of one or the other you’ll find it easy to count up enough arguments in your favor. Otherwise, perhaps this list will help tip you one way or the other, depending on your own priorities.

Turbo Tent at Ravenrock copy.jpg