Bush Skills

Why you need the new edition of Tom Sheppard's Four-by-four Driving

4x4.Edn.6.Frt.jkt.1.jpg

If you want to be a better driver— and who doesn’t no matter what level we might consider ourselves to be at the moment?—and you don’t have this book, you need it. Trust me on this.

Full disclosure: I receive a bit of commission on every copy sold in the U.S., and I contributed the sections on winching and Hi-Lift/ARB jacks. But that’s not why I want you to buy it.

The reason you need it is because there is no other instructional book on four-wheel-drive technique that does what Tom Sheppard does in this one.

Four-by-four Driving doesn’t simply tell you how to drive in different situations. As the blurb on the back cover states, “I.T.D.S.—It’s the Driveline, Stupid.”

Knowing how to drive is great. Knowing why the vehicle does what it does, knowing how different drivetrains operate and how each reacts to differing terrain, knowing the strengths and weaknesses of each type of four-wheel-drive system, and learning how to exploit those strengths and accommodate those weaknesses, will turn you from a competent driver into a master of the machine and the terrain. I still learn or am reminded of those lessons every time I open my copy.

You can, if you like, just read the section in Four-by-four Driving that covers your own vehicle, but you’ll gain much more if you read through the descriptions of drivetrains and operating systems of vehicles around the world. Not only can you master your Tacoma, you’ll be able to hop in a friend’s Discovery or Wrangler or G-Wagen and master it too. In fact if you dedicate yourself to the first part of this book you could probably be air-dropped anywhere on the planet and stand a good chance of knowing how the dominant local transport works. Suzuki Jimny? Sure. Skoda Karoq Scout? Yep. On the off chance you find yourself in a Rolls Royce Cullinan, you’ll be right at home. And this edition includes, among other updates, full technical details of the new Land Rover Defender. (If you already own the fifth edition, note that the Defender coverage comprises the majority of changes to the sixth.)

4x4.edn.6.Sec.2.FWD.systems..jpg

Only after explaining drivetrains, traction-control systems, suspensions, and operating systems does the book start in on driving techniques, beginning with what I consider to be the basic skill that must underpin all others: mechanical sympathy.

Then, yes: You’ll learn how to drive on sand, mud, ice, and rocks. You’ll learn how to handle ruts, side slopes, water crossings, hill ascents and descents. Following this comes a chapter on recovery, both solo and assisted (and that brilliant section on winching . . . ).

Finished? Not even close. Now comes a section on advanced driving. If you ever find yourself plopped in the driver’s seat of a 60-year-old Bedford truck with a non-synchro gearbox, you’ll learn how to handle it. Or, want to show off by shifting the transfer case in an FJ40 or Series Land Rover from low to high range, while moving? That’s in there too.

Following all this are sections on expedition basics, tires and tire pressures, loading and lashing, oil types and grades, fuel, water . . .

But it’s in Four-by-four Driving’s former-RAF-test-pilot level of detail explaining how four-wheel-drive vehicles do what they do that the real gold of the book lies. Which explains why, unlike those 30 different watches you can buy that all claim to be “Used by Special Forces,” Four-by-four Driving actually is used as a training manual by special forces in both the U.K. and the U.S. It’s worth every penny.

4x4.Edn.6.whole.jkt.Jan.2020..jpg

Available right here.

Not so simple: The simple redirected winch pull

Take any reasonably comprehensive winching course and, once you’ve covered the basic single-line pull, you’ll be introduced to the snatch block—or, more recently, its elegant one-piece alternative, the billet-aluminum recovery ring.

A pulley—which is what both devices are—serves a couple of purposes in a winch system. Most impressively, when a winch line from a vehicle is led through a pulley attached to an anchor and then back to a recovery point on the vehicle, the power of the winch is essentially doubled (minus minor frictional losses) while line speed is halved. (A corollary to this is that by pulling more line off the winch to rig a double-line pull, you are further increasing the power of the winch by reducing the layers of line on the drum. Thus you receive a double benefit during a difficult recovery.)

The other valuable use of a pulley is to redirect a pull—around a corner as it were—when a straight one is either awkward, dangerous, or impossible. It’s frequently used to recover a bogged vehicle when a recovery vehicle equipped with a winch cannot be positioned directly in front of it. A suitable anchor such as a tree is employed as a redirect point, using a tree strap and a pulley.

Winching Angles Diagram - Redirected Pull.jpg

When you learn how to rig a redirected pull you’ll also learn that this use of a pulley does not multiply the power of the winch, nor does it halve the line speed. The easiest way to figure out whether or not you are multiplying winch power in any situation is to count how many lines are shortening when you engage the winch. For example, in the illustration below labelled Double-line Pull, both the line from the winch to the pulley and the line from the pulley back to the vehicle will shorten as the winch pulls, thus the power is multiplied by two.

On the other hand, in our simple redirected-pull scenario above, only the line running from the pulley to the bogged vehicle will shorten—the distance between the pulley and the winching vehicle will not change. Therefore the winch is operating at its rated power.

But now comes the not-so-simple  part. What about the load on the anchor?

Let’s assume that in all our scenarios, the bogged vehicle needs 4,000 pounds of pull to retrieve it. If the operator rigs a single line pull to the tree anchor directly in front of the vehicle and engages the winch, the load on both the winch and the tree is 4,000 pounds.

Winching Angles Diagram - Single Line Pull.jpg

If the operator rigs a double-line pull, the vehicle still needs only 4,000 pounds of pull to move. Due to the effects of the pulley the load on each line is halved, to 2,000 pounds; thus the winch is  only exerting 2,000 pounds (and only drawing the amperage necessary for that), and the recovery point on the vehicle is also experiencing 2,000 pounds of force. The load on the anchor remains 4,000 pounds.

Winching Angles Diagram - Double Line Pull.jpg

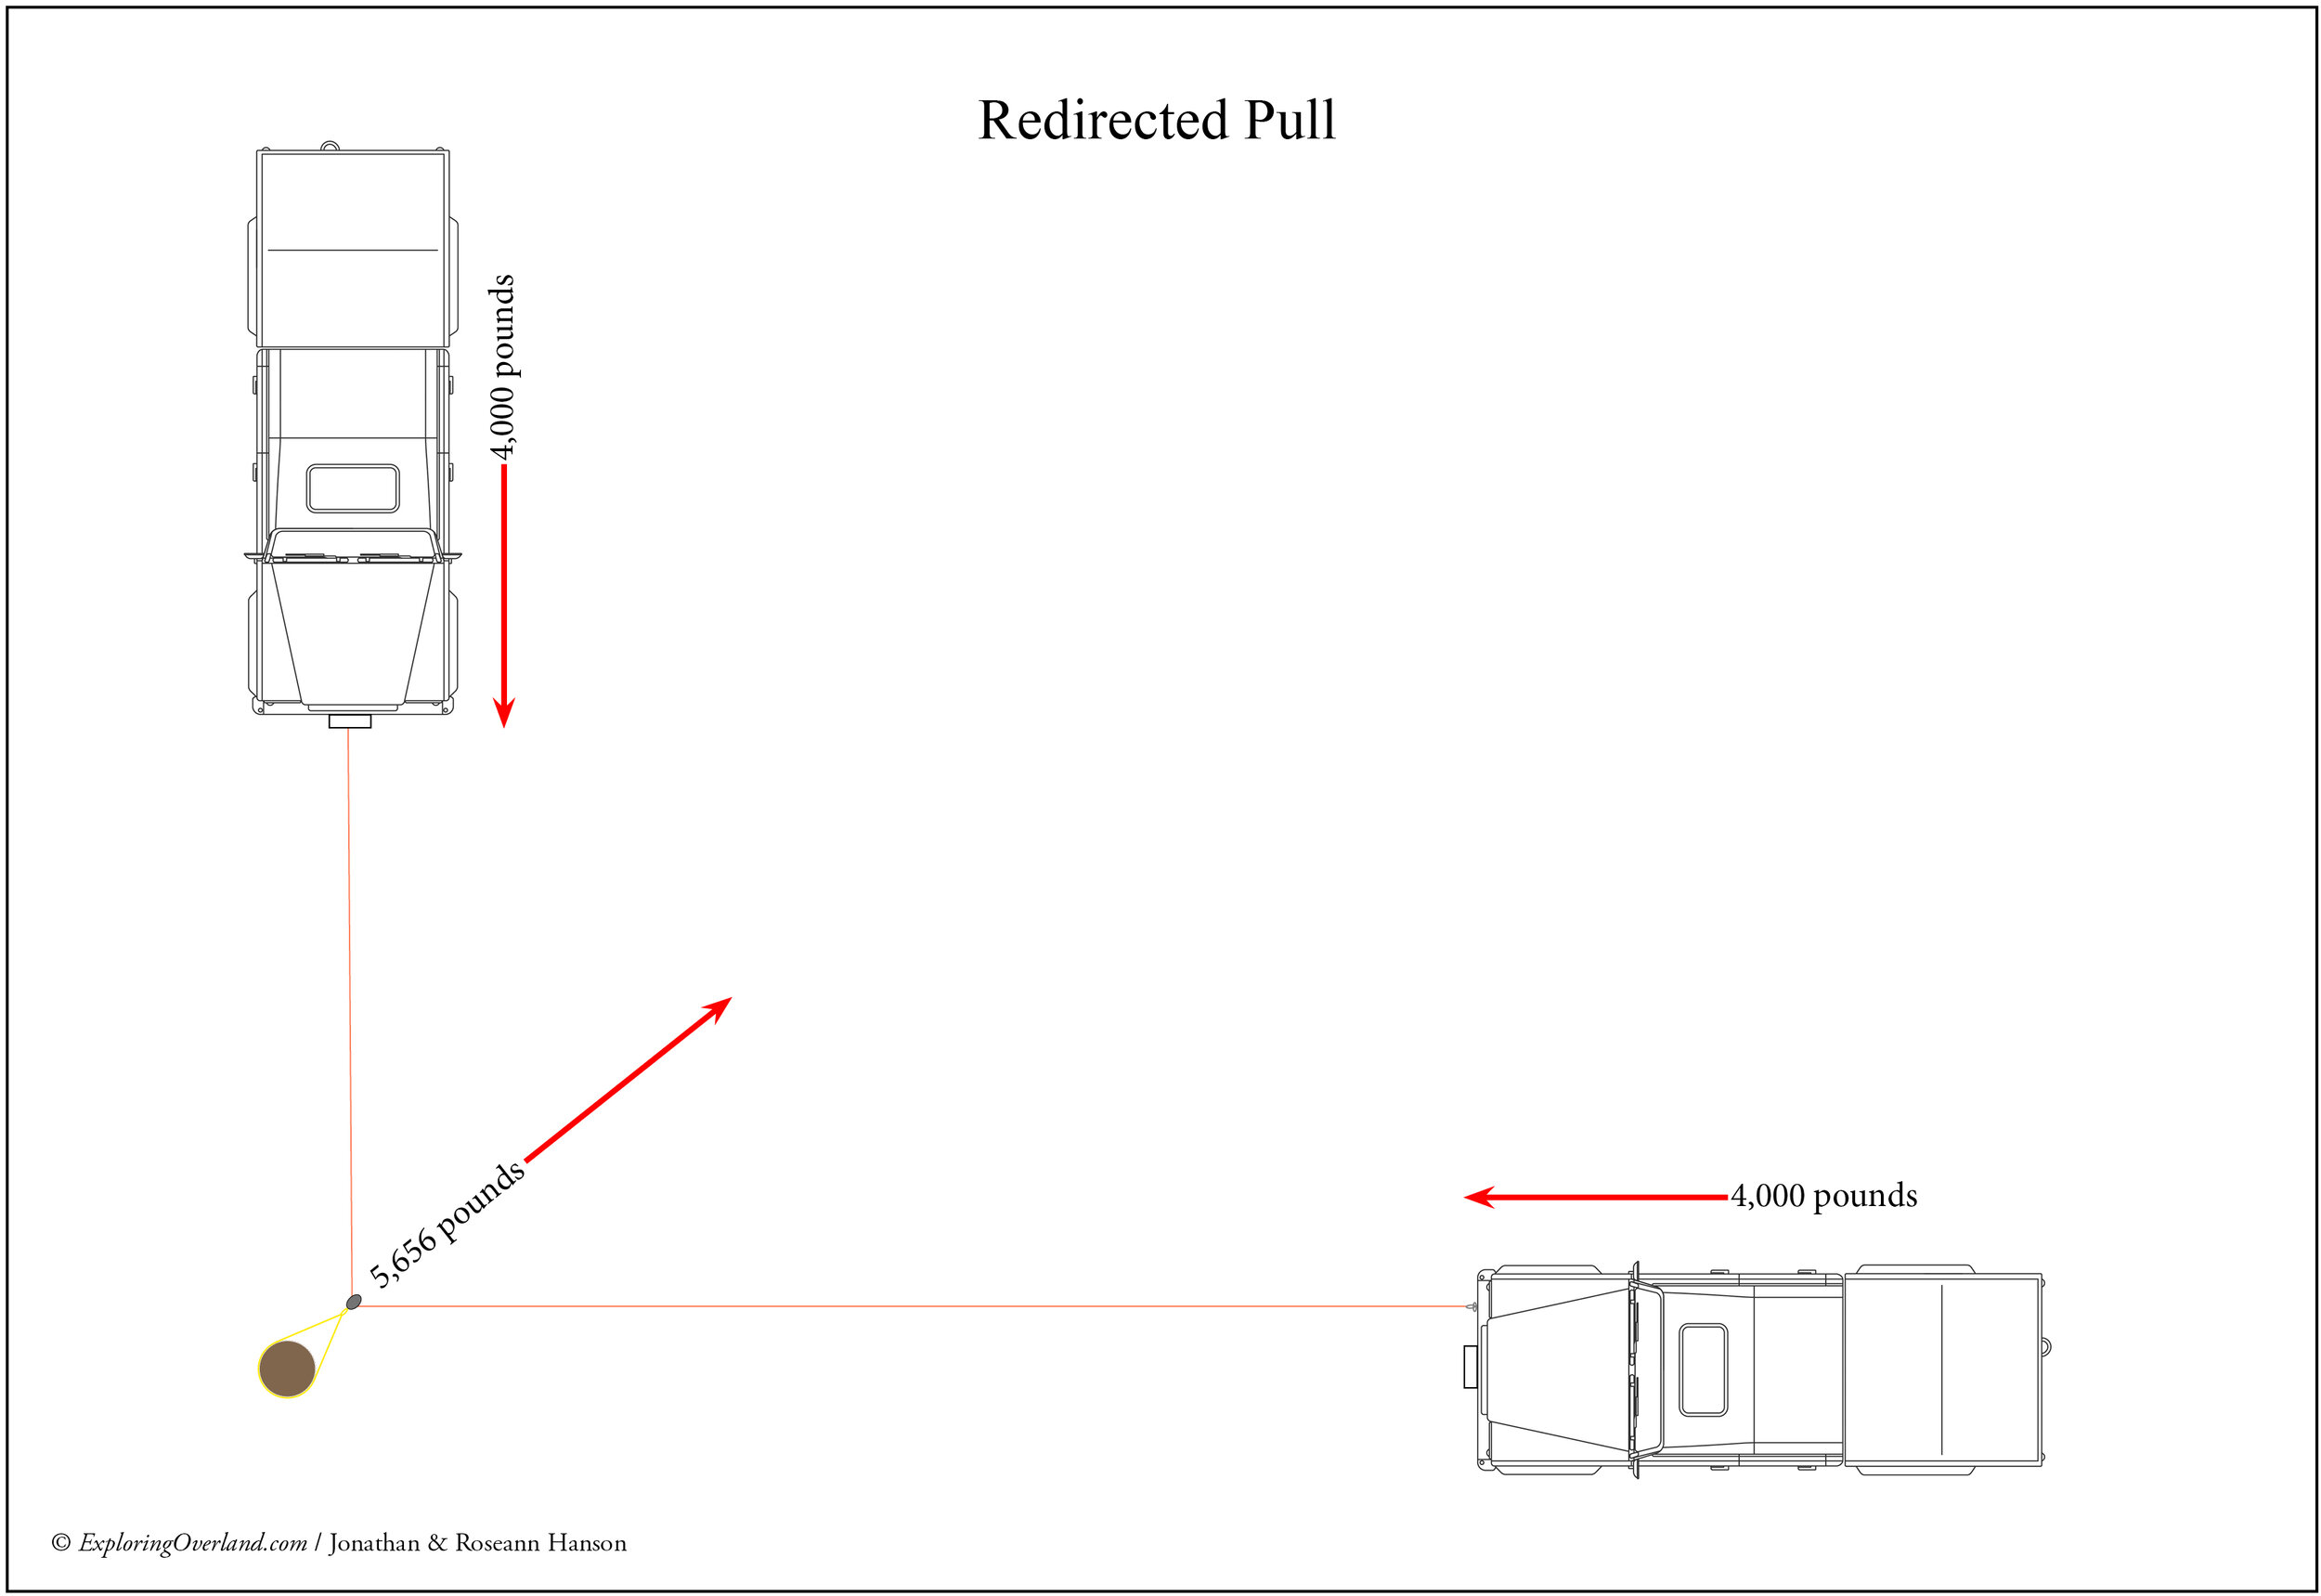
So far so good. Now let’s take another look at our redirected pull, where one vehicle is at 90 degrees to the other. In this scenario, the bogged vehicle still needs 4,000 pounds of force to move. The winch on the recovery vehicle is also subjected to 4,000 pounds—again taking into account slight frictional losses. So the force on the anchor must also be 4,000 pounds, right?

Actually . . . no.

In this case—a 90-degree redirected pull—the force on the anchor will actually be 5,656 pounds, almost 50 percent higher. The force is calculated using the formula:

pull = 2t(cosine x)

 . . . where pull is the force on the anchor, t is the force exerted by the winch, and x is one half the angle at which the winch line passes through the pulley (in other words, the direction in which the anchor would move if it failed; in a 90-degree redirect it would be 45 degrees).

So, in our case, 2 x 4,000 pounds is 8,000, multiplied by the cosine of 45º which is .707, equals 5,656 pounds. 

Winching Angles Diagram - Redirected Pull w figures.jpg

There’s more. As the angle between the bogged vehicle and the recovery vehicle narrows, the force on the anchor continues to increase. Imagine the scenario below, in which the recovery vehicle has to be situated directly alongside the bogged one—I’ve been in this situation. In this case, with the angle between the winch lines near zero, the force on the anchor would be (very nearly) doubled, to 8,000 pounds—even though the bogged vehicle is still only subject to 4,000 pounds of pull to free it. Imagine a tougher scenario in which the recovered vehicle took the full might of, say, a 10,000-pound winch to free it. In such a case that pine tree you wrapped your strap around is going to have about 20,000 pounds of force trying to pull it over—and all the hardware attached to it will be subject to the same stress.

Winching Angles Diagram - Redirected Pull 2.jpg

You don’t actually have to have a calculator with a cosine function to figure the increase in force if you use a chart such as this, where “factor” equals how much the force on an anchor is multiplied by different angles of redirected pull :

Screen Shot 2020-04-19 at 2.41.47 PM.png

And, in reality, you don’t need to do any figuring or checking at all. All you need to remember is that in any redirected pull, the force on the anchor can be up to twice what the rest of the system is subjected to. And the anchor includes the tree or chocked vehicle or whatever you are rigging to, as well as the tree strap, shackle, and pulley in the anchor assembly.

Non-instinctive effects of physics such as this reinforce the axiom always to use recovery equipment rated for the vehicle and winch, with working load limits (WLL) clearly marked, and adequate safety factors. 

Learn how to winch online! Or not.

Screen Shot 2020-04-26 at 7.05.11 AM.png

The greatest thing about the Worldwide Web is the vast amount of information accessible with a few clicks of a computer mouse.

The worst thing about the Worldwide Web is the vast amount of mis-information accessible with a few clicks of a computer mouse.

As part of my explorations of the online overlanding world, I occasionally browse through instructional YouTube videos, and I am frequently reminded how many of them should be called “instructional” videos. Sometimes the information in the latter type is harmless. Other times it is decidedly not harmless. That especially applies when the “instruction” is about winching.

Consider the video I have bookmarked in which the host attempts to demonstrate the party trick of moving a vehicle backward with a front-mounted winch. In essence this is a simple and virtually worthless procedure that involves running the line from the winch through a snatch block anchored to a tree in front of the vehicle, then to another attached to a tree behind the vehicle, then back through a third snatch block mounted on the vehicle’s rear recovery point, and finally to an anchor. When the winch is engaged the mathematics of the line being pulled results in the vehicle moving slowly backward. Aside from the fact that very few of us carry three snatch blocks, the odds of anchors being in exactly the right spot to rig this system where you might get bogged are scant. Our host got around the problem of multiple snatch blocks by simply using shackles instead—with steel winch cable. Ouch. He also utilized a child’s car seat as a winch line damper. Needless to say his attempt failed. However, the furthest anyone really needed to go with this “instructional” video was a glance at the fellow’s “spooled” winch cable.

A rat’s nest just begging for a snarl or jam.

A rat’s nest just begging for a snarl or jam.

In another demonstration of reverse winching, a cheerful Aussie bloke uses a kinetic strap as a tree saver—pretty much the most egregious never-do-this move you can make when rigging a winch recovery.

However, a recent video I watched, from Bold Canyon Outdoors, was in a way even more confusing, as it boasted decent production values, a well-spoken host, and significantly better equipment. The video offered a basic guide to winching, including a single, double, and triple-line pull.

It started out with a bit of humor, which was fun. But after the host brought out the winch kit he was using—and heavily promoting—from a company called Gear America, and began discussing the procedure, things began to go south. If I went through the video again I could probably pick out more goofs, but what I noticed immediately included the following.

First, he simply introduced a Jeep Wrangler with a winch. He said nothing about winch selection, sizing, mounting—the winch was simply there, taken for granted.

Then, when he introduced the “Gear America Ultimate Winching and Rigging Off Road Recovery Kit” (yes, really), he made no mention of matching the kit to the winch, no mention of working load limits (WLL) or minimum breaking strength (MBS) of the shackles or snatch block. He pulled out a “tow strap” included in the kit. Was it truly a tow strap, or a kinetic-recovery strap? Big difference. You can use an elastic recovery strap to tow with, but it would be dangerous to use a non-elastic tow strap as a kinetic recovery strap. He referred to the bow shackles in the kit as D-rings—not a big deal, you might say, but the little mistakes and omissions were quickly adding up to a not-very-credible presentation.

When the host ran the winch line out to a tree to use as an anchor, he mentioned nothing about choosing an appropriate (i.e. live and large enough) tree to take the strain. He also, critically, failed to check overhead for dead limbs that could be dislodged by the stress of winching. He properly employed a tree saver strap, but positioned it above waist height. A tree strap should be positioned as low as possible to reduce stress on the tree. Finally, when he connected the winch line to the tree strap with a bow shackle, he specified that the shackle pin should be “snug”—an elementary beginner’s mistake. A shackle pin should be snugged, then backed off a quarter turn or so. This is not a safety issue, but a way to ensure the pin doesn’t jam under load.

He then properly advocated employing a winch line damper to help control a recoiling line if a component in the system breaks. He placed the weight in the middle of the line. This is a small point, but I prefer placing the damper closer to the end of the line where the shackle and winch hook are—those are the heavy bits that represent the most danger should either or both come loose.

Next the host demonstrated a double line pull. While doing so, he introduced the Gear America snatch block, and noted that it is “suitable for either synthetic or steel winch line.”

Ugh.

The Gear America snatch block has a steel pulley with what looks like a standard semi-circular groove for the line. That’s perfectly suited for steel cable. A snatch block for synthetic line should ideally have a composite pulley. More to the point, while the steel Gear America pulley could be used with synthetic line, you would certainly not want to do so once it had been used with steel cable, and you most definitely would not want to swap back and forth. Steel cable will leave micro-abrasions on the pulley that are not good for synthetic line. (For the same reason, a winch fairlead—whether hawse or roller—that has been used with steel cable should be replaced if synthetic line is installed on the winch.)

I looked up Gear America, which seems to specialize in low-cost recovery equipment. The “Gear America Ultimate Winching and Rigging Off Road Recovery Kit” actually comprises a pretty basic assortment of kit, including what the website lists as a “tow strap.” Hmm. So I looked up that product separately, and found its description:  “Use it as a Tow Strap, Recovery Strap, Tree Saver Strap or Winch Extension Strap, making it an extremely versatile product.”

Oh brother.

I looked at the construction, which is polyester, meaning there will be very little stretch in this thing. Therefore the suggested use as a “recovery strap” is highly problematic, since a recovery strap is commonly made from nylon and designed to stretch and absorb shock when it is used in a kinetic recovery. A novice who had looked at just enough YouTube “instructional” videos to have a vague idea of how to snatch a stuck vehicle could easily break something or rip off a bumper by backing up and taking a run at moving a bogged vehicle with this “multi-purpose” strap. At least the site lists the MBS and WLL of the strap (35,000 and 12,000 lb).

Next I looked at the bow shackles included with the not-going-to-write-it-all-out-again recovery kit—which are actually described there as “D-ring shackles.” They’re 3/4-inch versions, a standard size in thousands of recovery kits, and properly stamped “WLL 4 3/4T,” or 9,500 pounds. With a standard six-to-one safety factor on shackles that works out to a 57,000-pound MBS. However, the description right under the photo of the shackle and its stamp says it has a “10,500-lb WLL and 58,000-lb MBS.” Hmm . . .

9,500 pounds? Or 10,500?

9,500 pounds? Or 10,500?

Not to worry about math. Below that is the assurance that you can:

  • MAKE A BOLD STATEMENT - Our Unique Design Ensures Unprecedented Strength and Looks Amazing on your Jeep or Tuck (sic).

Lastly I looked at the Gear America snatch block, and sure enough it’s listed as being suitable for both steel and synthetic line. Also, the snatch block itself is labeled “9 US ton,” while the description below it says it has a “10,000-pound working load limit,” and an MBS of 10 tons. So . . . which is it, guys? Further, it appears there is no WLL indicated on the product, which could lead a user to assume the “9 US ton” refers to a working load limit—a dangerous assumption.

My impression of the Gear America site, I’m afraid, is that is was conceived and created by some people who thought selling 4x4 recovery gear would be a good business, but who have very little experience with actual 4x4 recovery. Either that or they handed off their website design to someone with no clue, and didn’t do any fact-checking.

Going back to the Bold Canyon Outdoors video, I realized the host was simply parroting most of what the Gear America advertising stated regarding their products. But that’s no excuse: If you’re going to post an “instructional” video that involves a potentially hazardous activity (the one in question has had 8,000 views), you really should strive to get every detail correct.

Driving with elephants: Botswana, anyone?

L1050766.JPG

Last year we spent three weeks+ in Southern Africa and fell in love—Botswana in particular is now our hands-down favorite place on the continent to explore (and we’ve spent considerable time in Tanzania and Kenya). Easy to get to via Durban (direct flights now from many cities) or Johannesburg, it’s accessible, friendly, laid-back, and blessed with abundant wildlife.

And now is the time to go—as we said in this fall 2019 article in the Overland Sourcebook. If you just don’t have the time to plan your own trip (which can take considerable effort, especially if you haven’t ventured into Africa yet), we can highly recommend a September 2020 Botswana safari with Graham Jackson (Overland Expo training team director) and 7P Overland.

L1050822.jpeg
Up close and personal at Elephant Sands Camp, northern Botswana

Up close and personal at Elephant Sands Camp, northern Botswana

Beginning August 31 at Santa Safari Camp near Victoria Falls, the trip will wend its way through the famous Makgadikgadi Pan, through the Central Kalahari Game Reserve, resupply at Maun (like Moab only with elephants), then explore Moremi Game Reserve and the legendary Okavango Delta. It just doesn’t get any better—especially with a small group (no more than 9)—for 16 days of classic Africa. ($14,500 all-inclusive once you arrive to Botswana; a bargain, in our opinion.)

More information at 7p.io/destinations/botswana/

A serendipitous funnel hack

Bottle funnel.jpg

Okay, I might be the last person on earth to discover this, but . . .

I went out to change the oil on our Troopy this morning, and discovered that somehow all my funnels had ended up at Ravenrock, our desert place . . . 40 miles away. No problem: I had an empty gallon bottle of windshield washer fluid, so I cut off the bottom to make an impromptu funnel.

And, lo and behold, when I inserted it into the fill port of the Troopy it engaged more or less perfectly with the threads. I was able to screw it in and employ both hands to control the oil pour. Plus, when I was finished I screwed the cap back on the bottom of my new “funnel,” so the residual oil wouldn’t seep out into the box where it’s stored.

I’m curious how many vehicles this would work on. Going to try the rest of ours . . .

The (more) versatile ARB jack base

IMG_5044.jpg

Nearly everyone I know who owns a Hi-Lift jack also owns one of the ubiquitous red plastic base plates, which hugely enhance flotation in soft sand or mud. Recently ARB introduced their own base plate, which is of course designed to accept the rounded base of the ARB hydraulic jack. However, ARB cleverly molded the recess so it will also accept a Hi-Lift, and furthermore I found it fits many bottle jacks as well, which the red Hi-Lift base plate will not. So if you have a Hi-Lift but haven’t yet bought a base for it, consider the more versatile ARB version. Bonus: If you ever decide to spring for that pricey but superb ARB Jack, you’ll be ahead of the game.

IMG_5036.jpg

African trail hazards

The offending limb

The offending limb

It was Connie who alerted me, in her inimitable style, as we stopped at the entrance gate to the Moremi Game Reserve to pay the entrance fee.

“Jonathan,” she said, deadpan, “You have a stick up your butt.”

I realized even without checking that she was speaking metaphorically, so I looked at the next obvious spot—the rear of our Troopy. And there it was: a pretty stout limb as a matter of fact, wedged somewhere firmly in the vehicle’s undercarriage and dragging on the ground. Wedged so tightly as to be scoring an impressive furrow behind us. I was pretty sure I’d heard it get there, but the forest track we had followed had been littered with such limbs of various sizes, and I’d gotten used to the odd one smacking the undercarriage when a tire flipped it. The strategy with such limbs lying crosswise is to drive over the middle if possible, as this reduces the chance of flipping, but it wasn’t always possible, and many of the limbs were concealed in undergrowth.

A glance under the truck showed the limb angling up to the rear axle, where it took an abrupt bend in front of the tube and up into the chassis. I got down and slid under the Troopy, gave a yank on the limb, and  . . . nothing. It was well and truly jammed in there. So I slid in all the way, and found that the end had somehow crammed its way past brake, water, and diff-lock lines to lock itself behind a frame crossmember.

And then I noticed the sheen of some sort of liquid. Uh oh.

I could see the water line from our chassis-mounted tank, and it was intact. My next, worried thought was brake line. But the brakes had felt fine as we stopped. By now Graham had crawled under as well, and said, “Gear oil.” We smelled it and sure enough. The stick had ripped off the air line fitting for our ARB diff lock, and severed the line itself. Some differential oil had come out with it.

It took some serious heaving to free the end of the limb and remove it—I’m still mystified as to how it managed to insert itself that firmly in a fraction of a second. There was no way to repair the line—it was now too short and the fitting was mangled. So Roseann found a wood skewer of the approximate inside diameter as the fitting on the diff housing; I cut a short plug from it and used Gorilla Tape to securely fasten it in place. 

We drove the rest of the trip through Botswana and Namibia with the bandage in place. There was no more leakage, so the truck went into its shipping container that way. I’ll fix it properly when it arrives in Arizona. (I’ll check carefully to make sure no oil is being pumped up the air line toward the compressor, which can happen in certain circumstances with ARB lockers.)

I only forgot about the issue once, on the challenging track we took from Twyfelfontein to the Ugab River Canyon. I paused before a short but very steep and loose climb and, without thinking, hit the compressor switch for the locker.

“Uh, watcha doing?” Roseann asked. Oh, right. Of course we made the climb with zero drama and no locker.

In this case I don’t feel that I did anything wrong driving-wise, and I don’t feel that I was remiss in not having spare air line and fittings along. You just can’t predict everything. I did learn, however, to pay attention when Connie Rodman says there’s a stick up your butt.

And the damage

And the damage