Experienced mechanics don't often sound giddy over the phone, but Dave Anderson sounded giddy when he called me from his Flagstaff, Arizona, shop, the Good Carma Garage (which really should be a radio program).
“I just bought this thing off a tool truck, and you have to get one,” he said, “You’re going to think it should be on every overlander’s equipment list—even before he buys a pith helmet.”
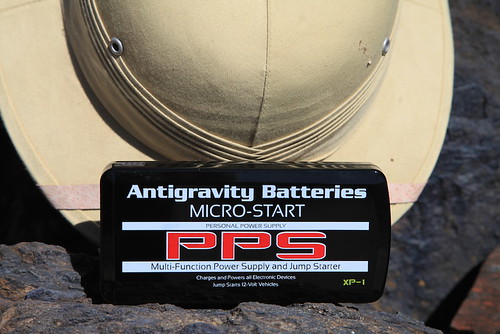
Dave. Such a kidder. As it happens, I own a pith helmet. And not one of those fake ones made from cork or, worse, styrofoam, either (I won’t even mention Graham’s mesh thing)—mine is a genuine pith helmet made in Vietnam from the pith of the Aeschynomene aspera, or sola plant (one of the original names for the helmet, sola topee, was later corrupted to solar topee). While they’re now little more than a Hollywood cliché, pith helmets are eminently practical—the thick fibrous material offers exceptional insulation from the tropical sun when touring one’s tea plantation or stalking a man-eating tiger with a Rigby.
Where was I? Oh, right: At Dave’s insistence I ordered a Micro-Start XP-1 from Antigravity Batteries. The zippered pouch that arrived three days later was no bigger than a calendar/day planner (remember those?). Inside was a bewildering array of adapters for charging various electronic devices from phones to laptops, and an astonishingly lightweight (15 ounces), 225-amp-hour lithium/ion battery, just one by three by six inches, which, incidentally, can also be used to jump-start your truck.
Say what?

It’s true. The pouch includes a set of battery-post clamps, and the company claims the power pack will start a V8-engined truck—not once, but several times.
Could this mean the end of jumper cables? I’ve always hated those things, and especially I hate what happens when I play good Samaritan to jump some poor bloke’s dead Malibu—in trying to help he always wants to grab the cables and hook them up in the wrong sequence—if not to the wrong terminals. I have to come off as a tyrant just to do a good deed. With the Micro-Start I’d be in complete control of the situation. And of course if your own vehicle becomes stranded you are completely removed from the need for a donor vehicle—handy if the nearest candidate might be 40 miles away.
The instructions for jump-starting a vehicle tell you to hook up the terminal clamps to the dead battery first, then plug the siamese fitting into the power pack. The reason for this is that, while the teeth of the clamps are well-surrounded by plastic, it would theoretically be possible to screw up and touch them together, resulting in the same alarming pop and flash you get when you do the same thing with jumper cables. If you were really determined and managed to clamp the teeth together, a puff of smoke would signal the death of your power source. I found it easy to remember to hook up the clamps first and then attach the battery, and virtually impossible to remember to unplug them first and then undo the clamps after use. But I never shorted anything.
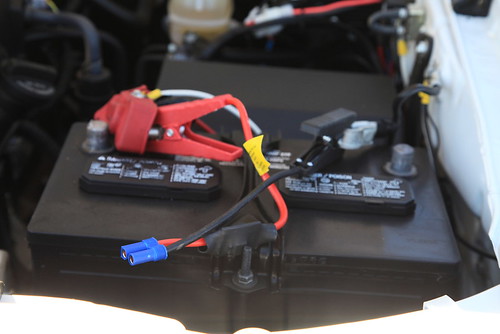 Hook up the terminal clips first, then plug in the power pack.
So how well does the XP-1 work? I disconnected our Tacoma’s battery to give it a try by clamping the leads directly to the battery cables. I wanted to video the process, and while setting up the camera I simply stashed the XP-1 battery in my back Levi’s pocket—it really is that small.
You can find more torturous demonstrations online, but the initial trial on the Tacoma went thusly:
It was impossible to detect a difference between the XP-1 and the way the truck fires with its own battery. I started it three times in a row with no trouble at all, and there were four blue LEDs left out of five on the battery’s charge indicator. Clearly there’s not only sufficient amperage inside that little brick to turn a V6’s starter motor, but to do it multiple times.
As impressive as that demonstration was, it simply confirmed the maker’s claims. Looking around for an unfair test, my eyes alighted on our 1985 Mercedes 300D turbodiesel. To start that the XP-1 would first have to power the glow plugs, then turn the hi-amperage starter necessary to crank a five-cylinder engine with 18:1 compression. After recharging the power pack and removing the cables from the 300D’s massive battery, I hooked up the XP-1, and:
Okay, so that was a bit too much to ask. (Scot Schafer at Antigravity Batteries confirms that they have a model in the works that will be configured for the much tougher task of starting diesel engines.) Rather alarmingly, there were no blue LEDs left on the charge indicator after the Mercedes experiment. Had I killed this thing 15 minutes after first deploying it? I plugged in its 120-volt charger (there’s also a 12-volt car adapter)—and an hour later it was back at full charge. It’s a resilient piece of equipment.
If your vehicle is powered by anything up to a 400-cubic-inch gasoline V8, the XP-1 will provide you with ample starting capability. The battery will retain its charge for many months at a time; if you remember to give it a top-up every half year or so you should be pretty much immune to becoming stranded due to a bad battery. And think of the effect on the owner of the dead Malibu when you start his car with a magic box the size of a paperback. It might be a good idea to keep a few XP-1 kits in the truck to sell at an exorbitant profit . . .
The XP-1 is a bargain at around $140. A basic model, the XP-3, sans the adapters for personal electronic devices, is available for about $30 less. AntiGravity Batteries is HERE.
Update on 2014-06-10 19:08 by Jonathan Hanson
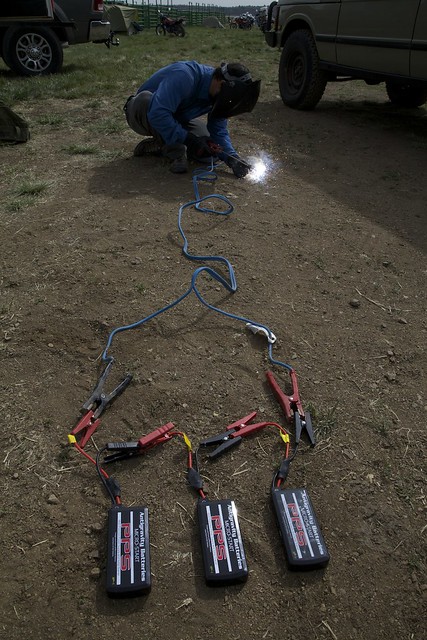
An update: While discussing the Micro-Start as we were setting up the Overland Expo, Graham Jackson, Tim Scully, and I started musing on whether one could weld by hooking up three of them in series. Taking a chance that we'd blow all three units we owned, Tim hooked them up, connected cables and a welding rod—and produced a perfect bead connecting two pieces of 1/4-inch steel. We were gobsmacked. We then hooked up two of the units to my Redi-Welder DC wire-feed unit, and again got a perfect result.
Obviously this is not something endorsed by the maker, and would quite rightly invalidate your warranty. But it showed what would be possible if a weld repair might make the difference between walking and driving out of a remote location.