
What could be more magic than an invention that brings the world seven, eight, even ten times closer? A shy bird, a dangerous animal, the moon and planets, a distant and questionable 4x4 route (or, in the above photo, a possible poacher): a thousand things can be enjoyed, evaluated—or apprehended—with binoculars.
I’ve used binoculars for fun for many decades, and I never tire of simply sitting and looking through them at anything that catches my fancy. However, I’ve also used them professionally, as a sea kayaking, natural-history, and birding guide, and the latter experiences in particular have taught me a lot about both choosing and using them the most efficient way. Like many products, to a large extent you get what you pay for—but there are ways to ensure you get the best instrument for your needs regardless of how much you plan to spend.
(I’ll note here our weird misuse of the term “binocular,” which means, of course, two oculars. So technically we look through a binocular, rather than a “pair of binoculars,” which would be something both you and a friend could look through at the same time. However, the term is so ingrained you’ll probably catch me using it in the next paragraphs.)

Binocular anatomy
The single most visible diagnostic component of a binocular is the front, objective lens. All other aspects of construction being equal, the diameter of this lens determines, 1) how much light the binocular gathers and how bright the image appears, 2) how much magnification the binocular can effectively deliver, 3) how bulky and heavy the binocular will be to carry and use, and 4) how much it will cost. Small—e.g., 20 or 25mm—objectives equal low light-gathering, low power, light weight, and lower cost. Larger—30 to 60mm—objectives gather more light, allow higher magnification, are heavier and bulkier, and cost more.

Objective lenses. Left to right: 20mm, 32mm, 42mm
Remember that as objective diameter increases linearly, objective area increases geometrically. The 32mm objectives in the middle in the photo above have two and a half times the light-gathering power of the 20mm objectives on the left.
Binoculars are referred to by their magnification factor (the number of times they make an object appear closer) followed by the objective diameter—6x20, 8x42, 10x42, 10x50, etc. The compromise between objective-lens size and magnification is one of the main decisions you’ll need to make when selecting a binocular. So let’s look at the relationship.
Hold a pair of binoculars a foot or so from your face. See the little circle of light in the eyepiece? That’s called the exit pupil.
The diameter of that exit pupil is a function of the objective lens diameter and the magnification of the instrument: objective diameter divided by power gives you the exit pupil diameter—in any binocular, regardless of construction or cost. A 10x40 binocular has a 4mm exit pupil; so does an 8x32 binocular. An 8x40 binocular has a 5mm exit pupil, in a compact 8x20 binocular it is 2.5mm.
Why is this important? It has to do with the variable diameter of your own pupils as they react to light. In bright sunlight your pupils will contract to just 2mm or so, but near dusk they will expand to 5, 6, or even 7mm, depending on your age (as we age our pupils cannot expand as much). Consider that compact 8x20 binocular and its 2.5mm exit pupil. Looking through it in bright sunlight, with your own pupils constricted to 2mm or so, you’ll see a full, bright view. But look through it near dusk, when your pupils have expanded to 5mm or more, and you’ll see dark clouding around the central image, because your pupils are larger than the exit pupil. This vignetting means that binoculars with small exit pupils don’t perform well in low light (which can also include a shaded forest, for example). Thus binoculars with larger exit pupils are better for viewing near dawn and dusk. Years ago I had a pair of 7x50 binoculars with a stupendous 7mm exit pupil. Despite otherwise modest optical quality they excelled at low-light viewing.
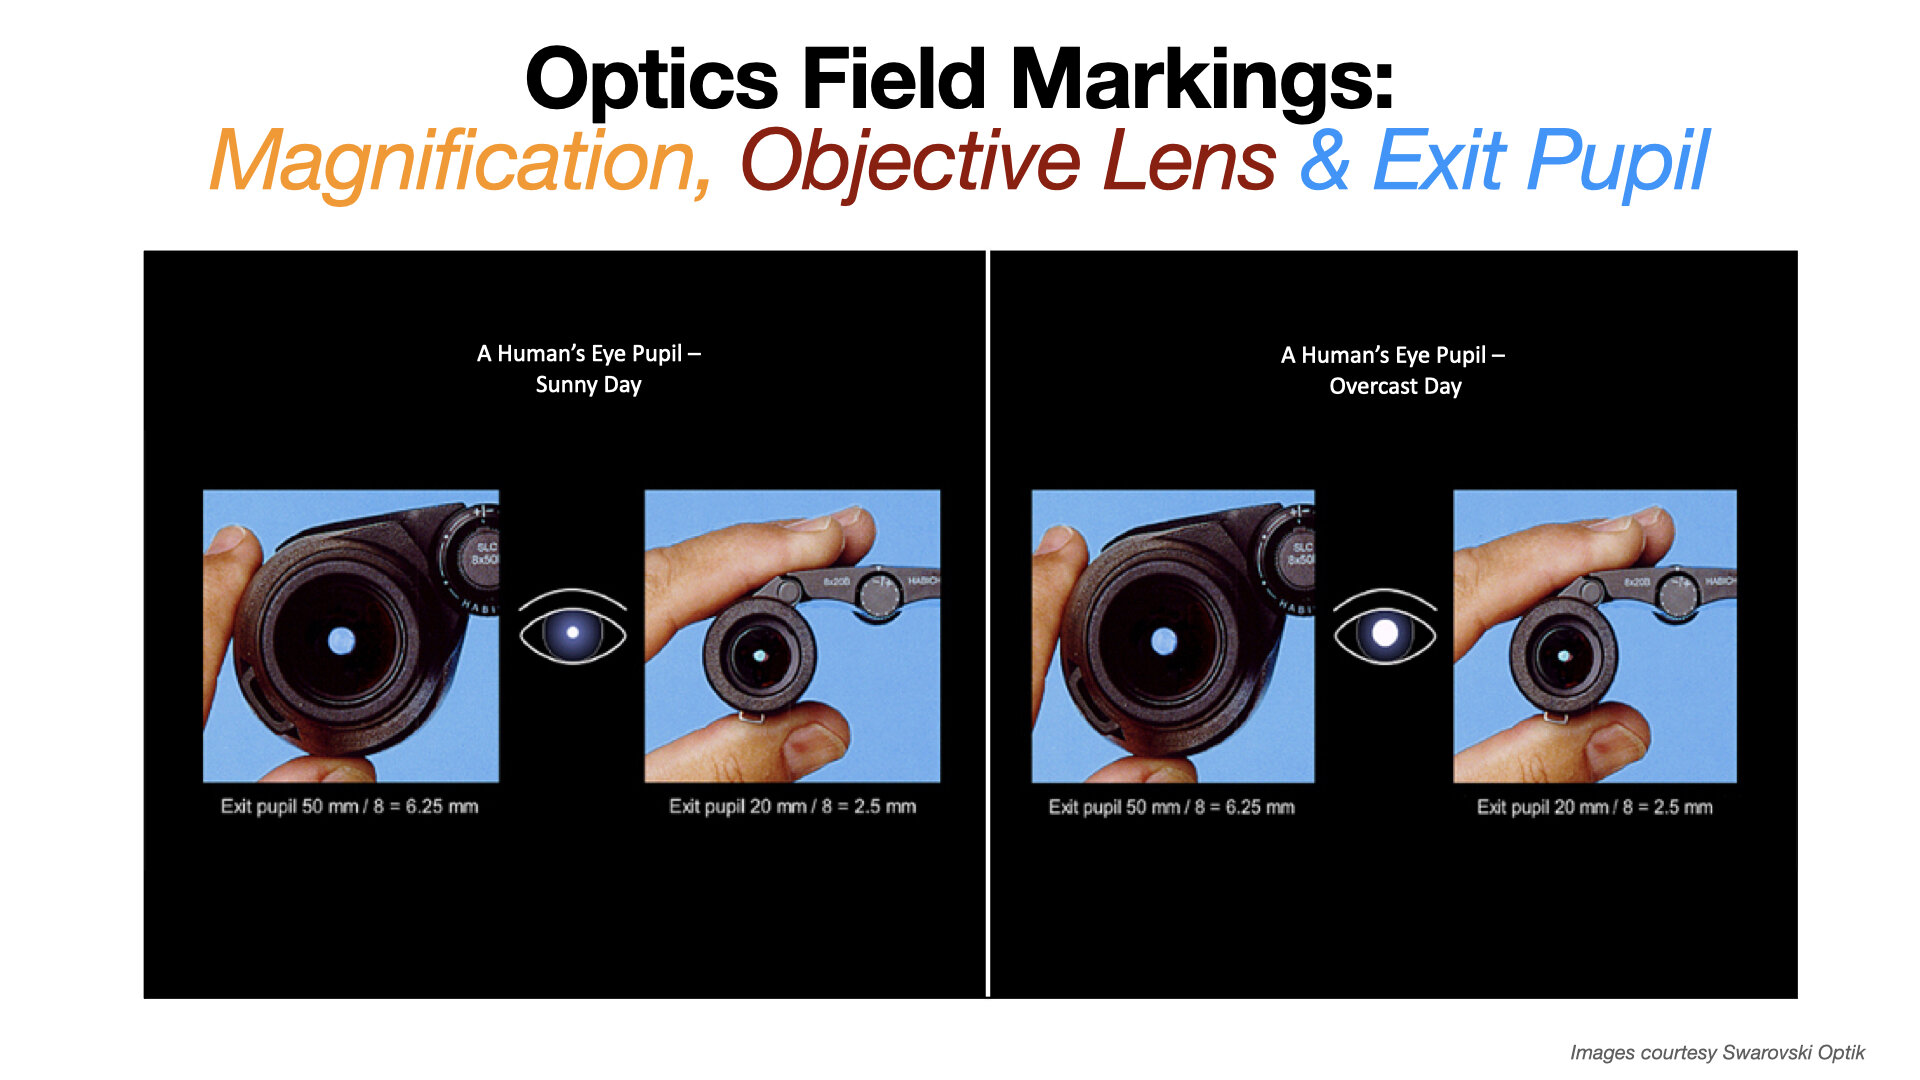
Comparison of the exit pupil of an 8x50 binocular with an 8x20.
So, all else being equal, a larger exit pupil equals better low-light viewing. However, magnification has an effect as well. Note the 10x40 and 8x32 binoculars I listed above. Despite identical 4mm exit pupils, the 10x40 will perform better at dusk due to the greater magnification. (As we’ll see, many other factors also contribute to brightness.)
Herewith my first guideline: For all-around use I do not recommend a binocular with an exit pupil smaller than 3mm, and 4mm is notably better. Those 10x25s in a company’s catalog might seem like a wonderful combination of high power and compact size, but their 2.5mm exit pupil will be a serious hindrance in low light.

The same binoculars, showing relative size. These are all roof-prism instruments—note the oculars in line with the objectives.
Now let’s look at the next most important feature of binocular construction: the prisms.
All modern binoculars except a few toys and cheap opera glasses employ prisms as part of their optical system. There are two reasons for this. The first is to correct the image orientation, which as it comes through the objective lens is turned upside down and reversed. The second is to allow the binocular to be shorter than it otherwise would be to gain sufficient magnification.
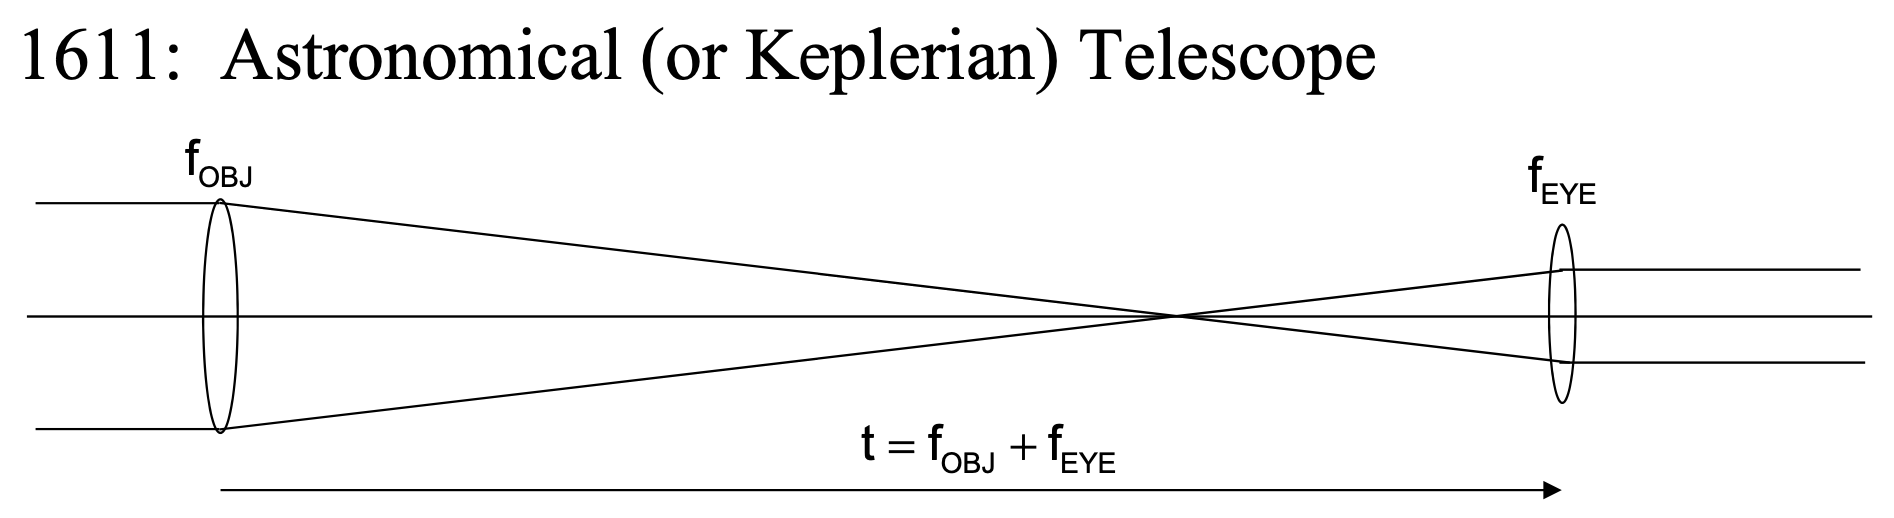
You can make a simple telescope—as Galileo did—with nothing but a convex objective lens and a concave eyepiece that can be moved back and forth to focus. The image will be erect and the right way round with this simple arrangement, and those toy binoculars and opera glasses are made this way. But the Galilean telescope and binoculars are extremely limited in magnification, and the image blurs quickly toward the edges.

The Keplerian telescope (for Johannes Kepler) was an improvement in that it used two convex lenses, allowing longer focal lengths and much higher magnification. However, the image in the eyepiece or ocular was reversed and upside down—not an issue for astronomy, but definitely so for terrestrial viewing. Adding an additional convex lens rights the image, and the classic collapsible “spyglass” of pirate movies and highland stag hunts is made this way. They are, however, necessarily long for their magnification. A binocular made this way would be unwieldy to say the least—thus the prism.
Prisms can be used to do different things. We’ve all seen dispersive prisms—the triangular versions that break up white light into its lovely constituent colors. Binoculars employ reflective prisms, which at their most basic work on the principle of internal reflection—light entering perpendicular to one surface is reflected and redirected off the angled surface behind it. As long as the light hits the back surface at what’s called a critical angle, no mirrored surface is needed; perfect reflection is achieved at the glass/air interface. You can see this effect by looking up at the surface of an aquarium at an angle that turns it into a mirror.

The first prisms used in binoculars (by a smidgen) were porro prisms, named after their inventor, Ignazio Porro; they’re still employed today. In binoculars, two porro units are cemented together at right angles to each other in each optical tube, which gives binoculars in which they are used the classic offset configuration, where the objective lenses are set outboard of the oculars (or, in some compact binoculars, inboard). The advantage to porro prisms is that they obtain perfect internal reflection using nothing but glass—no mirrored surfaces are needed. This gives them intrinsically better light transmission and clarity than Schmidt-Pechan roof prisms (see below). Additionally, porro-prism binoculars with objective lenses set outboard of the oculars can render a slightly better three-dimensional view. Disadvantages include poor close focusing ability ( also an artifact of the wide-set objectives) and more difficult weather sealing, along with greater bulk and, frequently, weight.
A porro prism unit as used in a bincocular
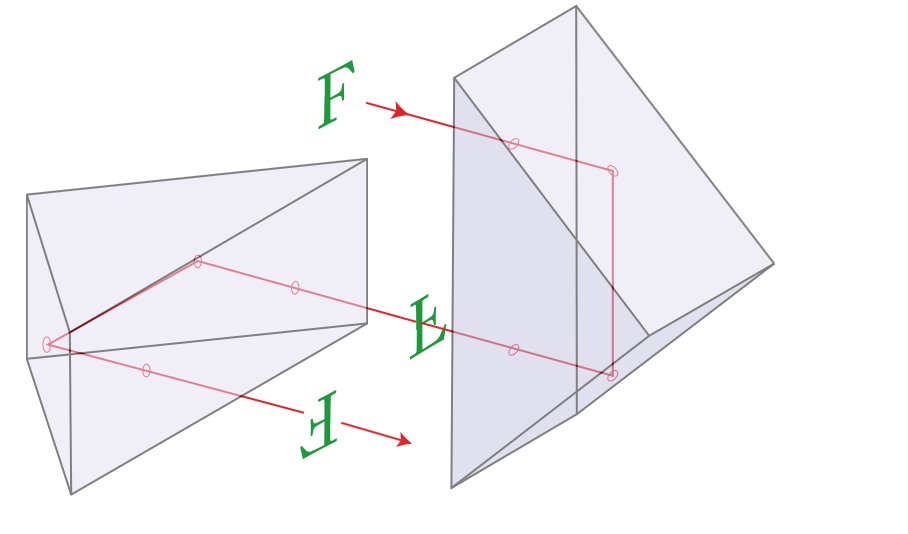
Roof prisms overcome those bulk and weight issues. The most commonly used roof prism configuration in binoculars, the Schmidt-Pechan, comprises two prisms separated by a minuscule air gap. In part because incoming light rays are “bounced” more times in a tighter space than in a porro-prism instrument, roof-prism binoculars are more compact. Note in the diagram how the incoming and outgoing rays are in line; thus roof-prism binoculars can be configured as straight tubes, saving the weight as well as the bulk of the offset tubes.
But there are downsides. Collimation—that is, the internal alignment—of roof prisms is critical and expensive to replicate consistently and durably. Also, every time light is reflected it loses a tiny bit of brightness, and one of the prism surfaces in the Schmidt-Pechan design reflects at less than the critical angle, so it must have a reflective coating applied. Finally, the internal reflections of the Schmidt-Pecan design first separate the light beams, then recombine them, which causes slight polarization of the beams, reducing contrast. Manufacturers counter these issues with phase-correction coatings, which porro prisms do not need, and by using either a silver or, much better, dielectric coating on the reflective surface. Schmidt-Pechan prisms employing phase-correction coatings and a dielectric reflective surface come very close to the performance of a porro prism. Nevertheless, making a high-quality roof-prism binocular is more complicated and more expensive than making a high-quality porro-prism equivalent.

Another type of roof prism, the Abbe-Koenig, does boast perfect internal reflection and has no need for reflective coatings (although it still requires phase correction). However, as you can see in the diagram here, Abbe-Koenig prisms are significantly longer than Schmidt-Pecan prisms, and are rarely used except on large binoculars such as an 8x56, where light weight and compact size are less important than ultimate light-gathering power.

The two binoculars on the left employ Schmidt-Pechan roof prisms; the two on the right, Abbe-Koenig roof prisms.
So far this sounds like an open-and-shut case for porro-prism binoculars. However, if you’ve ever carried full-size binoculars around your neck for an hour or two, or looked through them for more than a few second at a time, you’ll be well aware of how much difference a few ounces can make in preventing fatigue and image shake. A roof-prism binocular of the same objective and magnification can weigh several ounces less than an equivalent porro-prism instrument, in addition to its reduced bulk. Roof-prism binoculars are generally easy to use one-handed when necessary—often impossible with porro-prism instruments. For this reason (in addition to their easier weather-sealing and close-focus capabilities), virtually all ultra high-end field binoculars are roof-prism models. And manufacturers have developed roof prism technology to the point that the differences between high-quality examples of each type would be difficult, if not impossible, for a casual viewer to detect. In fact, given the relative lack of development in porro-prism technology in the last couple of decades, I’d wager that the best current roof-prism binoculars are equal or superior in terms of light transmission and clarity to the best available porro-prism binoculars.
With that said, do keep in mind that manufacturing a bright and durable pair of roof-prism binoculars is significantly more difficult than doing so with porro prisms. If you are on an extremely limited budget, you might find you can get noticeably better quality out of the latter than the former, for the same price.
Not all prism glass is equal. The very best we have today is called BaK4, for BaritleichKron or Barium Crown, a glass made by the German company Schott AG. It has a very high refractive index (1.569 if you want to know, which is, like, really high, to be technical). Many cheap binoculars claim to be made from this glass when in fact they are not; there is essentially zero enforcement of such marketing lies. The manufacturer’s reputation—and price—is nearly the only way to be sure you’re getting Schott BaK4. And even given that, manufacturing tolerances, coatings, and a dozen other parameters will make or fail to make a high-performing prism.
The next critical aspect of binocular design is the lens coatings. Look at the objective lenses of your binoculars and you’ll notice a definite tint—purplish, greenish, reddish, more or less of each depending on the brand. Why is this?

All glass reflects some light—look at a piece of window glass and you’ll see this. Furthermore there is a reflection both when the light enters the sheet of glass—or a lens—and when it exits the back of it. This reflection can reduce the amount of light making it all the way through a lens by ten percent or more. Multiply that by the several lenses in a binocular and the light fall-off is severe. In 1886 the 3rd Baron Rayleigh, John William Strut (who would win the Nobel prize in physics in 1904), found to his surprise that old, slightly tarnished glass he tested transmitted more light than new, clear glass. This led to the development of specialized anti-reflection coatings, introduced by the Carl Zeiss company just prior to WWII. In one leap of technology, the total light transmission through a typical 8x30 binocular increased from 50-60 percent to 70-80 percent. Today’s high-end binoculars are fully multi-coated—that is, every glass surface has an anti-reflection coating comprising up to seven layers—and total light transmission is well over 90 percent. However, like BaK4 prisms, “fully multi-coated” can mean a lot or not very much at all. Simply put, a $150 Chinese binocular with “fully multi-coated optics and BaK4 prisms” will not have the same stuff inside as a $2,000 binocular with “fully multi-coated optics and BaK4 prisms.”
Next in line is the clarity and contrast of the image controlled by the objective lens or lenses, the focusing lens behind it, any field-flattening lenses behind the prisms, and the lenses comprising the ocular. Careful grinding/polishing of high-quality glass will ensure a crisp image, but color rendition raises its own issues.
Remember the dispersive prism and its colorful rainbow of colors? To some extent this happens with light passing through any lens. The different colors of the spectrum bend at slightly different angles, and if they are not brought together somehow by the time they reach the eyepiece, the image will display a fringe of spurious color around it—almost invariably blue, because blue light is more sharply diffracted then yellow or red.
Chromatic aberration, as this is known, can be reduced using an achromatic objective lens, comprising two layers of different types of glass that together reduce diffraction, and/or with aspheric lenses, which accomplish the same thing by altering the shape of the lens, and/or with extra-low-dispersion (ED) glass, which doesn’t diffract as much to begin with. As with everything we’ve discussed, this adds to the cost of the binocular as well as the quality of the image.

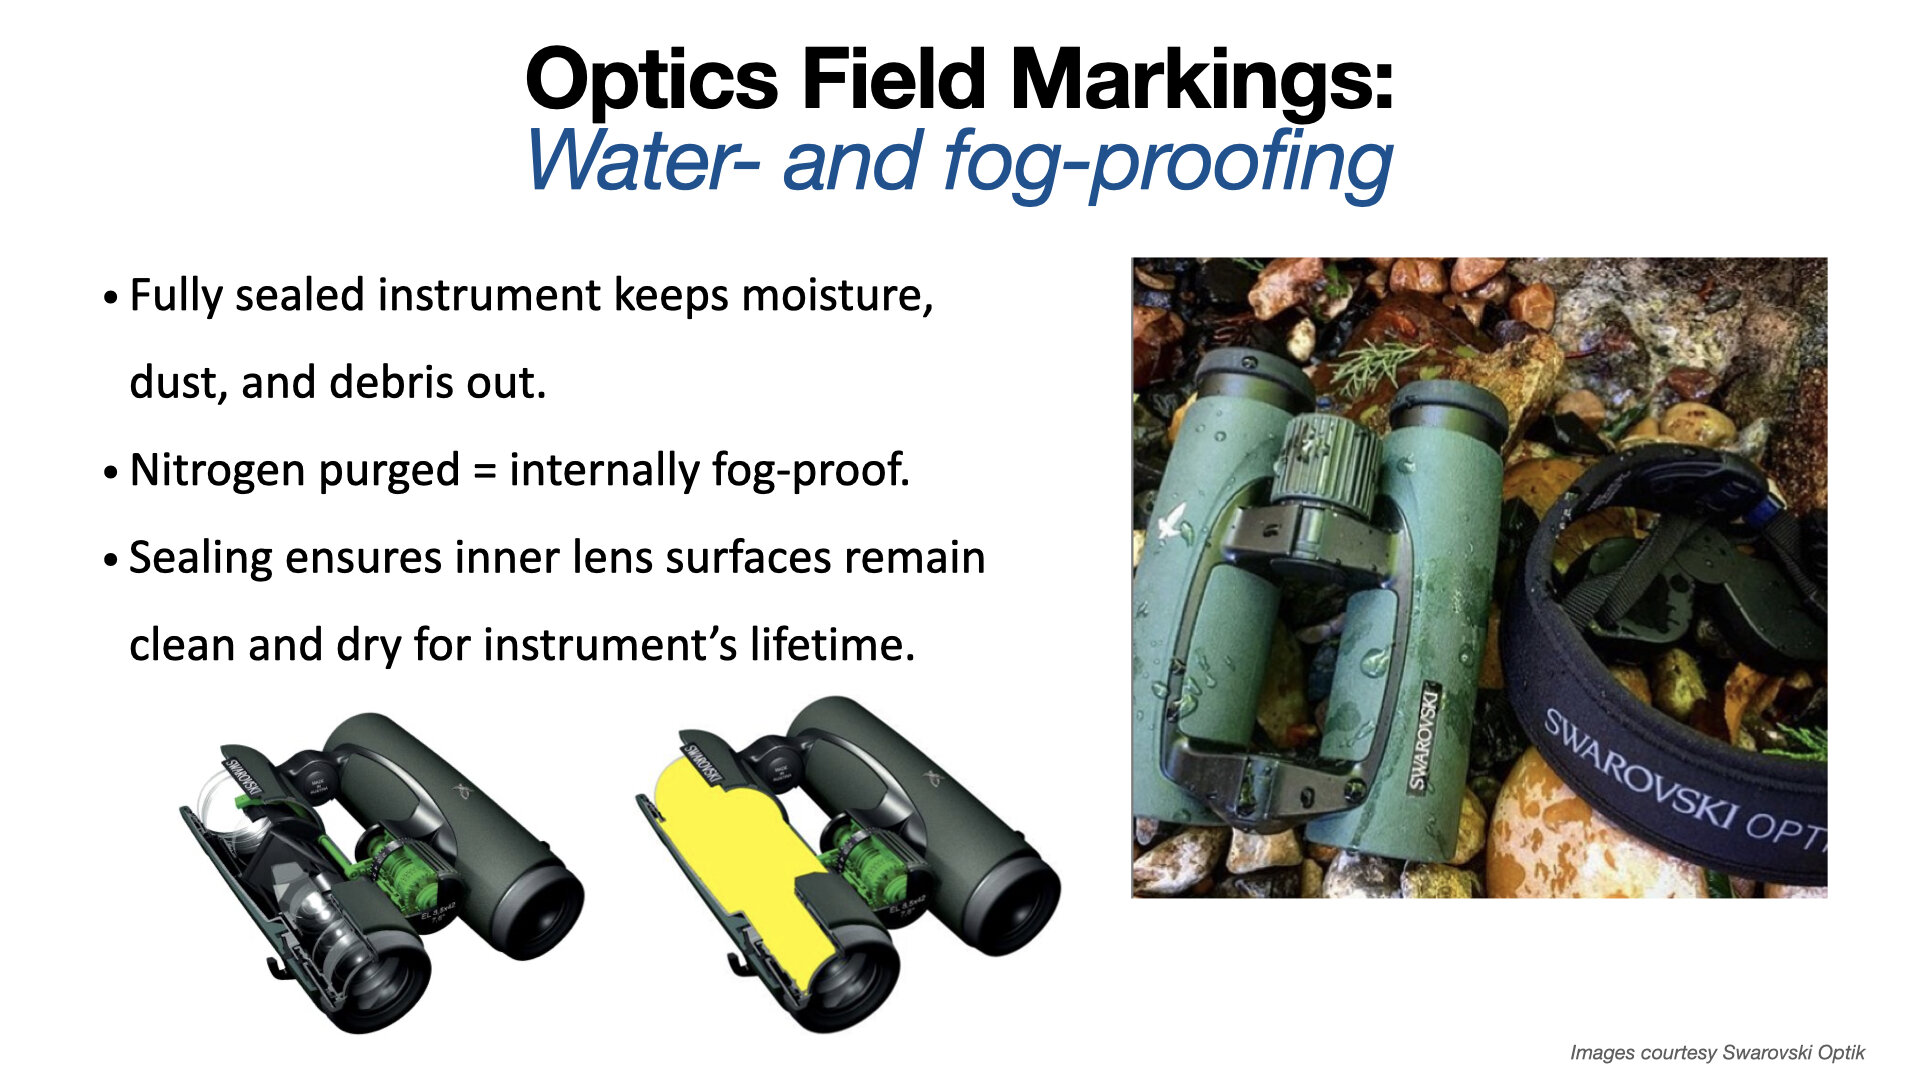
The best binoculars in the world can be ruined if any moisture is allowed inside. Fogging obscures the image and damages coatings, and fungus or mold will completely destroy the instrument, necessitating a complete disassembly and restoration at best. For this reason good binoculars are fitted with O-rings to seal out moisture, and then purged of air with pure nitrogen (sometimes argon) at slightly higher than atmospheric pressure. These gasses are dry, cannot fog, and do not support mold or fungus. Better binoculars incorporate better seals yet retain ease of focusing (the focusing mechanism is one of the most vulnerable entry points for moisture).
Many high-end binoculars now incorporate a field-flattening lens behind the prism, designed to increase edge-to-edge sharpness. This is especially useful for those who use binoculars on a tripod for long periods, scanning the entire field of view rather than moving the binocular around.
Is there anything else? Oh yeah, a lot of it. Proper internal baffling to prevent flare; shielding and blackening of the sides of the prisms to prevent spurious light entering them; reinforced housing of the prisms to prevent de-collimation; proper size of the prisms to capture all available light; grooving the hypotenuse face of the prism to control abaxial rays. Construction of the housings—aluminum, or lighter and more expensive magnesium? Hydrophobic objective-lens coating? You get the picture, and perhaps begin to see why the price of two binoculars that are to outward appearances identical might have price tags that differ by an order of magnitude.

The best binoculars available today offer brilliant, sharp, true-color views comfortable for hours of viewing without eye strain; complete weather sealing; shock-proof construction; light weight, and a lifetime guarantee—often transferable. A premium binocular represents a considerable investment that will repay itself every time you use it, and continue to do so for decades.
Next up: Choosing the best for your needs.
Companion workshop: View our Field Arts workshop on optics, with Swarovski’s Ben Lizdas joining us for a Q&A, here or view below.
