So much wrong here

Screen Shot 2018-03-29 at 7.32.30 AM.png

I copied this photo from the excellent American Adventurist site, where it was posted as an example of how not to rig a winch.

Indeed. Yet this is not some low-budget bodge job on a winch installation. There are quality products represented here—a Warn winch and synthetic line. But several things set off alarms.

Let's begin with the least-egregious aspect: that winch hook stuffed into the recovery loop. There is nothing wrong with the standard open winch hook, although aside from being quicker to deploy it suffers when compared to a closed thimble, which is positively connected to the winch point with a shackle and cannot come loose inadvertently. What worries me here is that the spring-loaded safety tab could easily be stressed and bent the way it is forced open, possibly interfering with its effectiveness or even damaging it.

Next there is the hawse fairlead. As with the hook, there is nothing wrong with a hawse fairlead, although it is a myth that you should use only a hawse fairlead when running synthetic winch line. A roller fairlead is fine for synthetic line and is in fact easier on the line. The problem with this particular hawse fairlead is the extremely shallow chamfer on the opening, which will severely stress the line when used on an off-angle pull. The chamfer on such a fairlead should ideally have a radius six times the radius of the line itself. Here is a much better hawse fairlead:

Hawse fairlead and Viking Dyneema winch line

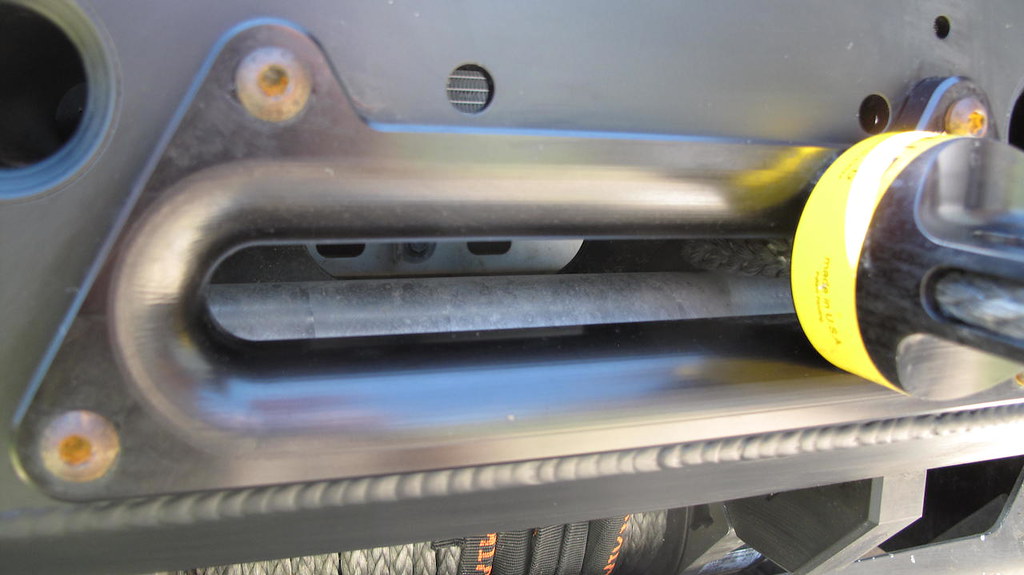
The real disaster here, however, is the line, which is spooled over the top of the drum rather than under the bottom. Besides causing the remote to work backwards—"in" will spool out and vice versa—and the fact that the line has a much more acute angle to travel through the fairlead, there are two genuinely dangerous results. First, pulling in line over the top of the drum on a winch mounted this way, with the feet down, moves the center of force farther away from the mount, increasing the stress on it. Second, the brake will not operate correctly if, for example, the operator needs to lower a vehicle down a steep incline, although Warn tells me the winch will still not let the vehicle free-fall.

A vehicle-mounted winch is not a tool to be installed casually or carelessly. I worry that the person to whom this one belongs will have taken the same approach to learning how to actually use it. Not a good scenario.

Tool storage

Tool boxes 1.jpg

Carrying tools in a vehicle is always a balancing act. 

First you have to decide how many to bring. Do you go with some screwdrivers and a pair of pliers, or do you go the one-case-tool-kit route discussed here in the past, and wind up with a comprehensively stocked but 62-pound-heavy Pelican case? 

Then you have to decide how to carry them. A hard case such as the Pelican is durable and easy to secure, while a soft case saves weight and can be quieter. You can go with a steel chest with a top compartment and drawers, which is excellent for organization but very difficult to keep from rattling. 

Some months ago I began assembling a tool kit that went the middle route in terms of contents. I tried to include everything I would want to do minor repairs up to and including such things as replacing a serpentine or timing belt, an alternator, or a water pump, and fit it all in a Blue Ridge Overland Gear Tool Bag (see here). After some experimentation that kit now comprises:

  • Set of screwdrivers
  • Combination wrenches from 8mm to 19mm
  • 3/8” socket/ratchet set, standard sockets 8mm-19mm, deep sockets 10mm-19mm
  • 1/4” socket/ratchet set, standard sockets 5mm-15mm
  • Channel-lock pliers, Knipex pliers, needle-nose pliers
  • Side cutters and wire stripper/crimper
  • Ball pein hammer
  • Box knife with spare blades (which function as gasket scrapers, etc.)
  • Hex keys

That totals 15.4 pounds with the bag—not bad at all. And it has been working very well for minor repairs. However, it is near capacity. I could fit in a few cold chisels and a circlip plier, for example, but that would be it. If I wanted or needed to carry more tools I’d need another solution. Of course I could add another Blue Ridge bag, but I’d still be limited in my tool selection by things that simply wouldn’t fit—a hacksaw, for example, or my 18-inch 1/2” Snap-on ratchet, or a big no-bounce hammer such as the Park model here

Alternatives? A smaller Pelican case than the 1550 is an obvious and excellent choice, but I wanted to try something different.

I’ve always been attracted to cantilever tool boxes. I like the elegant way they bloom open, and the organization offered by the trays, whether it’s a two- or four-tray model. Perusing the usual sites revealed lots of Chinese-made versions for under $30, but the innate complexity of a cantilever box made me leery, and one I inspected at a hardware store did nothing to relieve my prejudice. So I landed on an $80 Italian-made Beta C20 four-tray box on Amazon (“Tools not included”), in can’t-miss orange. I was impressed with the quality, which seemed a definite step up from the cheaper models. 

Tool boxes 2.jpg

Compromises immediately became apparent compared to the soft case. Noise, chiefly—I could strap down the Blue Ridge bag so it barely tinkled; not so the steel box. I’d need to use One-Wrap velcro straps to bind wrenches and things to cut down on the racket on a bumpy road with the box in the back of the FJ40 (in the bed of a pickup or elsewhere more isolated it wouldn’t be a problem). Weight was also an issue—with the same contents as the Blue Ridge bag it was eight pounds heavier. Since I always secure tool cases with a ratchet strap, I don’t consider the steel box to be significantly more of a hazard in an accident—you wouldn’t want to be hit in the head with a “soft” case filled with 15 pounds of steel—but it does need more of its own space, and could conceivably gouge other equipment if not packed carefully.

On the other hand, the organization of those top trays is a wonderful feature: Grabbing frequently used tools such as screwdrivers or wrenches is easy. And the capacity is vastly up on the bag; my long ratchet, hacksaw, and hammer fit lengthwise easily, and the volume in the main compartment would allow me to carry significantly more tools if I wanted or needed to. It wouldn’t match the capacity of the Pelican 1550, but then I couldn’t stuff enough into it to match the weight either. So I call it a viable alternative for a mid-sized tool kit, and worth considering depending on your own needs.

The four-tray cantilever box containing the tools from the Blue Ridge bag. Plenty of room left over. 

The four-tray cantilever box containing the tools from the Blue Ridge bag. Plenty of room left over. 

Battery decluttering

Battery declutter 1.jpg

Even in a vehicle as electrically antediluvian as a 1973 FJ40, connections to the battery can get out of hand with the addition of just a few accessories. For many years, I’ve used battery terminals incorporating a threaded vertical post to secure positive and negative cables and wires, both for basic functions (starter, etc.) and accessories such as the 2-gauge cables powering the Warn 8274 winch, and the 10-gauge connection to the auxiliary driving lights. 

But over time the connections have been stacking up—there’s now a separate cable to charge the auxiliary battery, and another for the ARB compressor.  Even with the installation of an Optima yellow-top battery with redundant side terminals, it was beginning to look cluttered, and probably doing nothing to maintain adequate current flow.

So I ordered a pair of Pico 0810PT “Military style” (their words) terminals from Amazon. Nothing fancy—no gold plating or built-in digital voltmeter—but substantial, and the horizontal bolt not only doubles the available connections but is far more secure than the wing nut on the old terminals. At $10 for the pair it was a bargain for a significant improvement in my wiring. 

Battery declutter 2.jpg

Will I ever learn?

Soldering iron.jpg


A cockroach brain has barely a million cells, whereas a human brain has about 100 billion. Nevertheless, cockroaches are capable of learning and remembering things such as mazes.

I'm not sure about myself.

Last week I needed to install a new set of Baja Designs LED lamps on the FJ40—an S2 Sport reversing lamp, and a pair of XLR-Pro driving lamps up front. To incorporate the wiring harness of each into the existing reverse and driving lamp wiring harnesses, I wanted to properly solder the connections to ensure connectivity and longetivity. However, my good soldering gun was out at our desert cottage, 40 miles away, and we needed to stay in town for several commitments. So I thought, I’ll just buy a cheap soldering iron to have here, and ordered one from Amazon with next-day delivery. Just $19.99. You can already see where this is going, can’t you?

Indeed. The kit arrived, in a plastic box with a coil stand and some accessories. Next morning I got to work—and the iron proved utterly incapable of heating a connector sufficiently to melt flux-core solder on a 50-degree morning. Or, later, on a 65-degree day with a trace of a breeze.

Sigh . . .

So I drove to a hardware store and bought the identical 100/140-watt Weller soldering gun I have at Ravenrock ($36.95) and had the connections soldered in minutes.

Weller.jpg

Anyone need a heated coffee stirrer?

Buy good tools.

IMG_3520.jpg

Effective backup lighting

_1050463.JPG

I’ve never met a vehicle with factory backup lamps that were worth a damn, and I’ve never been sure why—granted, we don’t reverse at the same speed we go forward, but there are plenty of bad things that can happen at five miles per hour when your field of vision is reduced to a couple of mirrors, or your neck is craned at 100 degrees and you’re peering out the corners of your eyes.

In the context of a four-wheel-drive vehicle negotiating a difficult trail after sundown, this problem is magnified tenfold. If you’re backing up, it’s often because the trail in front has become too difficult to negotiate, and that means the trail behind you is not that much better. If you need to turn around and the trail is narrow with a steep dropoff, well . . . you’ve probably been there, as have I.

For those reasons, my FJ40 has been supplied with superb backup lighting for several decades, courtesy of a 7-inch round Cibie Oscar halogen fog lamp with a 100-watt bulb. The Cibie provided a massive amount of light, and drew enough power that I had to re-engineer the backup circuit with 10-gauge wire and a relay. But it’s gotten me out of tight spots more than once, and makes reversing in town a breeze.

Cibie.jpg

However, time marches on, and halogen lamps are for many applications being quickly outdated by far more efficient LEDs, which last much longer (50,000 hours compared to 2,000 or so), are more resistant to vibration, and draw a fraction of the power. The Cibie had a very high cool factor in addition to its usefulness, but I decided an upgrade was in order. So I looked up Baja Designs, which in a lot fewer years than Cibie has been around has earned a stellar reputation for its auxiliary lighting systems. A quick browse through the online catalog landed me on the S2 Sport “work and scene” lamp, a two-LED lamp a fraction of the size of the Cibie (2.93 x 1.76 x 1.68 inches), yet which produces 1,130 lumens while drawing an absurd .9 amps, compared to 8.3 for the halogen lamp. 

The Cibie had always been mounted on a tab on the right side of the Stout Equipment rear rack on the 40, which was really not optimal, although it threw enough light that the loss on the driver’s side was minimal. I tried mounting the BD lamp there, but it just didn’t look right and would have suffered the same offset effect, so I remounted it to the bottom center of the rack, where it is well-protected and produces a perfectly balanced spread. I had to carefully trim away come copper filaments in the fat 10-gauge positive wire that had fed the 100-watt halogen bulb in order to be able to solder it into the BD quick-disconnect fitting, but otherwise installation was easy.

_1050467.JPG

Results? The S2’s 1,130-lumen output is lower than the Cibie’s halogen bulb, which probably put out around 2,000 lumens. However, the fog-oriented focus of the Cibie produced an extremely bright horizontal strip of light about 20 feet behind the vehicle, with less bright light in front and behind, because it was mounted higher than a fog lamp normally would be. The BD S2 produces a much more even flood of light closer to the vehicle, which is slightly less impressive but actually much more useful.

The S2 has an IP69K waterproof rating, which means it is submersible to nine feet and impregnable to pressure washing. It also exceeds the MIL-STD810G rating, which means . . . actually I have no idea what it means, but it should mean this will be the last backup lamp I need to install on the FJ40.

Baja Designs is here. Stay tuned for an upgrade on the 40's driving lamps as well.


Tire repair in the field

Screen Shot 2018-02-08 at 7.24.29 AM.png

“Stop!”

I’d heard the unmistakable hiss of a punctured tire losing air, and alerted my partner, who was driving the Ford pickup we were using to conduct road surveys in southern Nevada. Our job took us down scarcely used tracks with significant incursion from creosote bushes, which leave vicious little daggers sticking out around the base of the plant as the perimeter dies off. This was our third puncture today—and it was not yet 8:00 in the morning. 

Two minutes later we had the tire repaired and had resumed collecting GPS data. We didn’t even bother to add any air, much less replace the punctured tire with the spare.

Tire failure is by far the number one cause of vehicle breakdowns in the backcountry, whether you are exploring Nevada or Namibia. Yet I’m astonished at how many people still rely on a single spare and maybe a can of fix-a-flat as backup on remote excursions far from AAA. The irony is that the farther you are away from well-traveled routes and outside assistance, the higher the possibility of running into projecting root splinters, knife-edged rocks, or even an off-camber rut that can pop a tire bead right off the rim and deflate it instantly. 

Why not be prepared, and self-sufficient? With a few tools, a good air compressor, and a proper repair kit, you’ll be able to repair any tire mishap short of a shredded blowout and be on your way.

Most tire problems result from simple punctures in the tread area, where the tire actually contacts the ground. Close to civilization, likely culprits include nails, bolts, and screws. Farther afield, you might run afoul of those creosote daggers or any number of other biological or geological hazards. At higher speeds, punctures typically occur on the rear tires—the front tire rolls harmlessly over a nail or screw lying flat, but pops it into the air where it can land pointy end up just as the rear tire passes. At low speeds, it’s more often the front tire that will find some projecting bit. A nail that embeds itself in a tire might not make its presence known for hours, since it forms a partial plug and slows deflation. A root end is more likely to puncture and pull out, causing rapid loss of air and possibly an audible warning. 

The easiest and quickest way to repair a simple puncture is with a plug kit (which is what we used in Nevada). A tire plug comprises a short length of rubber-adhesive-impregnated nylon yarn, which is inserted into the puncture with a special tool, after reaming the puncture with another tool. Cheap plug kits that include tools with plastic handles are available everywhere, but skip them—plugging involves a fair amount of force, and you don’t want to push very hard on a plastic-handled tool embedded with a steel rod. High-quality plug kits with sturdy tools and better plugs come from Safety Seal and ARB. By far the most comprehensive tire repair kit I’ve used is the Ultimate Puncture Repair Kit from Extreme Outback, which includes not only plugs but an exhaustive assortment of patches, spare valve cores, valve stems, a valve core tool—everything you’d need to be self-sufficient on any trip up to and including a global circumnavigation.

The basic tools in a plug kit comprise the plugs, a reamer resembling a round file, and an insertion tool that has a large, slotted eye at the end. How do they work?

High-quality plug tools from Extreme Outback.

High-quality plug tools from Extreme Outback.

Picture yourself at the side of the trail with your plug kit and a slowly collapsing tire. You can jack up the vehicle and remove the tire and wheel if access is limited, or leave it on and slowly roll the vehicle while looking and listening for the source of the leak. Let’s assume you spot a nail head embedded in the tread, and it is accessible. The first step to repair the hole is to prepare the plug in advance, to minimize leakage. Pull a plug free from its cellophane packaging—you’ll find it ridiculously difficult due to the adhesive, but surprisingly it doesn’t stick to your fingers. Pinch one end flat, and insert it into the eye of the insertion tool; pull through to its midpoint. You’ll have to pull quite strongly to get it in there. Your plug kit should come with a tub of lubricant; once the plug is positioned in the tool dunk the end in it to adhere a small glob to the plug right where it goes through the eye of the insertion tool.

Now you’re ready to prepare the hole. With a multitool or pliers, yank out the offending bit (the ARB kit thoughtfully incudes needle-nosed pliers). The next step is completely unintuitive: You’re going to make that hole bigger, so the plug can fit. Insert the reamer into the hole—it might take some real shoving—then work it in and out briskly a few times. Don’t be gentle; move it around and twist back and forth. If the puncture is in the tread area you’ll be able to hear and feel the steel belt as the reamer works through it. You’re not damaging the belt, merely pushing the steel strands apart enough to get the plug in.

Screen Shot 2018-02-05 at 9.39.08 PM.png

Once it moves back and forth easily, set it aside. Insert the tip of the tool and the plug into the puncture. Again you’ll need a strong shove to get the tip and the doubled plug into the tire. Push until just a half inch or so of the tips of the plug shows above the tread, then pull the tool straight back out—no twisting on this. The split edge of the eye will first pull the middle of the plug back into the puncture, packing it tightly with vulcanizing material, then free the plug so the tool pulls out, leaving the plug in place and the puncture instantly sealed—no waiting for glue to dry. (The ARB insertion tool incorporates a collar that prevents you from accidentally shoving the plug all the way into the tire.) Trim the plug as flush as possible with a knife or razor blade, and you’re finished. The tire manufacturer will warn direly that this is a temporary repair, but I’ve known tires with just a few hundred miles on them repaired thusly that went on to live out their full tread life. If the tire has deflated enough so that pushing on the insertion tool just pushes in the face of the tire, add some air with your compressor to give it more resistance.

Push the plug in until the ends stand just clear of the tread.

Push the plug in until the ends stand just clear of the tread.

What if the hole is larger in diameter than one plug will seal? Try two—or three, or four. My friend Tim once repaired a sidewall split with no fewer than five, and it got him back to civilization. While we’re on sidewalls, note that a plug repair there really should be considered an emergency fix only. The sidewall, even on a sturdy all-terrain tire, lacks the structural integrity of the belted tread area—it’s designed to flex, and can’t support the plug as well. Nevertheless, a sidewall plug repair should hold long enough to get you back. (Also note that, as excellent as plugs are, they won’t seal every puncture. Recently on a trip to Mexico a friend holed a tire with a sharp branch right at the corner of the tread and sidewall. The result was a flapped triangular hole that I simply could not get to seal, even with three plugs. It happens.)

Tim’s five-plug repair notwithstanding, a much better way to repair a sidewall split (sidewalls collect splits from rock gashes and pinching more often than they do simple punctures) is with a patch on the inside of the tire. To do that you’ll need access to the inside, which means you’ll need to break the bead, a procedure that sounds alarming but really doesn’t break anything. 

The inside edges of an automobile tire, where they grip the rim of the wheel and seal the air inside, are each reinforced with a very stiff wire cable embedded in thick rubber—the bead. The wheel is made with a corresponding groove running around its inside and outside edge. When your local Discount Tire store tech mounts a tire, his fancy machine first levers the tire over the rim so the beads are inboard of the grooves. He then applies a sharp blast of high-pressure air, which pops both beads outward and into their respective grooves. The tire can then be fully inflated. The grooves hold the beads very tightly—even running for some time on a flat tire will rarely unseat them.

When your tech needs to remove a mounted tire, his machine pries the beads loose with a powerful automatic lever. In the field, you’ll need to be more creative. Trust me, just jumping up and down on a deflated tire won’t work. (Important note: Those of you with shiny alloy wheels—or shiny steel wheels for that matter—will find that some of the following techniques might scratch and gouge them. I hereby absolve myself from responsibility.)

The first step is to remove the valve core to ensure the tire is completely deflated and to easily let out additional air as you compress the carcass. Both the Extreme Outback and ARB kits come with a valve core removal tool. Mark the tire and wheel with chalk or anything handy, to make sure you re-install it in the same place and don’t mess up the balance (the EO kit includes chalk). To “break” the bead you need to apply inward force to the sidewall of the tire as close as possible to the edge of the rim, in order to force the bead out of its groove. One effective way to do so is to lay the tire and wheel on its side under your vehicle’s bumper, then position a Hi-Lift or bottle jack with the base plate on the tire and the lifting tongue or post under the bumper. Crank up the jack and the base plate will push the bead out of its groove. You generally only need to do this in one spot as the bead will easily pop out of the rest of the groove when stood on. Always break the bead on the outside of the wheel first; the groove on the inside has a ramp that makes it more difficult. 

Screen Shot 2018-02-05 at 9.43.19 PM.png

An elegant enhancement to the Hi-Lift technique is the Extreme Outback Beadbuster, which attaches to the jack’s base plate and incorporates a curved spade to precisely bear against the tire close to the rim, reducing stress on the sidewall. The opposite, cruder end of this spectrum is to lay the tire on the ground and simply drive over one edge of it with the help of a spotter. Effective, but a bit hard on the tire.

The Beadbuster makes beadbreaking with a Hi-Lift jack easier on the tire.

The Beadbuster makes beadbreaking with a Hi-Lift jack easier on the tire.

By far the quickest—and most stylish—way to break a bead is with the Australian-made Tyrepliers. This cunning tool, which adjusts to fit wheels up to 19 inches in diameter, frees the bead using good old Archimedean leverage. It’s nearly foolproof, and so universally respected that it carries a NATO stocking number. I’ve lost count of the onlookers and students I’ve amazed by popping the bead on a tire in about ten seconds flat. You stand on the tire and use one foot to push the fixed hook of the tool under one edge of the rim, then work the lever hook under the opposite side with the paired handles. Push down on the lever handle and voilá. It’s not only fast, you’re bearing only on the actual bead, so damaging the sidewall is virtually impossible.

First lever both hooks of the Tyreplier under the rim.

First lever both hooks of the Tyreplier under the rim.

Then push down on the outside lever to force the bead out of its groove.

Then push down on the outside lever to force the bead out of its groove.

Once the first bit of bead pops free of the groove, it’s generally possible to stomp the rest of it out around the circumference of the rim. If that doesn’t work, reposition the jack or Tyreplier.

Once the outside bead is free, turn the tire over and do the same to the inside bead. The tire will now be loose in the well of the rim, but you still will not have access to the inside of the carcass. For that you’ll need a pair of automotive tire irons, which look like and are just butched-up bicycle tire irons about two feet long, and work exactly the same way. (Extreme Outback's Deluxe model is the best I've used.) Start near the valve stem (again, you’re working on the outside of the wheel), insert one iron and lever the tire over the wheel edge. Insert the next one near it and lever that section of the tire over. Leave the first iron in place as you proceed around the tire until it pops free. With one side of the tire off the rim, you’ll have adequate access for most repairs; if not, you can use a tire iron and a dead-blow hammer to take the tire completely off the wheel. But getting the second bead over the edge is significantly more difficult.

Using tire levers to pull the bead over the rim.

Using tire levers to pull the bead over the rim.

If the sidewall split is short, you can simply patch it from the inside; again think glorified bicycle repair. The patches in the Extreme Outback kit cover a range from small to terrifyingly huge. If the split is severe, you’ll want to stitch it to hold the edges together and reinforce the patch—yes, more or less like a surgeon would do with a bad cut. I use a cordless drill, or an awl with a cutting edge, to make a line of small holes on either side of the split, an inch or so apart and a quarter inch from the split, then stitch it together tightly with whatever is handy. Small-diameter, flexible wire works best; heavy fishing line works too but is difficult to knot. (I’ve heard of people using dental floss, which might work if it were tripled or quadrupled.) With the slice secured, you can roughen the area behind it, spread cement on both tire and patch, wait until dry, then apply (obviously your patch needs to cover the stitch holes). This is another repair to be considered only in a fix-it-or-walk-home situation, but I know of stitched tires surviving dozens of rough miles. Incidentally, if you have a tire off the rim and you’ve done any plug repairs, note that now is a good time to trim the plug and install a patch behind it for ultimate security. 

Now you have to put everything back together. Starting this time opposite the valve, use the tire irons to pry the bead or beads over the rim and back into the well of the wheel, so you have a loose tire completely inside the rims. Remember the fancy machine the tire tech used to blast air into the tire and seat the beads? Again, we’re going to improvise. 

There’s a long-standing myth that you need a very large volume of air (or hold-my-beer pyrotechnics with starting fluid; see below), to reseat beads. But I’ve done it with very small compressors and proper technique—as long as the wheel is not too wide for the tire. If you run showpiece alloy wheels ten or twelve inches (or more) in width, so your tires’ sidewalls barely protrude past them, you might have a devil of a time reseating beads in the field—and you’ll also stand a much greater chance of damaging a wheel rim on the trail, since there’s no protection offered by the sidewall. The steel wheels on our Land Rover 110 and FJ40 Land Cruiser are 6.5  inches wide, and I can easily reseat beads on 255/85/R16 BFG tires (higher-profile tires help as well, with their more flexible sidewalls).

I mentioned that I’d reseated beads with very small compressors, but the larger volume of air you have, the easier and quicker the process will be (see sidebar on compressors). A CO2 tank will work very well, but be aware that CO2 can leak out of tires over time.

Here’s how it’s accomplished. Stand the tire and wheel upright, and center the tire as evenly as possible in the wheel with your chalk marks aligned. If tire and wheel are well-matched the tire’s beads will naturally bear against the inside of the grooves and form a partial seal on their own. Use water, with some detergent in it if you have it, to thoroughly soak the perimeter of each bead—this functions more as a lubricant than a seal. In a pinch any liquid is better than nothing—my nephew reports that Keystone Light beer works well, which is as far as I’m concerned the best possible use for Keystone Light.

Screen Shot 2018-02-06 at 11.49.51 AM.png

Your valve core is still out, right? Apply the air chuck to the valve and start inflating. (Note: You’ll need a chuck that doesn’t require the valve core to be in place to operate.) Check yours first. If the tire is not centered properly you’ll see a lot of bubbles in one spot; stop and reposition. If the seal is good you’ll see the tire’s walls expand slowly until, with a distinctly alarming metallic PING, they will seat in turn, usually the inside one first because of the ramp. Release the chuck—air will rush out but the beads will stay put. Re-insert the valve core, inflate, and you’re finished.

Some bush mechanics suggest running a ratchet strap around the circumference of the tire and tightening it prior to setting the beads, the idea being that it will push the beads outward and making sealing easier. I’ve tried it with and without and never noticed a difference, even with a big strap—and to me the strap just adds one potentially dangerous bit to fly off if something goes wrong. The other seating technique is the infamous starting-fluid routine, which involves spraying starting fluid or another flammable aerosol around the bead of the tire laying on the ground, then tossing in a match to create a minor explosion that blows the beads onto their grooves in a split second. When this works it is a crowd-pleasing spectacle, but search YouTube for videos and you’ll find plenty of crowd-pleasing, spectacular failures as well. I prefer the more civilized approach.

I only failed to reseat a bead once in public, at an Overland Expo. It was embarrassing, and I didn’t discover the reason until later. The wheel I was using was very rusty on the inside, and simply let too much air leak to re-seat no matter how hard I tried. Once I cleaned off the rust and repainted the wheel I never had trouble again.

There is another situation in which you might find it necessary to reseat a bead. Occasionally on very rough trails a rut or rock will catch the side of a tire with enough force to knock a bead loose and produce a startling whoosh as the tire deflates. This seems somewhat more likely to occur if you have aired down to enhance traction (or if you’ve been indulging in a bit of Baja 500 hooning). Frequently only one bead—usually the outside one—will be pushed off. While it is sometimes possible to reseat the bead with the wheel still on the truck, you might find it necessary to remove the wheel and actually unseat the opposite bead to get the tire to sit properly for reseating with an air compressor.

Once you’ve mastered the art of demounting tires and reseating beads in the field, dealing with simple punctures will seem like child’s play. That day in Nevada? If memory serves, we collected several more punctures before the day was out, and each one was repaired in a couple of minutes. We never even considered putting on the spare tire. That would have been way too much work.

Just part of the contents of the Extreme Outback Ultimate Puncture Repair Kit (about $100).

Just part of the contents of the Extreme Outback Ultimate Puncture Repair Kit (about $100).

 . . . and the also-excellent ARB kit, well-organized in a blow-molded case ($42).

 . . . and the also-excellent ARB kit, well-organized in a blow-molded case ($42).

One last note: The plugs that are included with the ARB kit are really too large in diameter for most punctures, and make the job more difficult than it needs to be. Do yourself a favor and look on Amazon for extra-thin Safety Seal plugs to augment the kit. They help with the Extreme Outback kit as well.

Hammers . . .

Park Tool hammer.jpg

Lately I’ve been trying to expand my dedicated set of bicycle tools, largely the iconic blue-handled items from Park, which I described last time as the Snap-on on of bike tool makers. Honestly, besides the specialty bits—bottom bracket tools, brake compressors, head-tube reamers, and the like—there really is no particular “bikeness” about Park’s hex keys, wrenches, pliers, and screwdrivers. But they’re inarguably of high quality, fairly priced, and, well, the pegboard just looks sharp with color-coordinated tools, and it makes me feel like I’m a better bicycle mechanic than I really am, and perhaps if you feel like a better mechanic you’ll actually be one.

Or whatever rationalization you like . . .

In any case, recently I decided it would be nice to have a dedicated hammer for bicycle work, for when certain things just need a tap or two either to get where they’re supposed to be or to be removed (the cottered cranks on Roseann’s vintage Raleigh come to mind). So I ordered a Park hammer with one hard face and one (replaceable) plastic face.

I was expecting a 3/4-scale tool suitable for not endangering expensive Campagnolo parts or brittle carbon fiber; instead I got a full-sized brute of a thing that weighs 2.1 pounds. 

Hmm . . . that got me thinking, and I pulled out the One Case Tool Kit (full-size version). In it I currently have two hammers—a sledge for rough work and a Craftsman plastic-faced product with one soft and one harder face. The sledge weighs 2.4 pounds, the plastic hammer just under a pound. Honestly, the plastic hammer has proved too light. Even as something designed to be gentle on parts it lacks sufficient mass and kinetic energy to be effective. Comparing the new Park hammer, it is not that much lighter than the sledge for rough beating, yet usefully twice the weight of the Craftsman plastic hammer. And by replacing both previous hammers I actually save almost a pound and a half. 

So, er, now I need to buy another bicycle hammer . . .  

The most perfect tool on earth

Jesus clip tool.jpg

Okay, that might be a bit of an overstatement. But every now and then you come across a tool that does exactly one thing, but does it so perfectly that you wonder how you got along without it.

In this case, the one thing to which I'm referring involves a fastener found, among many other places, on Land Cruiser carburetors. It's a near-microscopic springy bit known generally as a hair-pin clip, or colloquially as a Jesus clip (is it sacrilegious to use a capital there?)—either because some of them are shaped like the letter J, or because of the epithet used when one flies out of your grasp. On carburetors they're used to secure linkage rods by popping into a groove at the end of the rod. Removing and replacing them has always been a dicey proposition with needle-nose pliers or, slightly better, hemostats. Dicey because if one of these things pops out of whatever you're using to hold it, it's gone.

Jesus clips.jpg

A few months ago, our master Toyota mechanic friend Bill Lee was visiting, and while he was here he addressed some issues on the FJ40's carb. When he started disassembling the linkage he pulled this out of his kit: a simple plunger-activated rod with a tiny hook in the end of a tiny tube.

Jesus clip tool tip.jpg

The hook grabbed each Jesus clip and popped it off (and back on again) with effortless security. A groove in the end of the tube ensured the clip stayed straight, even when pushing it back into place.

OMG. I had to have one.

Except it turns out the company that made them, Lisle, discontinued part #46500. Little demand for fiendishly clever carburetor tools these days, I guess. I haunted eBay for weeks but failed to find a used one—until Bill visited again, and handed me one a mechanic friend, Jeff Bell, had given him. I'm going to be rebuilding my carburetor every six months just to employ this thing. Brilliant.

Jesus clip tool function.jpg