
I’ve been teaching a tool-selection class now for several years at the Overland Expo, and while most who attend are grounded in the basics of what tools are what and what they do, an increasing number of people are not. This is an inevitable consequence of the direction in which the world is headed—more and more complexity in our vehicles, fewer opportuities for shade-tree mechanics, more two-income families with simply no time to ‘mess around’ with cars. As well, vehicles have become more and more reliable and their drivetrains more durable in the last few decades. No one these days thinks a thing of handing down a 150,000-mile Civic or Corolla to a college student (and how many of those rack up another 100,000 miles before starting a new career crowned with a glowing Domino's Pizza sign?). One result of all this is the 20-something man who approached me after one class and admitted that, regarding my discussion of ratchet and socket sets, he had no idea how a ratchet and socket set worked. So I thought it a good time to step back and review some basics.
Those of us who venture off the beaten track, away from AAA and perhaps even out of cell-phone range, must assume more self-sufficiency than our pavement-bound friends. There are dozens of things that can go wrong on an overland vehicle, and fixing any of them, from easy repairs such as a broken fan or serpentine belt, a split radiator hose, or dirty battery terminals—even just tightening bolts on a roof rack—up to major events such as replacing a broken CV joint or birfield, is going to require tools.
I stress to my class attendees who plan to travel that even if they have no mechanical ability whatsoever, it’s still important to carry a set of tools. You’ll make a lot of points with any good Samaritan who stops to help if he doesn’t have to dig out his tools to use on your vehicle. And if the choice is between an attempt at a repair, or walking out, it’s surprising how many total mechanical rookies have successfully muddled through quite elaborate procedures using nothing but common sense.
The next thing I stress is that your tools should be quality products from reliable manufacturers. Think about it: If you’ve brought out the tools something has already gone wrong—why risk making the situation infinitely worse by using a poor-quality tool that breaks? With that said, few of us can afford to spend thousands of dollars on a complete outfit from Snap-on (the Rolls Royce of tool makers). So the smart strategy is to prioritize where you spend. If a screwdriver tip snaps, you can usually make do with a substitute. If the 19mm socket you’re using to remove transmission bolts breaks, you are not going to get those bolts off with your Leatherman. So let’s look at some of the elements of a basic tool kit, and their functions, starting with the most critical, and therefore the one on which you should spend the most.
Ratchet and sockets
Virtually all the important breakable bits on your vehicle—as well as many that simply need regular maintenance—are held on by either bolts or nuts. The only two proper ways to remove and install bolts and nuts without damaging them are with a ratchet and socket, or a wrench (not pliers!).
The socket part of the ratchet/socket team is a precisely sized piece that fits snugly over the bolt head or nut. Sockets come in metric sizes (10mm, 12mm, etc.) or SAE (Society of Automotive Engineers) sizes (3/8”, 1/2”, etc.) that correspond to the diameter of the bolt or nut they fit. Most new vehicles these days are metric, but a few mix both types. Note that some metric sizes are close to SAE and vice versa—you can use a 19mm socket on a 3/4” nut, for example—but the fit might not be as tight on crossover sockets, which could result in stripping a very tight fastener. (Also, note that a 3/4" bolt will not fit in a hole tapped for a 19mm bolt—the threads are different.)
Look inside a socket and you’ll see why they are referred to as either six or 12 ‘point’.
A 12-point socket is easier to pop over the head of a nut because you don’t have to turn it as far. On the other hand, a six-point socket is a bit stronger, better able to grip a rounded-off fastener—and thus generally better for a field kit. Speaking of rounded-off fasteners: In 1965 Snap-on patented a system they called Flank Drive. By radiusing the apex of each angle in the socket, they enabled it to bear on the flats of the fastener, rather than the corners. This allowed more torque to be applied, and also made it easier to remove butchered fasteners. Once the patent ran out, many other companies copied the system, giving it their own names since Snap-on still has the Flank Drive trademark.
Note the radiused points on the Flank Drive socket, left.
On the other, drive side of the socket is a square hole, and this is where the socket snaps on to the ratchet. The ratchet has a toothed mechanism in its head that allows it to lock when turning in one direction, while ‘ratcheting’ freely the other way. Thus tightening or loosening a fastener can be accomplished with a convenient back and forth movement of the ratchet handle, without the need to lift the socket off the fastener and reposition it. A lever or dial reverses the direction of ratcheting.
The square peg on the ratchet, on which the socket fits, is called the anvil or square drive, and its diameter determines the size of the ratchet: A 1/4” ratchet has a 1/4-inch diameter drive, and all sockets for that ratchet will have 1/4-inch diameter drive holes (that’s why you’ll see confusing references to, for example, a 3/8” socket for a 1/4” ratchet). A 1/4” ratchet is suitable for light-duty fasteners. A 3/8” ratchet is perfect for most general automotive work, and should be the first set you buy. A 1/2” ratchet is what you’ll need for more heavy-duty jobs. In terms of the range of fasteners each will handle, there is much overlap, but in general I think of my 1/4” ratchet set as suitable for anything from 4mm up to 12mm fasteners; the 3/8” works well for anything from 8mm up to 19mm, and the 1/2” set is great for 14mm on up. I rarely bother carrying a 1/4" socket set in our vehicles; the two larger sizes suffice for everything.
Left to right, a 1/4", 3/8", and 1/2" ratchet.
The number of teeth in the ratchet head has a bearing on how well it works. Hold the anvil between your fingers and turn the handle while counting the number of clicks it makes rotating 360 degrees. Thirty six clicks equals a 36-tooth ratchet, etc. Years ago most ratchets had 24 or 36 teeth, but lately the count has been going up, and today many ratchets have 72 teeth, and some now boast 80 or more. Why does this matter? Aside from a nicer feel, a finer tooth count means fewer degrees of swing before the ratchet clicks to the next tooth; this can be critical in tight spaces when you have little or no room to swing the handle. On one field repair I had a couple of years ago, my 80-tooth ratchet had exactly one click of free movement to remove a vital but nearly inaccessible nut. It took me 15 minutes to get that nut off, one click at a time—but I got it off. One caveat: It’s easy to make a coarse, 36-tooth ratchet strong, but when you get up around 80 teeth it takes better engineering to ensure adequate strength and resistance to skipping and ‘self-reversing’. So quality becomes even more important.
Materials: It used to be that ‘forged’ and ‘chrome vanadium’ or ‘chrome molybdenum’ were pretty reliable signs of a quality ratchet set. Unfortunately even the cheapest offshore brands now forge tools from chrome vanadium or chromoly, so that’s not on its own a reliable standard. You can easily forge a poor tool from chrome vanadium steel—the difference in a good tool will stem from the purity and mix in the alloy, the heat treating, the finish, and the precision of the fit on the fastener. The best way to ensure quality is to stick with a reputable brand (see below); but other features will help you identify a good set.
What should you look for in a 3/8” ratchet set? Start with the basics. The set should include:
- Ratchet
- Two extensions, one short, one long
- Standard-depth sockets from around 8mm to 19mm (or 1/4” to 3/4”)
- If possible, deep sockets from around 10mm to 19mm (These can be purchased separately if necessary. Deep sockets are used when a bolt protrudes far enough from the nut that it bottoms out on a standard socket.)
- Universal joint (to help access partially blocked fasteners)
- A sliding T-handle is nice. It’s a backup in case your ratchet breaks, and sometimes can access places where the bulkier ratchet head won’t fit.
- Some sets will include a pair of spark plug sockets, but these can easily be added later.
- In a 1/2” ratchet/socket set, look for standard sockets from about 12mm up to at least 25mm (32mm would be better). I don’t worry about deep sockets in a 1/2” set; I’ve rarely if ever needed them. For your 1/2” set you’ll also want a breaker bar for extra leverage on big drivetrain fasteners. Most breaker bars eschew a ratchet mechanism to retain ultimate strength—once the fastener is loosenedyou can switch to your standard ratchet. An 18-inch long breaker is sufficient for almost all tasks.
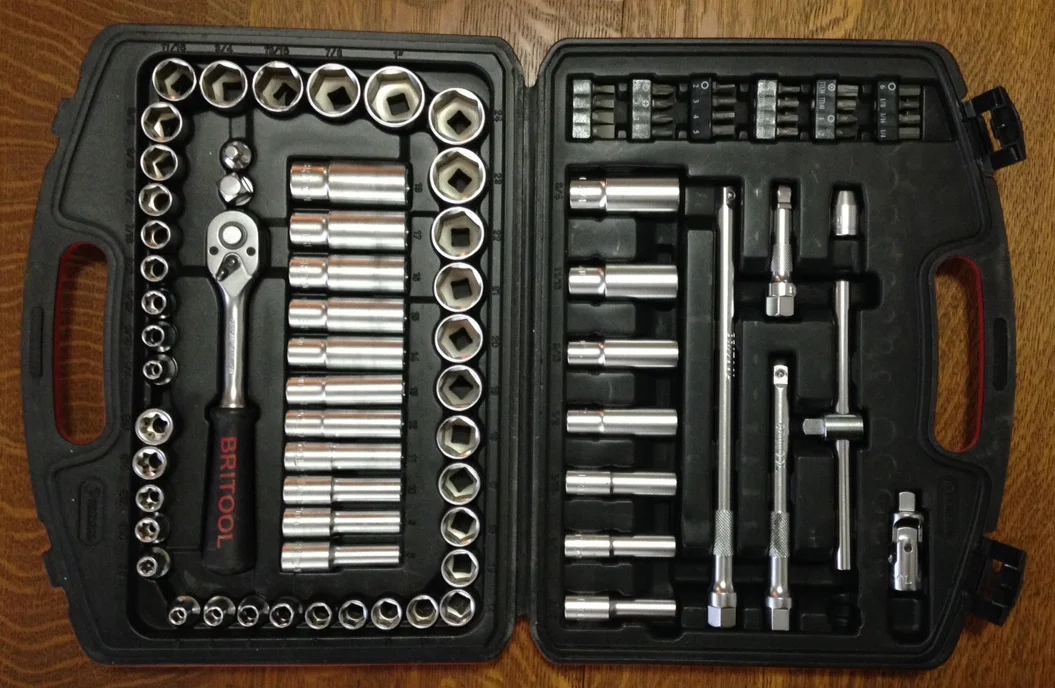
A superbly comprehensive and compact socket set from Britool, including standard and deep SAE and metric sockets, a sliding T handle, extensions, a universal joint (lower left), plus screw, torx, and hex fittings with an adapter. Sadly no longer made; the newer Britool products have diminished in quality.
In addition, many possible extra features are nice to look for, although it’s unlikely you’ll find all of them in one set.
- Knurled extension. This grippy area helps you to spin on (or off) a fastener before you need the torque suppled by the ratchet.
- Wobble-tip extension. A slightly rounded tip on an extension allows the socket to work at a slight angle, if an obstruction prevents you getting the ratchet directly over the fastener.
- Hex fitting. A few extensions come with a hexagonal section near the top, which allows you to apply a wrench to turn it if you cannot get ratchet on it, or if the ratchet breaks. (The more alternative and backup ways you have to accomplish a field repair, the better.)
A ratchet extension with a knurled section and a hex fitting for wrench.
A standard (left) versus wobble-tip extension.
- Some ratchets come with rubber or plastic ‘comfort handles’. These are definitely more comfortable, and prevent scratching if the handle bangs into sheet metal or paint; however, they’re also more difficult to keep clean. Fully polished ratchet handles are much better in that regard. It’s pretty much personal preference.
- A quick-release button is handy for removing sockets from the ratchet—otherwise the spring detent ball that holds the socket on can require a strong tug to overcome.
- Personally I like to retain the blow-molded plastic case that many socket sets come in. While it adds more bulk to the tool kit than if you simply dumped everything in a bag, the case keeps everything organized and easy to locate, it reduces wear on the tools, and—above all for me—it makes it easy to see if you’ve left out any sockets or other items when you’ve finished the work.
- You’ll see so-called ‘pass-through’ socket sets that eliminate the need for deep sockets. I’ve found these to be less than desirable because the components are very large in diameter and don’t work well in confined spaces. Also, they’re incompatible with standard sockets, so if you break one you can’t easily borrow a replacement or find one in some backwoods hardware store.
So what about brands? As I mentioned, the socket set is the most critical component of your tool kit in terms of quality, so if you’re going to splurge and shop at snapon.com or mactools.com, now’s the time to do it. Just make sure your payments are current on the Amex Platinum. (You can also do as I do and haunt eBay for used sets.)
Setting aside the gold standards, I’m very partial to the Facom (pronounced “fahcomb”) brand. Described as ‘France’s Snap-on’, most of their tools are now produced in Taiwan, but the quality control seems exceptional. Bahco makes some very nice boxed sets, although they rarely seem to include deep sockets.
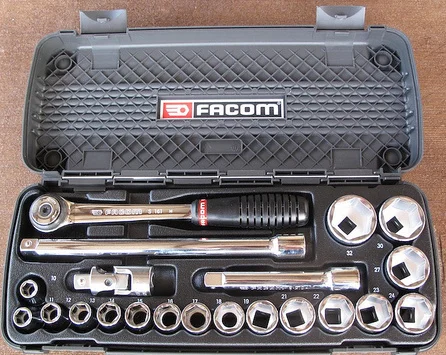
A high-quality Facom 1/2" set with a comprehensive assortment of sockets.
SK tools makes most if not all their sets in the U.S. After a decided dip in quality before a reorganization, it seems to be back again. The finish is really good, although the ratchet I tried only had a 40-tooth head—interesting how clunky that formerly standard count feels after getting spoiled with 80-tooth heads.
Stepping down a notch, but still functional, is the Sears Craftsman Professional line—as distinguished from the standard Craftsman line, which has lost quality over the last few years with a switch to offshore production. Stick with sets that include the fully polished ratchets and you’ll be okay. The thin-profile ratchets are nice, and they have 60-tooth heads.
Home Depot’s Husky line is not bad, although their ratchet design is an annoyingly blatant ripoff of the Snap-on style. But the prices are excellent and the tools have a lifetime guarantee (which, remember, is great but of little immediate value if the tool breaks in the field). Lowe’s Kobalt brand seems well-made, and the stores I've been in carry a wide selection. They make a 40-piece SAE and metric 3/8” set with a 72-tooth ratchet that is a bargain at around $30, although, again, there’s that Snap-on-esque handle (insert eye roll).
Once you've got a 3/8" and 1/2" socket set, you'll be ready for the companion tools for removing and attaching fasteners: Wrenches.