Look at reviews of shock absorbers for four-wheel-drive vehicles in U.S. magazines, and you’ll probably find just two types listed and described:
- Mono-tube, high-pressure gas-charged
- Twin-tube, low-pressure gas-charged
All modern automotive shock absorbers—dampers if you prefer the more technically accurate term (or dashpots if you like to flummox people in casual conversation)—use oil to retard the oscillations of the vehicle’s springs as they deflect over bumps or depressions, in turns, or when braking or accelerating. As the piston of the shock absorber moves up and down, it displaces oil through valves that restrict how much and how quickly the oil can move, thus attenuating the movement of the spring. Without shock absorbers, the vehicle—especially one equipped with coil or torsion-bar springs, which have very little internal friction—would pogo wildly after hitting a bump or depression, roll dangerously in turns, and nose-dive under braking. Manufacturers vary the valving to suit the vehicle and the application, to adequately control these movements. The valving is inevitably a compromise between ride comfort and control.
So far, so simple. However, the situation changes when you start working a shock hard—say, on a long washboarded road at speed (where the shock piston’s travel, or amplitude, is low but its velocity high), or on a slow rocky section where velocity is low but amplitude high because you’re using all the suspension’s travel. Under these conditions, the shocks can fade—that is, suffer a loss in damping capability so that control is reduced.
First, the harder a shock is worked, the more it heats up, reducing the viscosity of the oil. This allows it to move through the valves more rapidly, reducing effectiveness. An equally important factor is cavitation. When the shock’s piston moves rapidly, it creates a very high pressure zone in front of it and a very low pressure zone behind it. If that low pressure zone drops below what’s called the vapor pressure of the oil, the oil instantly boils—even if it is not hot (remember, water boils in a vacuum even at absolute zero). The boiling creates thousands of micro-sized vapor cavities or voids—and, unlike the oil itself, those voids can be compressed as the shock rebounds, reducing the effective viscosity of the oil and likewise reducing its damping effectiveness. Additionally, as the shock rebounds and the voids collapse, they create microscopic bursts of pressure that can erode seals and the edges of valve shims. The vapor pressure of oil increases with temperature; thus, so does cavitation, exacerbating the heat effect on fade. (You can see exaggerated cavitation in action in a short video HERE.) Finally, in certain shock designs, air or nitrogen gas in the shock can mix with the oil, drastically reducing its effective viscosity with a resultant loss in performance. If your shocks fade badly enough it can severely compromise safe handling of the vehicle, not to mention ruining the ride comfort and potentially damaging other suspension components or the vehicle itself.
Manufacturers try to prevent or reduce cavitation and fade in several ways. Keeping the temperature of the shock oil low is the obvious first goal. Higher-viscosity oil is more resistant to cavitation due to its lower initial vapor pressure, but there’s a practical limit there.
A nearly universal “fix” for cavitation is to pressurize the shock—usually with nitrogen, which is non-corrosive and resists aeration with the oil better than air. A pressurized shock resists the expansion that is the result of cavitation, helping to force the oil to stay in its proper state.
The de Carbon monotube shock, named after its inventor and developed commercially by Bilstein, does this within a single tube that functions as both the outer body of the shock and the cylinder of the piston. The nitrogen is separated from the oil by a second, floating (or dividing) piston.
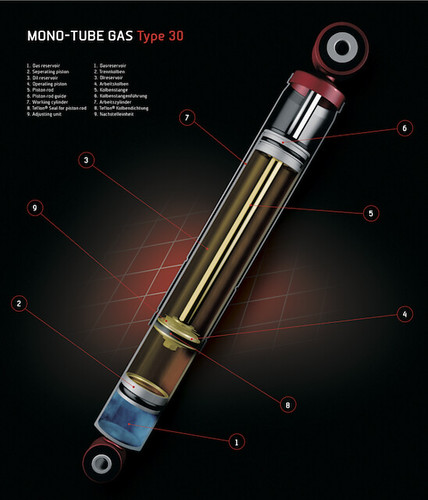 Monotube shock. 1. Gas reservoir 2. Floating piston 3. Oil reservoir 4. Operating piston 5. Piston rod 6. Piston-rod guide 7. Working cylinder 8. Teflon seal for piston rod 9. Adjusting unit
The monotube shock has several advantages, especially in terms of heat dissipation, as the single wall readily radiates to the passing air stream. Since the nitrogen is physically separated from the oil, aeration is eliminated. On the other hand, the high initial pressure of the de Carbon design (often over 300 psi) seems to heat up more quickly to begin with, and that same pressure puts constant stress on the vital piston-rod seal, even when the vehicle is parked. For a given length, a monotube shock will have less travel than a twin-tube shock, since it has to leave room for that gas chamber (this is one reason some such shocks are built with remote reservoirs that incorporate the floating piston and the gas charge). For a four-wheel-drive vehicle, though—especially one that might be employed on long journeys far from resupply—perhaps the biggest disadvantage is the vulnerability of that single tube. One dent from a flung rock will render the shock worthless (although it would take a significant smack, and many drivers put tens of thousands of miles on monotube shocks with no issues).
The twin-tube shock more or less reverses these plusses and minuses. The outer tube can withstand significant dents with no ill effects, since the space between inner and outer tubes is simply an oil and gas reservoir—which also allows longer travel than a monotube shock. That double wall inhibits heat dissipation, although the cylinder can be made thinner. Most twin-tube shocks employ a low-pressure charge of nitrogen in the top of the secondary tube, with no separation from the oil—which is why twin-tube shocks can only be mounted one way, and why a new twin-tube shock should ideally be stood upright and cycled fully several times to properly locate the gas. (Some twin-tube shocks employ a bag of gas, keeping it separated from the oil.) A large majority of original equipment shocks, and many aftermarket designs, use the low-pressure, nitrogen-charged twin-tube design.
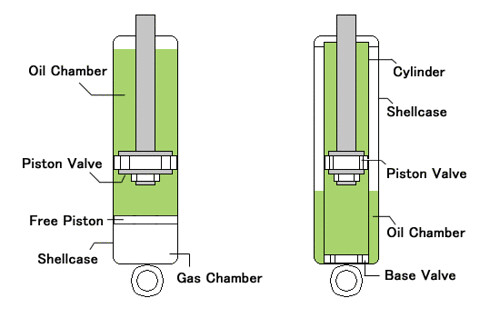 Monotube on the left; twin-tube on the right
But is there another way?
Perhaps the finest shock absorbers I ever had on my FJ40 Land Cruiser were from Koni, the legendary Dutch maker far better known (at the time) for equipping Porsches and BMWs than four-wheel-drive vehicles. I found them at significant expense because I’d had Konis on a street-racer Toyota Corolla and was amazed at how they transformed its handling. The Konis were bereft of any gas charge at all—they relied solely on a hefty volume of oil and sophisticated valving for their effectiveness, and worked sublimely in any situation I threw them at, whether low-speed rock crawling or high-speed Mexican washboard. I only regretfully replaced them when I decided to lift the Land Cruiser’s suspension so I could fit taller tires; Koni had no application for the new setup.
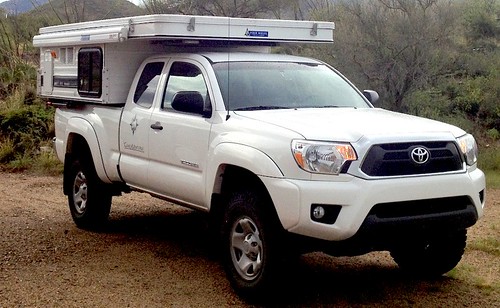
Fast forward 20 years. Roseann and I were scheduled to drive a 3,500-kilometer loop through Tanzania and Kenya, in a Land Rover Defender 110 loaned to us by Paul and Erika Sweet of Shaw Safaris in Arusha. The Shaw Defenders are comprehensively equipped for self-sufficient overland travel, as you can see here:

I never had a chance to put “our” 110 on a commercial scale, but I’d be stunned if it wasn’t banging hard on Land Rover’s suggested GVWR, if not significantly over. As Paul and I were going over the vehicle prior to our departure, I looked underneath at the suspension he’d installed. There were mighty coil springs from TJM—and four massive Koni shock absorbers, in the company’s signature red. The Heavy Track Raid, Paul told me, was Koni’s entry in the heavy-duty expedition suspension market, and he’d chosen them after less-than-stellar experience with several other brands.
Our second day on that trip was a 300-kilometer slog to Dodoma on a road cheerfully marked in main-highway-red on the Tanzanian map. It turned out to be a sadly degraded track that involved hours driving at ten or 20 kph, with the suspension cycling fully over ridges and warthog-sized potholes, the 110 rolling side to side like an overloaded tramp freighter in a squall. The road would then duplicitously smooth out until we were tempted to accelerate to a glorious 40 kph—at which point a hidden hole would slam the vehicle nearly to its bump stops.
I say “nearly” because throughout the 12-hour day the Land Rover’s suspension soaked up everything we threw at it with aplomb, maintaining composure whether hammering over corrugations or probing the limits of travel through craters. Several times during the day I crawled under the vehicle and gingerly felt those fat red shocks; at no time were they more than warm to the touch—give it 120-130 degrees at a guess. An astonishing performance—which was repeated virtually every day for the next two weeks as we explored the hinterlands of both countries, far off normal tourist tracks.
Back home I researched the Heavy Track Raids—discovering, much to my annoyance, that they’re unavailable in the U.S. except for certain models of the Mercedes G-Wagen—and found that, just as with my original Konis except to a far greater degree, the Raid relies on a massive volume of oil to control temperatures, rather than combining a lower volume of oil with nitrogen. The fatter shock body also promotes cooling: Since the area of a cylinder increases as a function of the square of the radius, a small increase in diameter results in a big increase in the surface that can radiate heat, even in a twin-tube shock such as the Raid. Further investigation showed the Raid shocks to be widely respected in Australia, where epic cross-country journeys are the norm. Mick Hutton, of Beadell Tours, has kept an exhaustive and convincing record of the performance of Koni Raids on their Land Rovers (HERE).
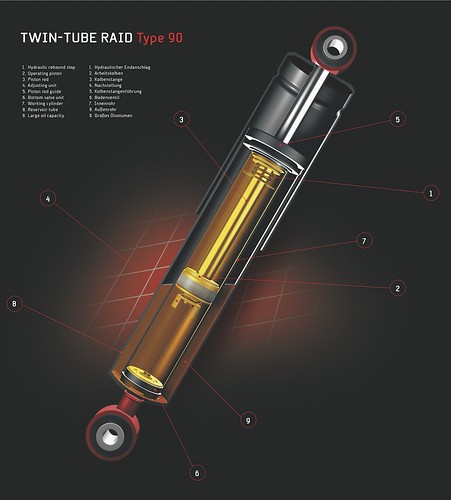 The Koni Heavy Track Raid. 1. Hydraulic rebound stop 2. Operating piston 3. Piston Rod 4. Adjusting unit 5. Piston rod guide 6. Bottom valve unit 7. Working cylinder 8. Reservoir tube 9. Large oil capacity
All right—enough torturing myself about unobtanium shocks. An alternative had been under my nose for some time: Boss, the Australian company that makes the heavy-duty air bags I installed on the JATAC, also makes a line of all-oil twin-tube shock absorbers—with a twist. Rather than filling the top of the secondary tube with pressurized air or nitrogen, the tube is completely filled with oil except for a thick sheet of heavy-duty closed-cell foam that wraps loosely around the inner tube. According to Boss, this accomplishes several things:
- The oil volume is maximized for increased resistance to overheating.
- The chance of aeration is completely eliminated, since no gas is ever in contact with oil as it is with most twin-tube shocks.
- Cavitation is reduced because the closed-cell foam provides, in essence, spring pressure against any expansion, collapsing and expanding as needed.
- The shock can be mounted in any position.
Several of these attributes are irrefutable as advantages. More oil is better, period. Keeping gas, whether air or nitrogen, completely separated from the oil is also better.
As to whether the foam-cell is superior to gas pressure in limiting cavitation . . . it depends on with whom you’re talking. The Australian manufacturers who produce both types position the foam-cell shocks above their gas shocks for heavy-duty use, and charge more for them. The Aussie magazine 4WD Action recently ran a comprehensive shock test, in which a foam-cell model, the Tough Dog (made in the same factory as the Boss shocks) came out on top of a stellar field—including the standard Koni Heavy Track.
On the other hand, a suspension engineer with whom I corresponded stated flatly, “There’s no way a foam-cell shock can control cavitation as well as a monotube shock pressurized to 250 psi or more.”
Whichever design has the edge in attenuating cavitation, one feature intrinsic to foam-cell shocks is indisputably advantageous: Since the shock is under no pressure at rest, the piston-rod seal is not constantly being stressed. That can’t help but enhance durability. A side benefit is that the shock is much easier to install—you can adjust the length by hand when offering it up to the mounts. I’ve had to use a bottle jack to compress some high-pressure monotube shocks when fitting them.
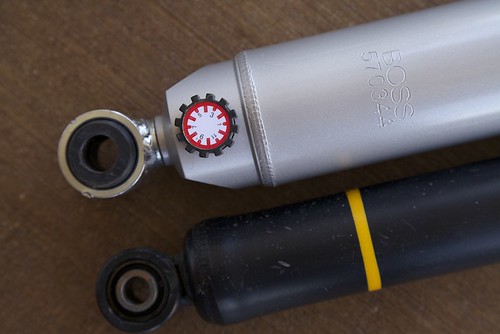
The Boss shocks incorporate one more excellent feature: 12-step adjustability, via a dial at the base of the shock. This mechanism—essentially an auxiliary bypass valve with a variable orifice—is shared with a few other excellent trail shocks such as the Rancho RS9000XL. It allows the user to tune the compression damping to suit the load and his preferences, and will also compensate for inevitable wear.
Reece Tasker at Boss Global in Canada arranged to ship a set of shocks to fit our Tacoma. It was impossible not to be impressed by the massive 21mm shafts and 60mm tubes of the Boss shocks. The stock Toyota (Tokico) shocks’ shafts are just 12.5mm in diameter, and look more suitable for supporting a hatchback’s rear window by comparison. The Boss shocks came with rubber boots to protect the shaft; I understand a change to a rigid plastic sleeve is underway (as is a switch to a Viton shaft seal).
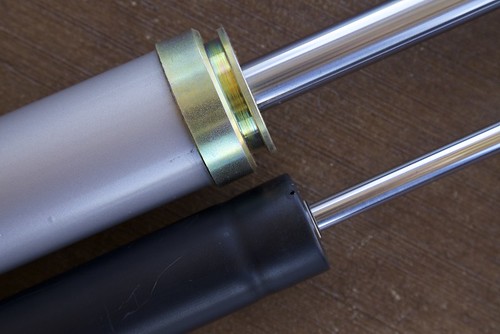 Boss on top; stock Toyota below
I should note that the shocks were not quite a bolt-in proposition. First, the company does not supply bushings for the oversized lower eye on the front shocks. I had to press out the stock bushings from the OEM Toyota shocks, and press them into the Boss eyelets with a bit of locking compound. Since our OEM shocks had less than 15,000 miles on them there was no issue with wear, but if you were replacing older shocks you’d need new bushings. Simple, right? Except that Toyota does not list those bushings separately for our year Tacoma, only the complete shock. I’ve yet to find an aftermarket alternative. Also, the Boss-supplied lower bushings (rubber with a metal sleeve) for the rear shocks were about a tenth of an inch too wide; I took them down a bit with a belt sender. Finally, at full droop the Toyota’s front anti-roll bar contacted the stout aluminum spring base of the Boss cartridge. I could have left it, or ground off a wedge of the spring base with no harm; instead, I installed a set of Icon relocation plates, which move the bar slightly down and forward, eliminating the interference. (Bilstein makes a similar kit; both bolt on with no drilling.) Perhaps once Boss becomes more established in the North American market, these issues will be solved; in the meantime, it was little trouble to address them.
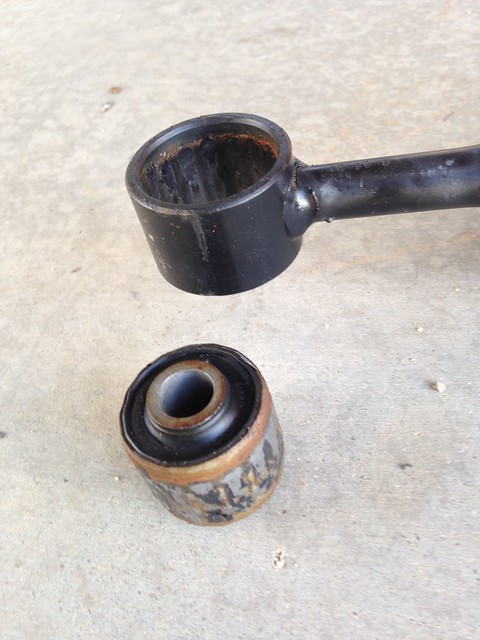 Pressing out the stock lower front bushing
The front Boss units are threaded to adjust ride height—which I left at the stock setting—and utilize the stock Toyota springs. I installed the springs into the new cartridges using my “widowmaker” Craftsman spring compressors—two threaded rods with cast hooks to grab the spring coils. A Snap-on impact wrench speeded up the task of cranking down the compressors (especially after I forgot to install the rubber boot on the first unit and had to disassemble it again). Done properly there’s scant risk to this method; however, if you have access to a proper wall-mounted spring compressor, I recommend it.
Once everything was buttoned up, I set the adjusters at a very modest three up front and five in the rear, and went for a drive along our rough approach road and a couple of nearby trails. The improvement in ride quality was immediately apparent, although no doubt that was partly due to the fact that the front springs previously installed had been 20 percent stiffer than the stock units, which are already on the firm side. High-frequency vibration and small-impact harshness was also noticeably reduced—and that was in part due to the standard rubber bushings in the Boss shocks. Our previous shocks employed Heim joints on the lower attachments. Heim joints, which are all-metal, are wonderful for precise handling and ultra-sharp steering response, but that isn’t a priority in a pickup carrying a camper.
With a few miles on the truck, I decided roll could be reduced a bit, and bumped up the rear shock by one and the front by two. That corrected the issue, and the truck is riding and handling in a fashion I consider close to ideal now. When we add the prototype aluminum front winch bumper we’re working on right now with Pronghorn Overland Gear, and install a winch, it will be easy to adjust the front shocks to suit, and also to bump up the ride height fractionally if necessary.
Based on the last week of driving, I’m optimistic the Boss shocks will prove an excellent match for the JATAC. Expect an update in a few months.
Boss Global is HERE. The Canadian link is HERE. Or you can talk to a live person at 604-799-1869.
While the commentary contains a couple of inaccuracies, the video HERE offers an inside look at foam-cell shock technology.