Field Arts

Master of Field Arts Decals, Patches, or Pins?

I’m preparing a special gift for all of you who are working your way through Master of Field Arts—a decal, patch, or an enamel pin!

Initially I was going to create a decal, similar to the very high-quality ones sold by John Muir Laws, and from my longtime favorite decal company, Sticker Mule (I like their outdoor stickers a lot; we currently use them for our Overland Tech and Travel decals).

But then it occurred to me maybe an enameled pin . . . and someone suggested a patch!

Help me decide! Please fill out my questionnaire by April 15: https://forms.gle/eha8g52W7QarHoZj6

The art above is NOT final—it’s just a concept / idea I’ve been working through for a decal or patch. Include ideas for art in the questionnaire as well!

Praise for Master of Field Arts

Many thanks to the 155+ people who pre-ordered my new Master of Field Arts—and I’m even more happy at the wonderful feedback. When one writes a book, there is always this fear just at the back of the mind that no one will like it. Whew! Read on to enjoy some of the community enthusiasm:

"Your new book arrived yesterday. I picked it up near bedtime intending to read just the introduction. Eighty brilliant pages later, I made myself stop for the evening but picked it up again with my morning coffee. You've condensed the kind of information that I find so valuable for my interests in not only nature journaling but also in my outdoor education and docent naturalist activities. I LOVE the MAP CHAPTER—In fact I have been hunting online for a fairly specific river map to go with a family history narrative I'm currently writing. Your map chapter has INSPIRED me to stop that search and create my own and I expect, better, map! Thank You for sharing your considerable expertise.” – Kim B.

My book arrived today, and I am very excited to spend some time with it! I can’t tell you what a great job you do with your books, your lessons…just everything! I am a big fan!! You are so good at sharing ideas and techniques. Thank you! – Rhonda R.

I'm impressed with your eco-centric focus on book printing and packaging. Also, I love your Field Arts Manifesto. That really sets the stage for your philosophy in the rest of the book. – Jaci E.

I appreciate all the visuals in the book, the historic images, and the examples from each of the practices explored in the chapters. – Mer B.

This book has the meatiest content book I've seen a quite awhile. – Bonnie

Master of Field Arts is a welcome companion to Roseann Hanson’s 2020 book, Nature Journaling for a Wild Life. In this second book in her Wild Life series, Hanson gives us an accessible and practical guide to advanced naturalist and field journaling skills. The lessons provide the structure and details to enable you to think and see like a naturalist, and take your observation and ability to investigate nature mysteries to the next level.

These methods connect you with old traditions of exploration and promote learning from experience. You will learn fundamental skills for journaling and recording, and ways to make your own art materials, a process that more deeply connects you to place. You will also dive deeply into reading the sky and tracks in the dust. As a bonus, Hanson gives us templates and field tools she uses in her own work. This book will help you take your nature discovery, inquiry, and journaling to mastery.” – John Muir Laws, The Laws Guide to Nature Drawing and Journaling (Heyday Books)

Book Launch Party – Video

We had loads of fun at the February 19 Master of Field Arts Book Launch Party! Giveaways and a contest—can you guess what I was drawing (@22.36 min)? Meredith B. did really quickly, and won her choice of goodies from my Field Arts Shop! And congratulations to Pam M., Jaci E., Kirstie W., and Art A. who won field kit in our random drawing.

I also talk about the inspiration for the book, my process building it, and highlights of content as well as answering lots of great questions. Enjoy!


Book birth – Master of Field Arts

I am beyond thrilled that my next book, Master of Field Arts is finally finished and I’m expecting copies from the printer around February 9th! PRE-ORDER NOW FOR SPECIAL DISCOUNT AND GIVEAWAYS—save the date for February 19 for a virtual Book Launch Party (details below)!

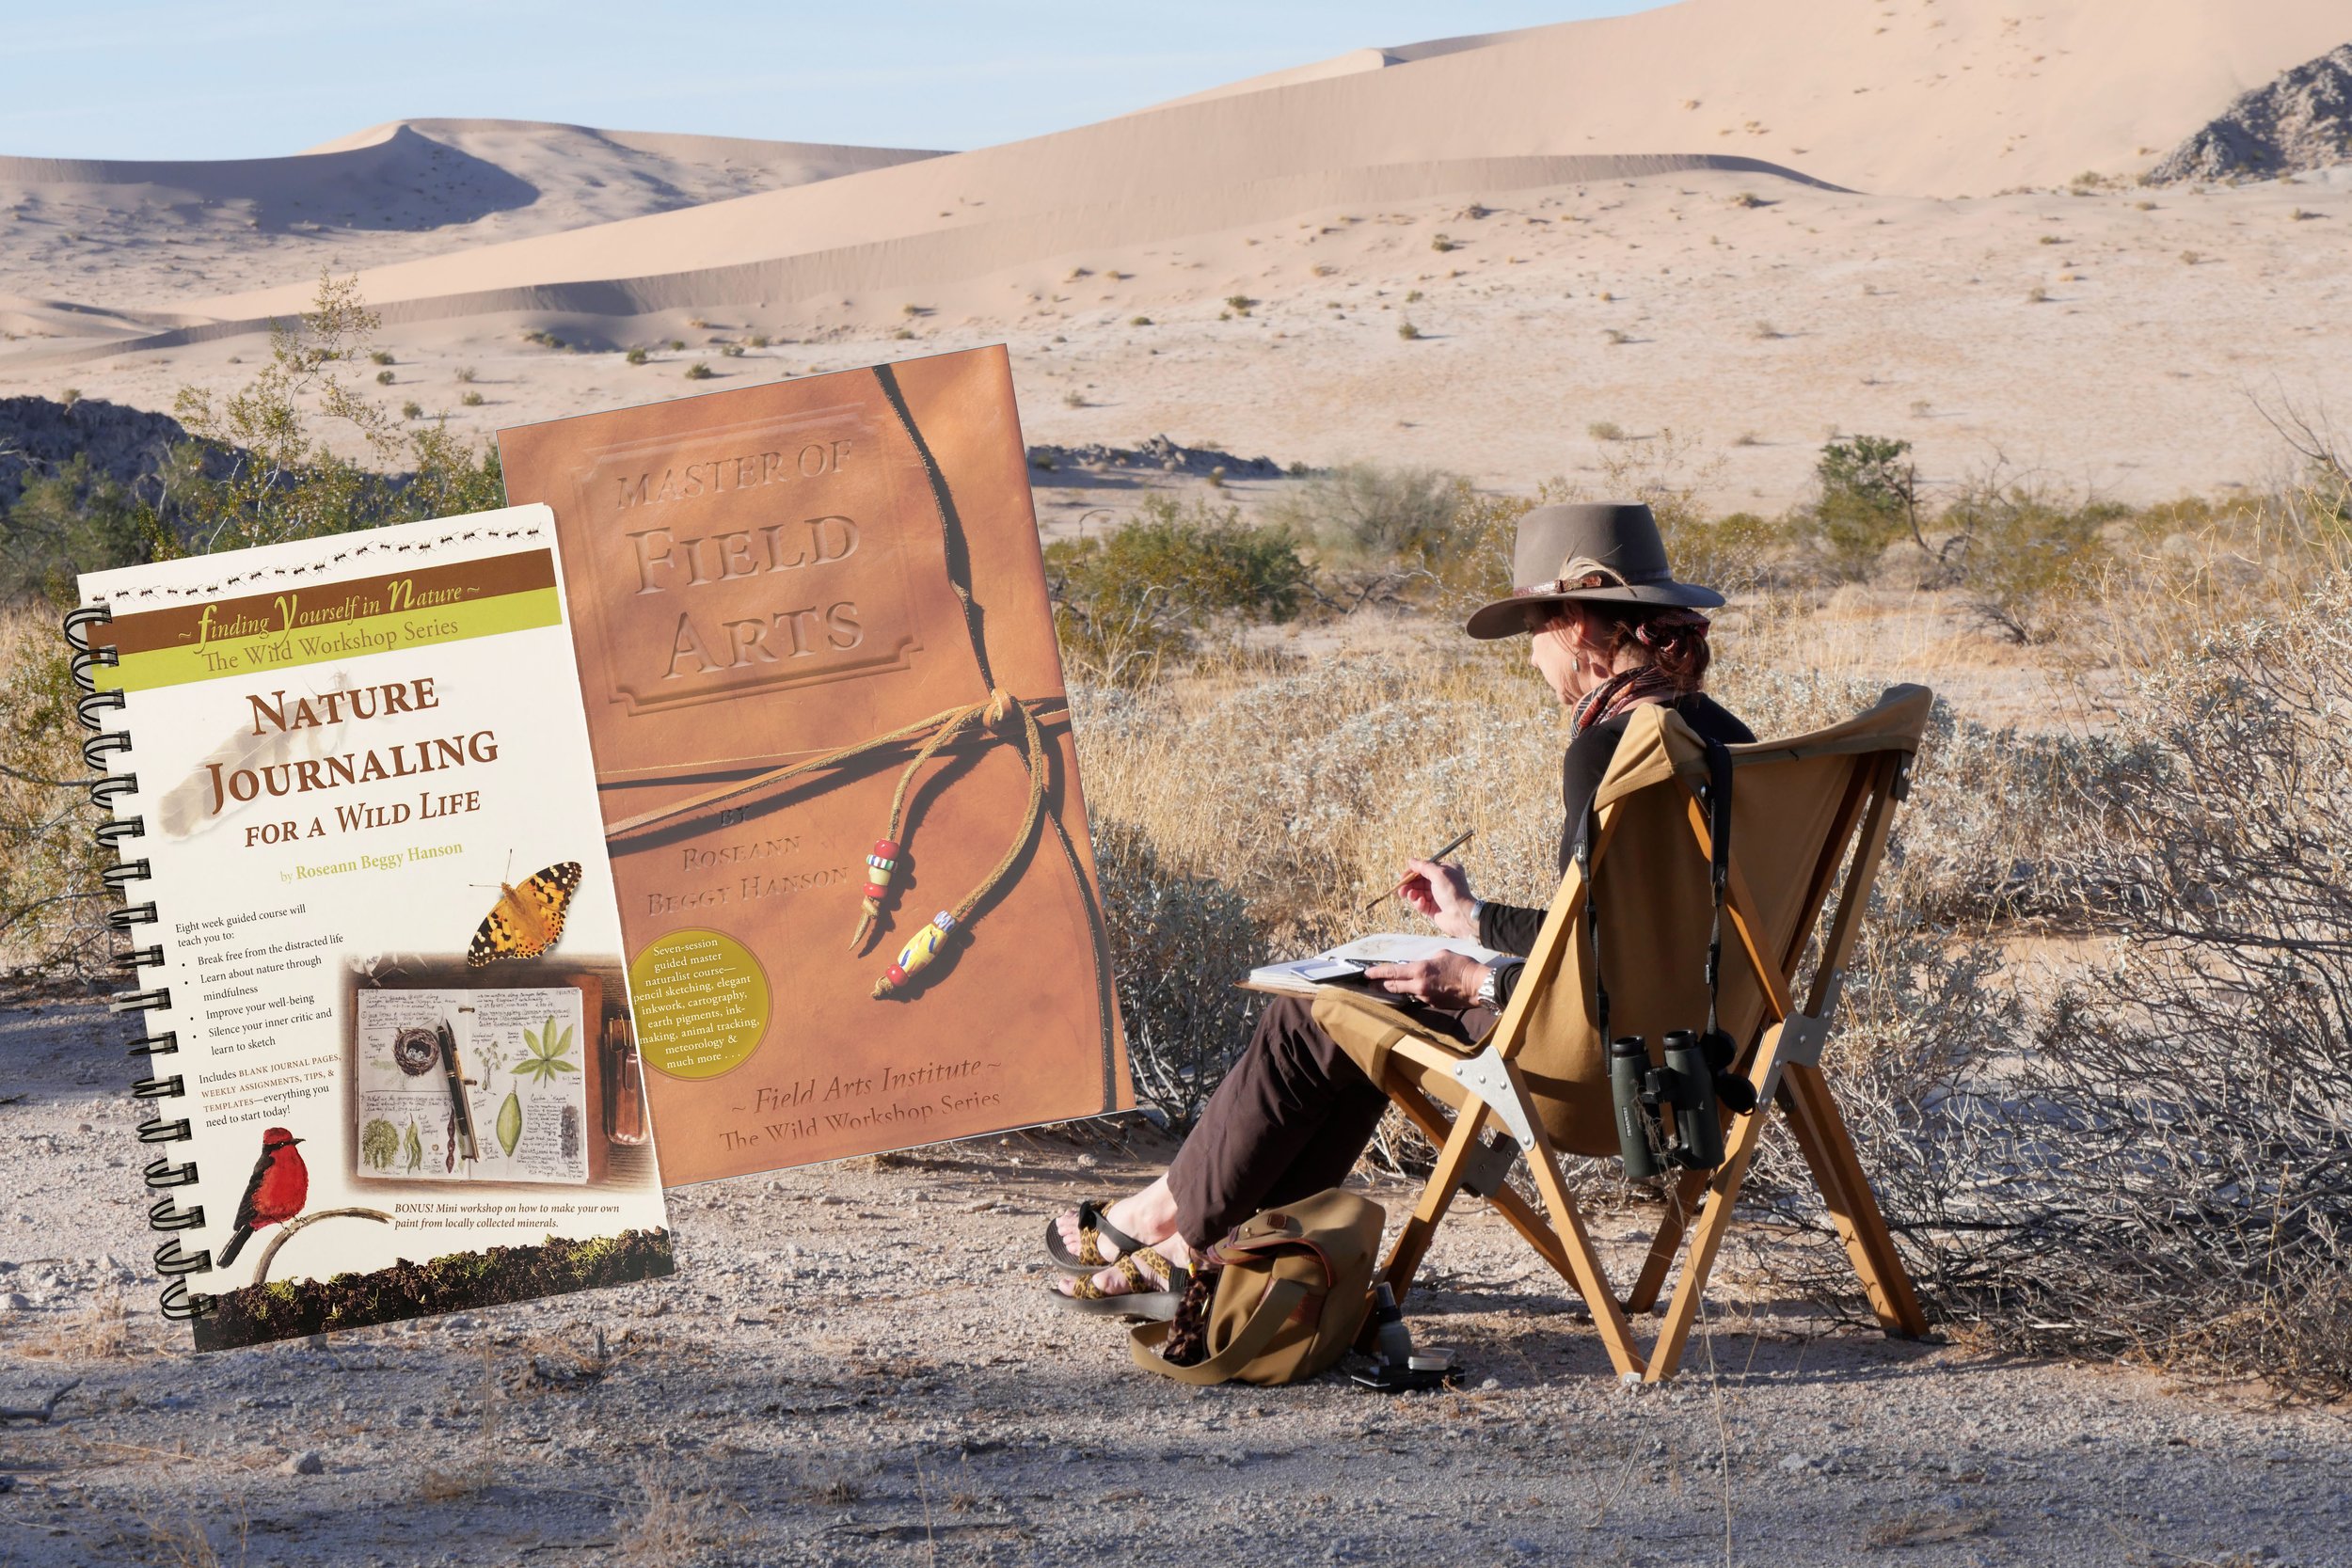
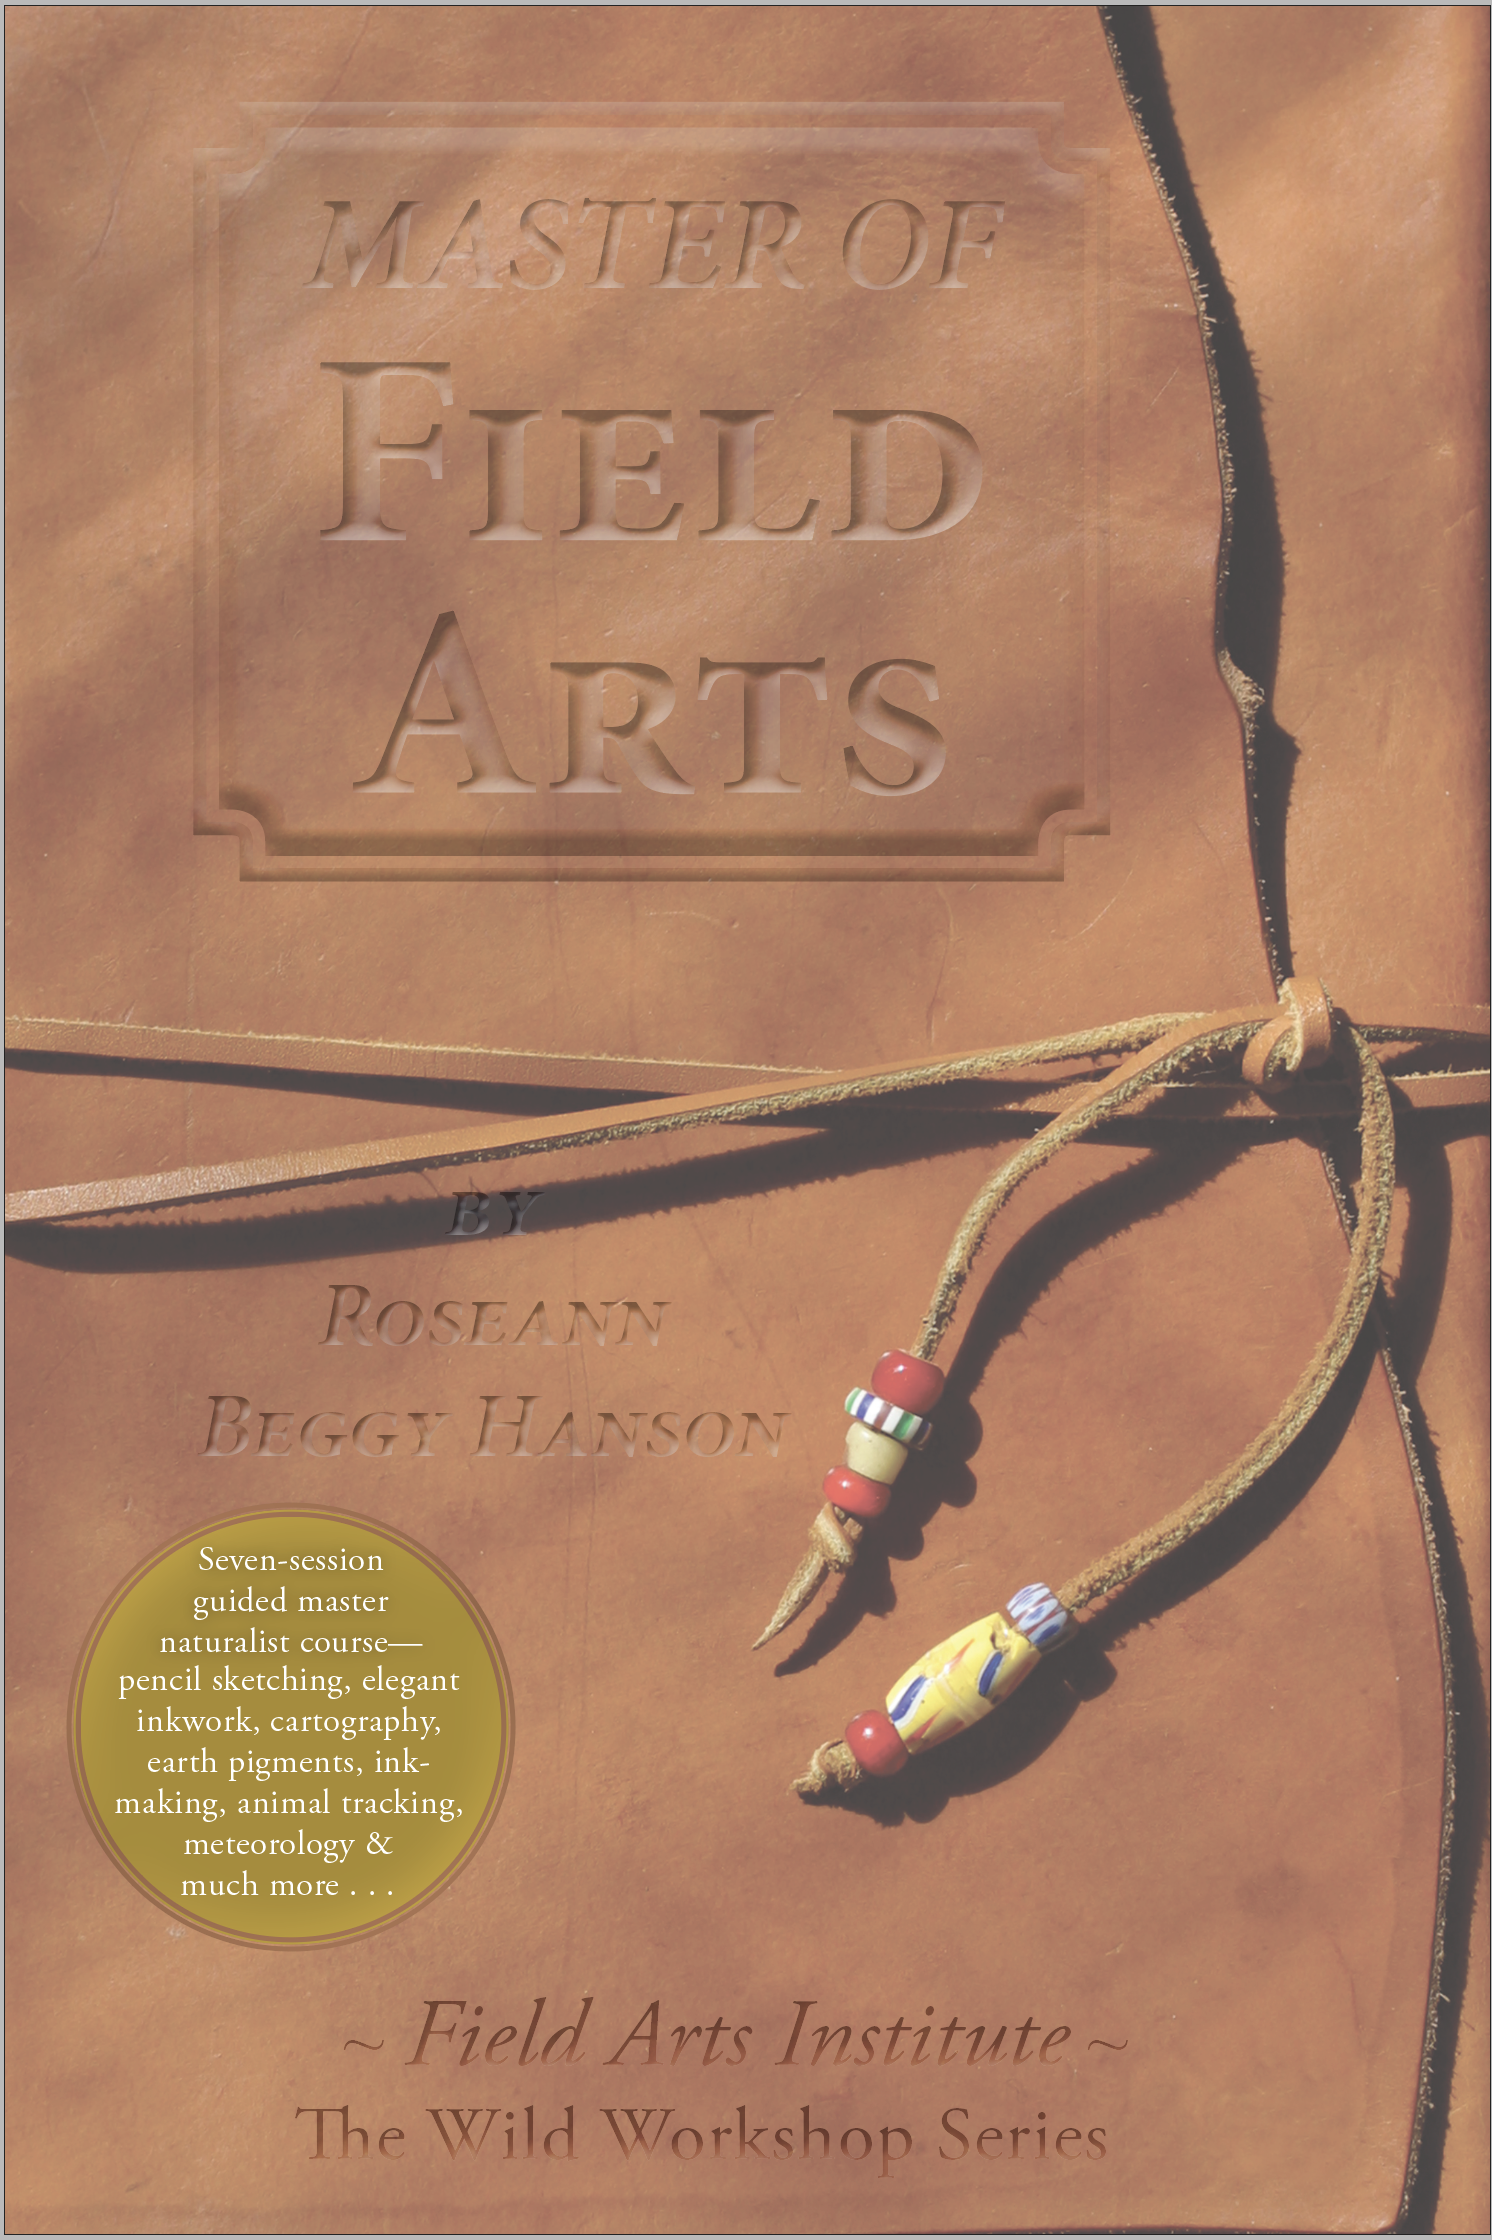
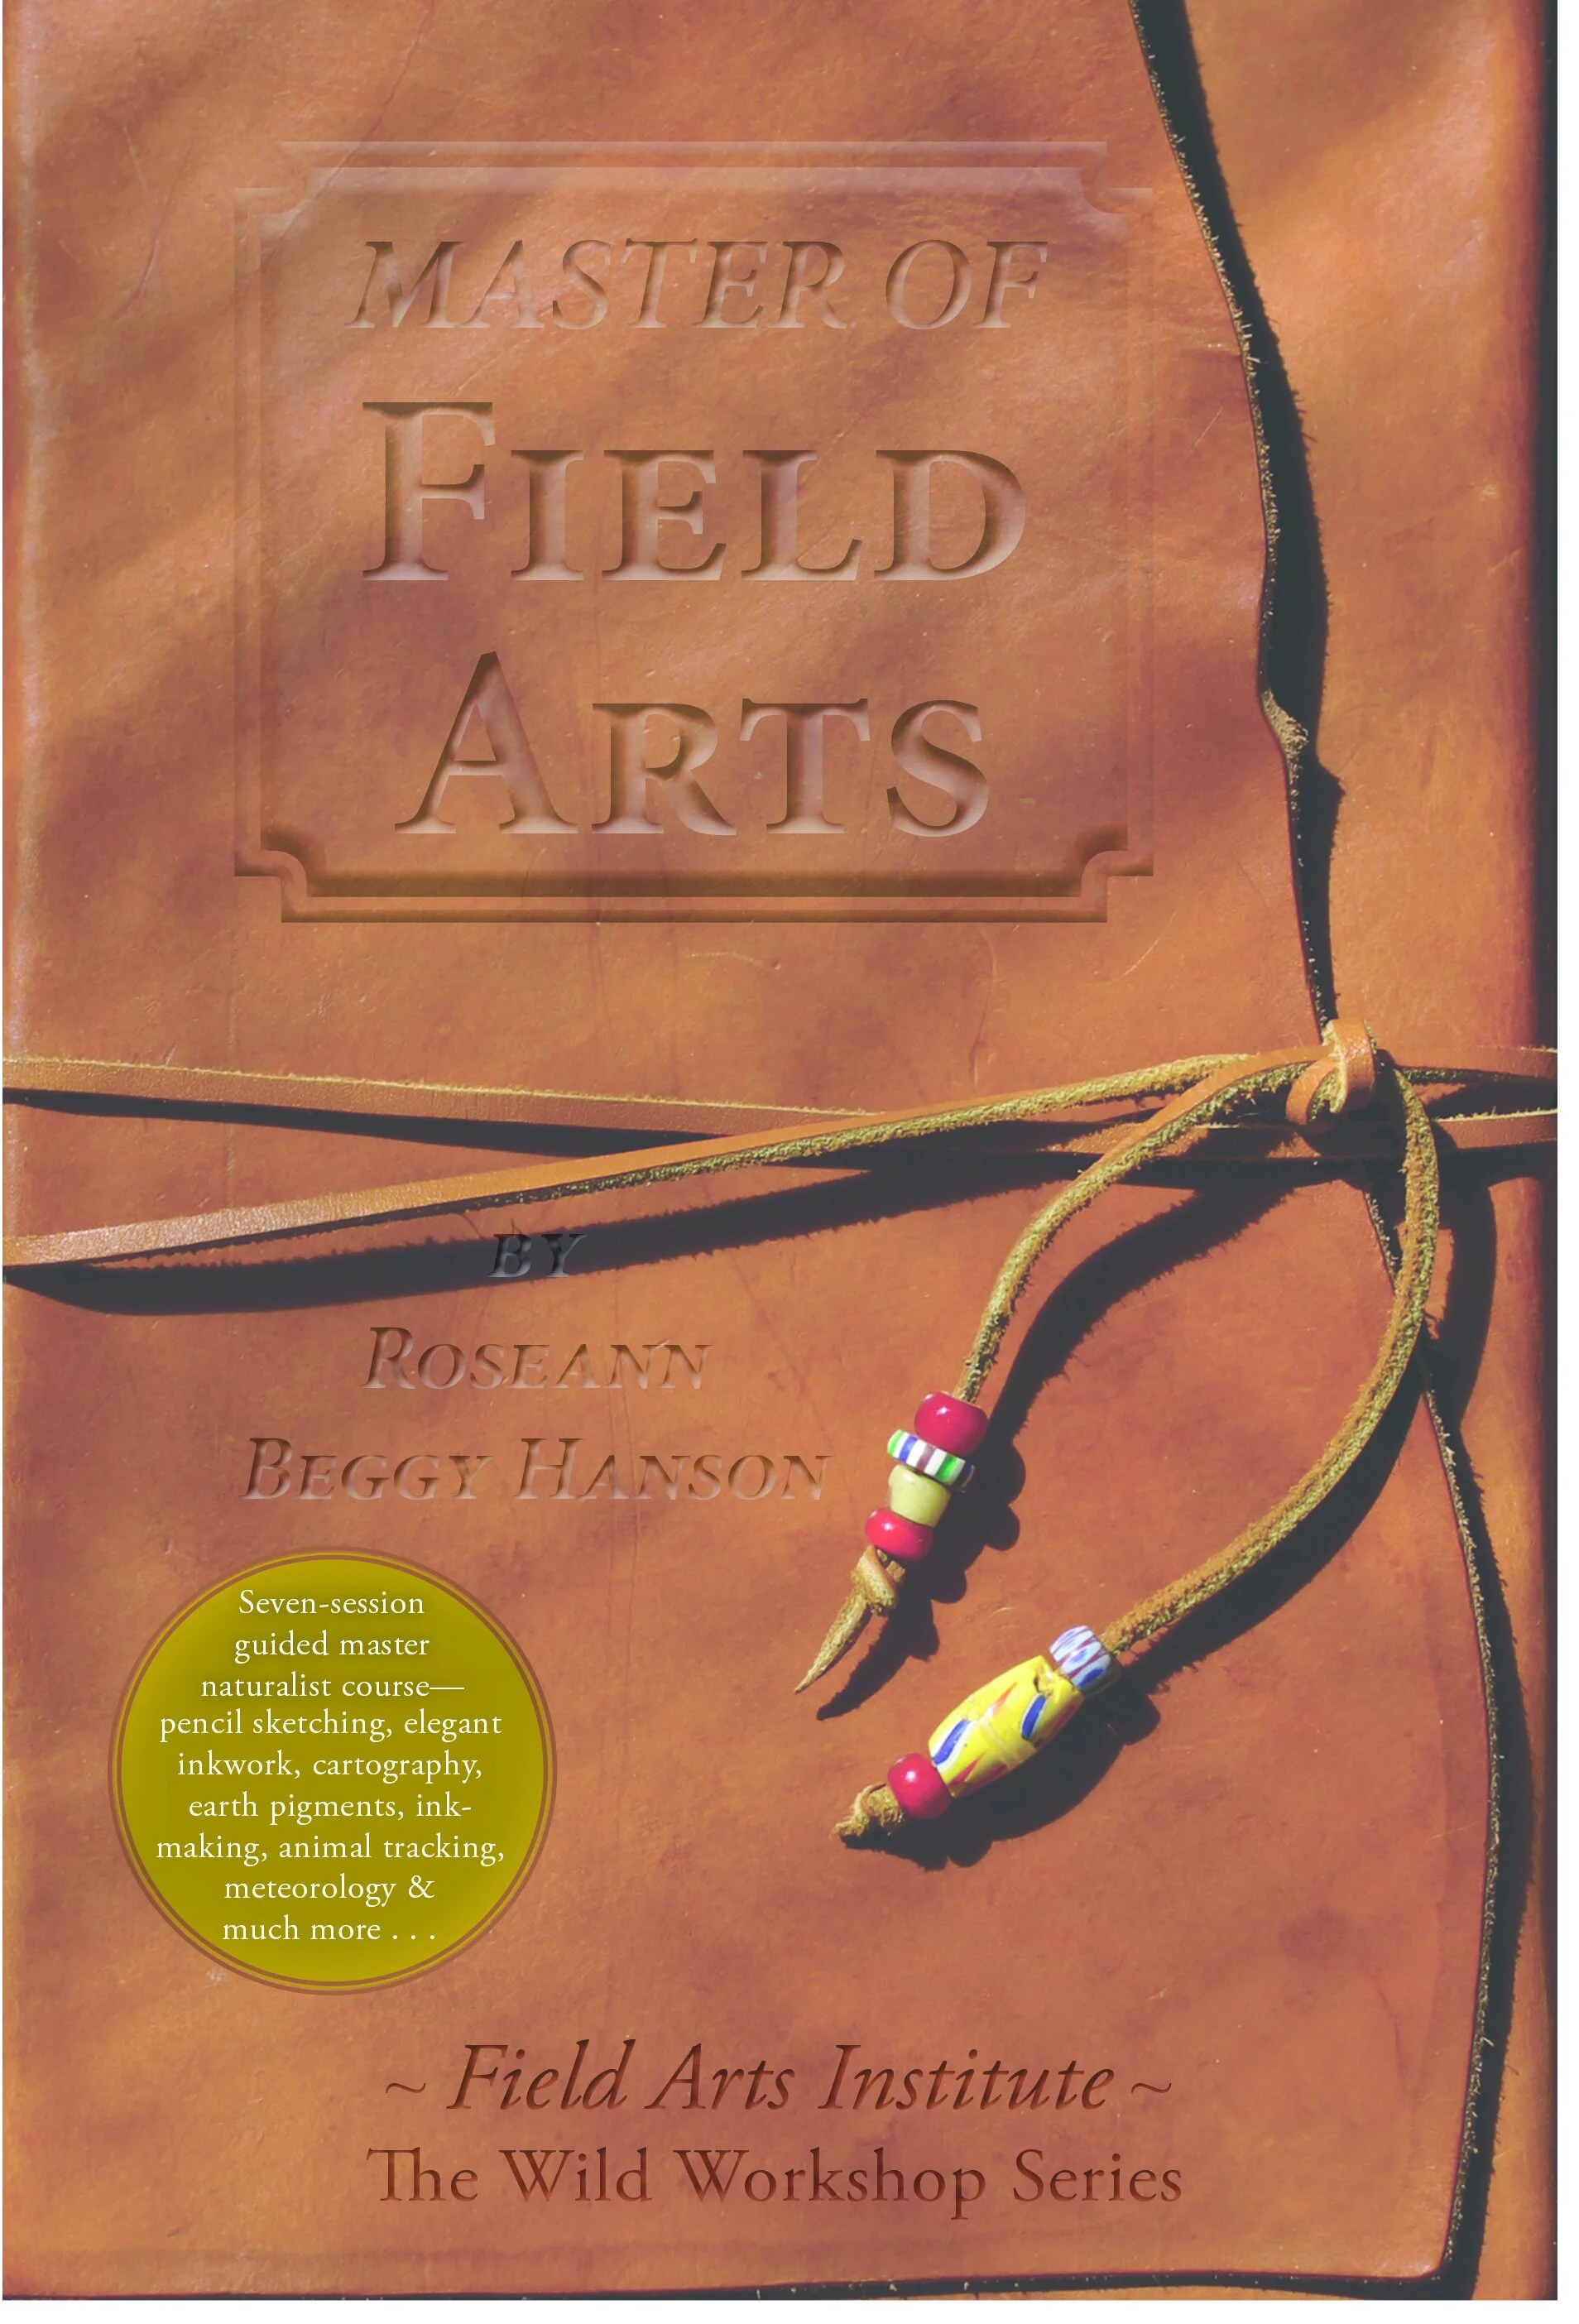
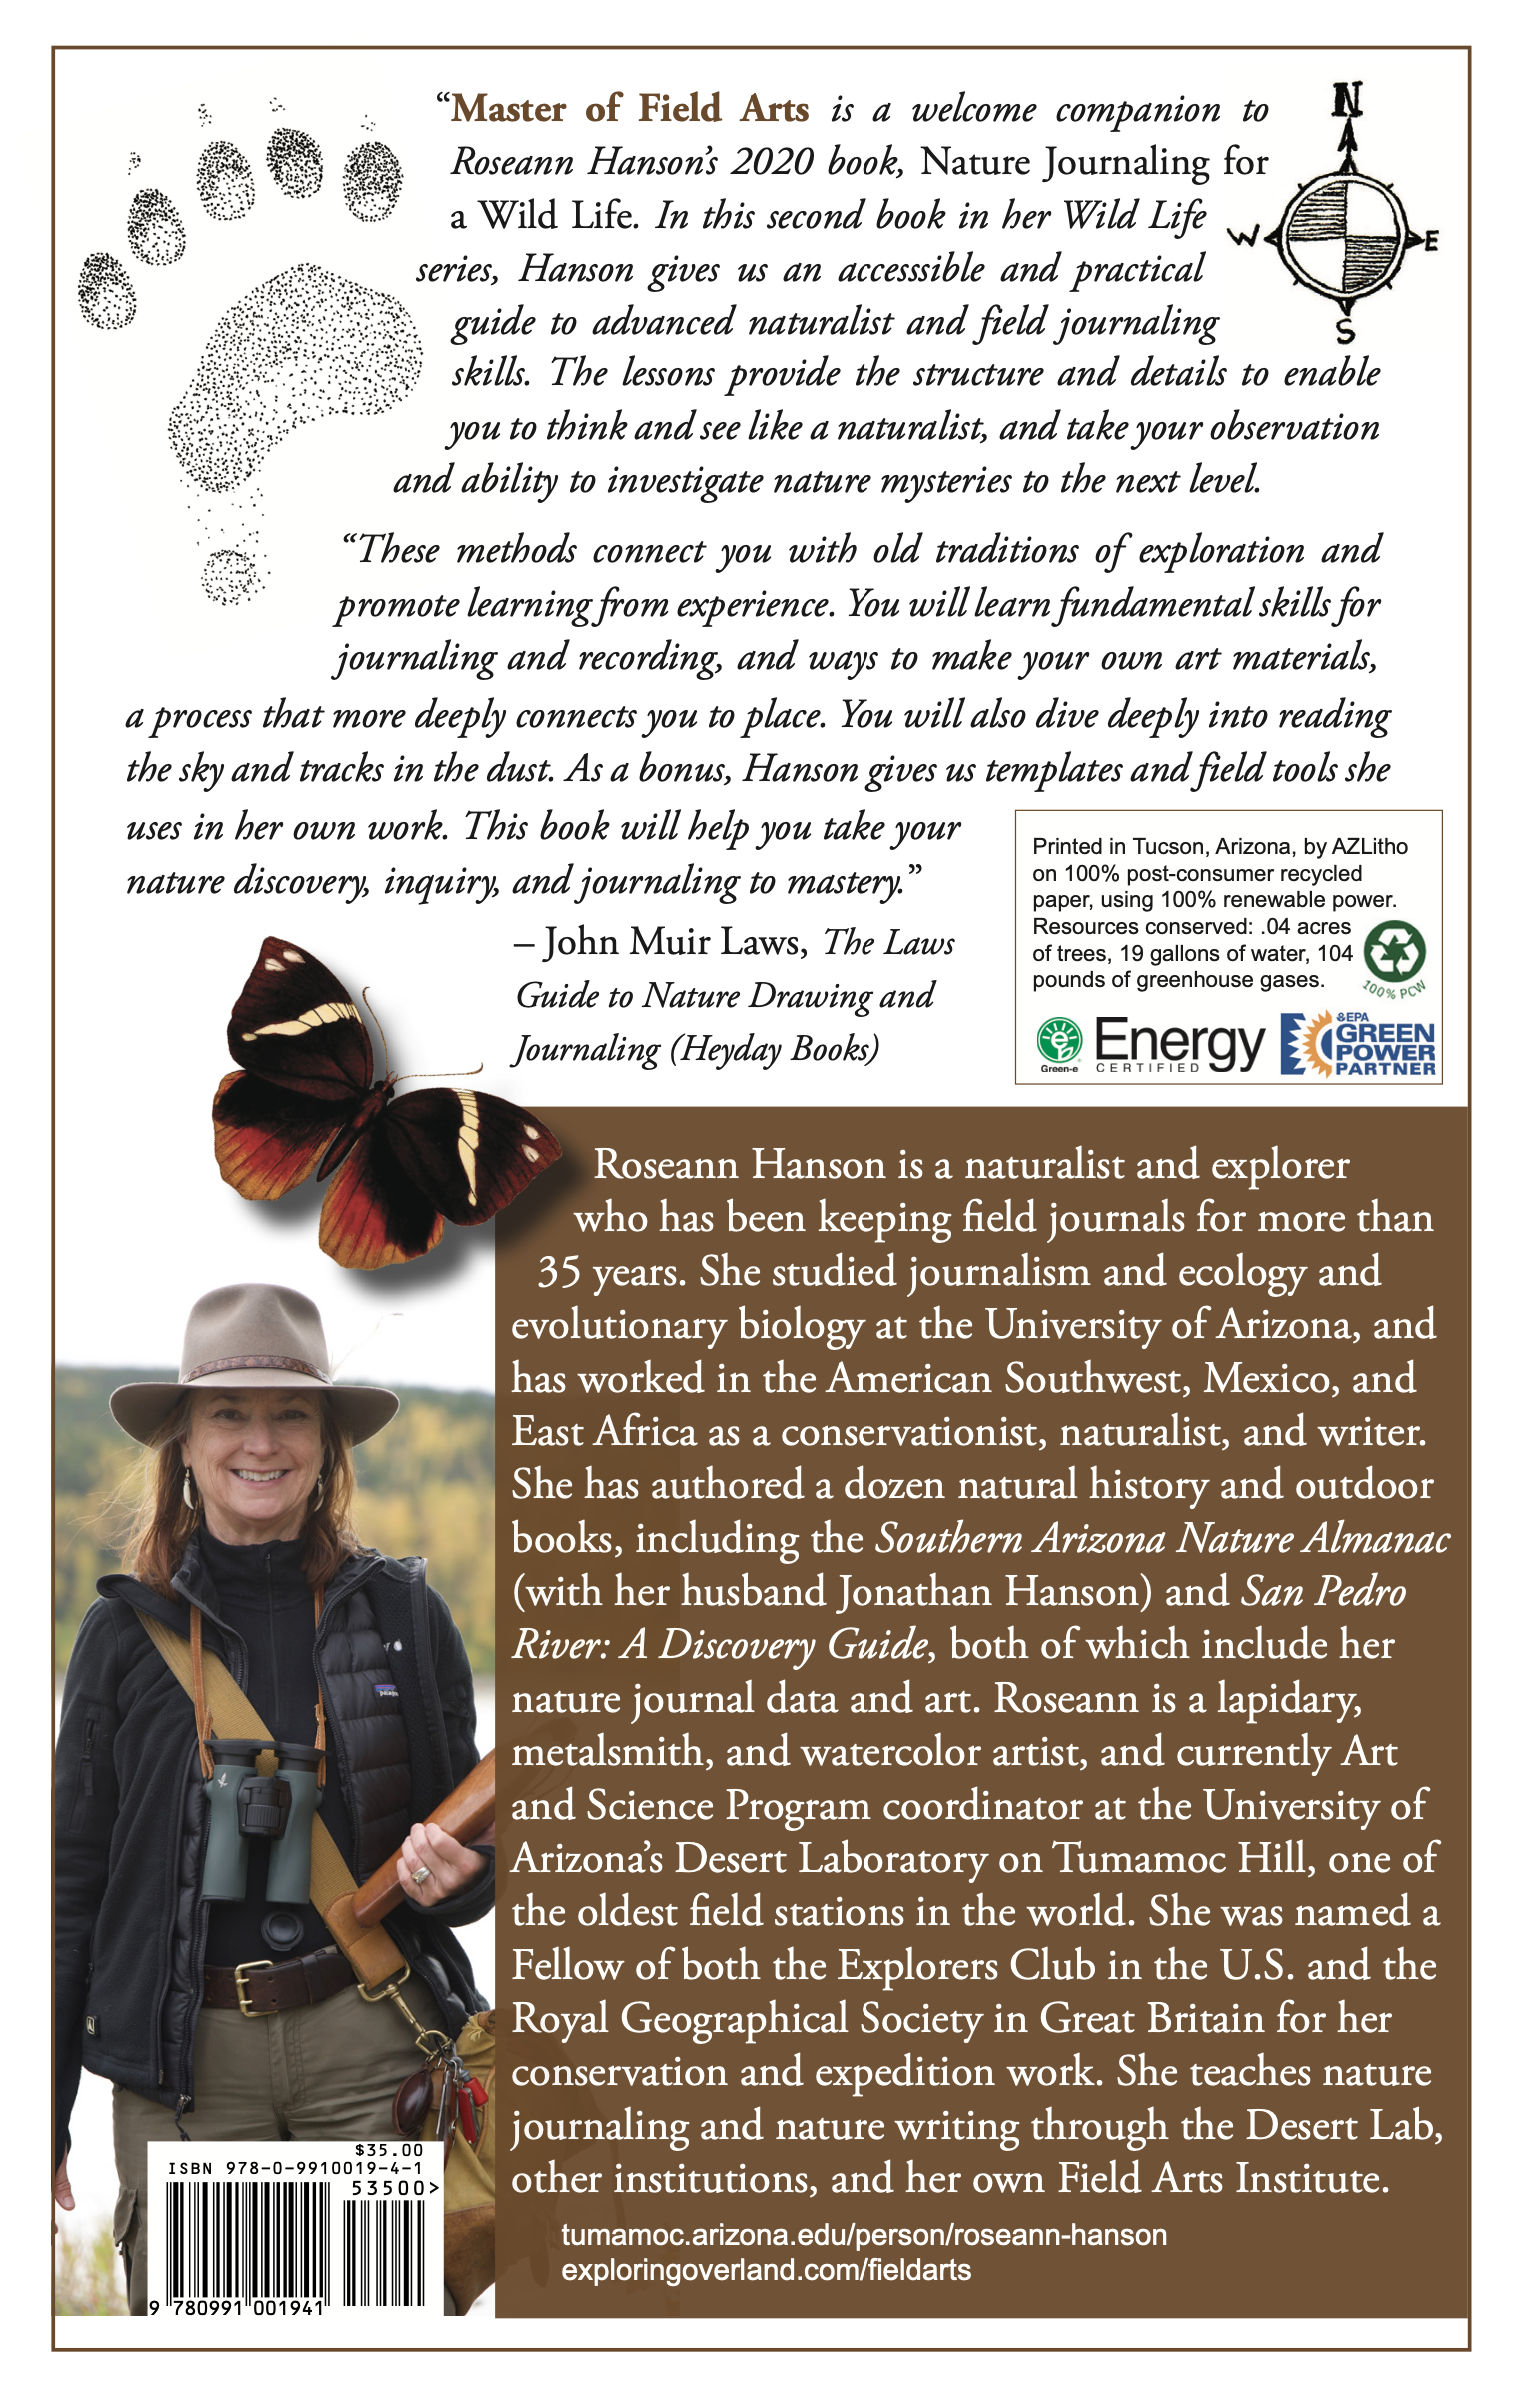
Master of Field Arts is the next level for nature journalers and field sketchers—a deep-dive into becoming a dedicated master naturalist and field artist. A Master of Field Arts.

Chapters are organized to build your skills and introduce you to new tools and methods, including:
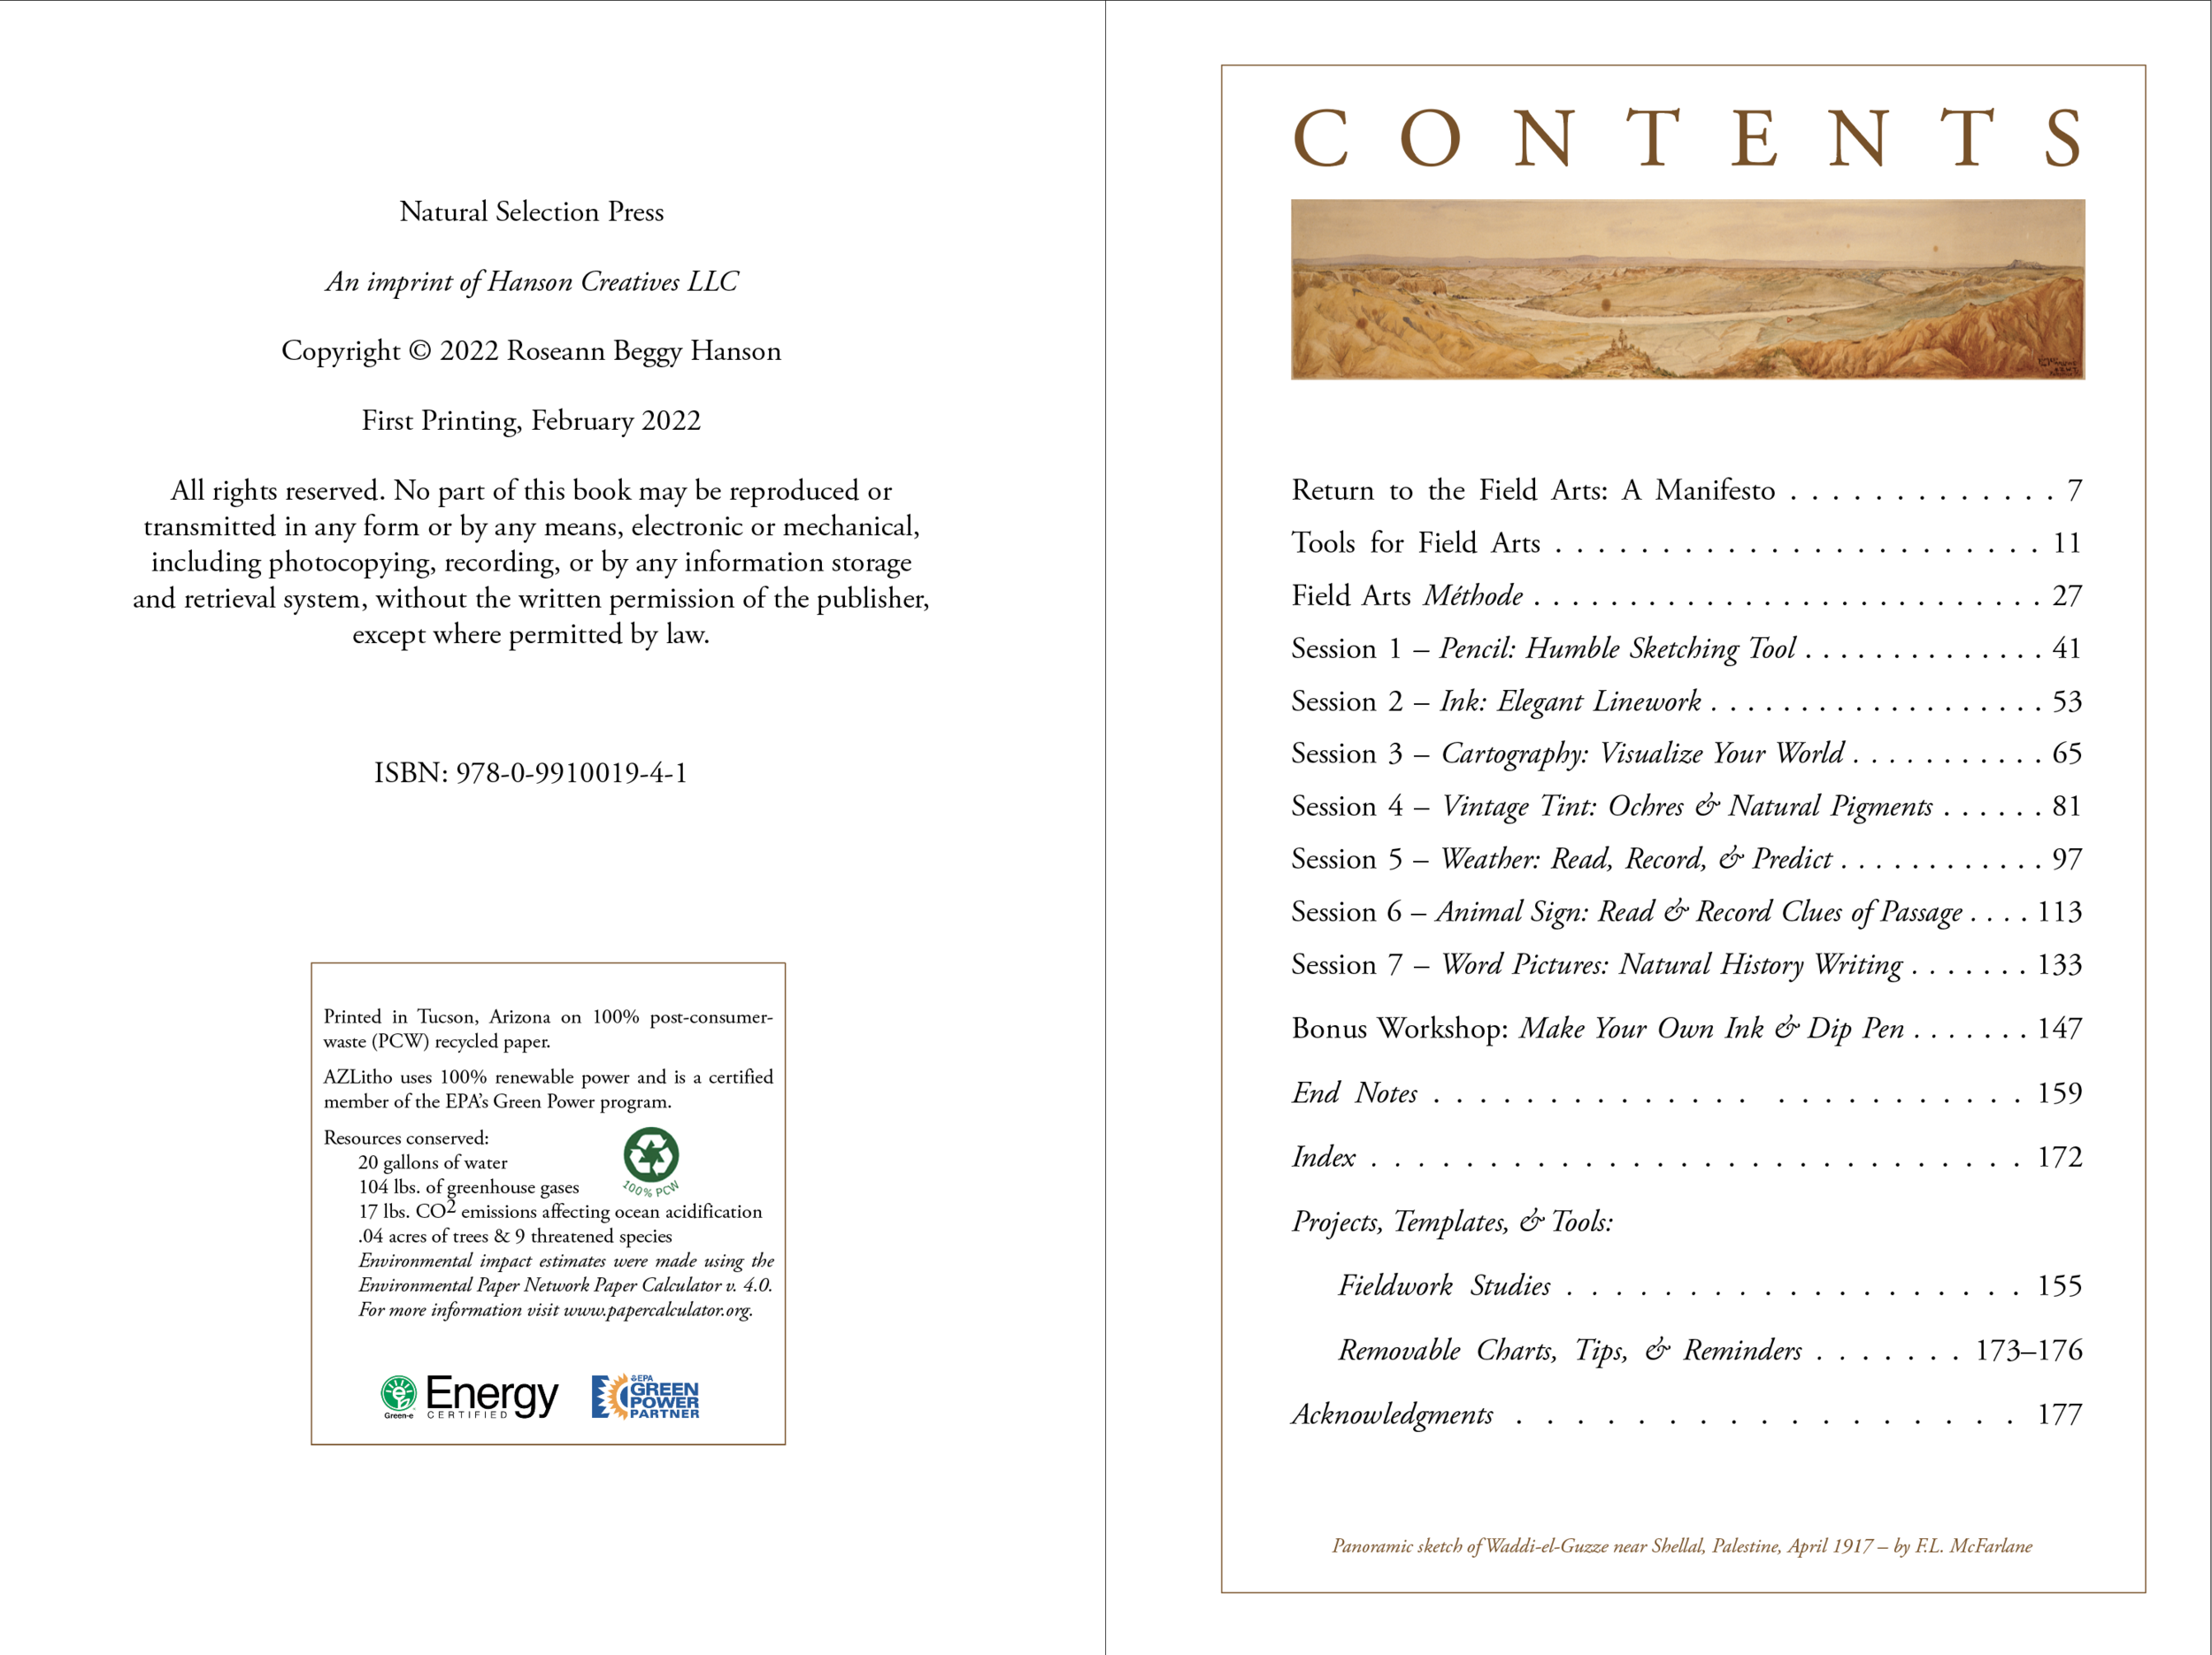
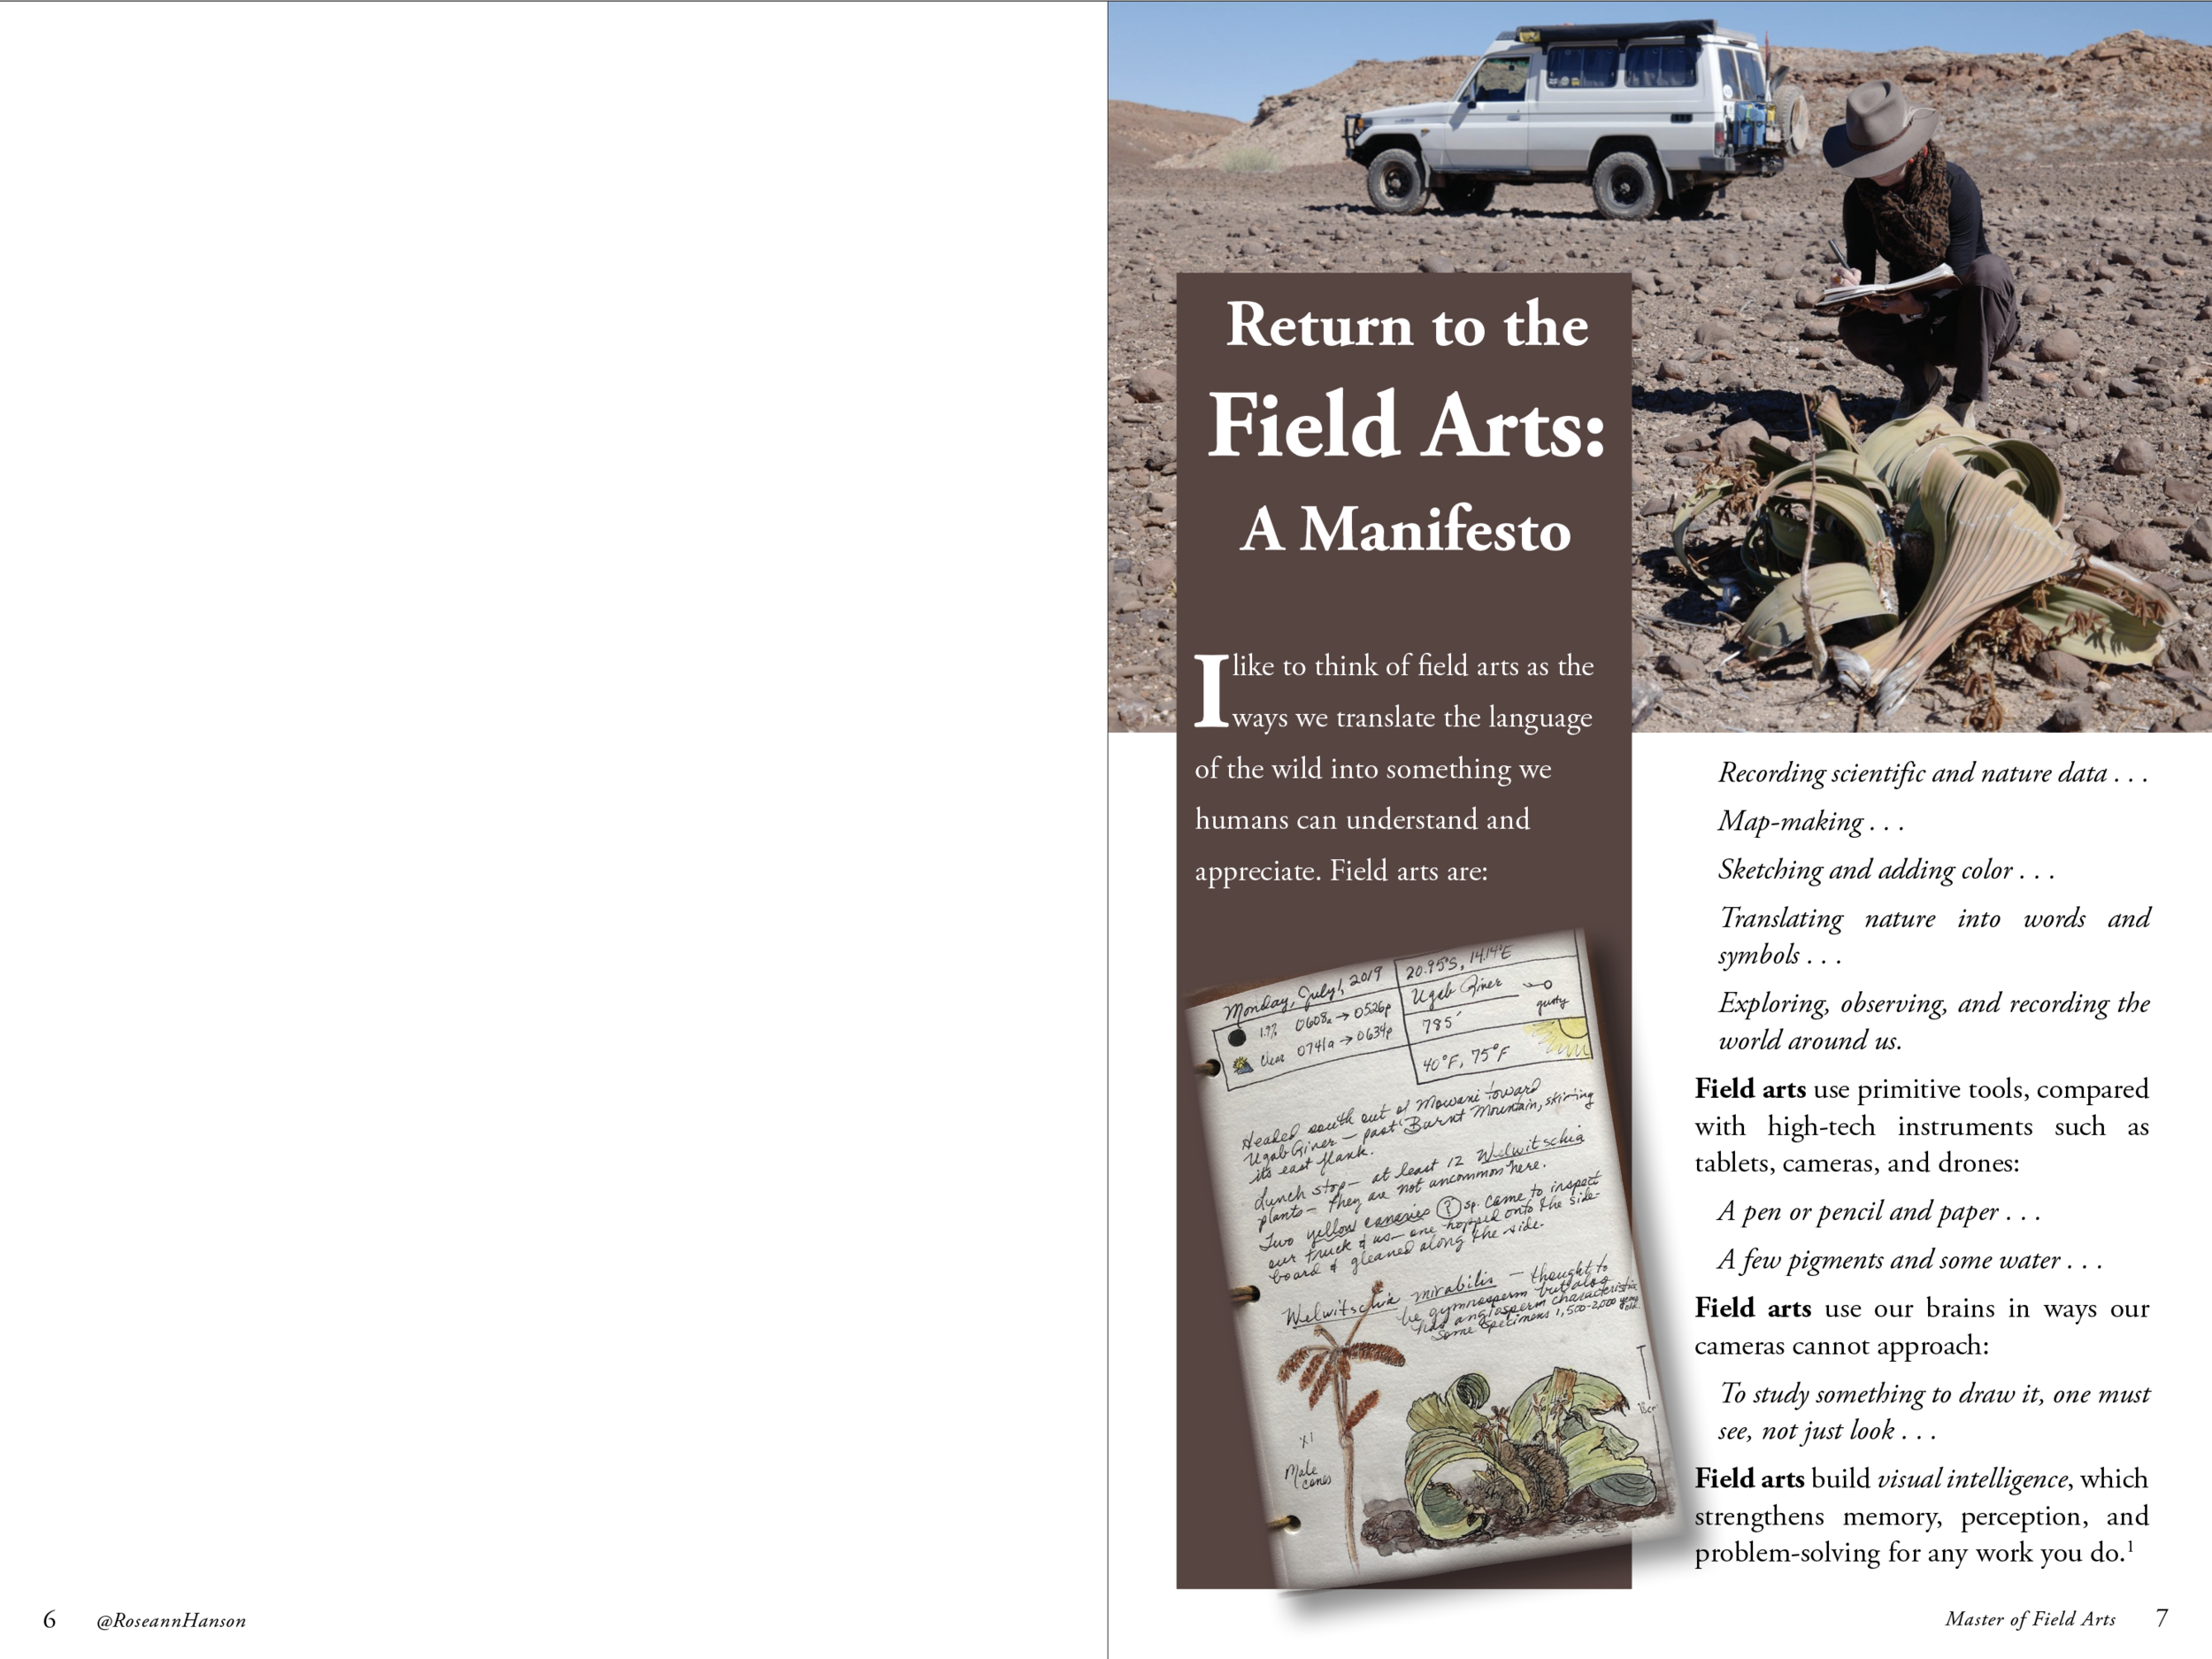
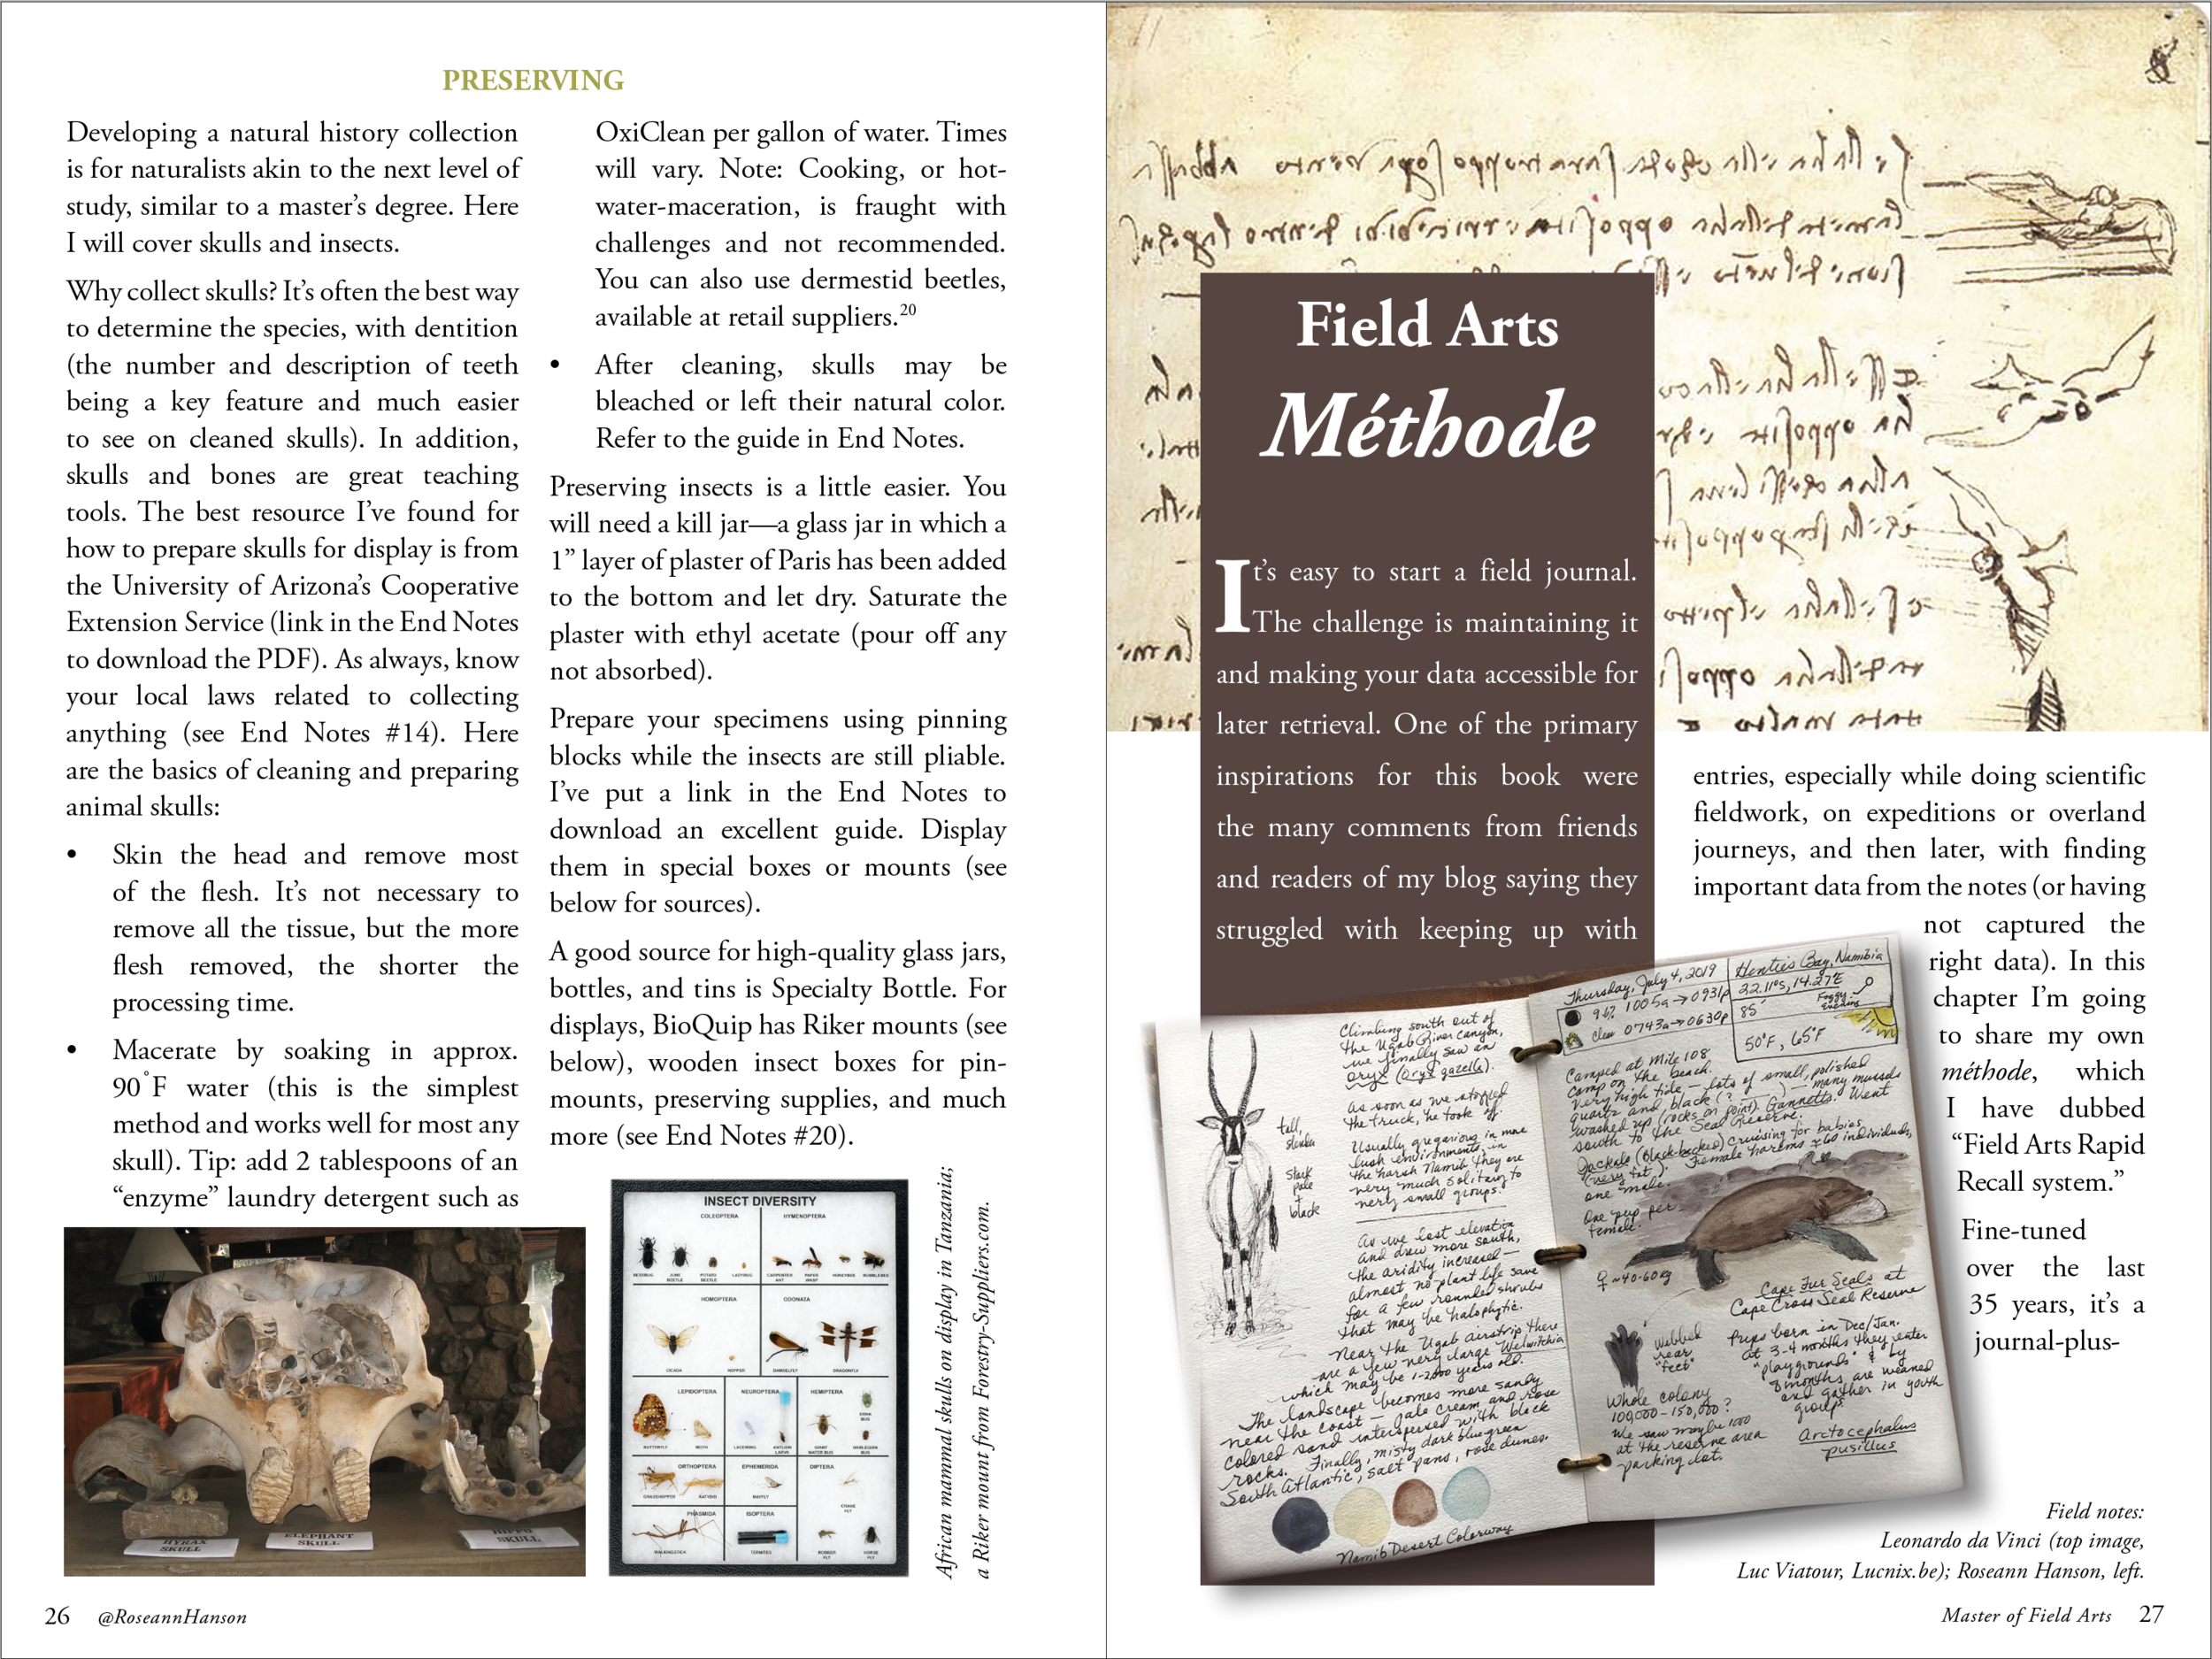
  • Field Arts Méthode

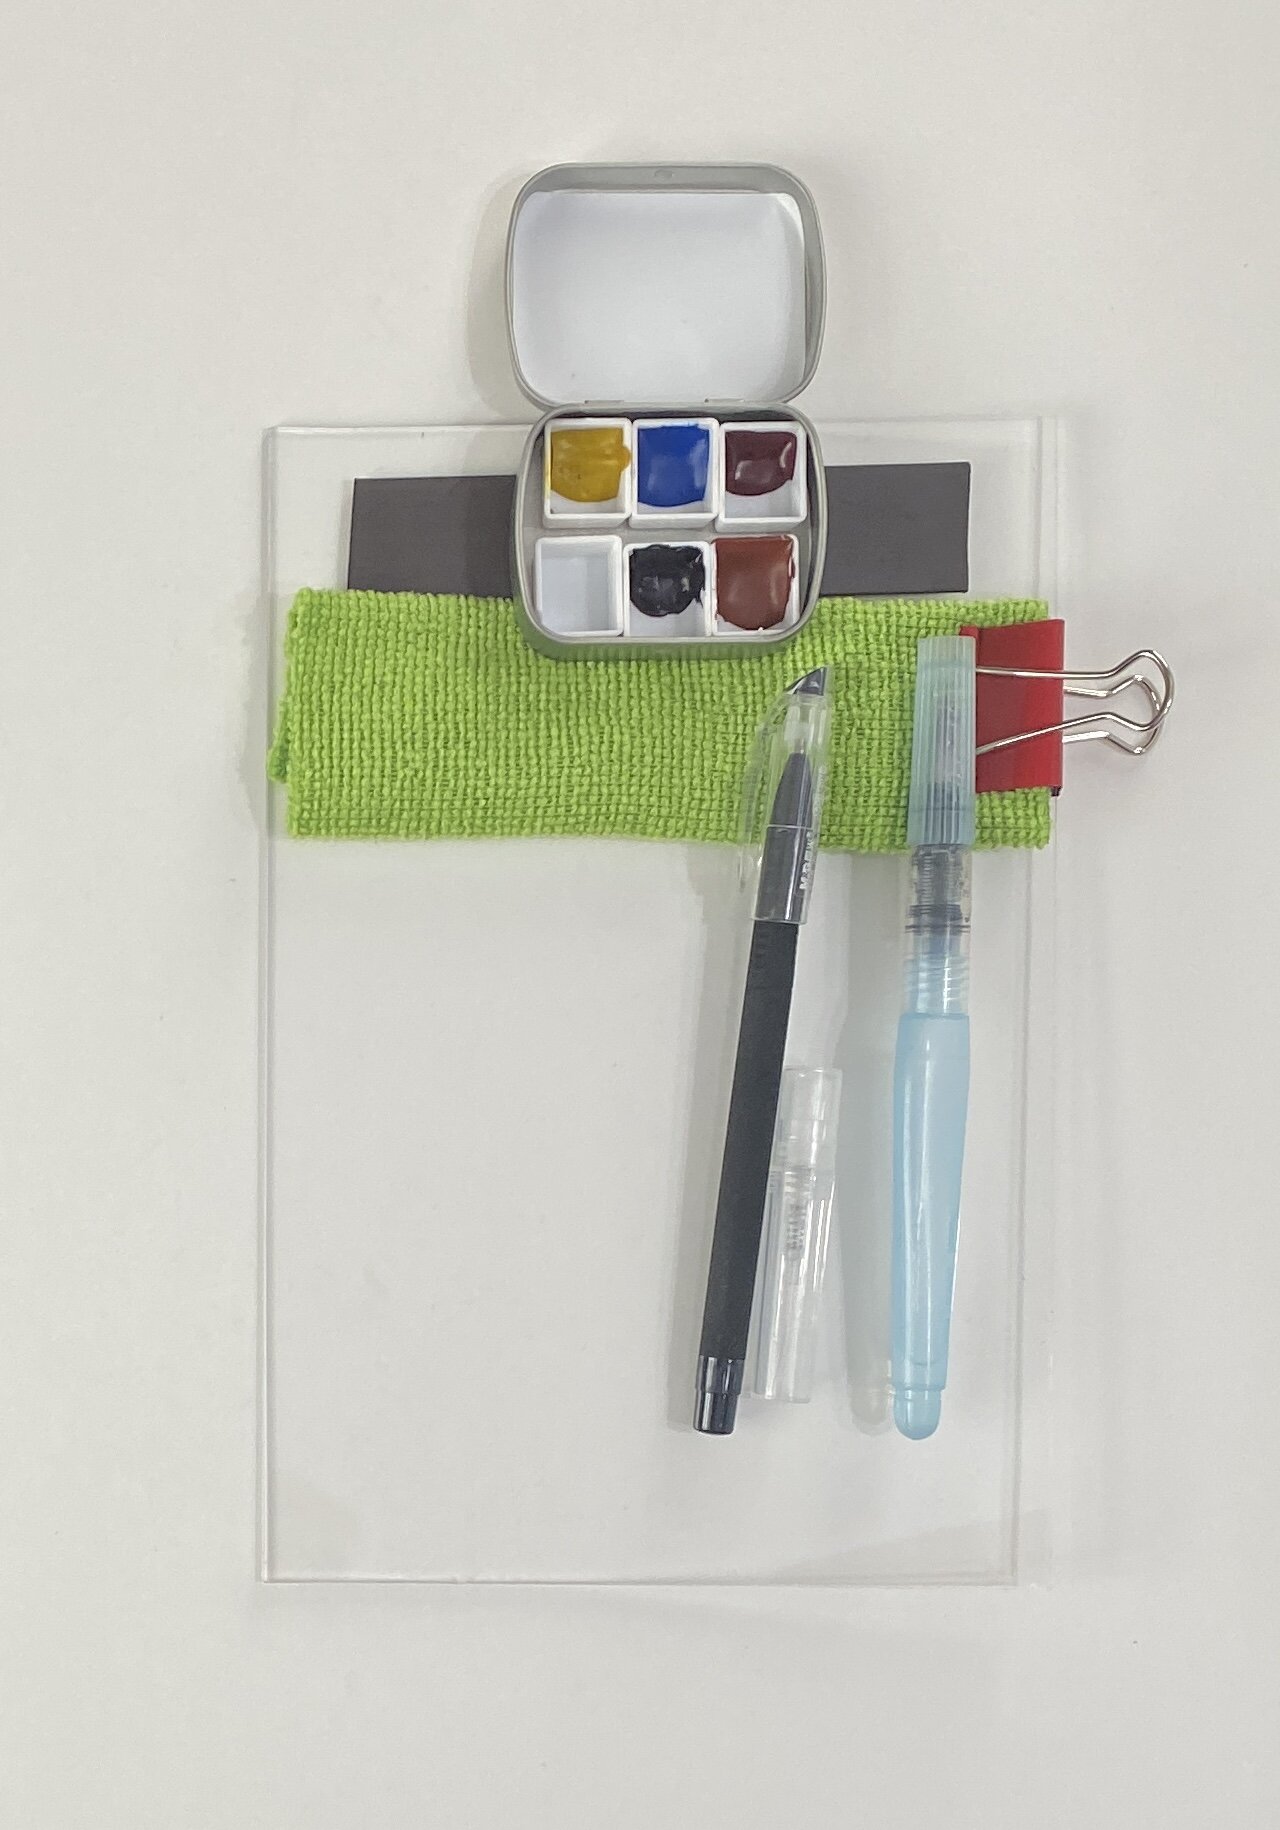
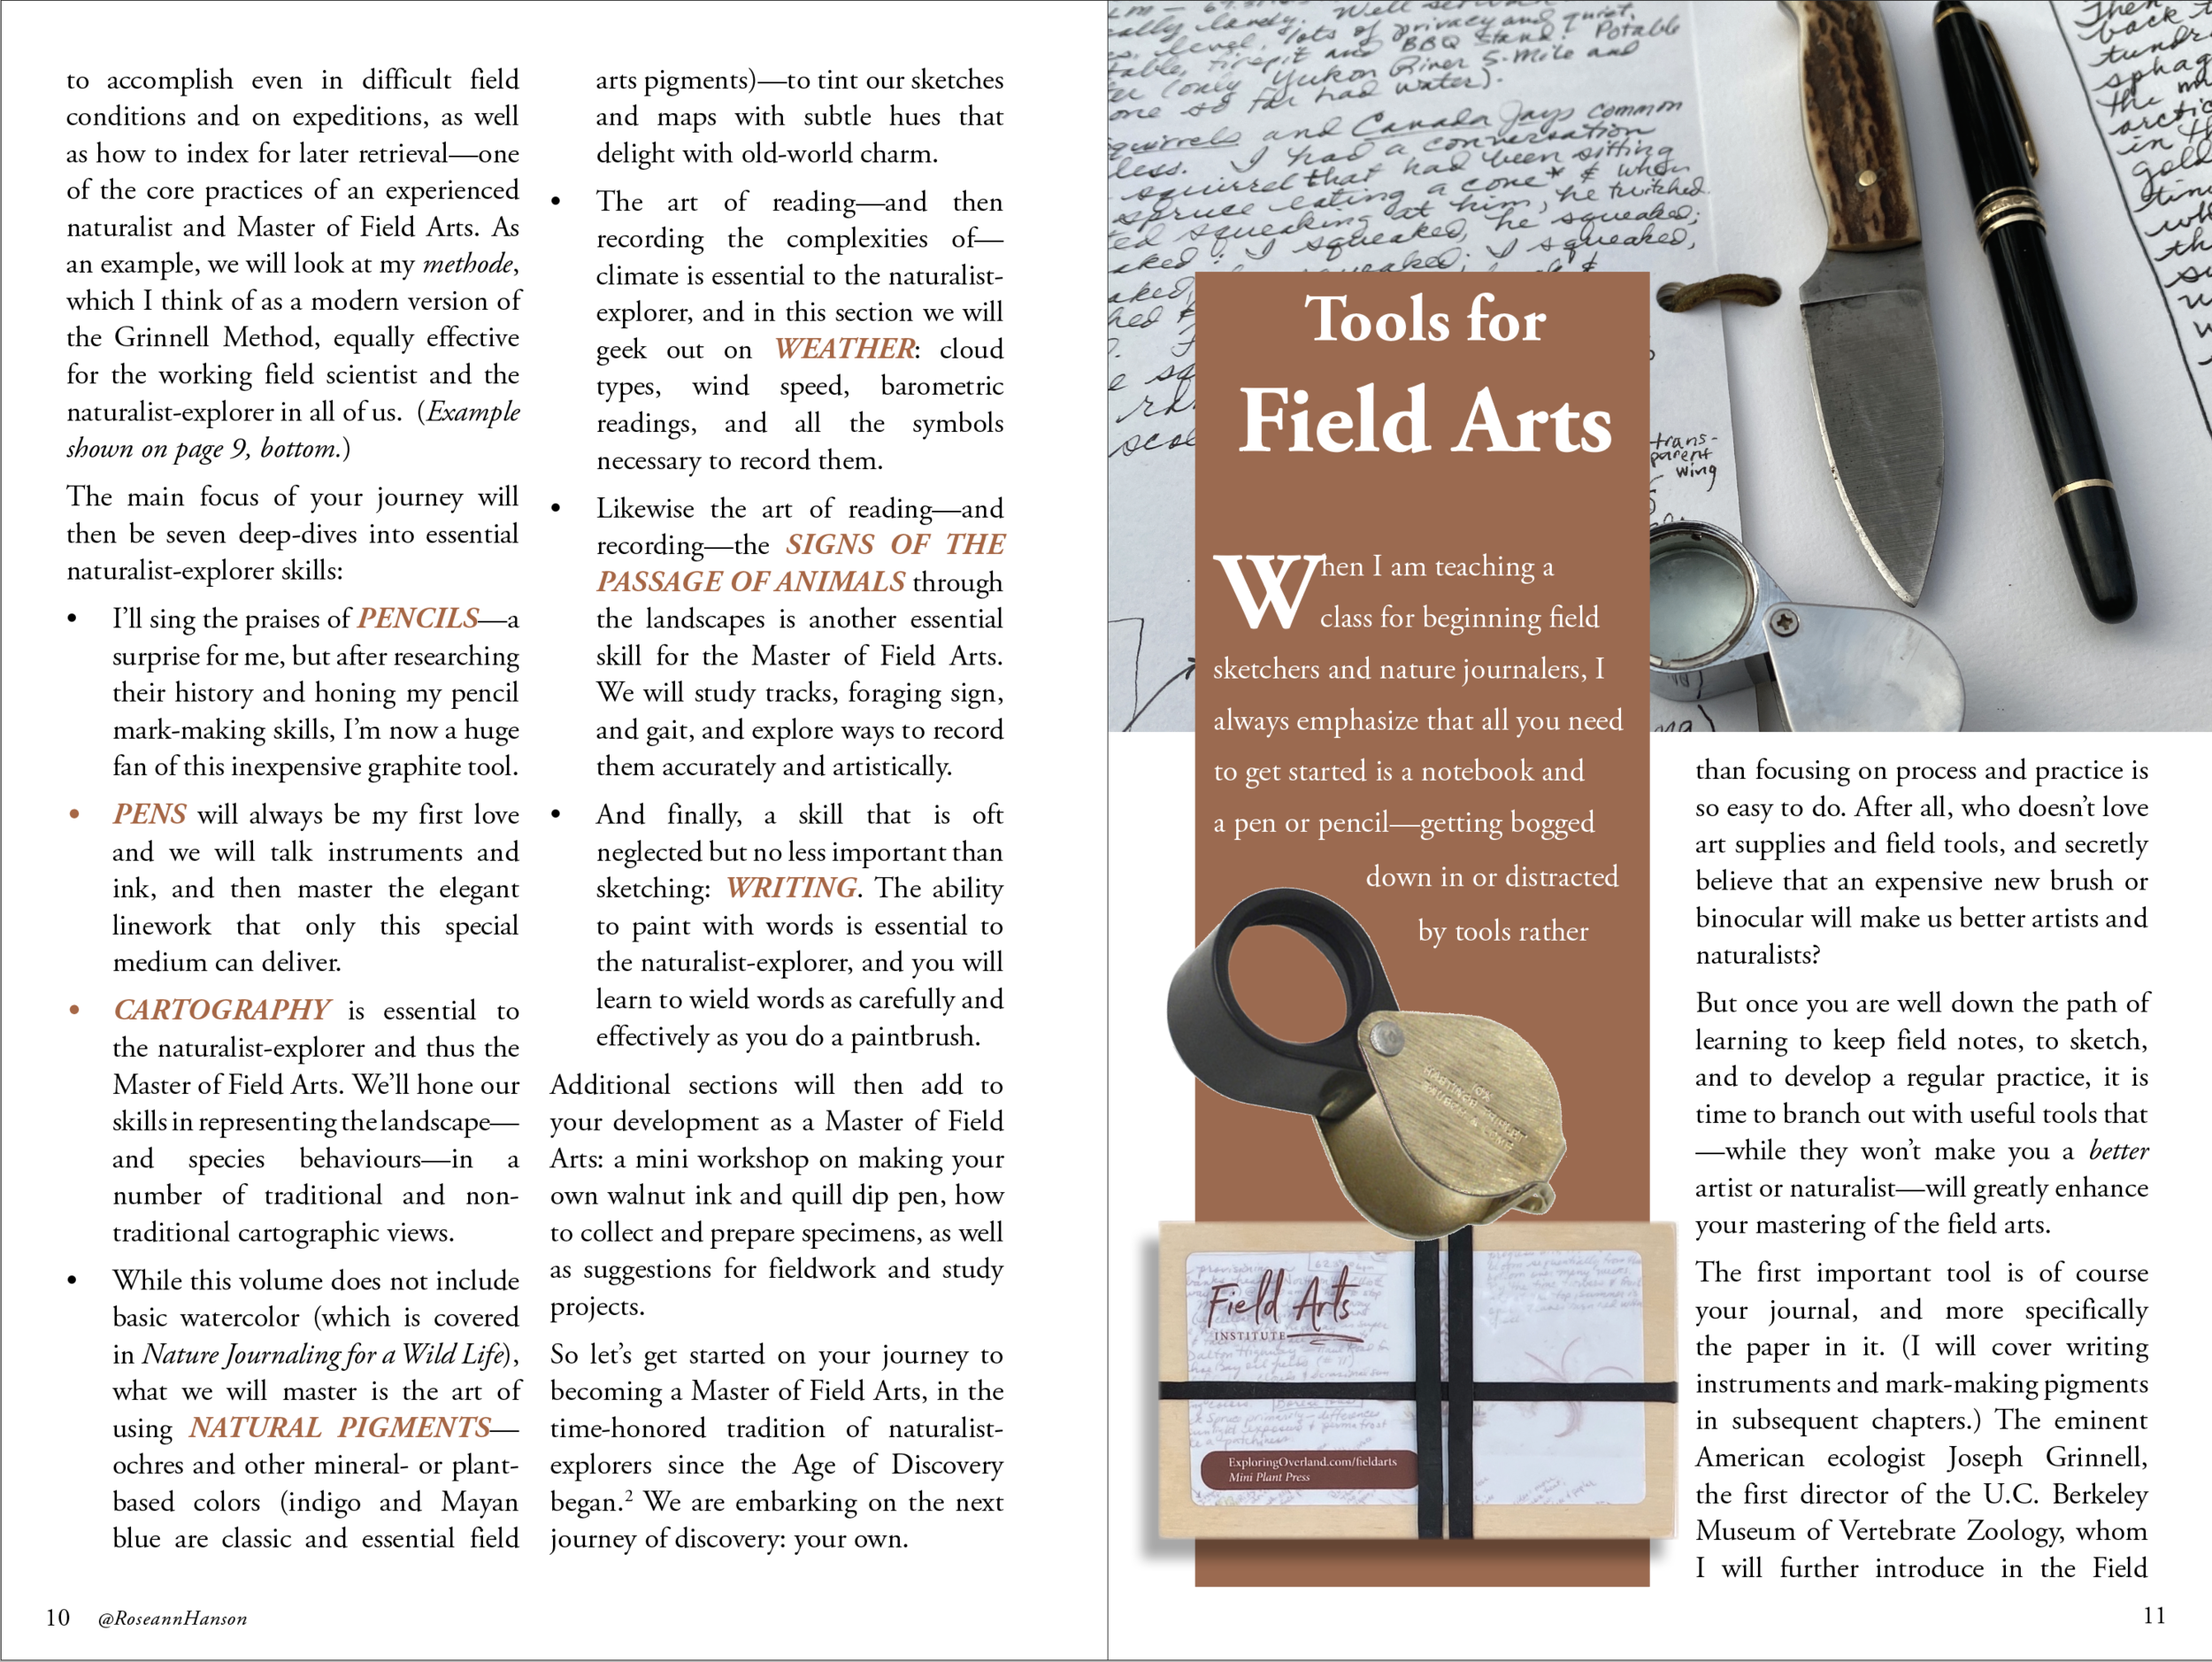
  • Tools for Field Arts

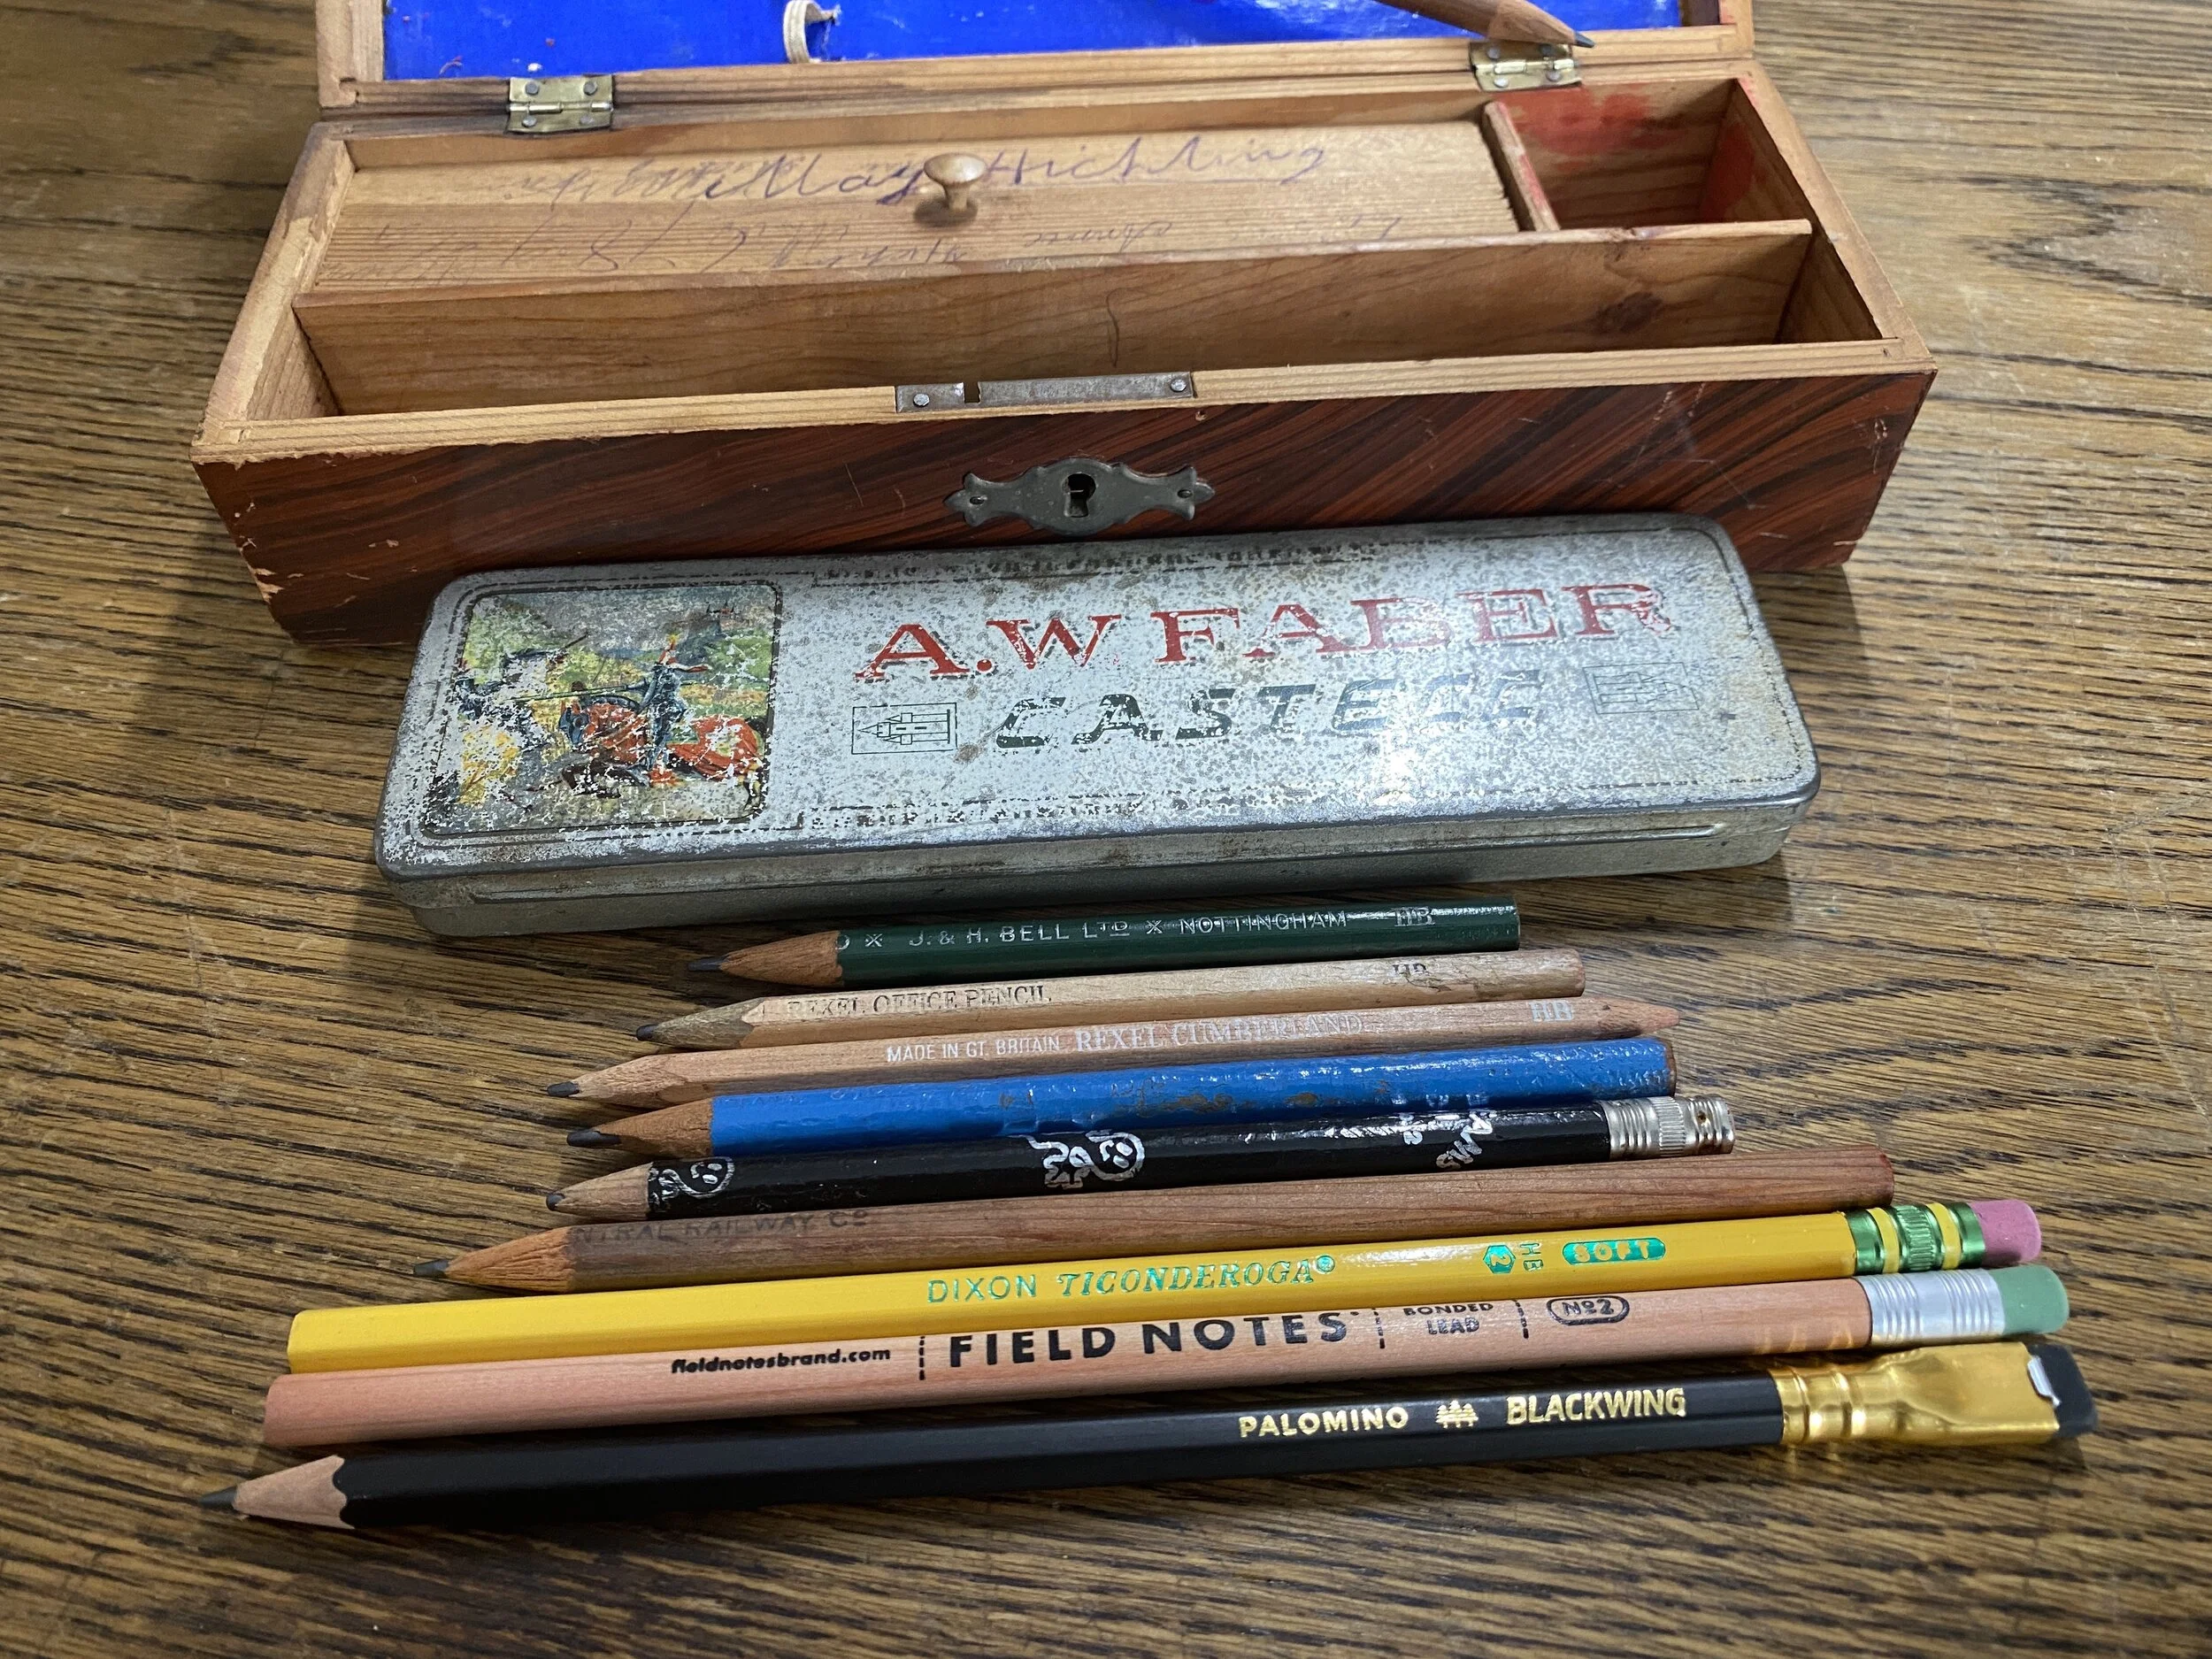
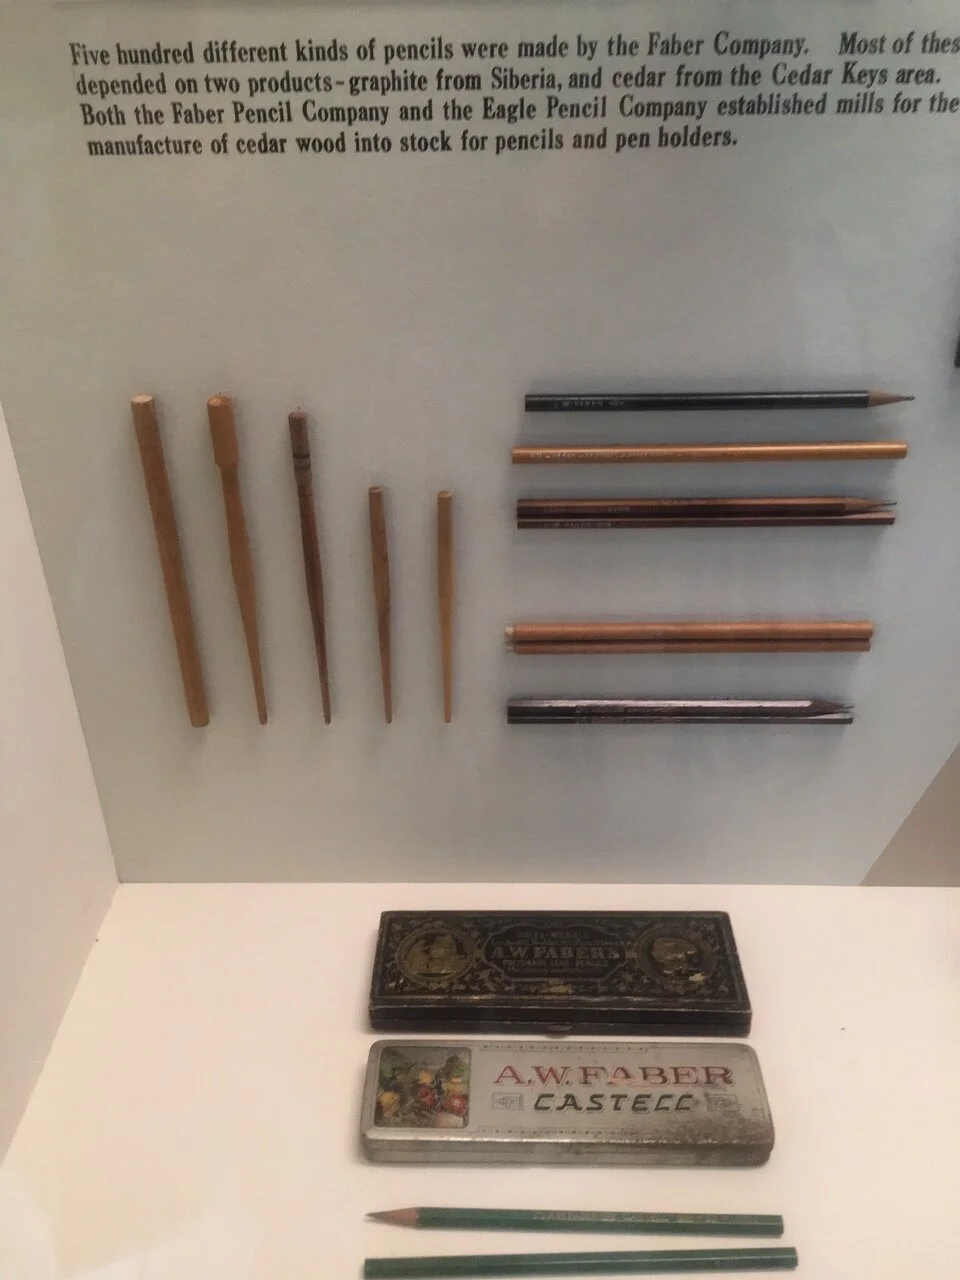
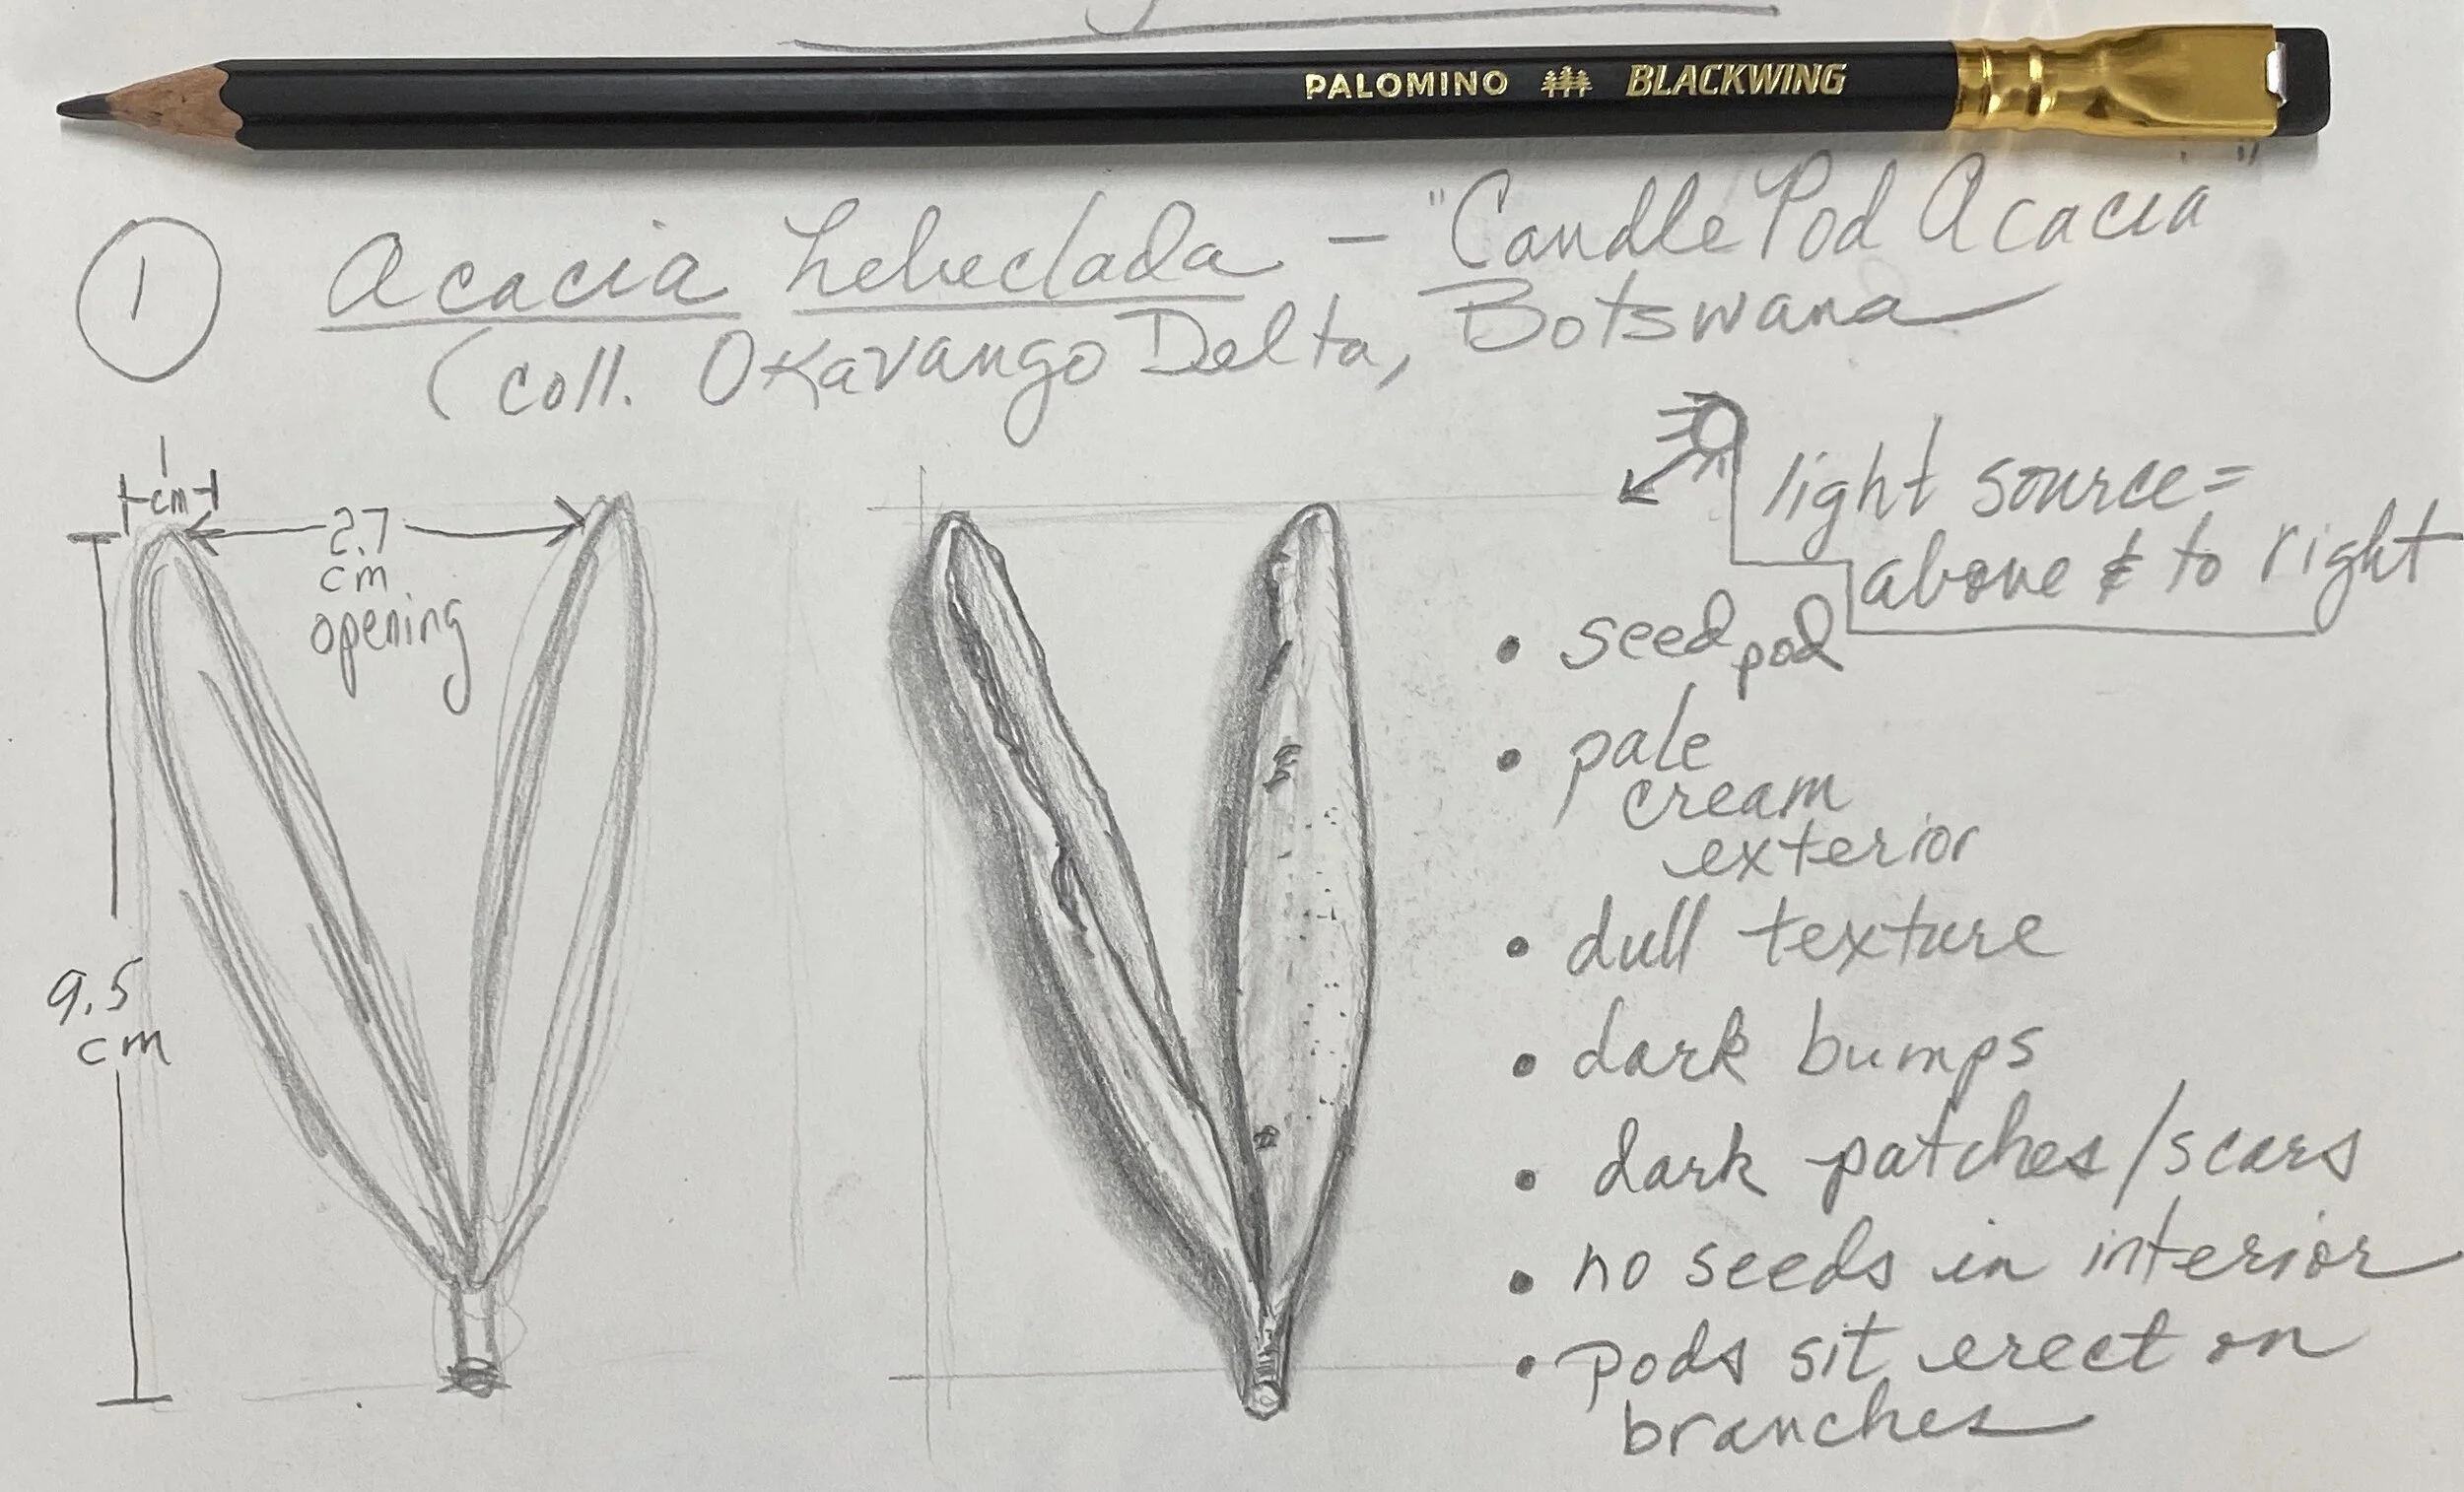
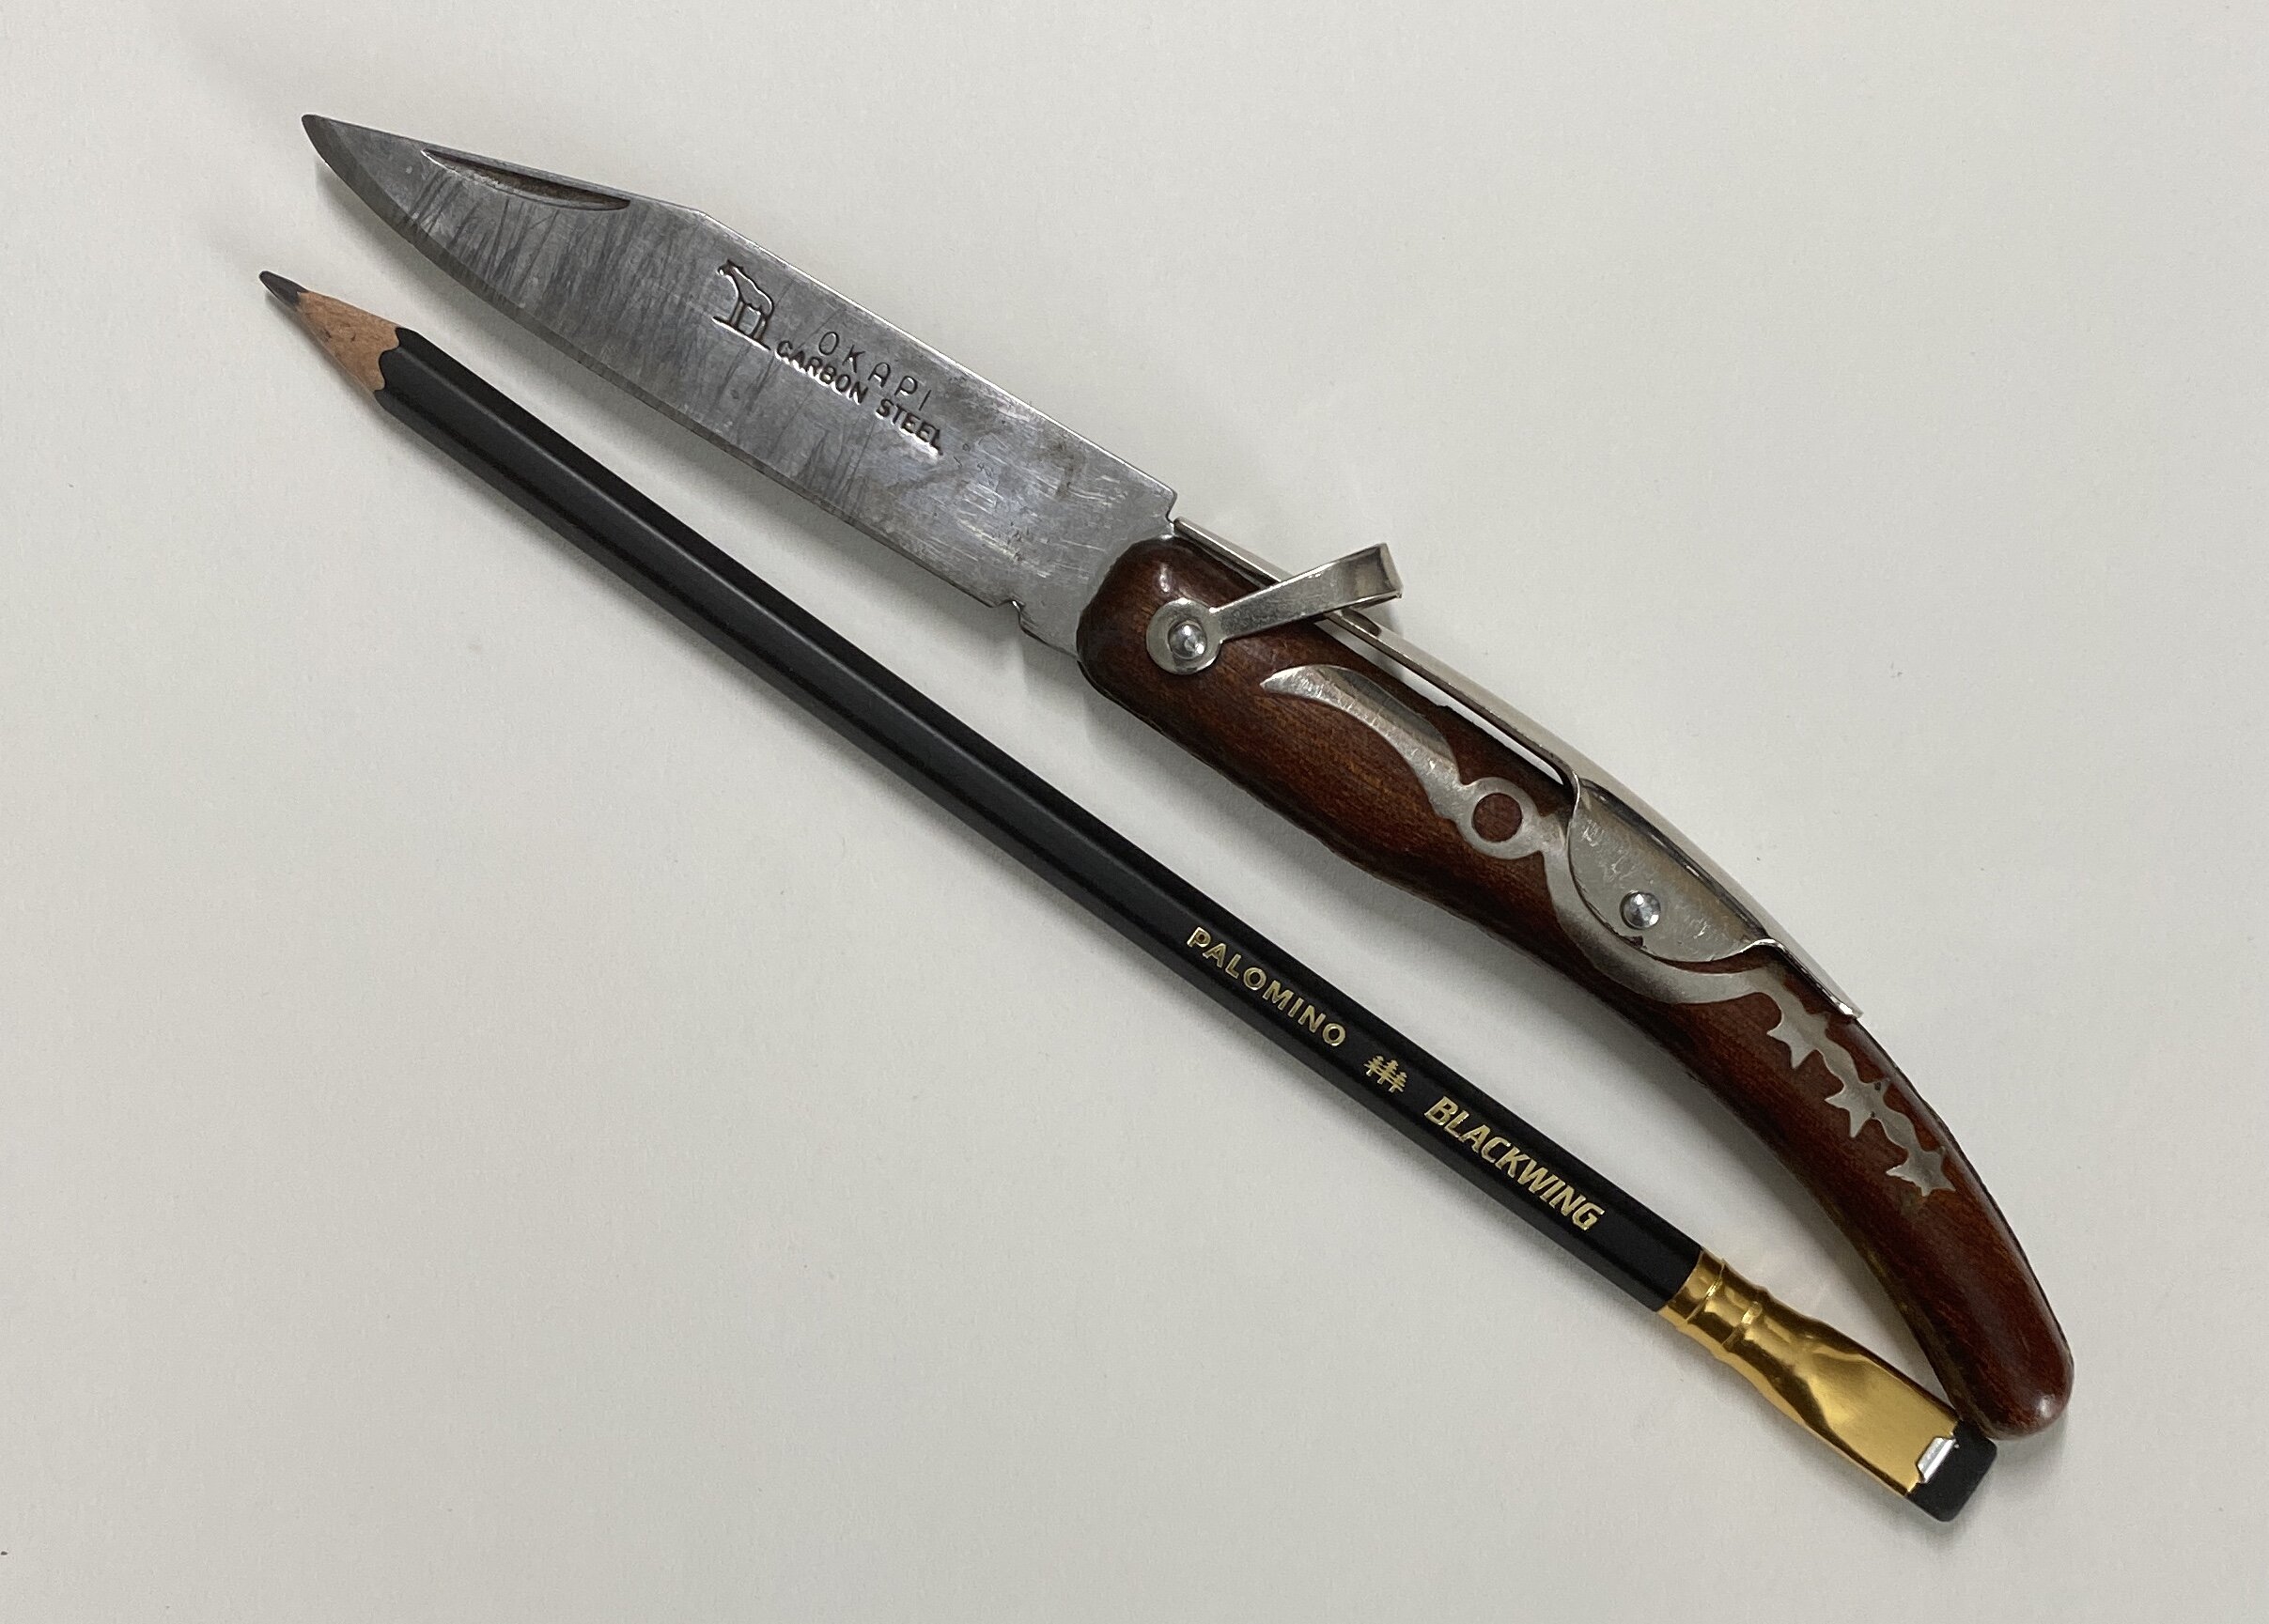
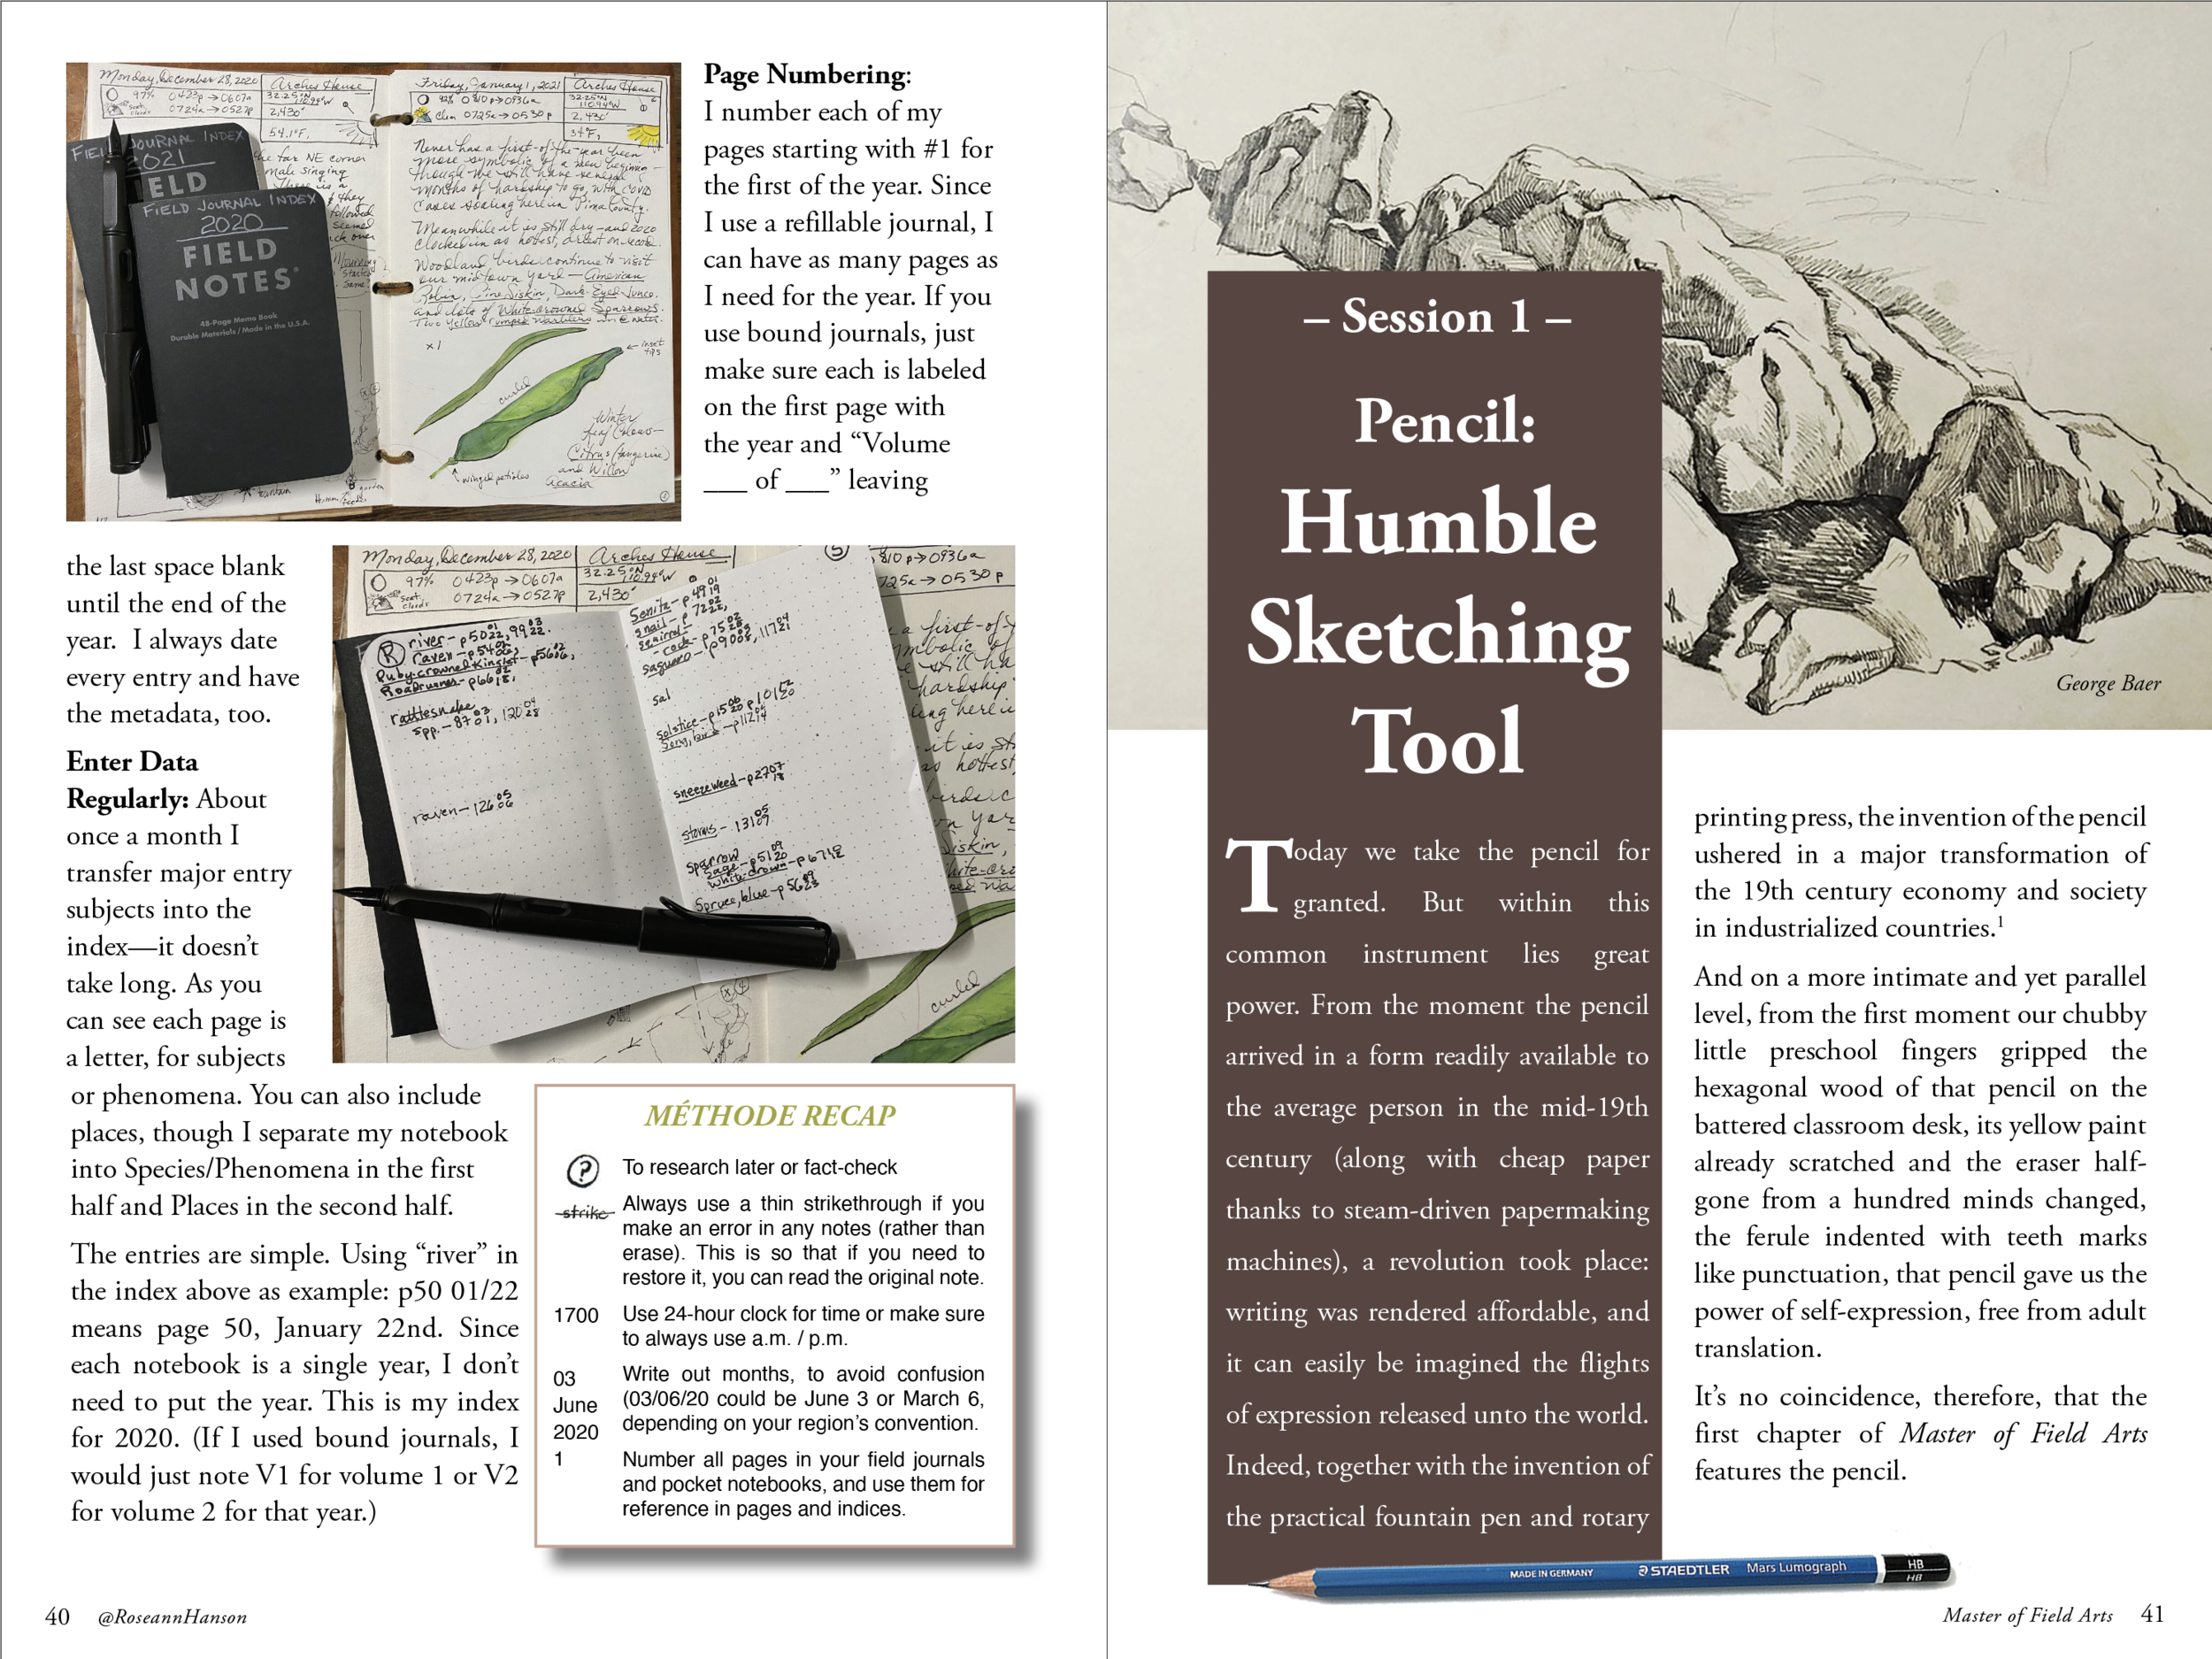
  • Session 1 – Pencil: Humble Sketching Tool

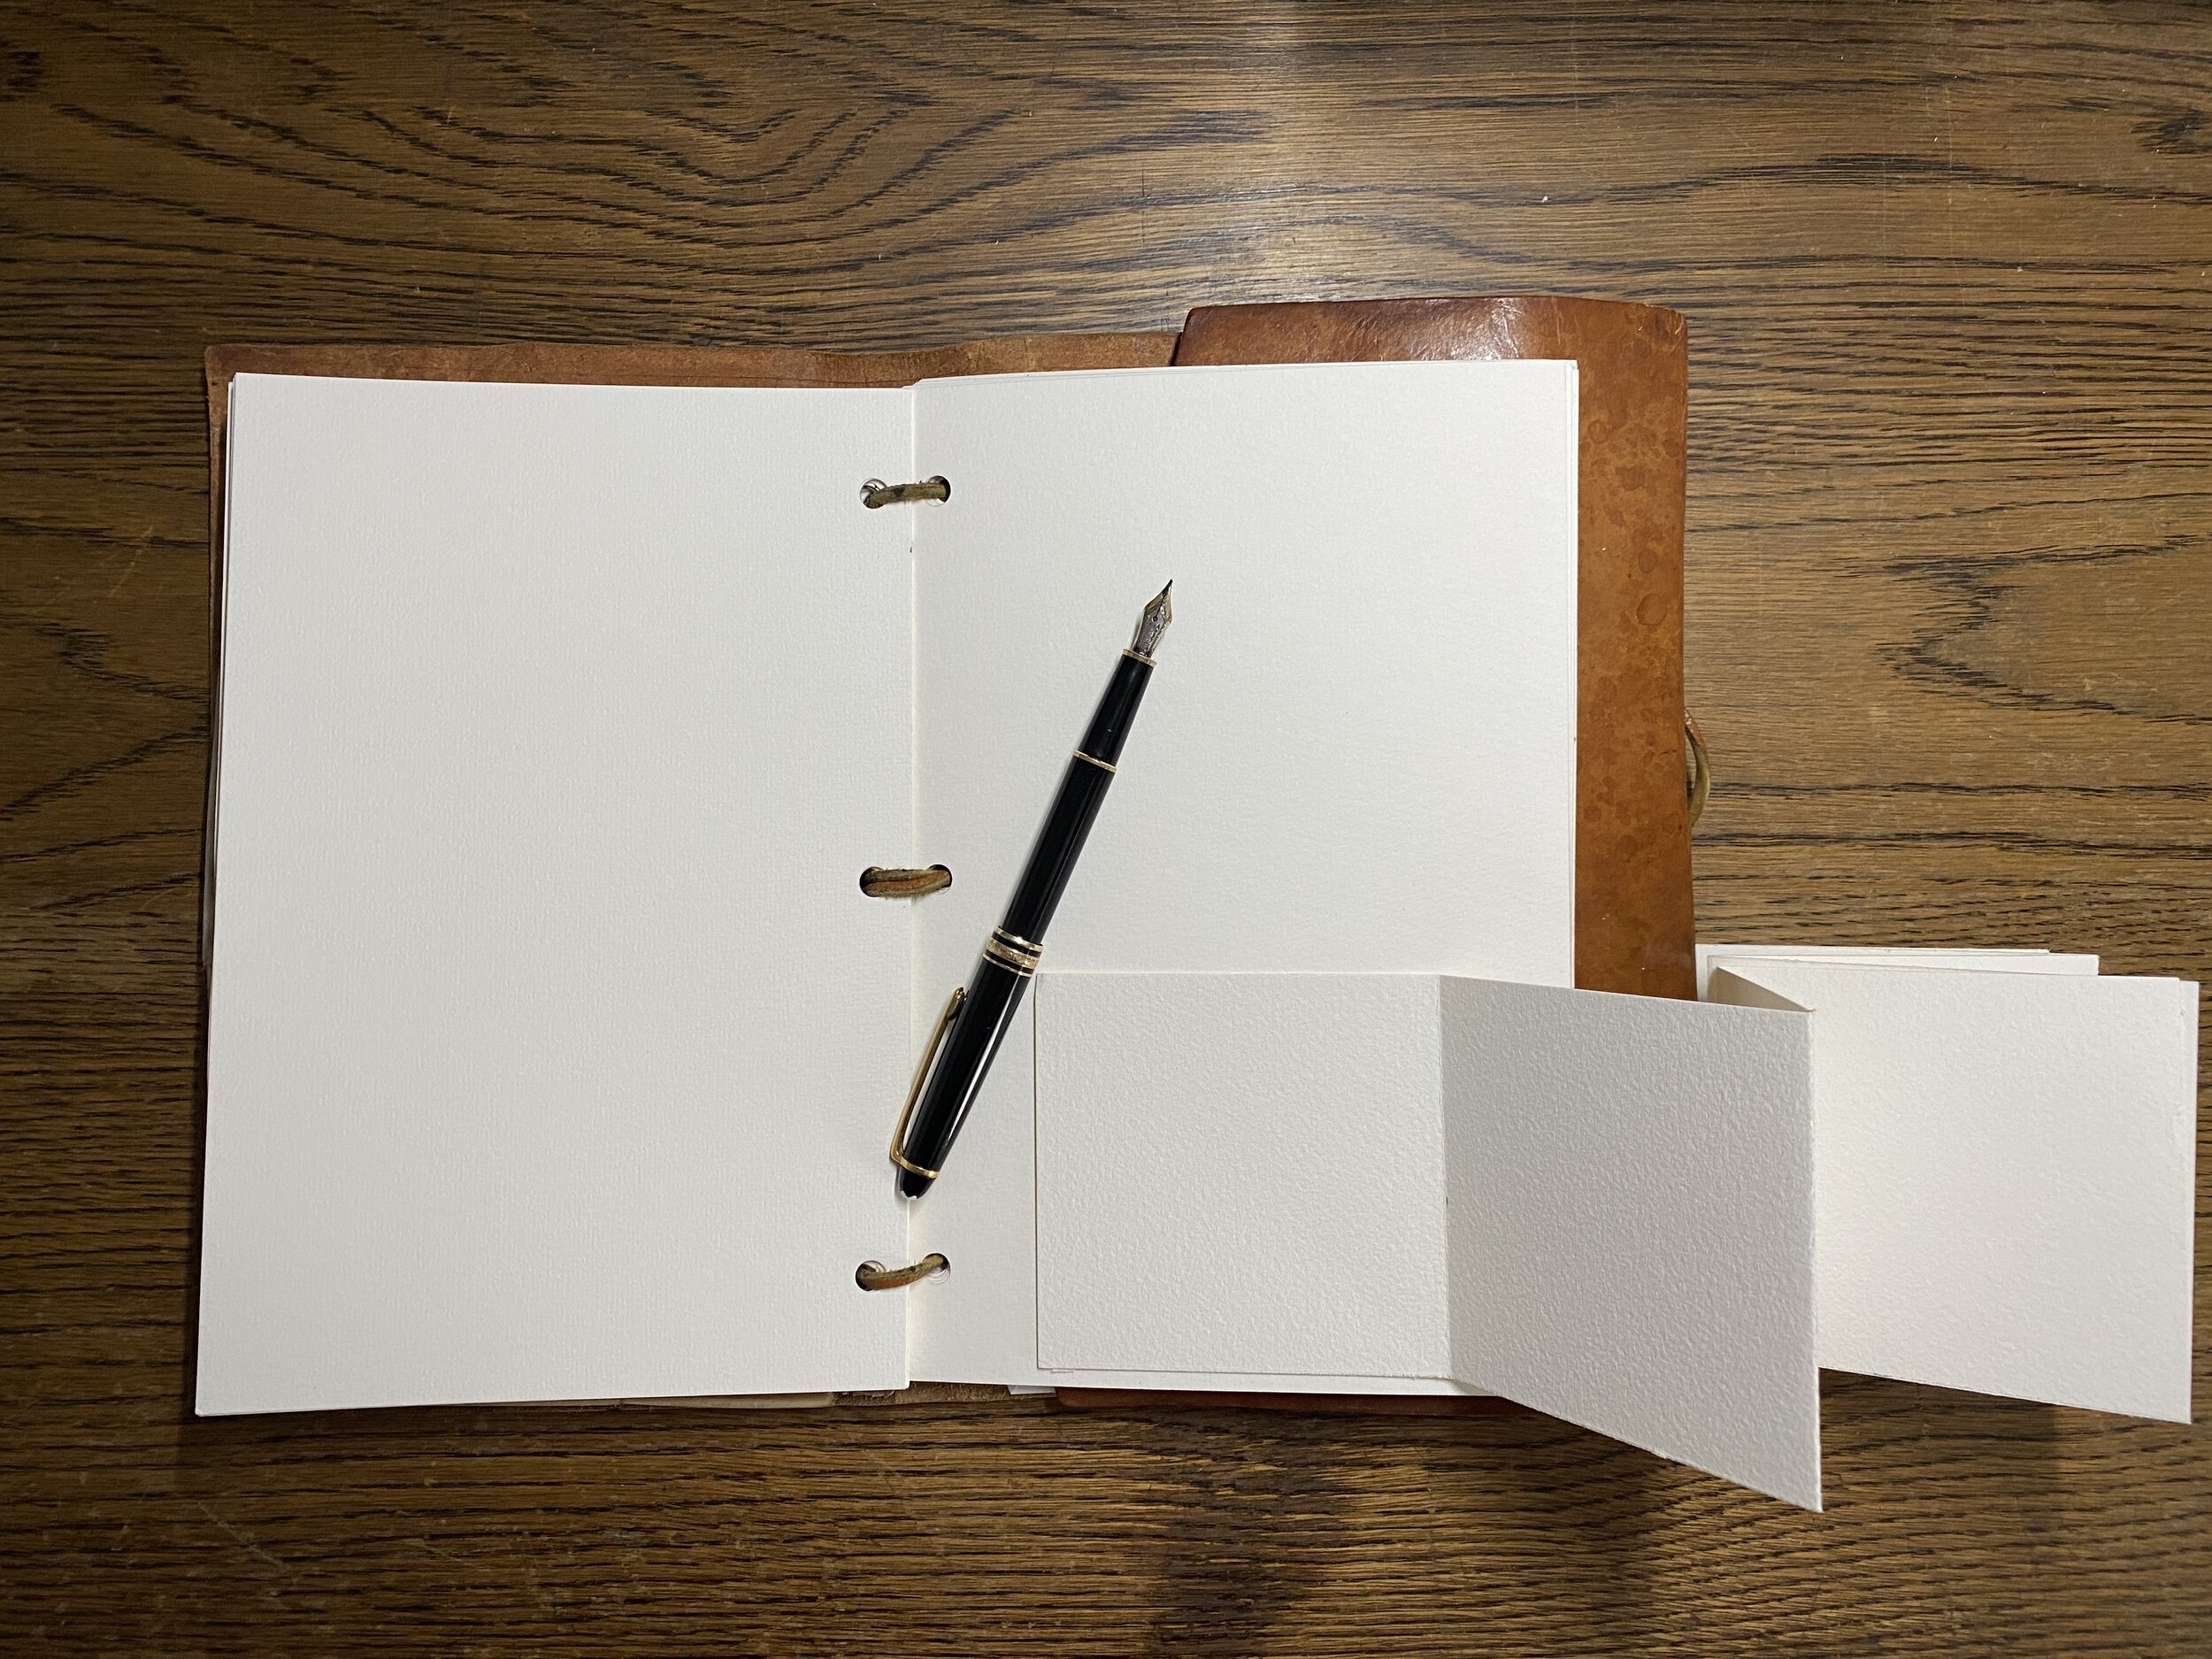
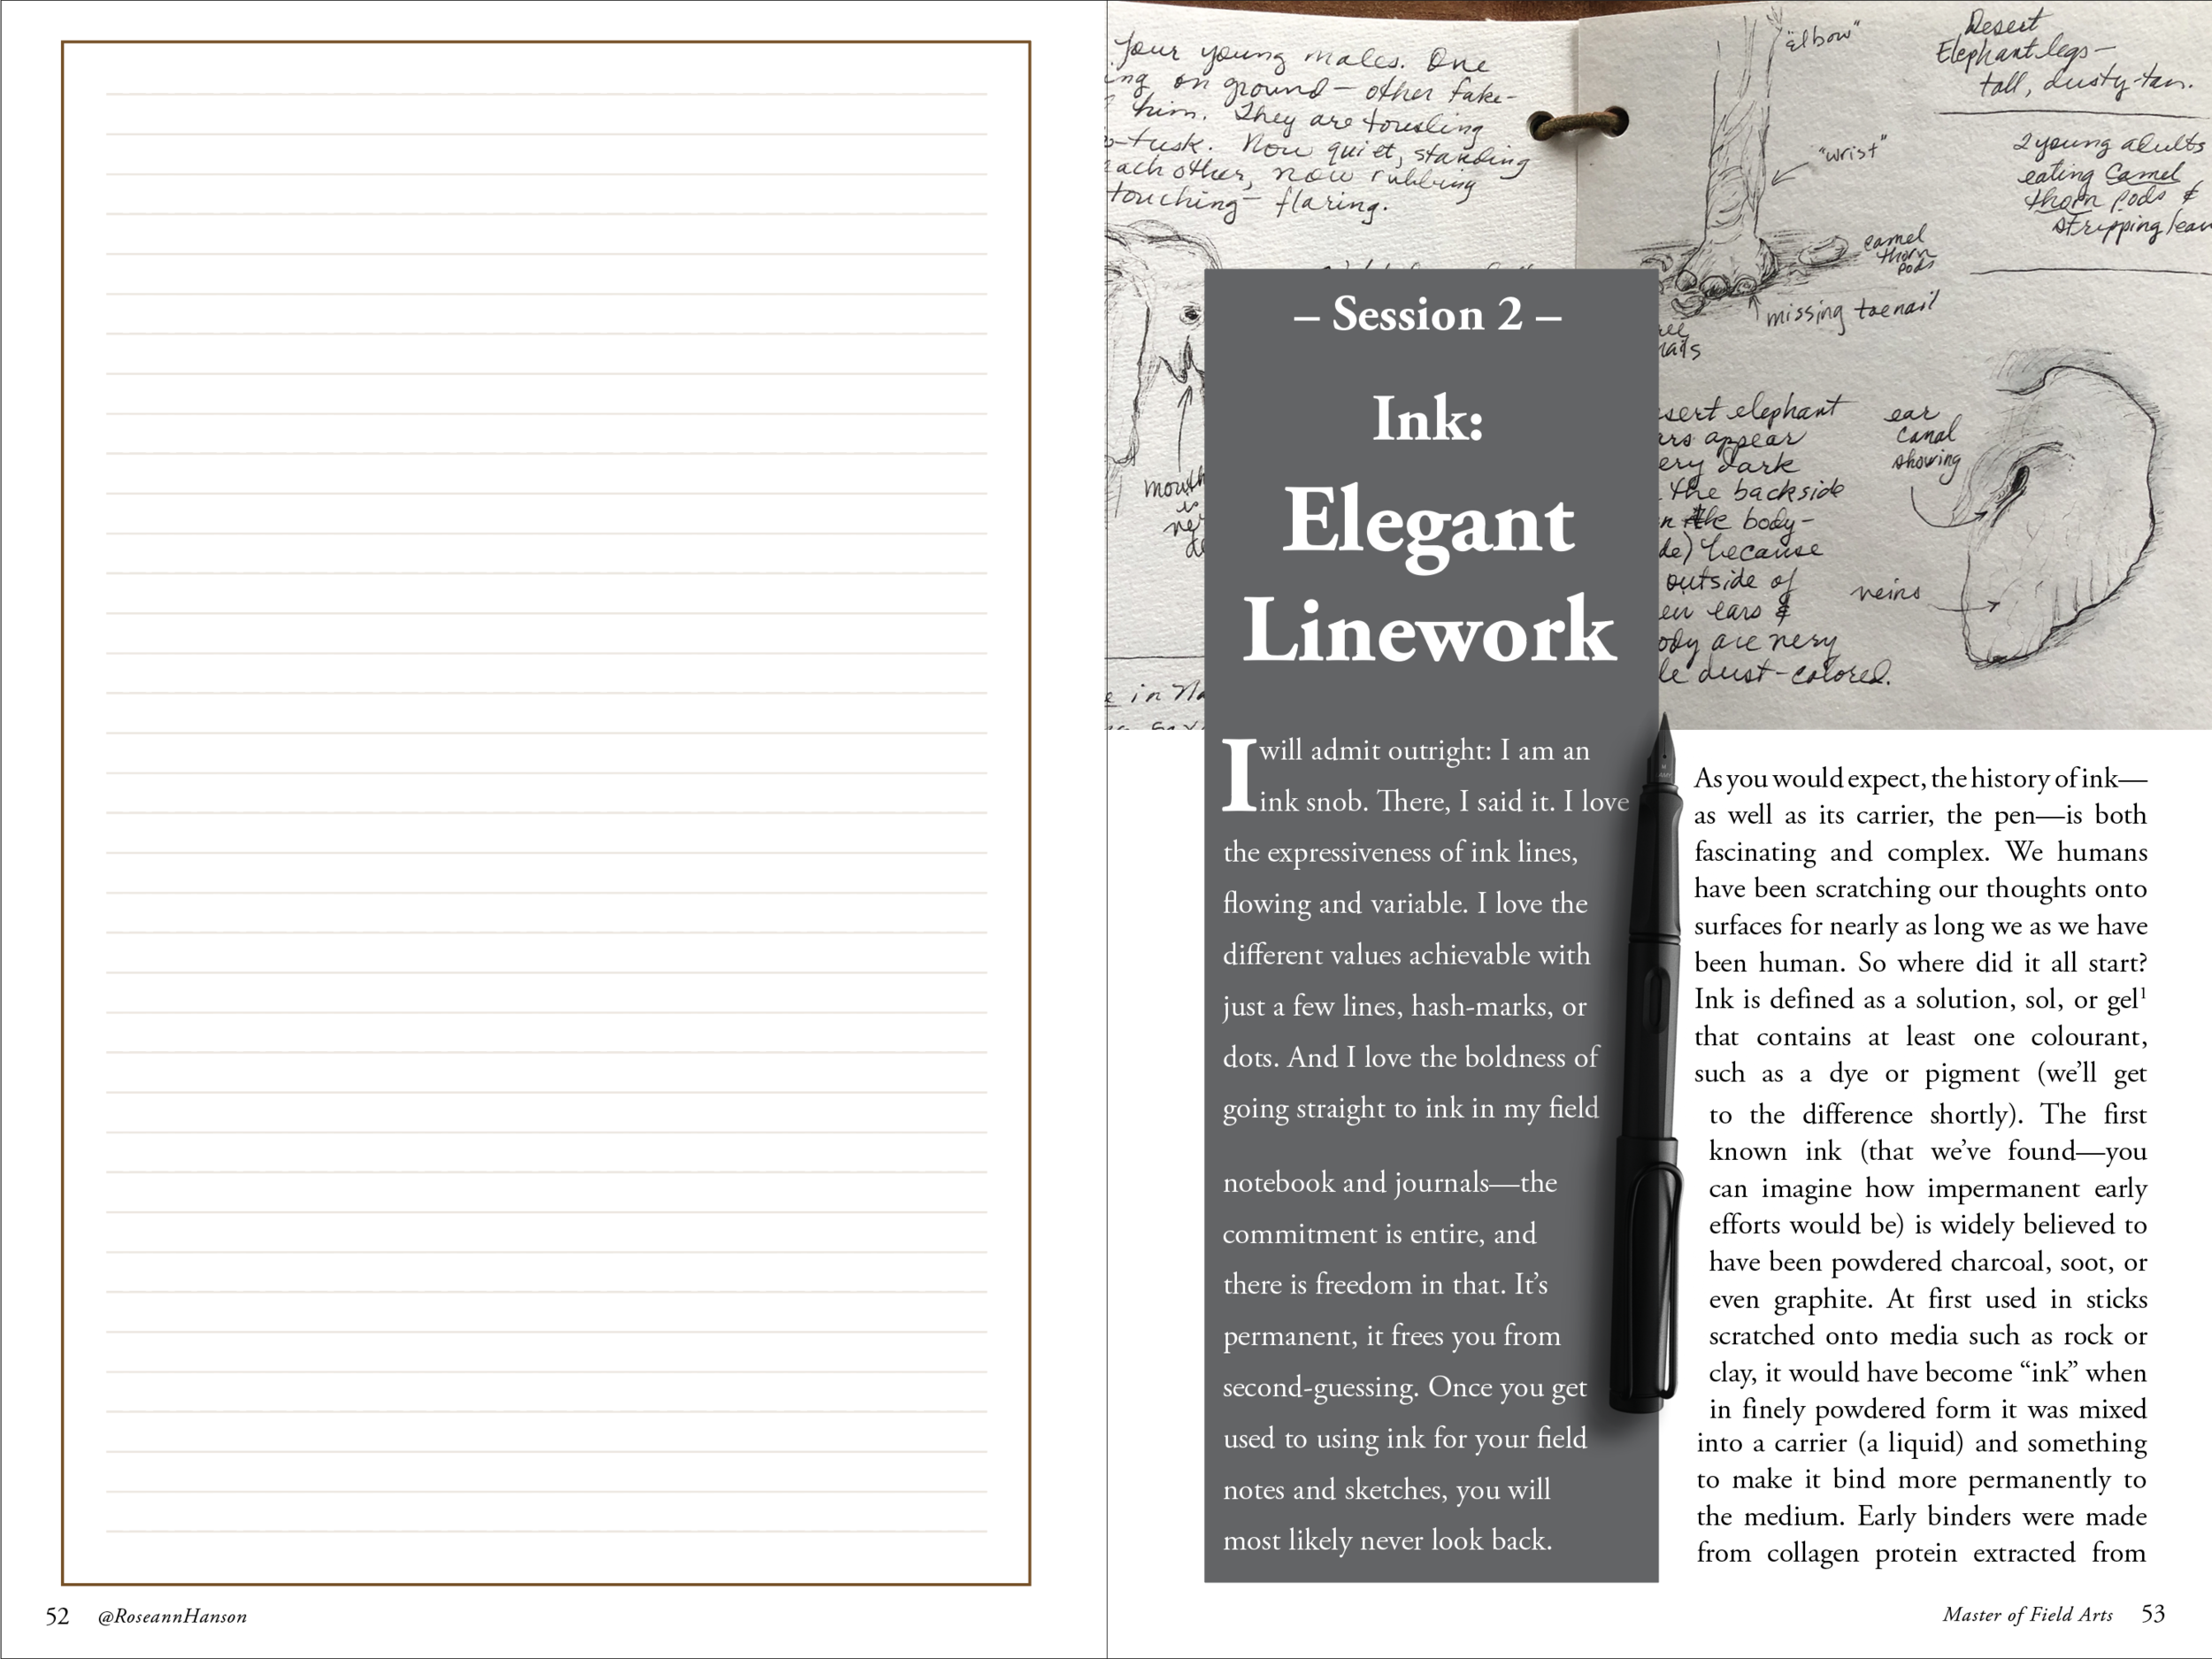
  • Session 2 – Ink: Elegant Linework

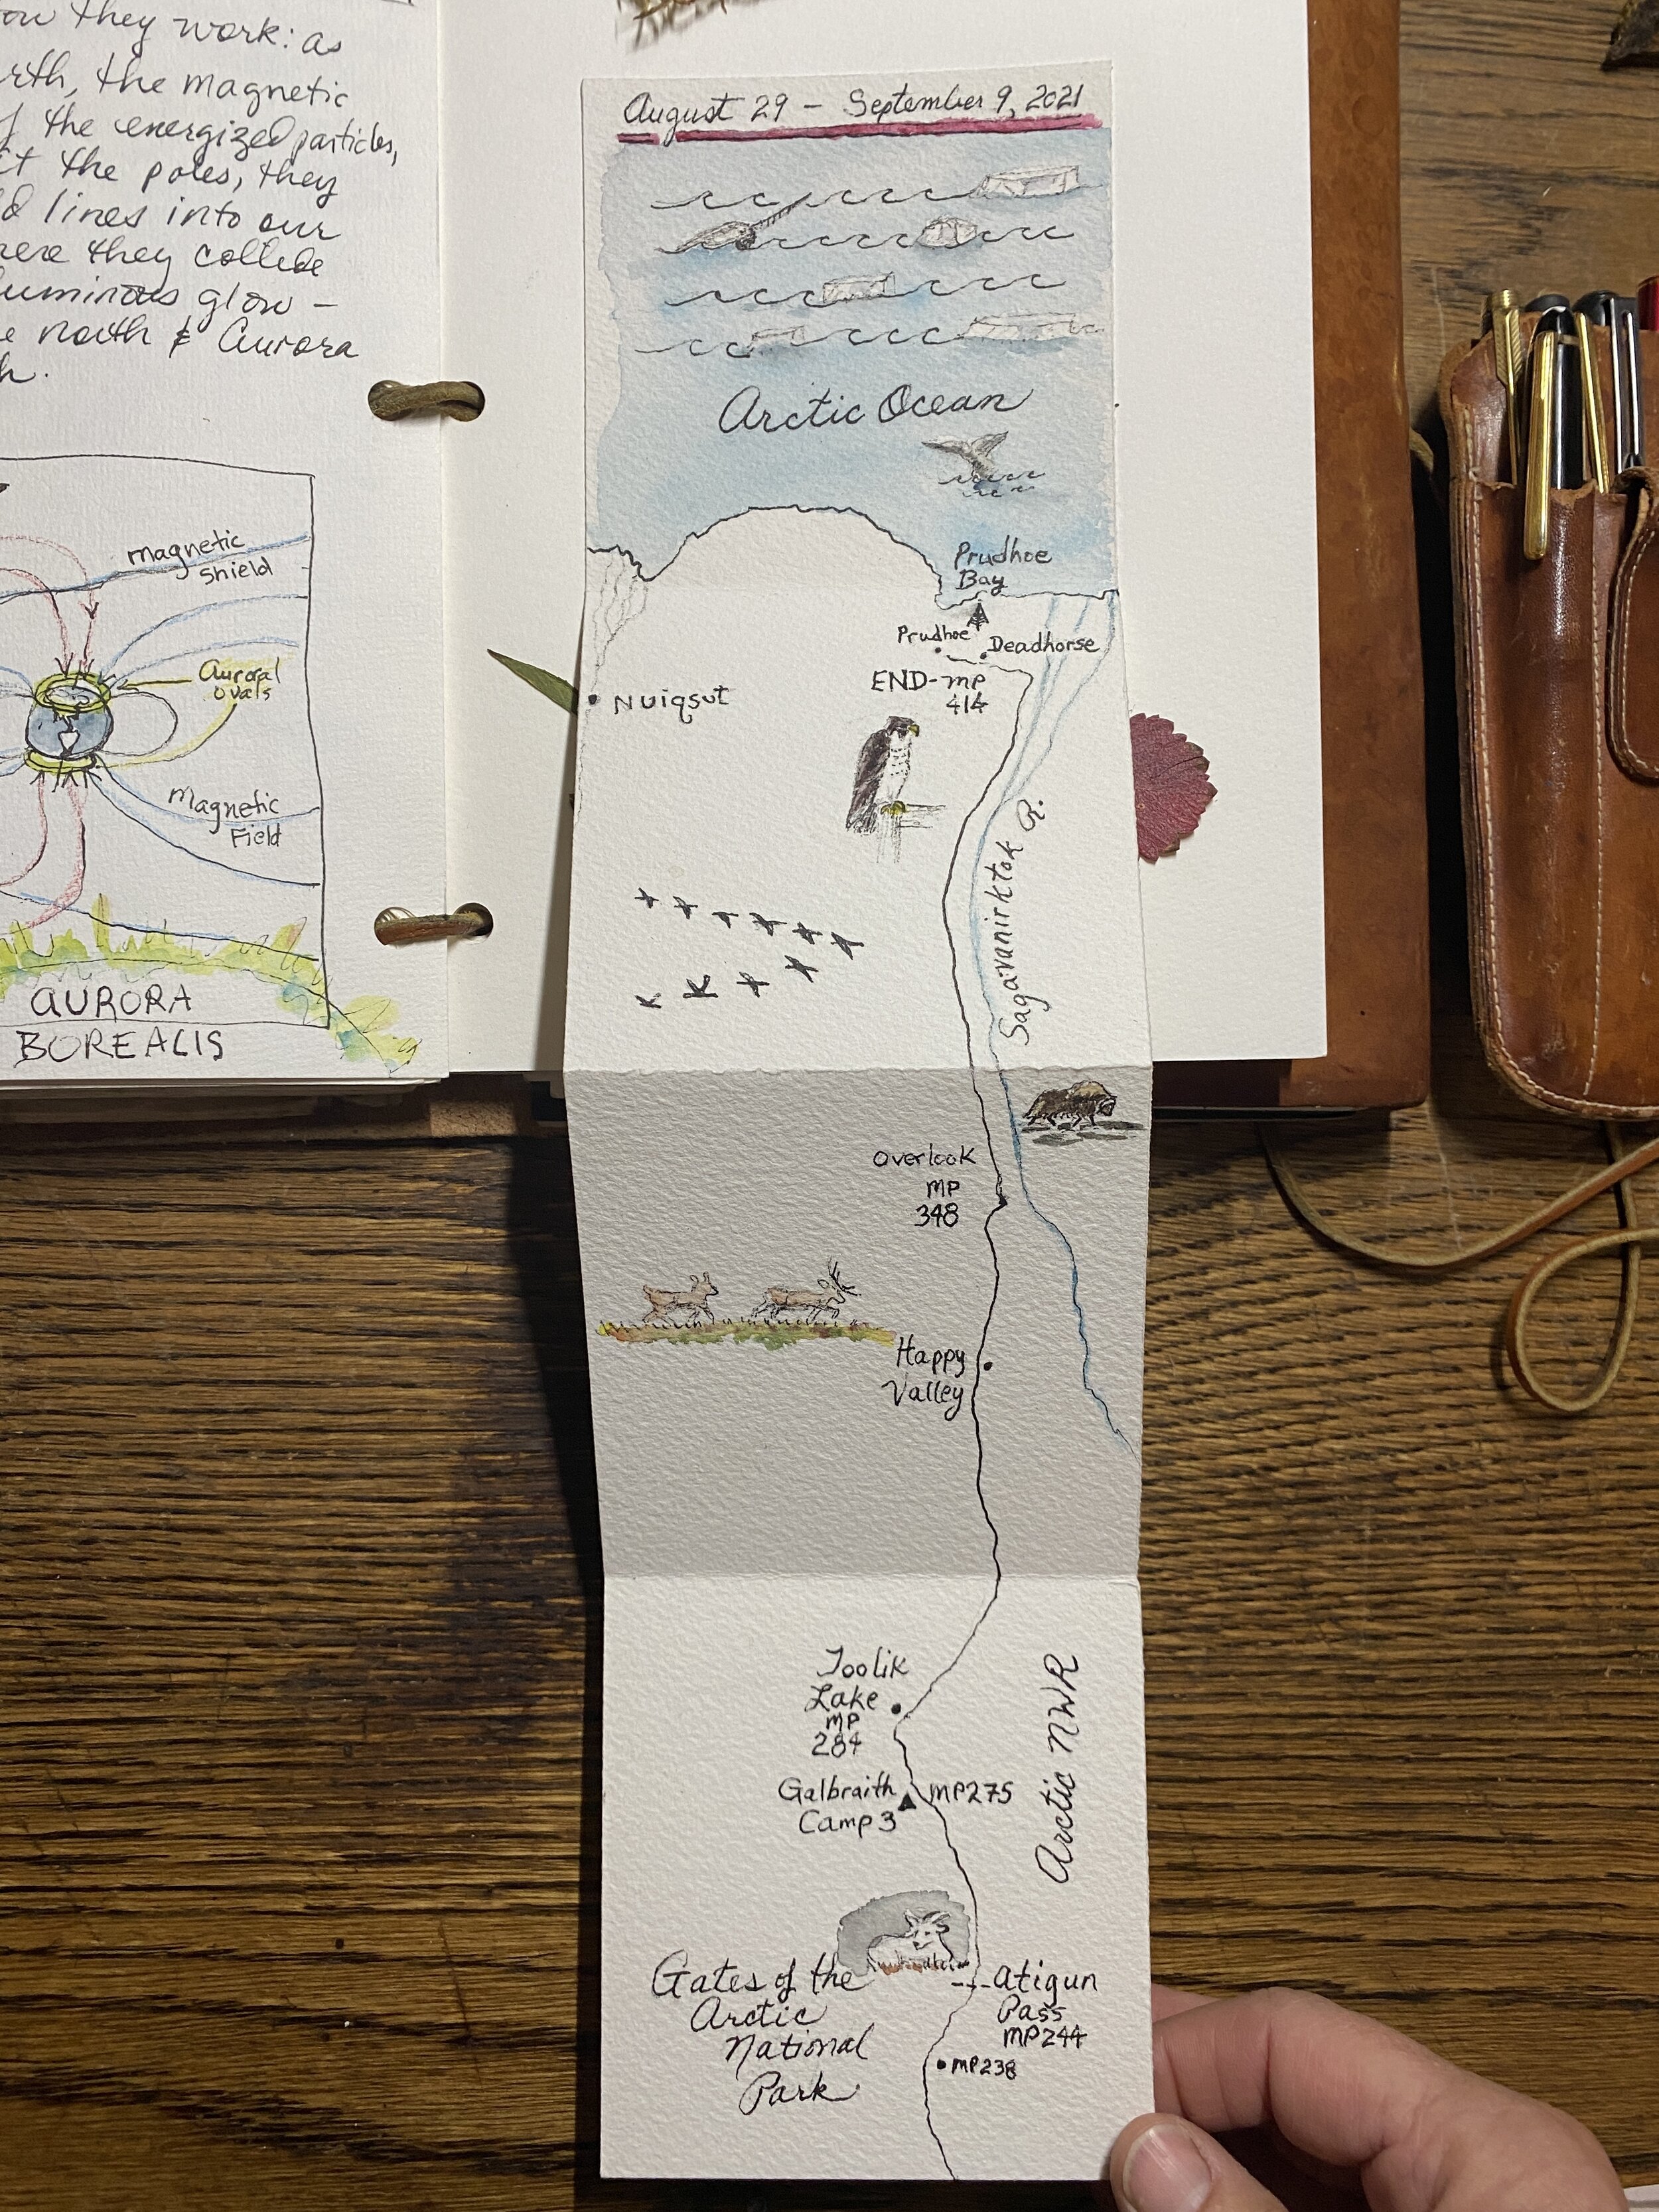
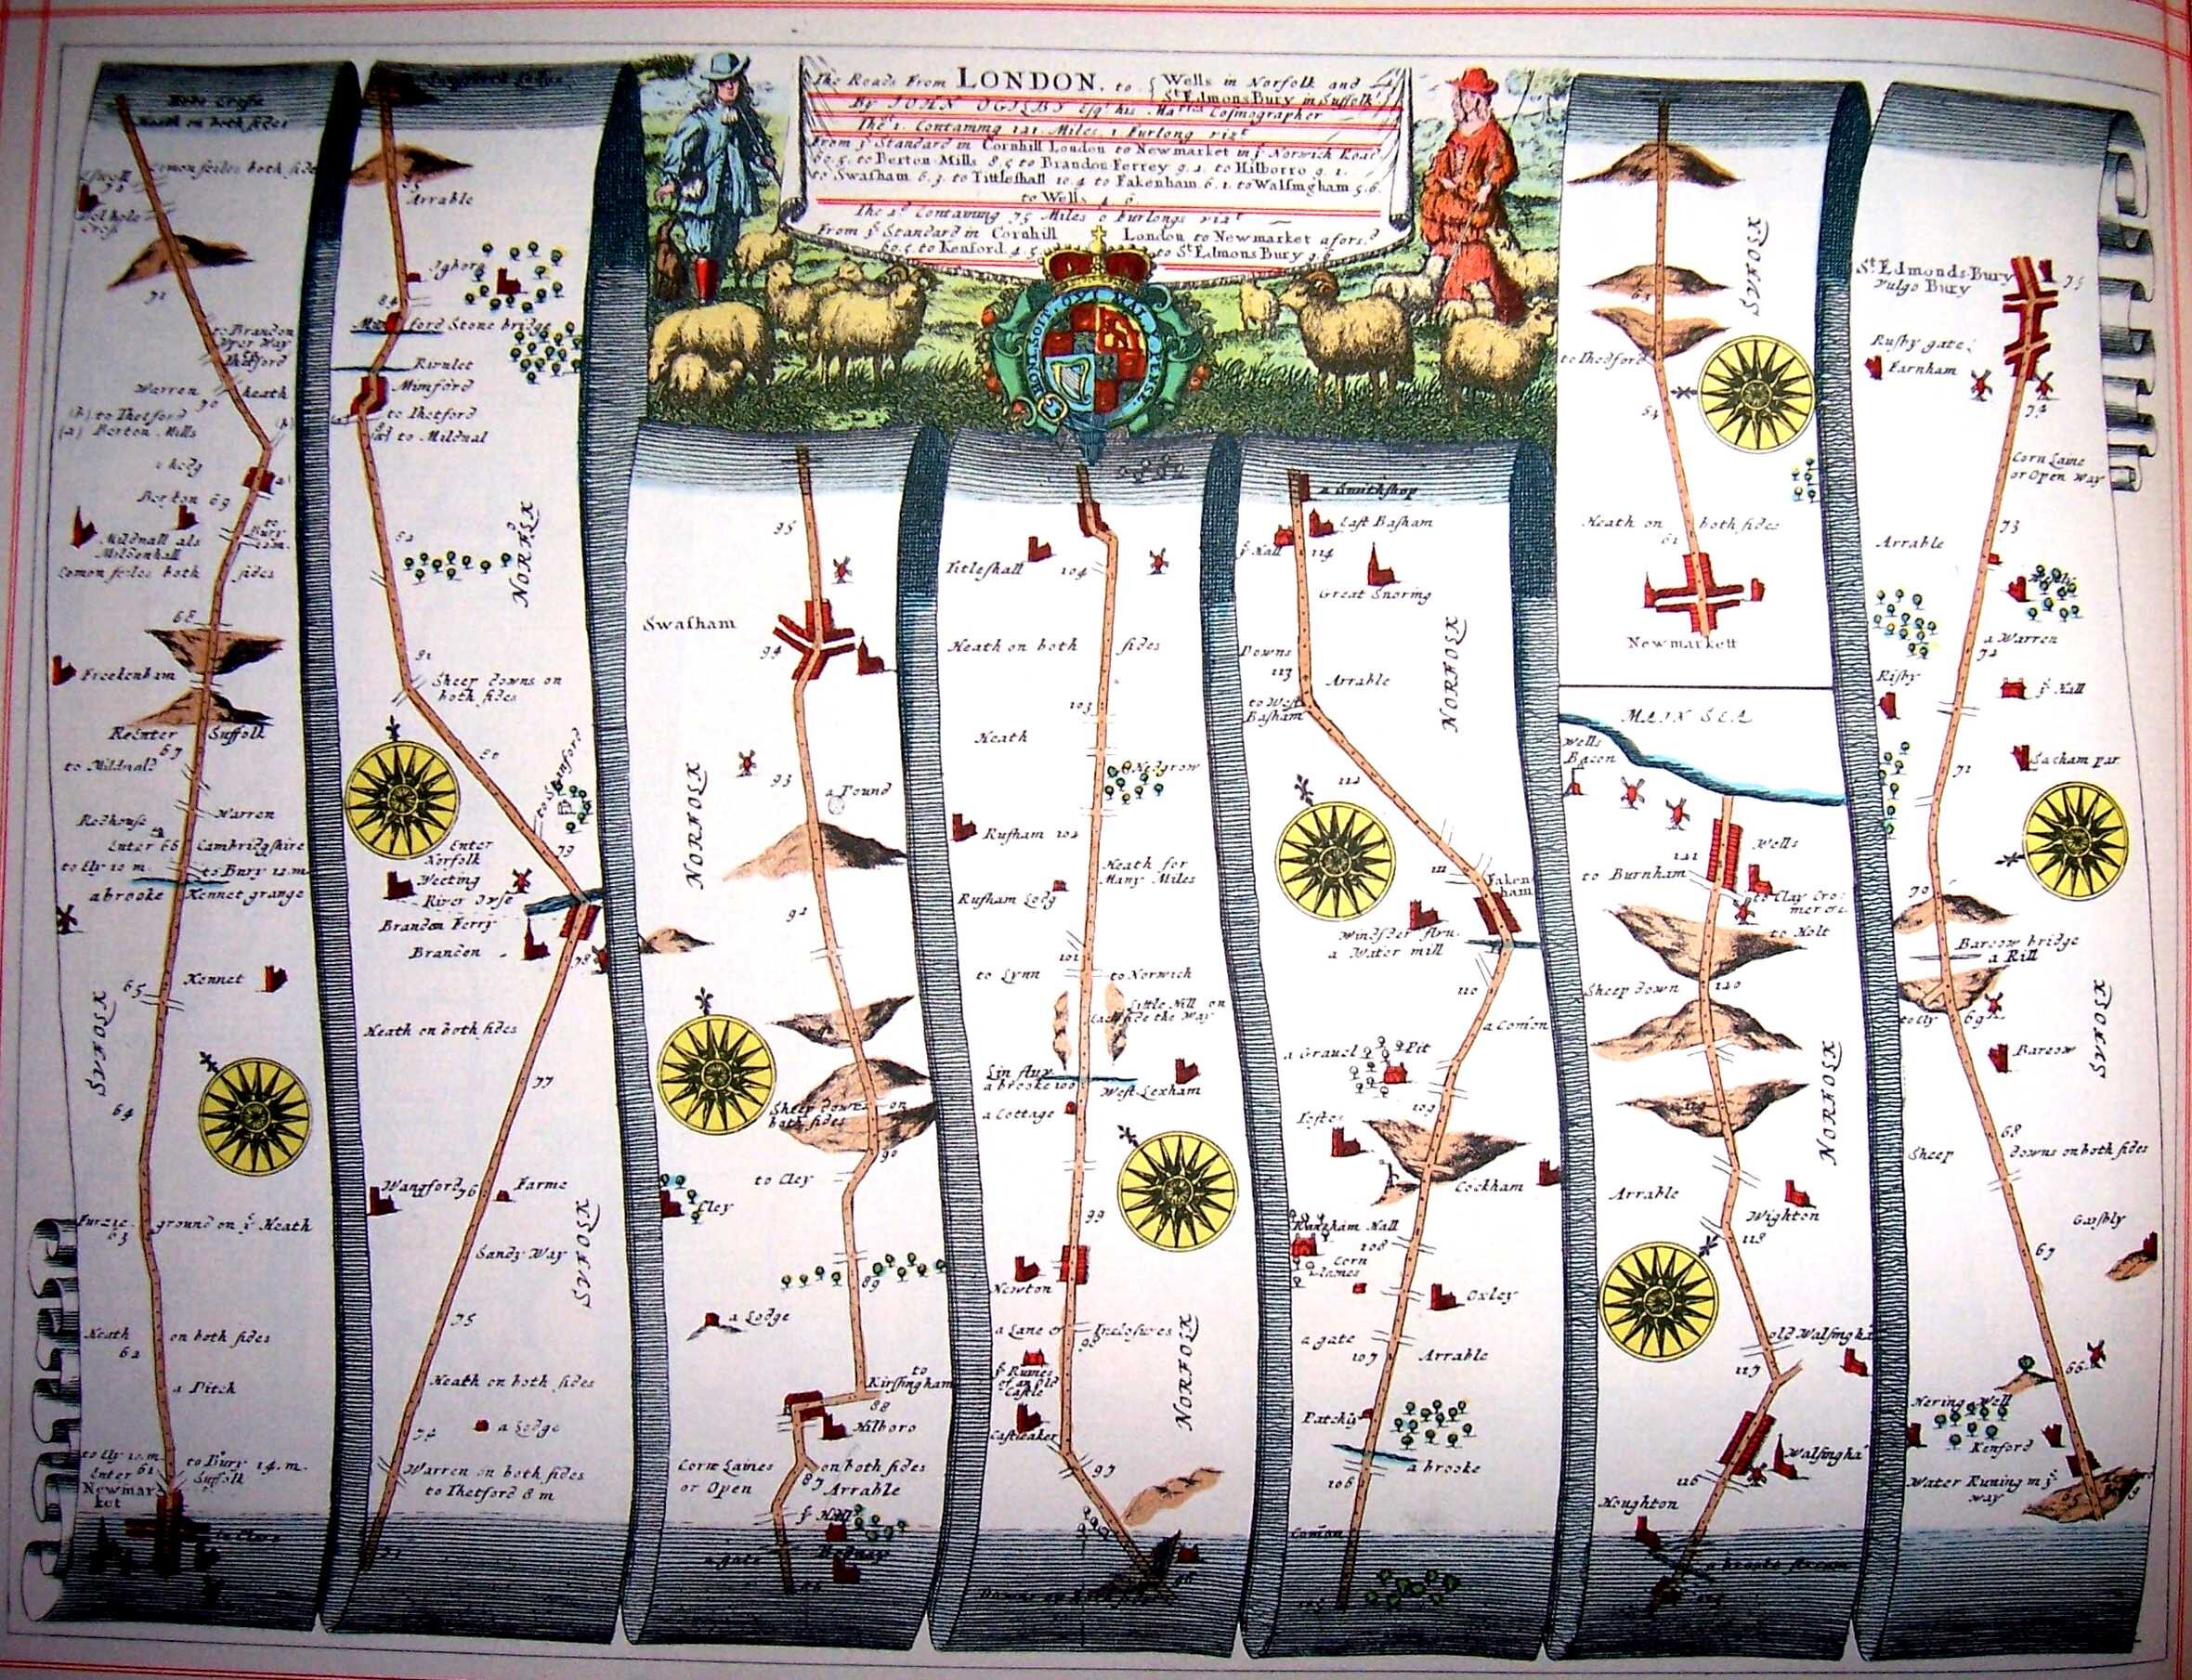
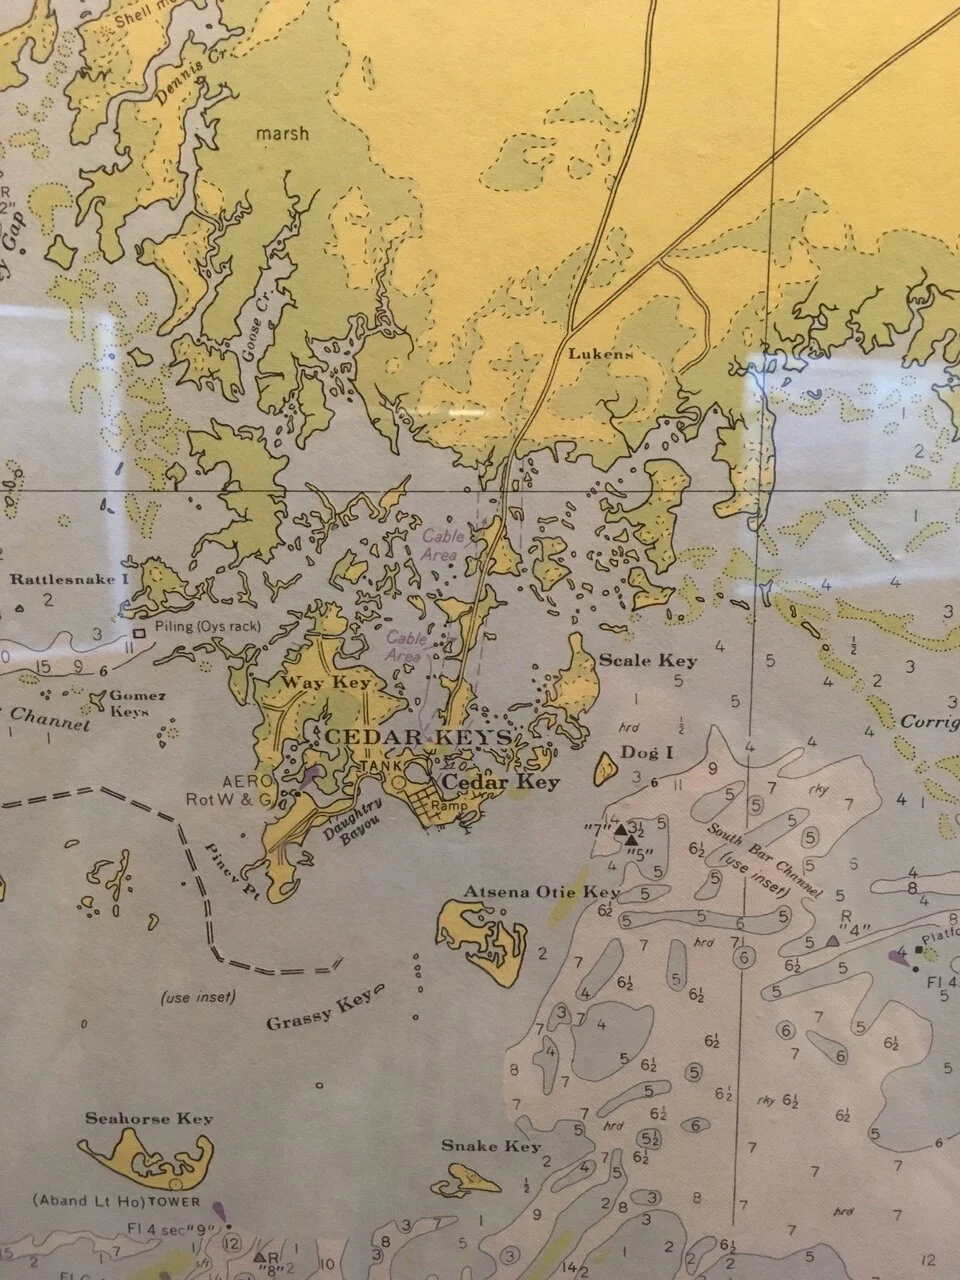
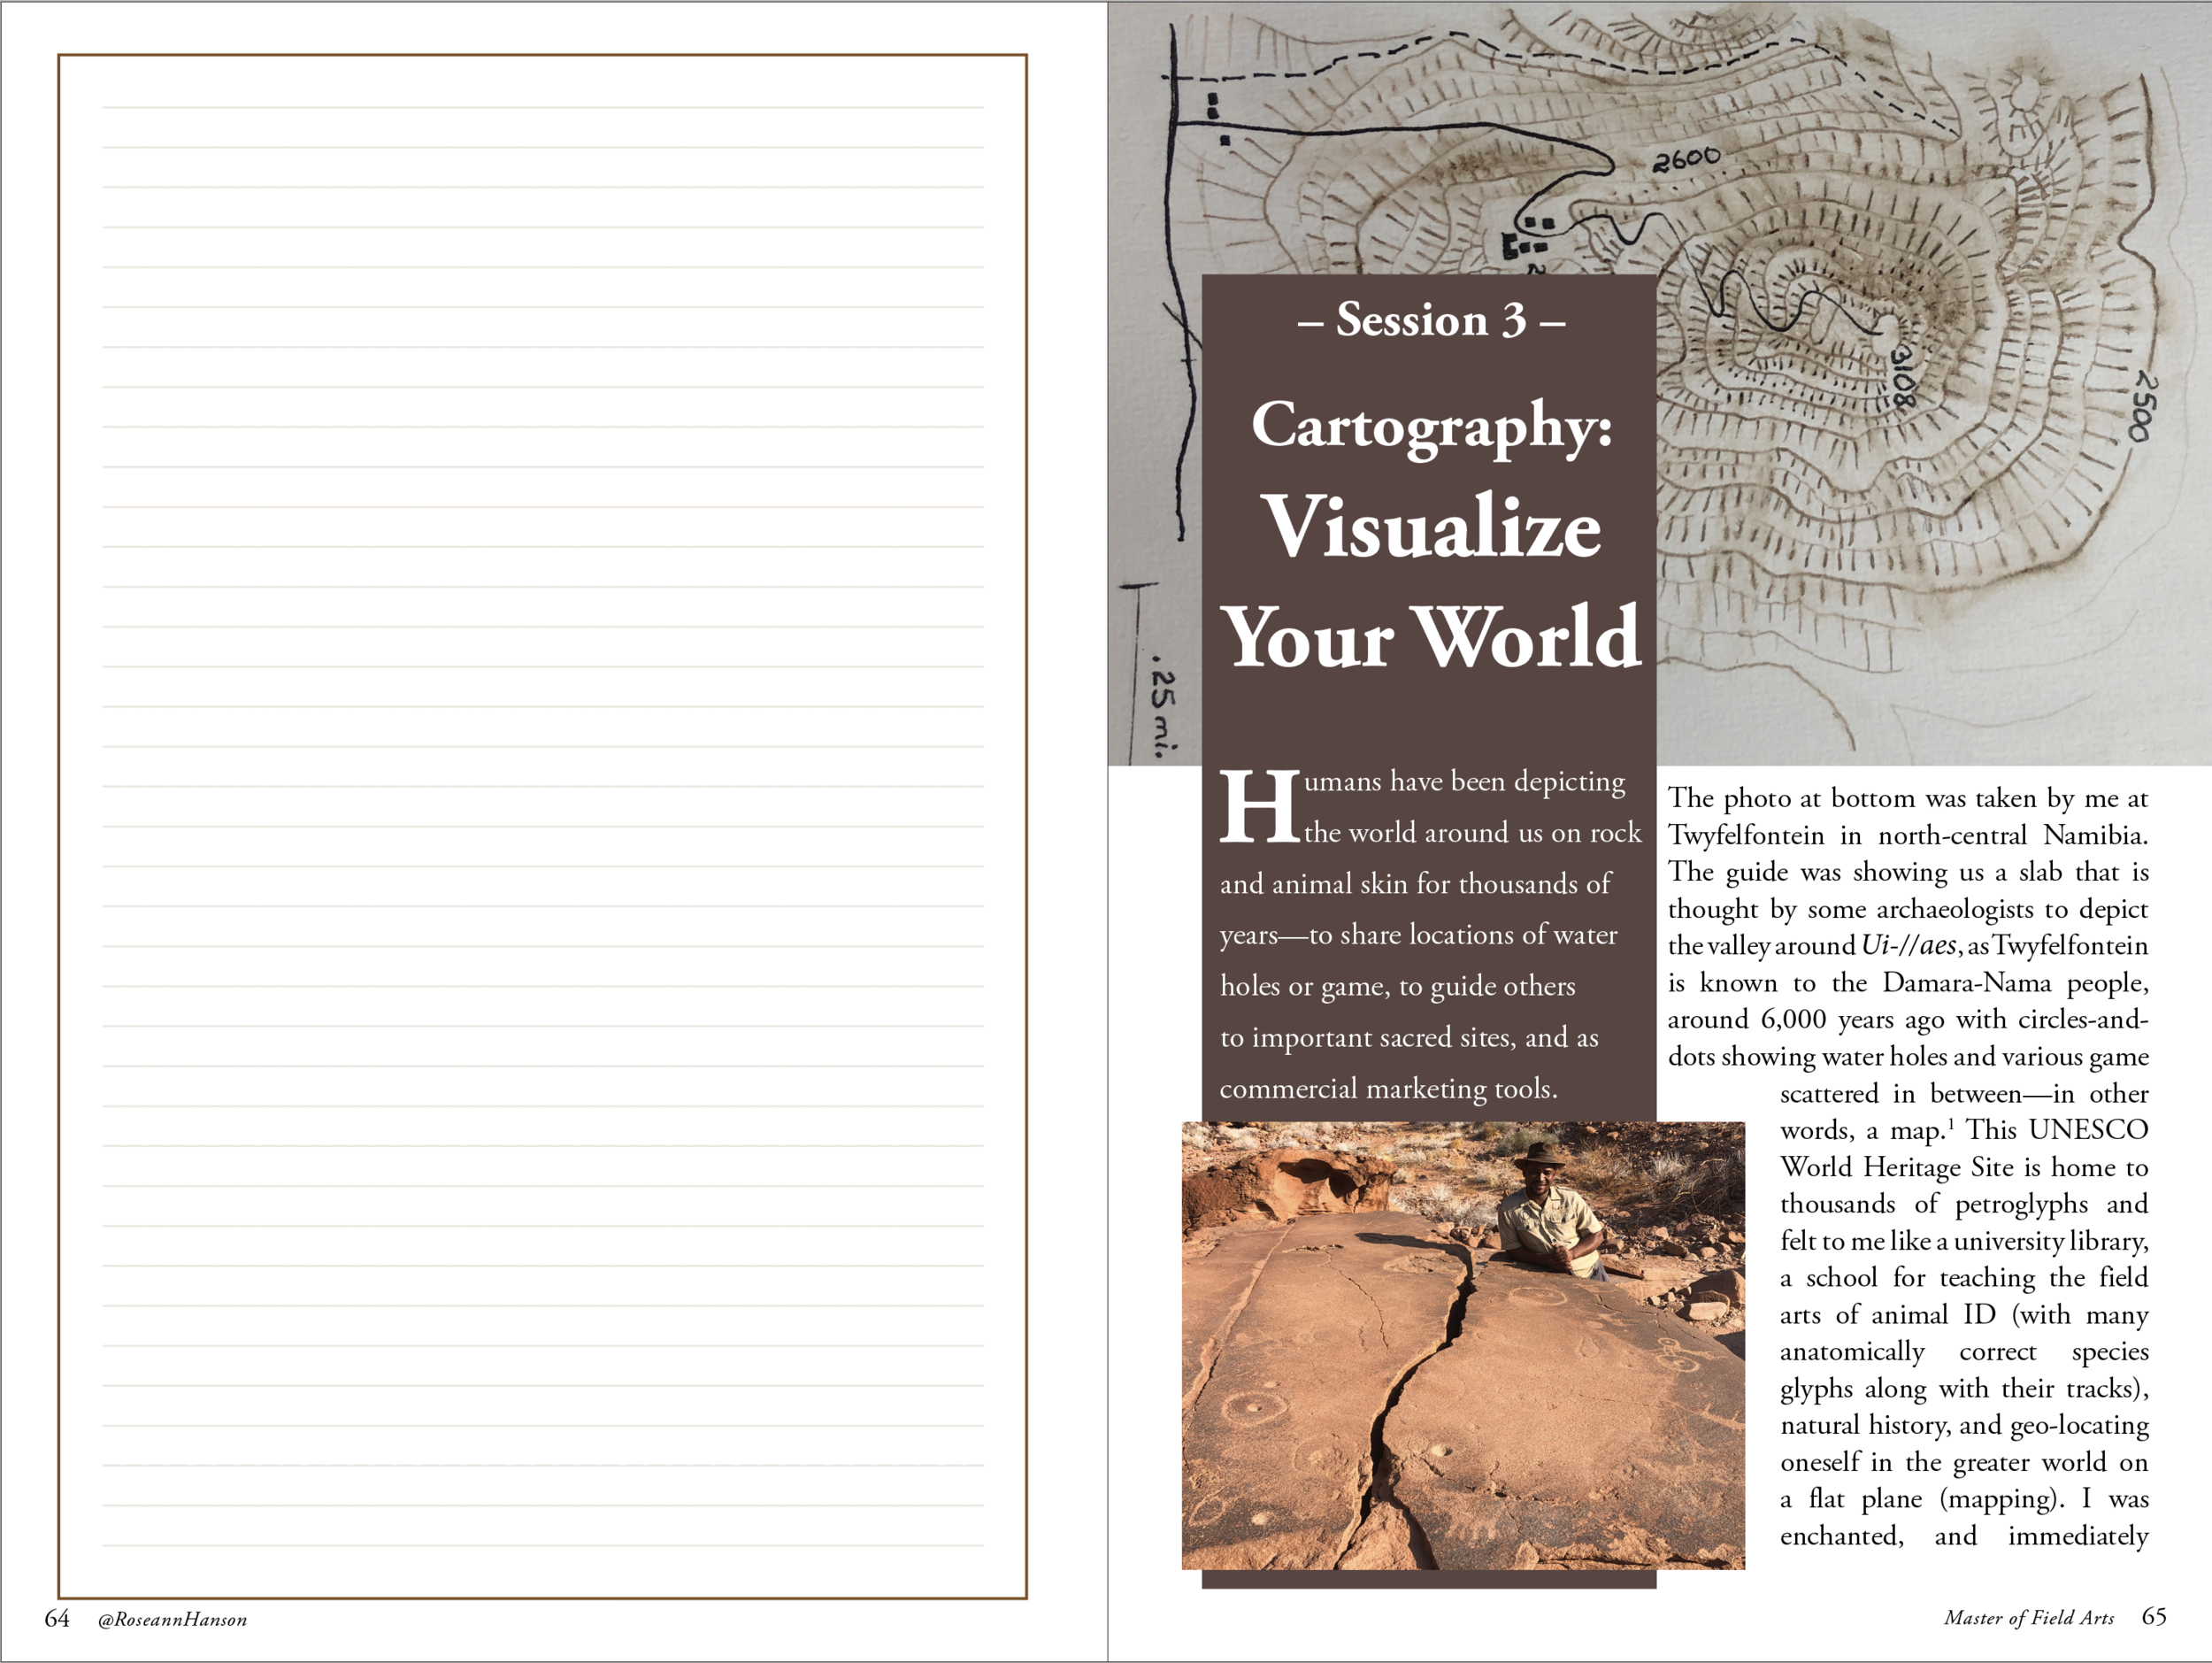
  • Session 3 – Cartography: Visualize Your World

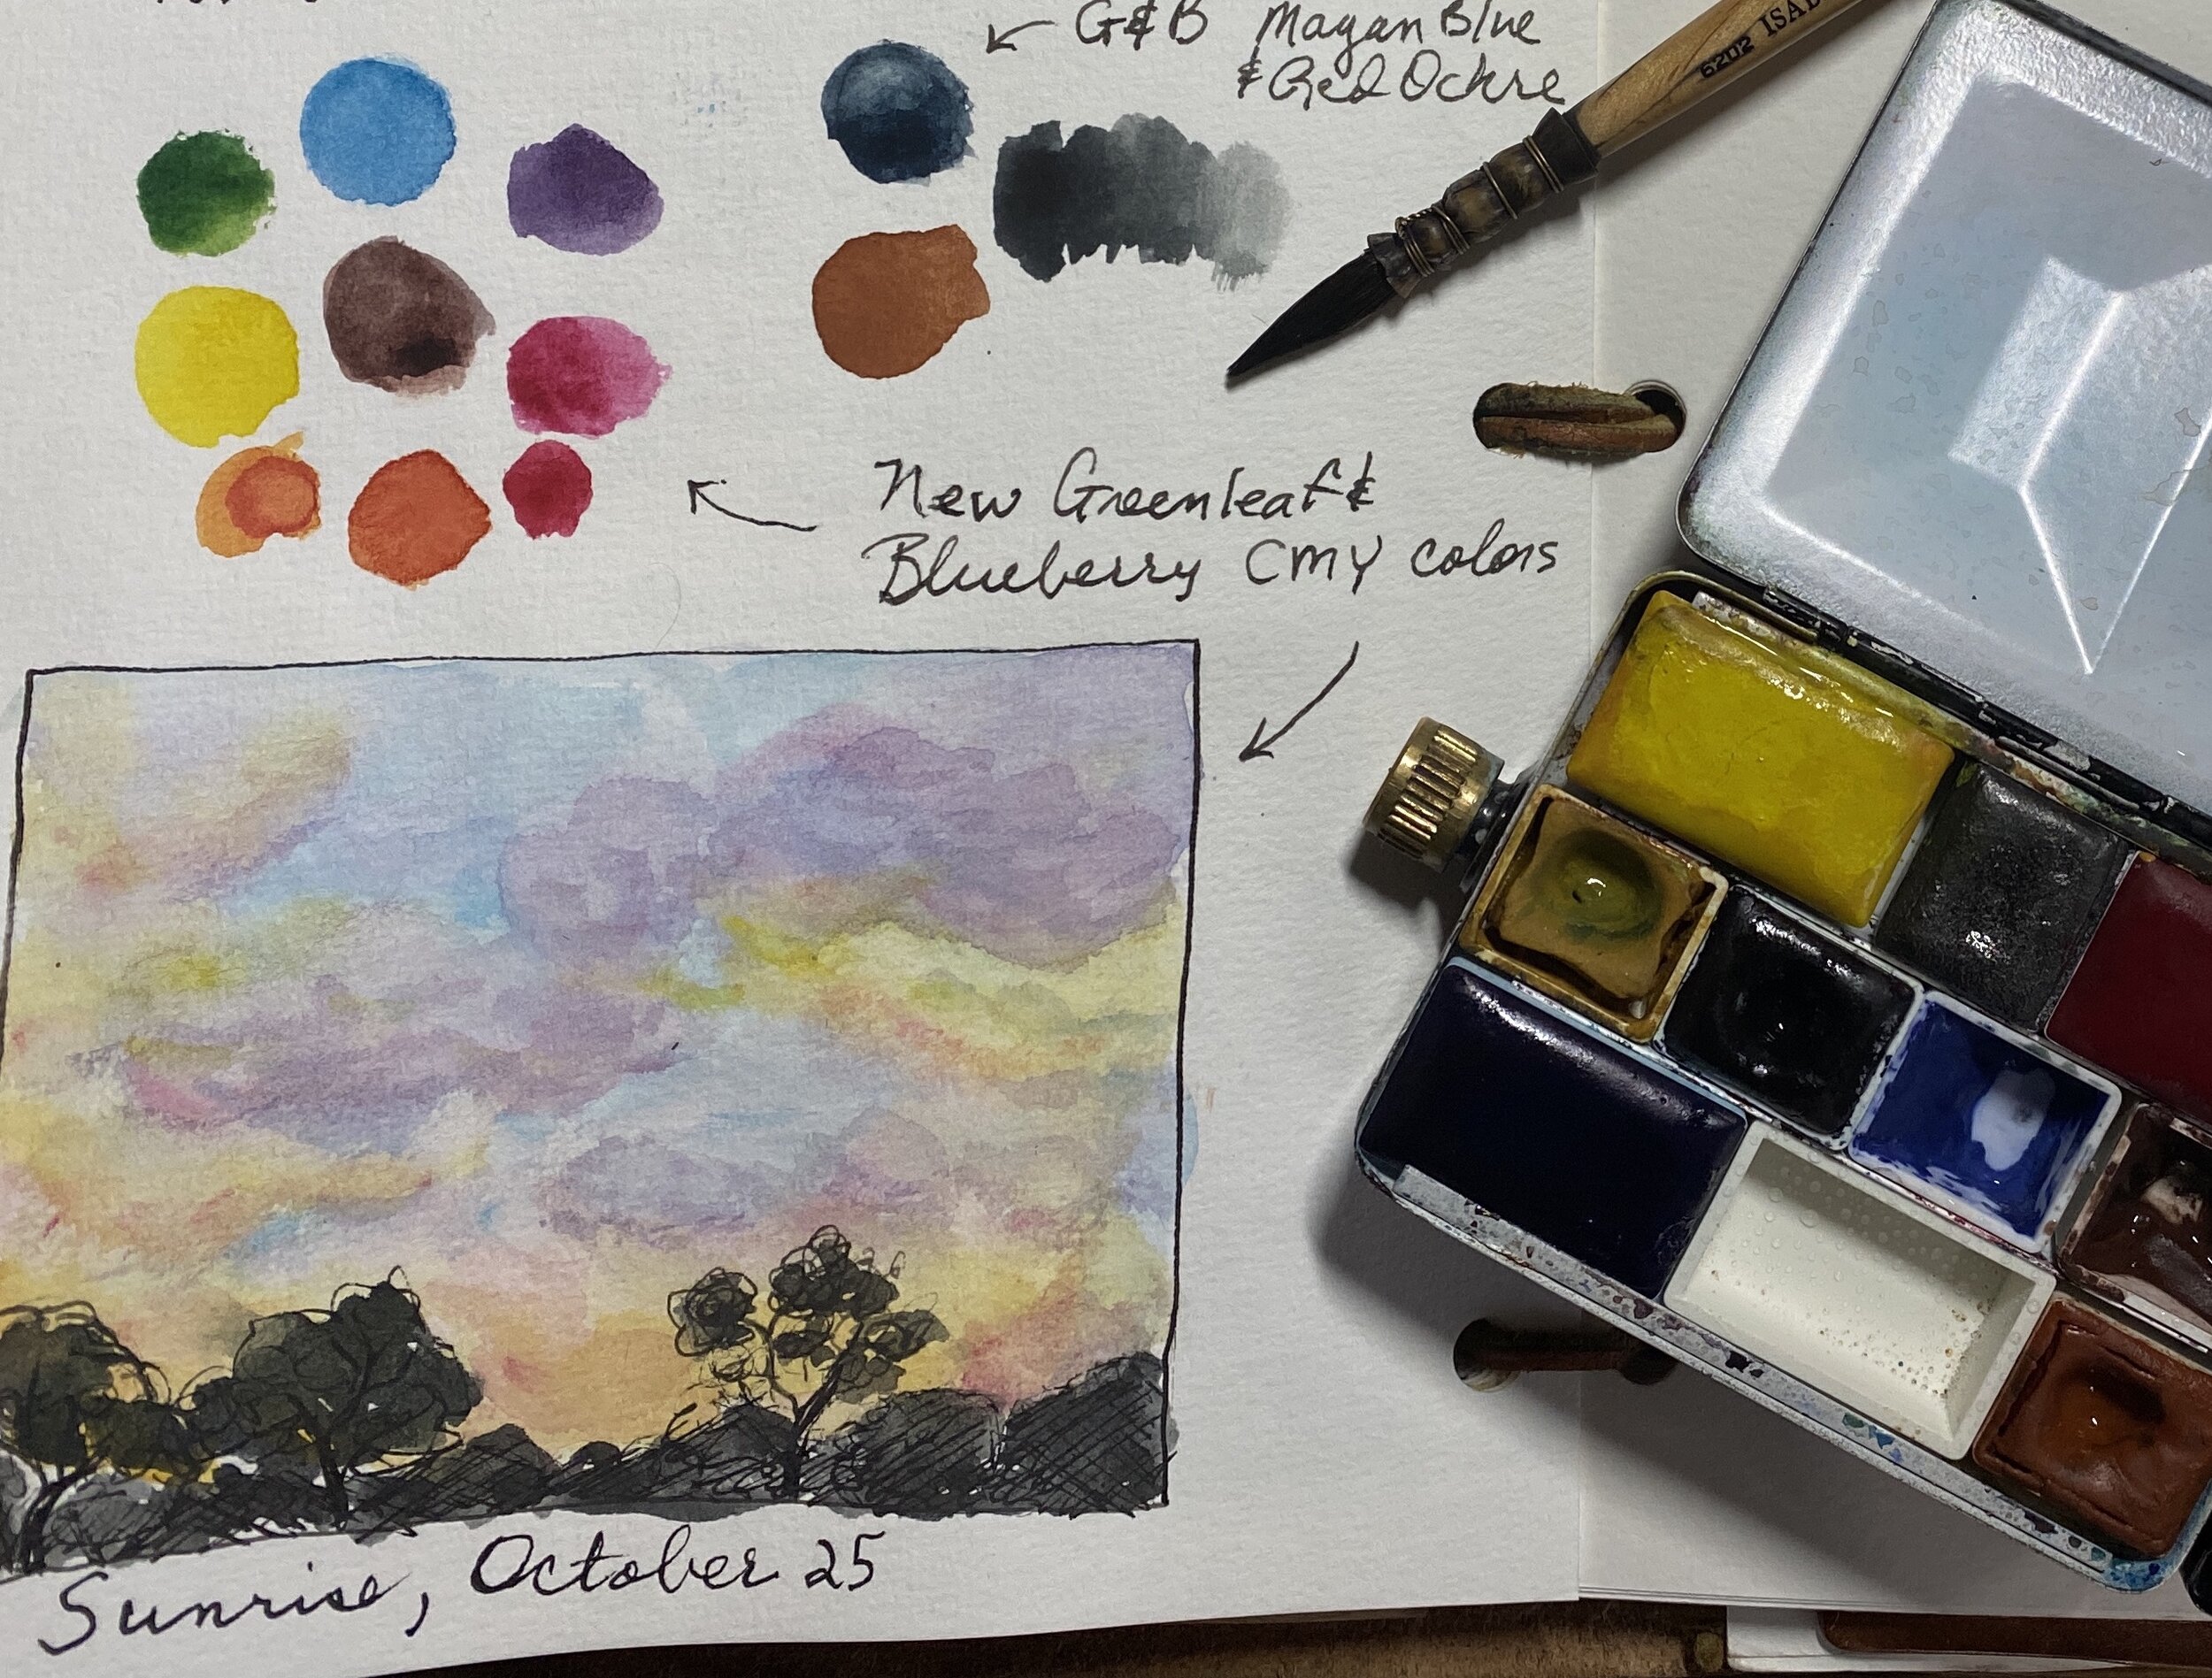
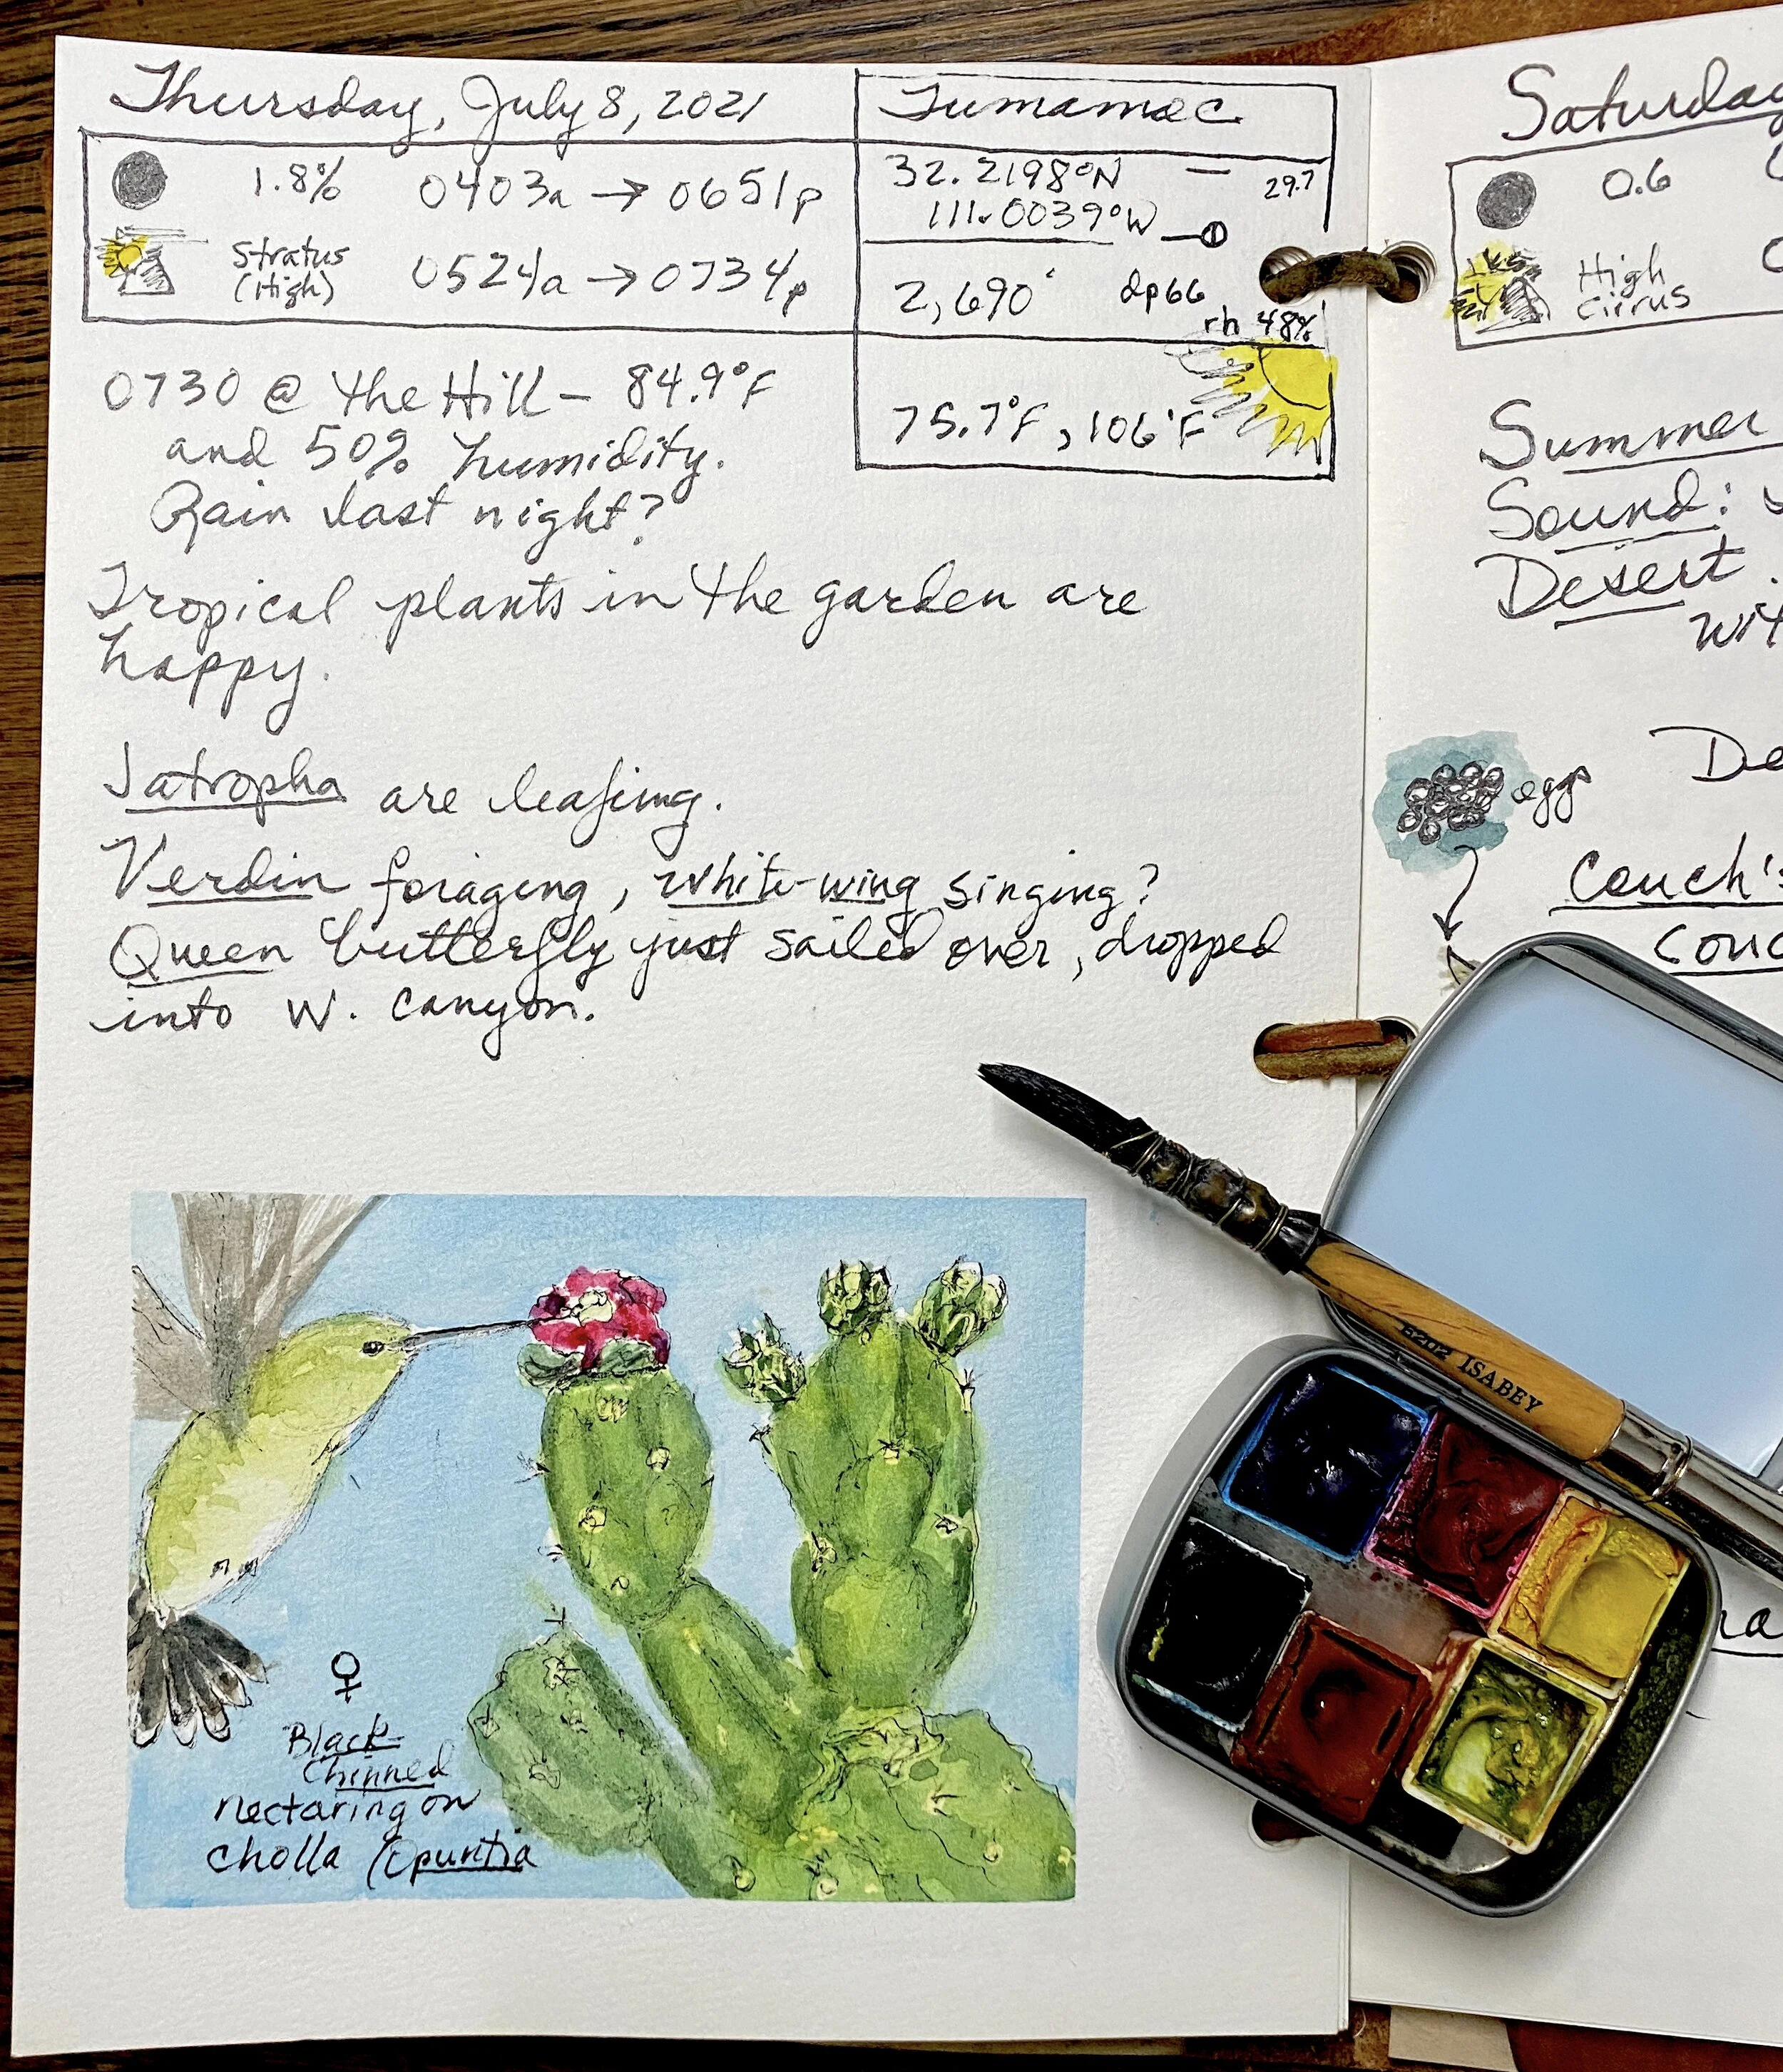
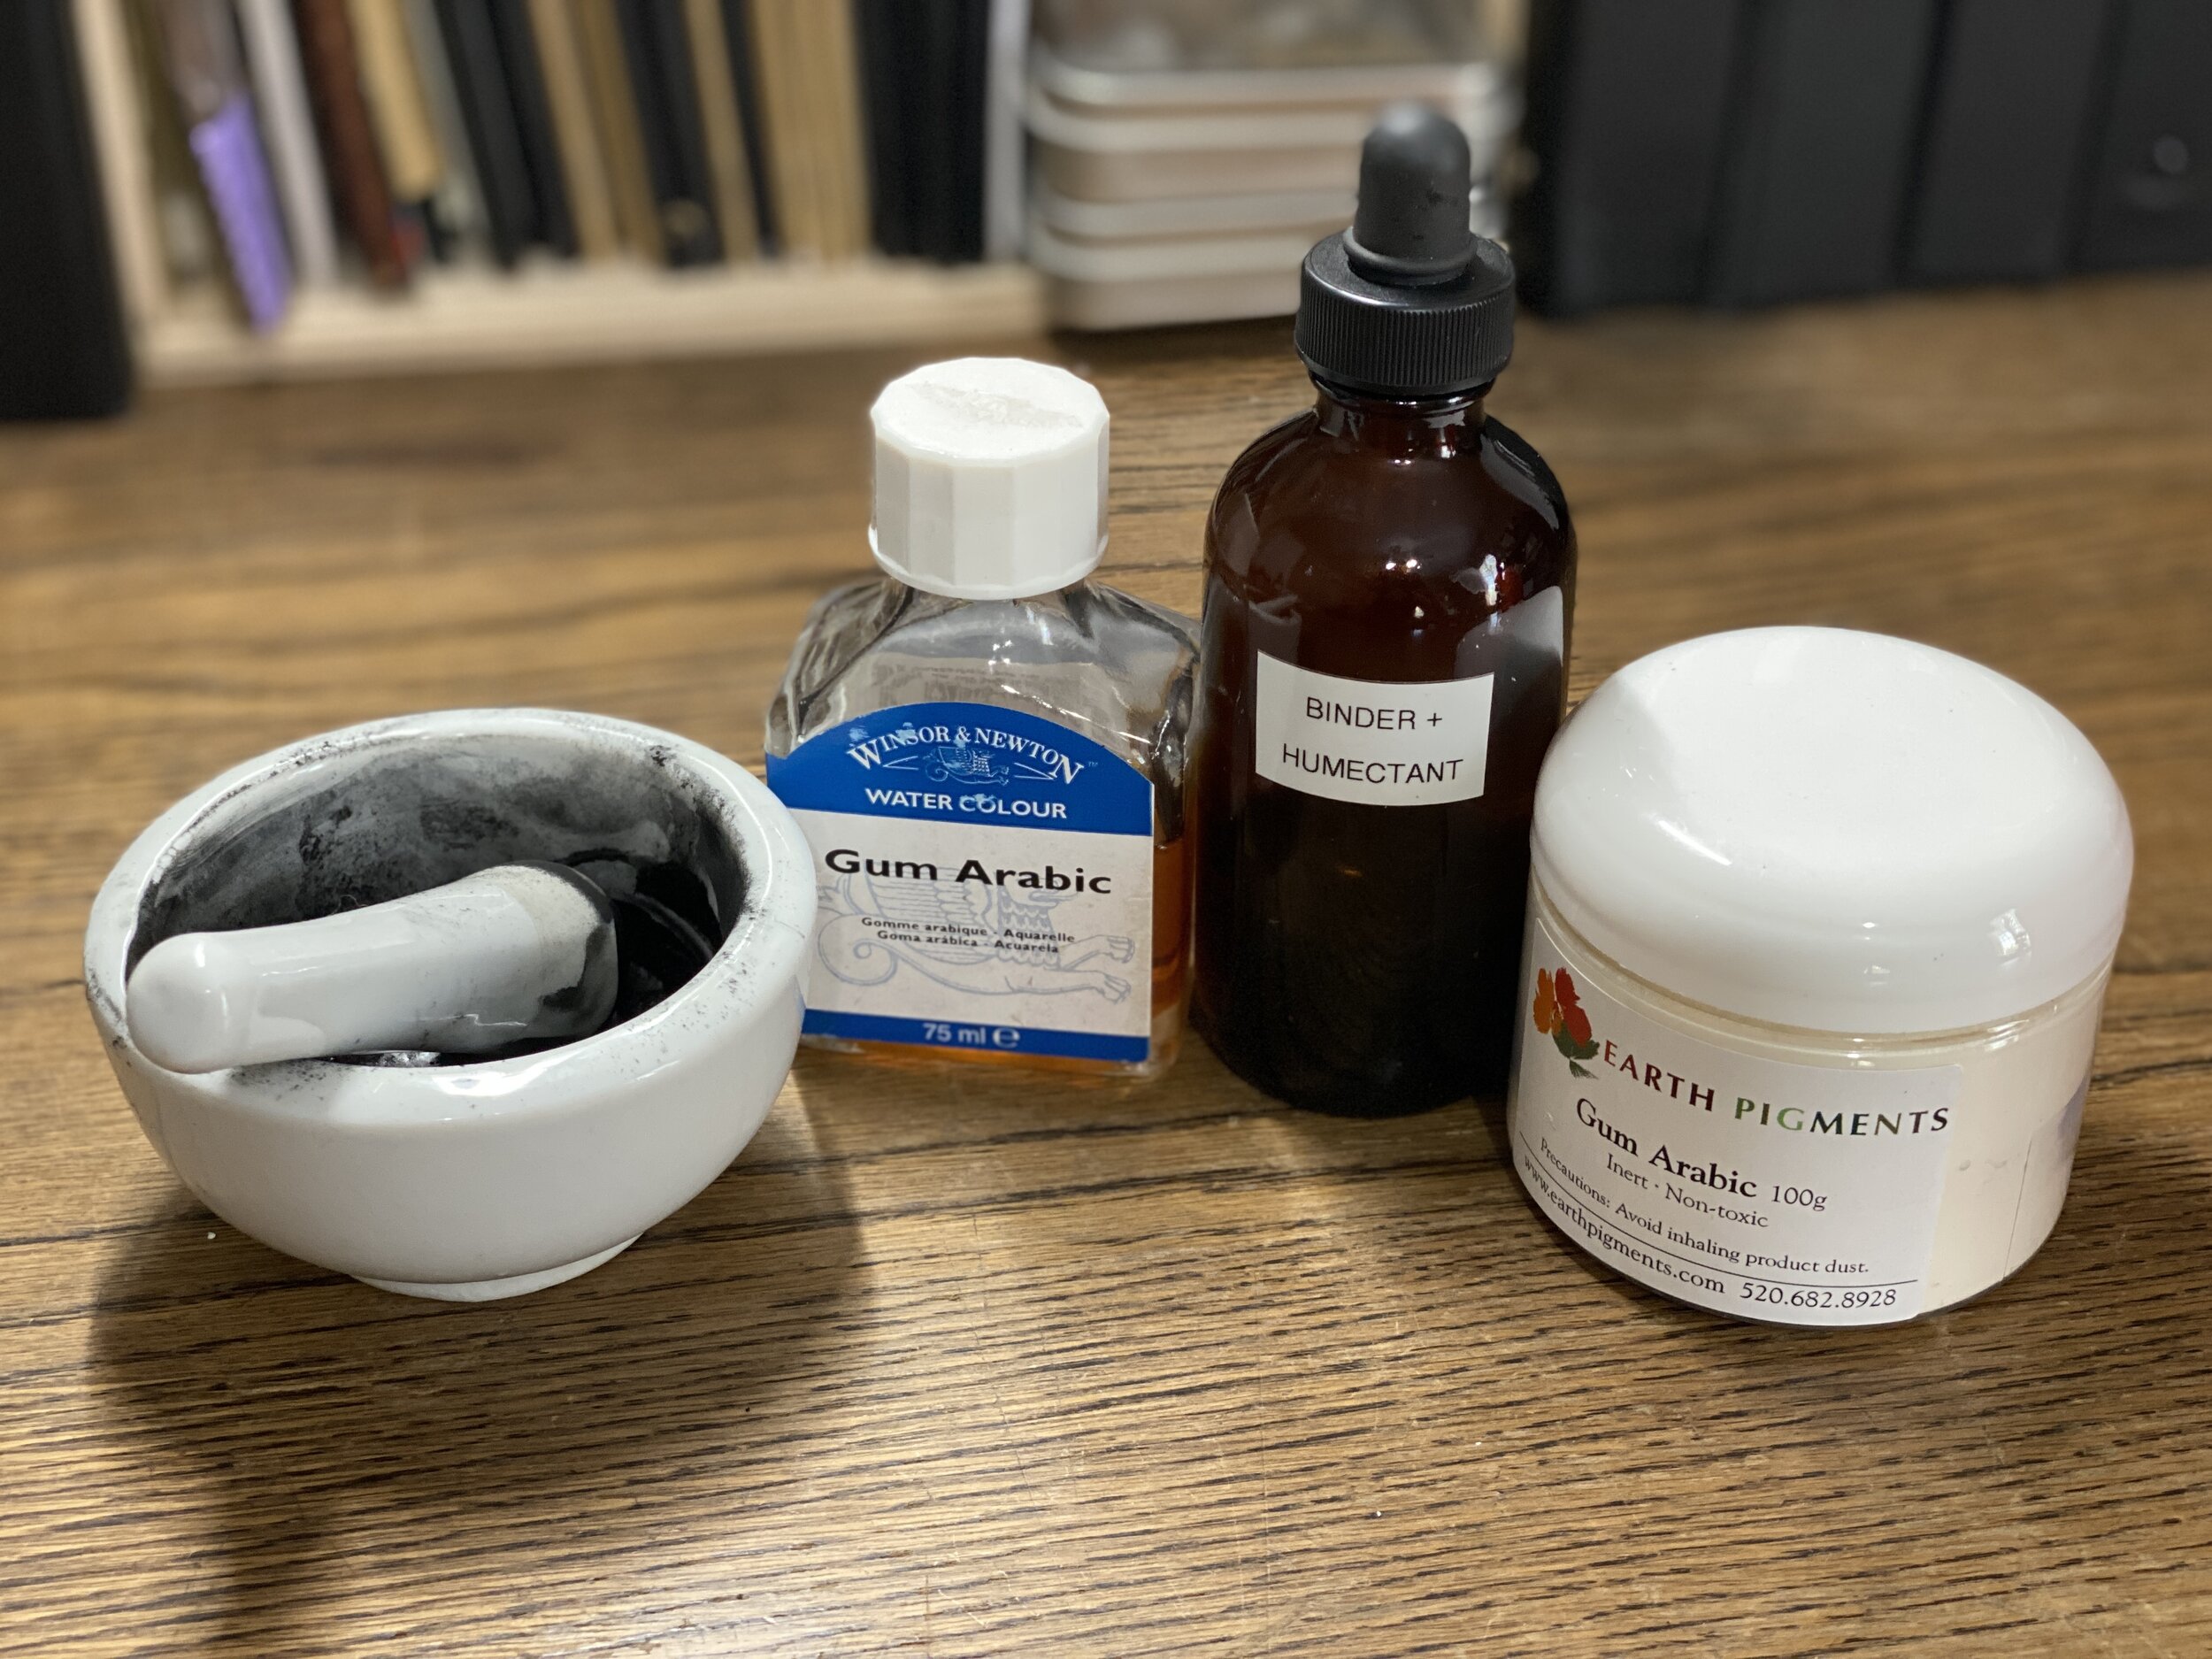
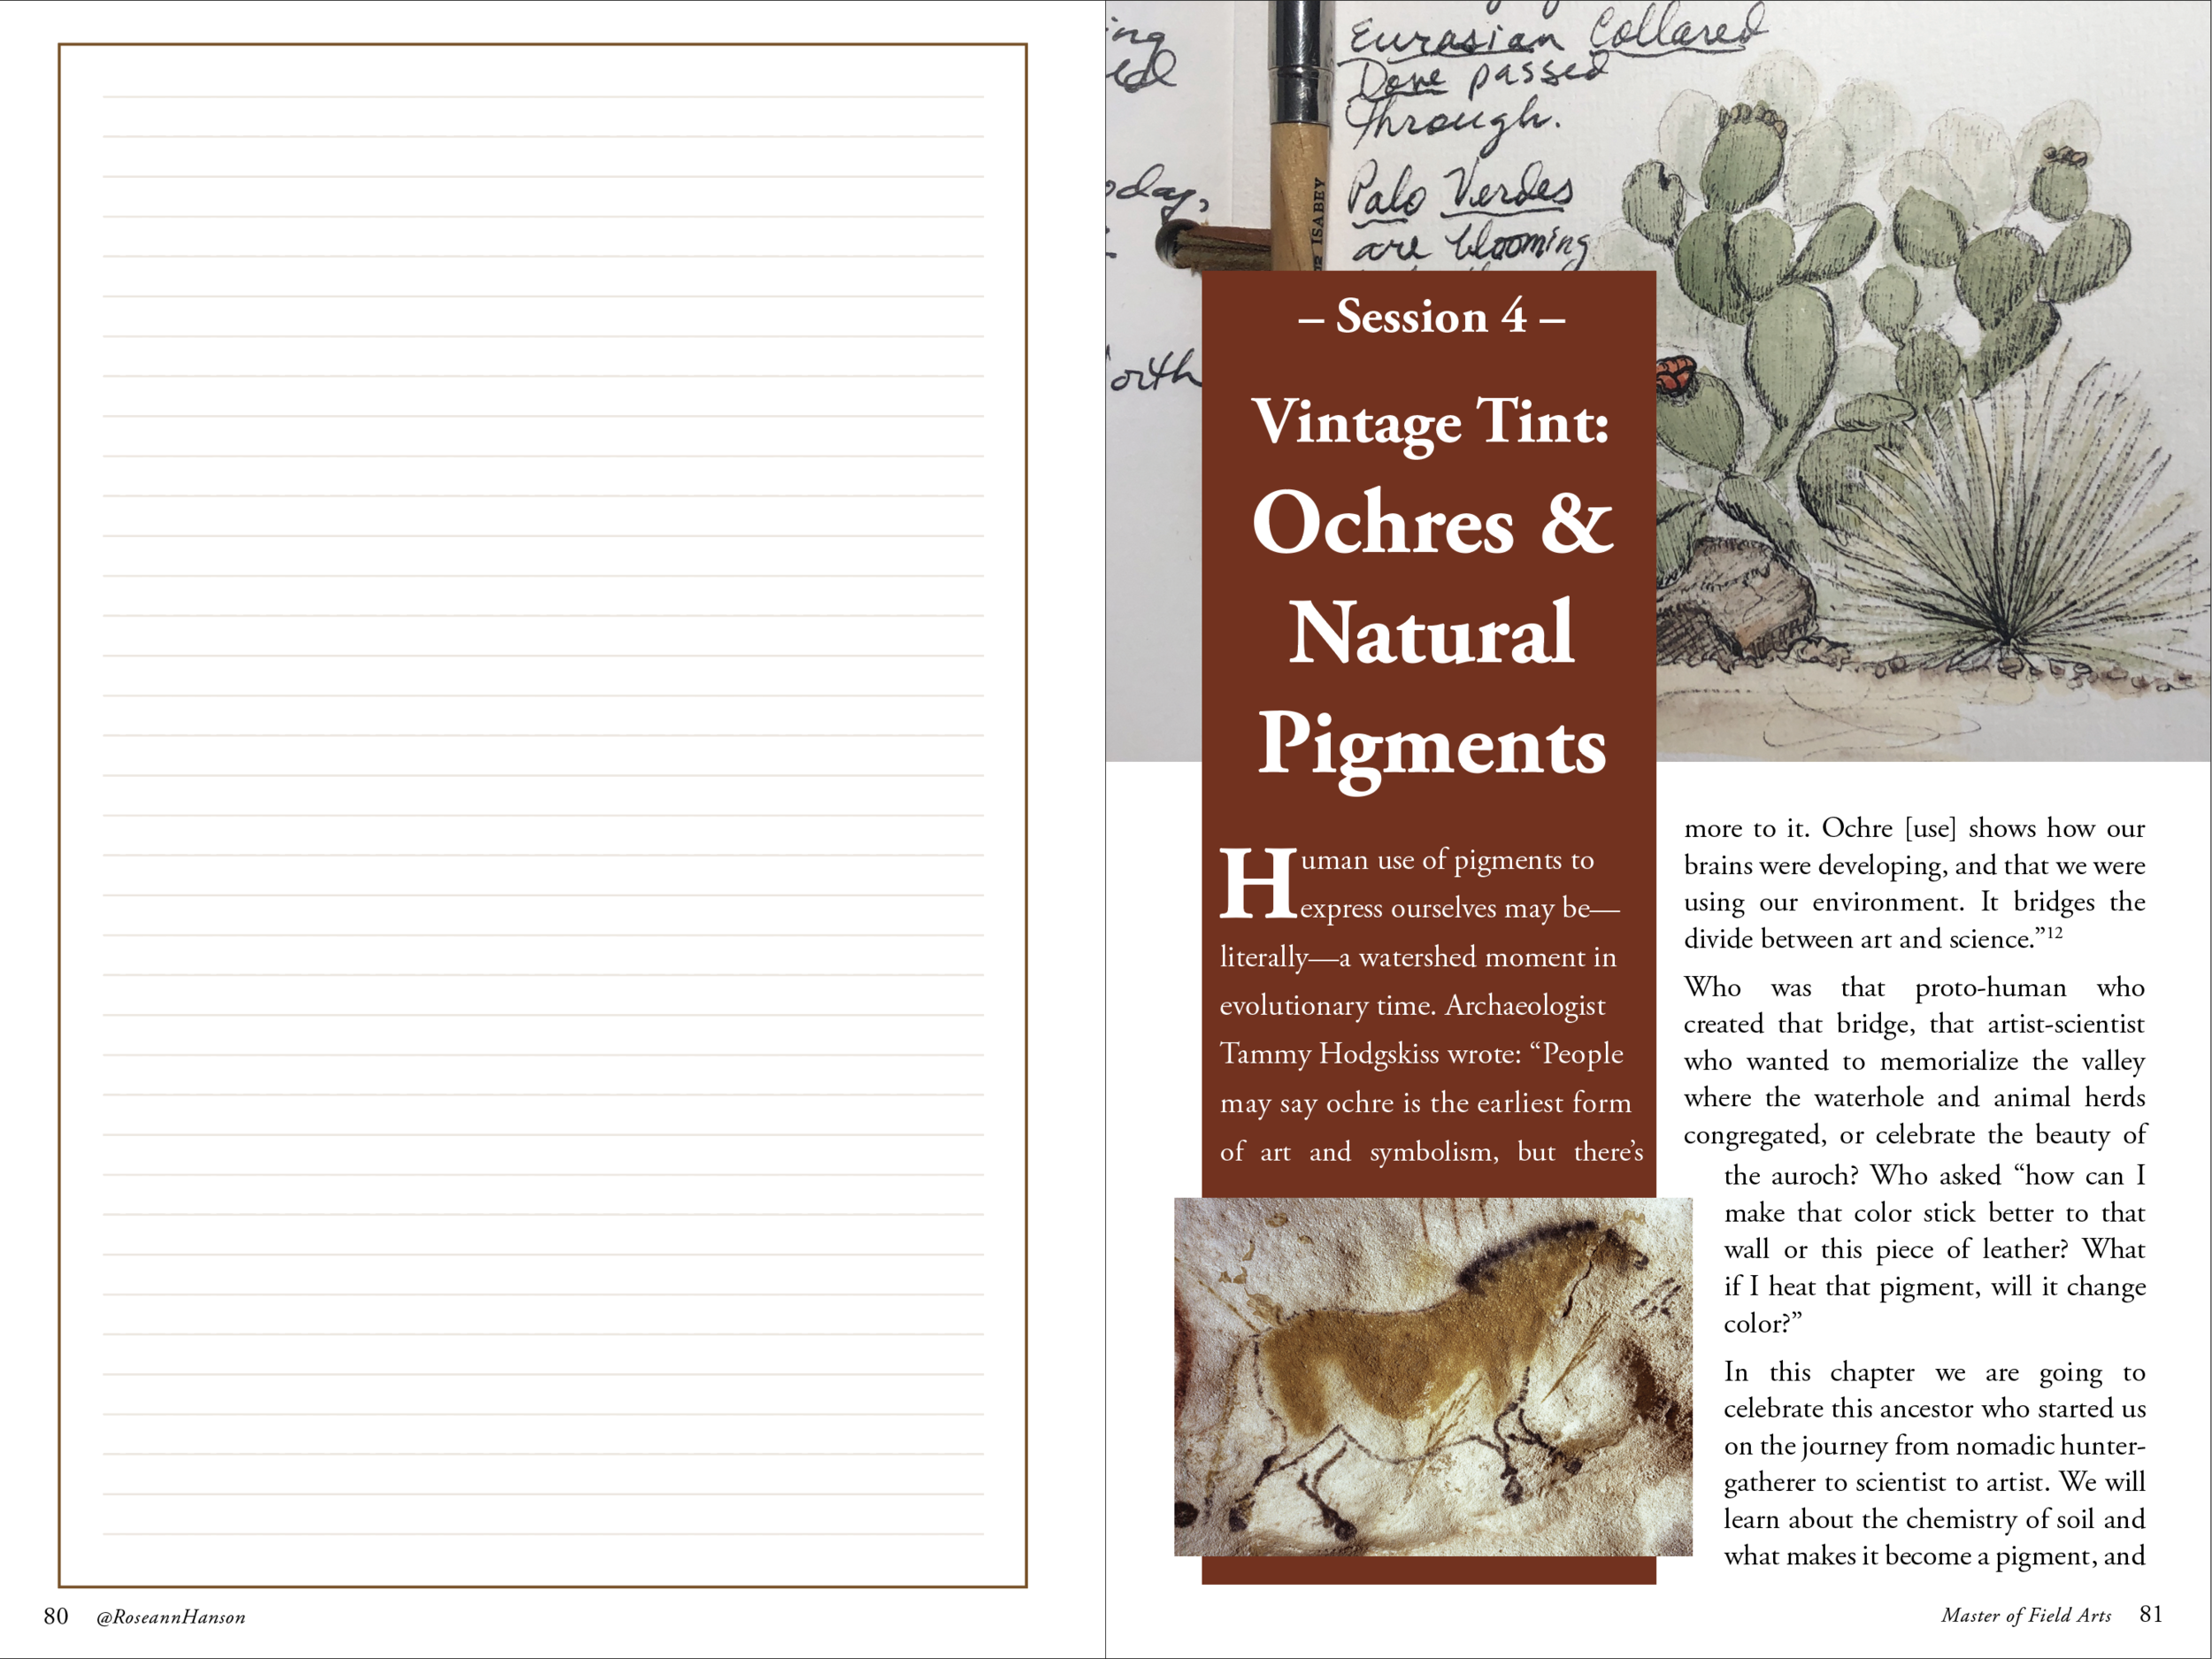
  • Session 4 – Vintage Tint: Ochres & Natural Pigments

  • Session 5 – Weather: Read, Record, & Predict

  • Session 6 – Animal Sign: Read & Record Clues of Passage

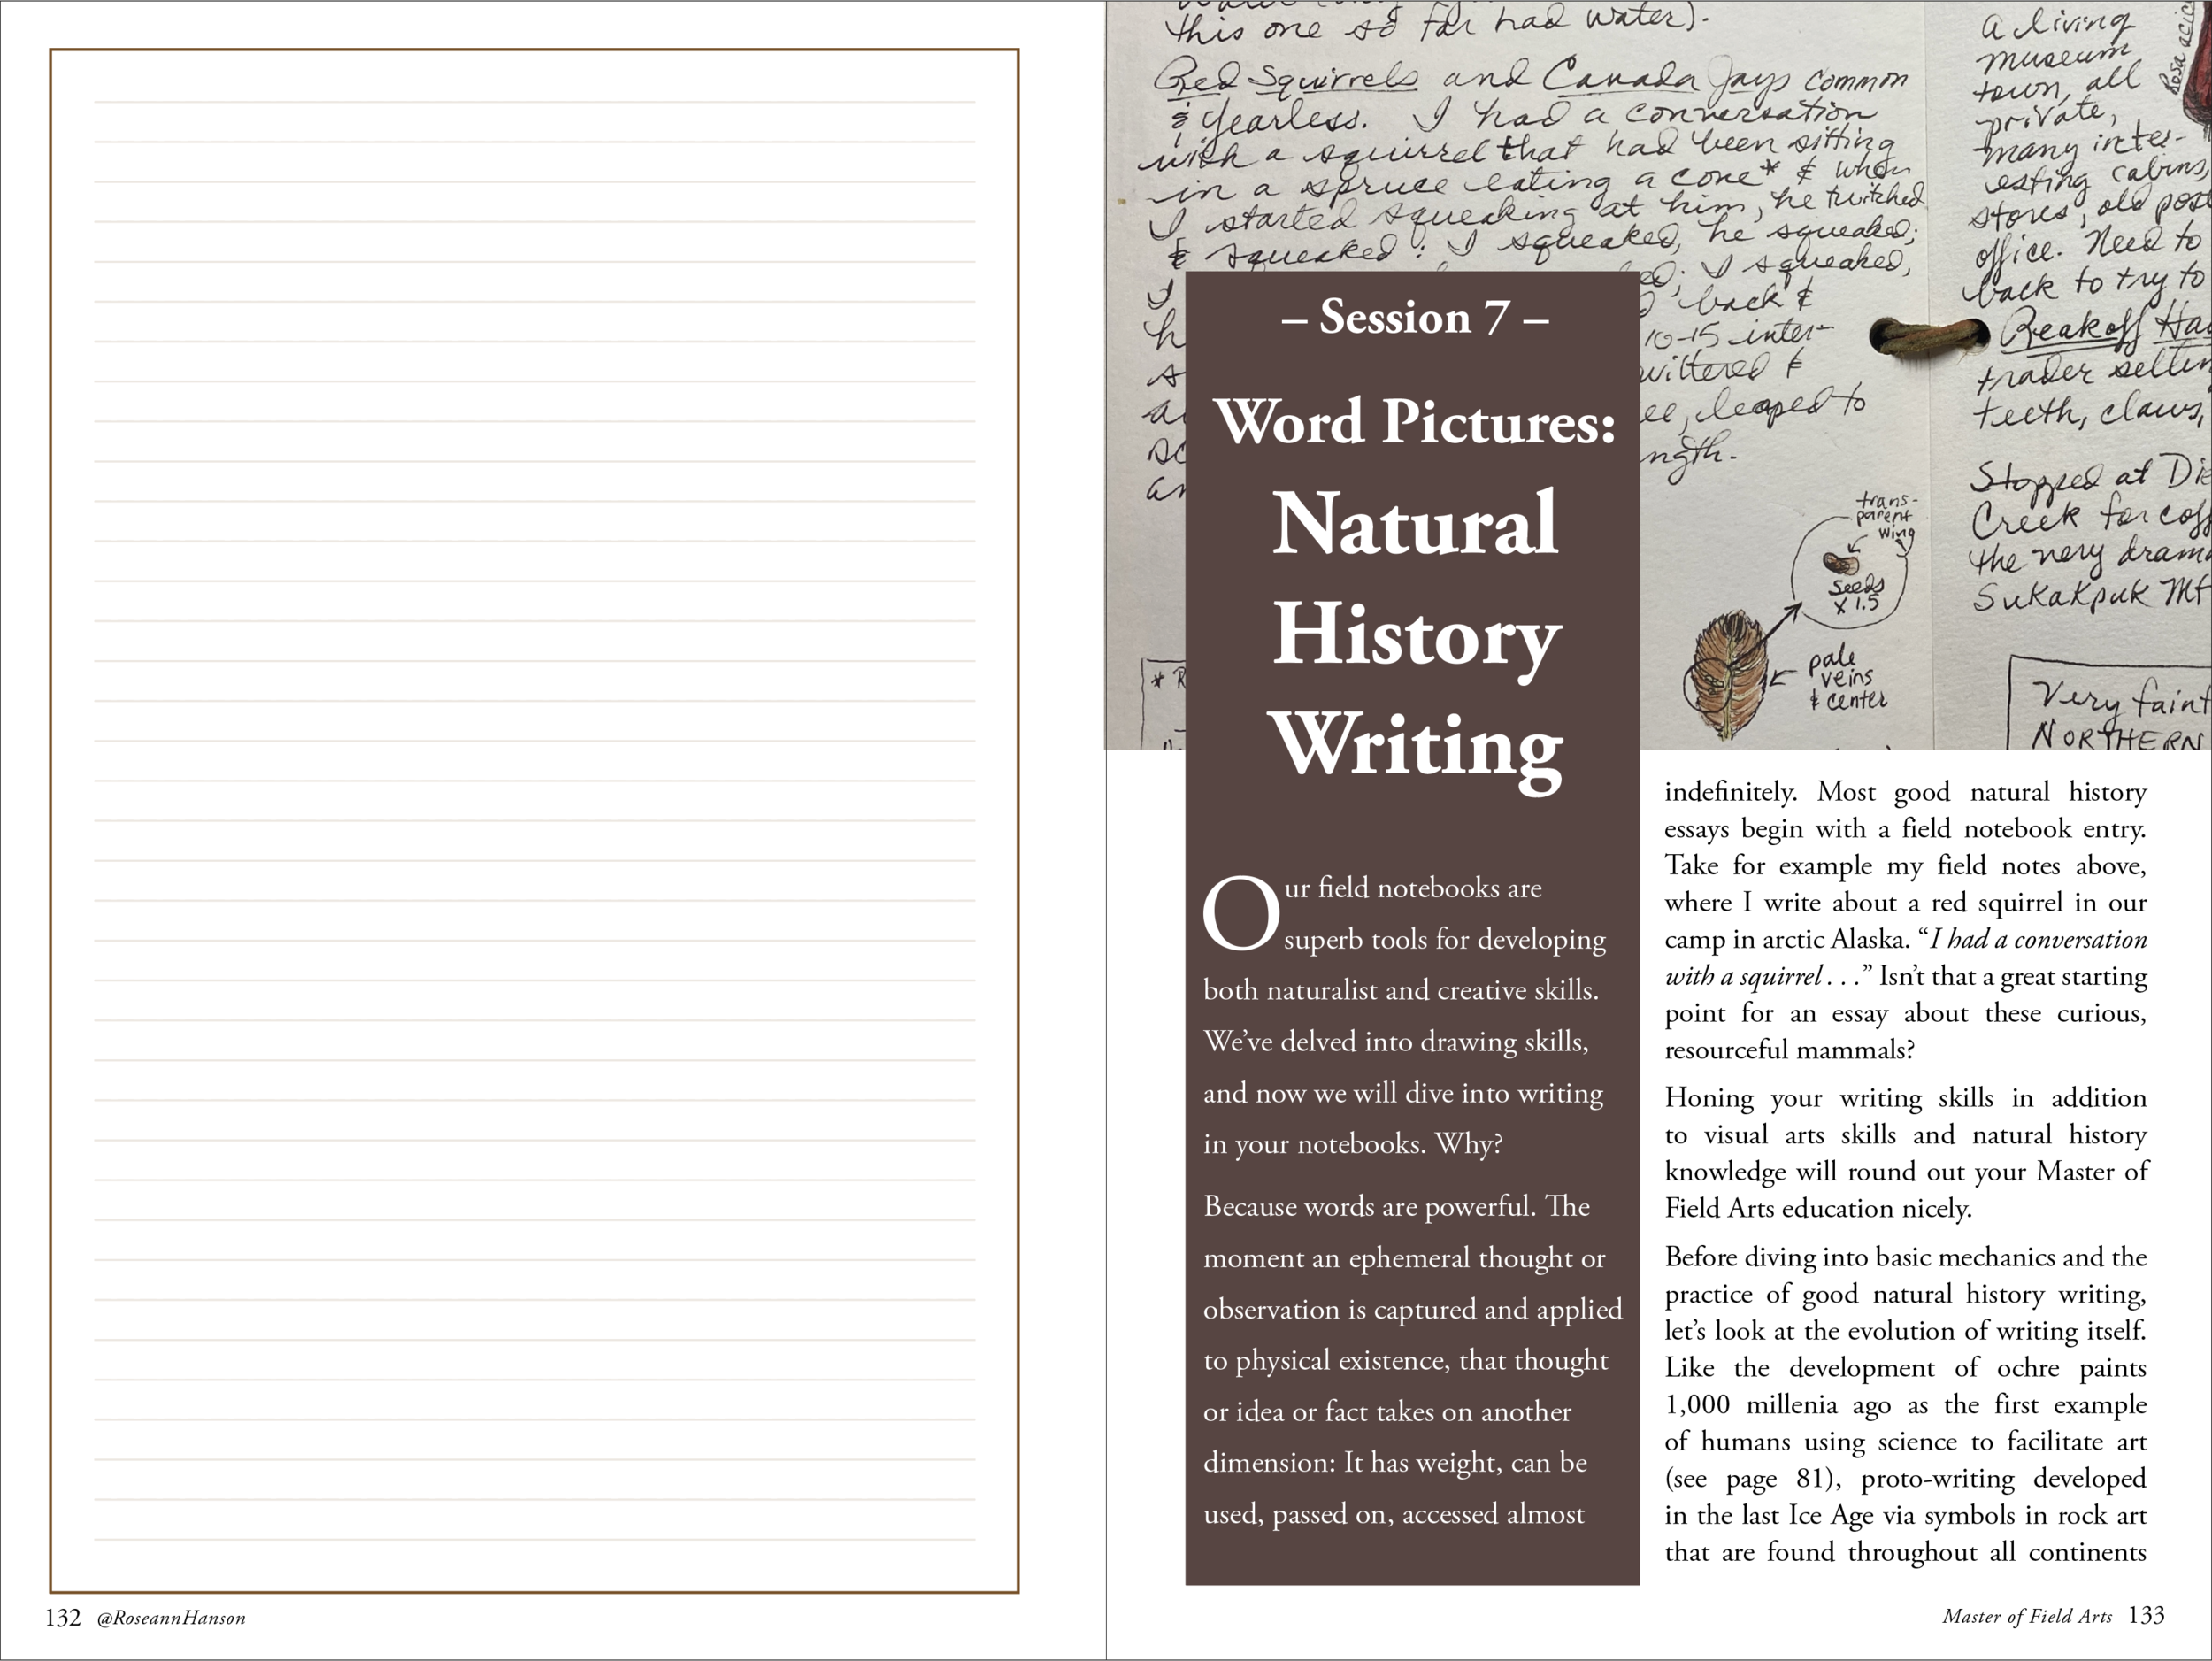
  • Session 7 – Word Pictures: Natural History Writing

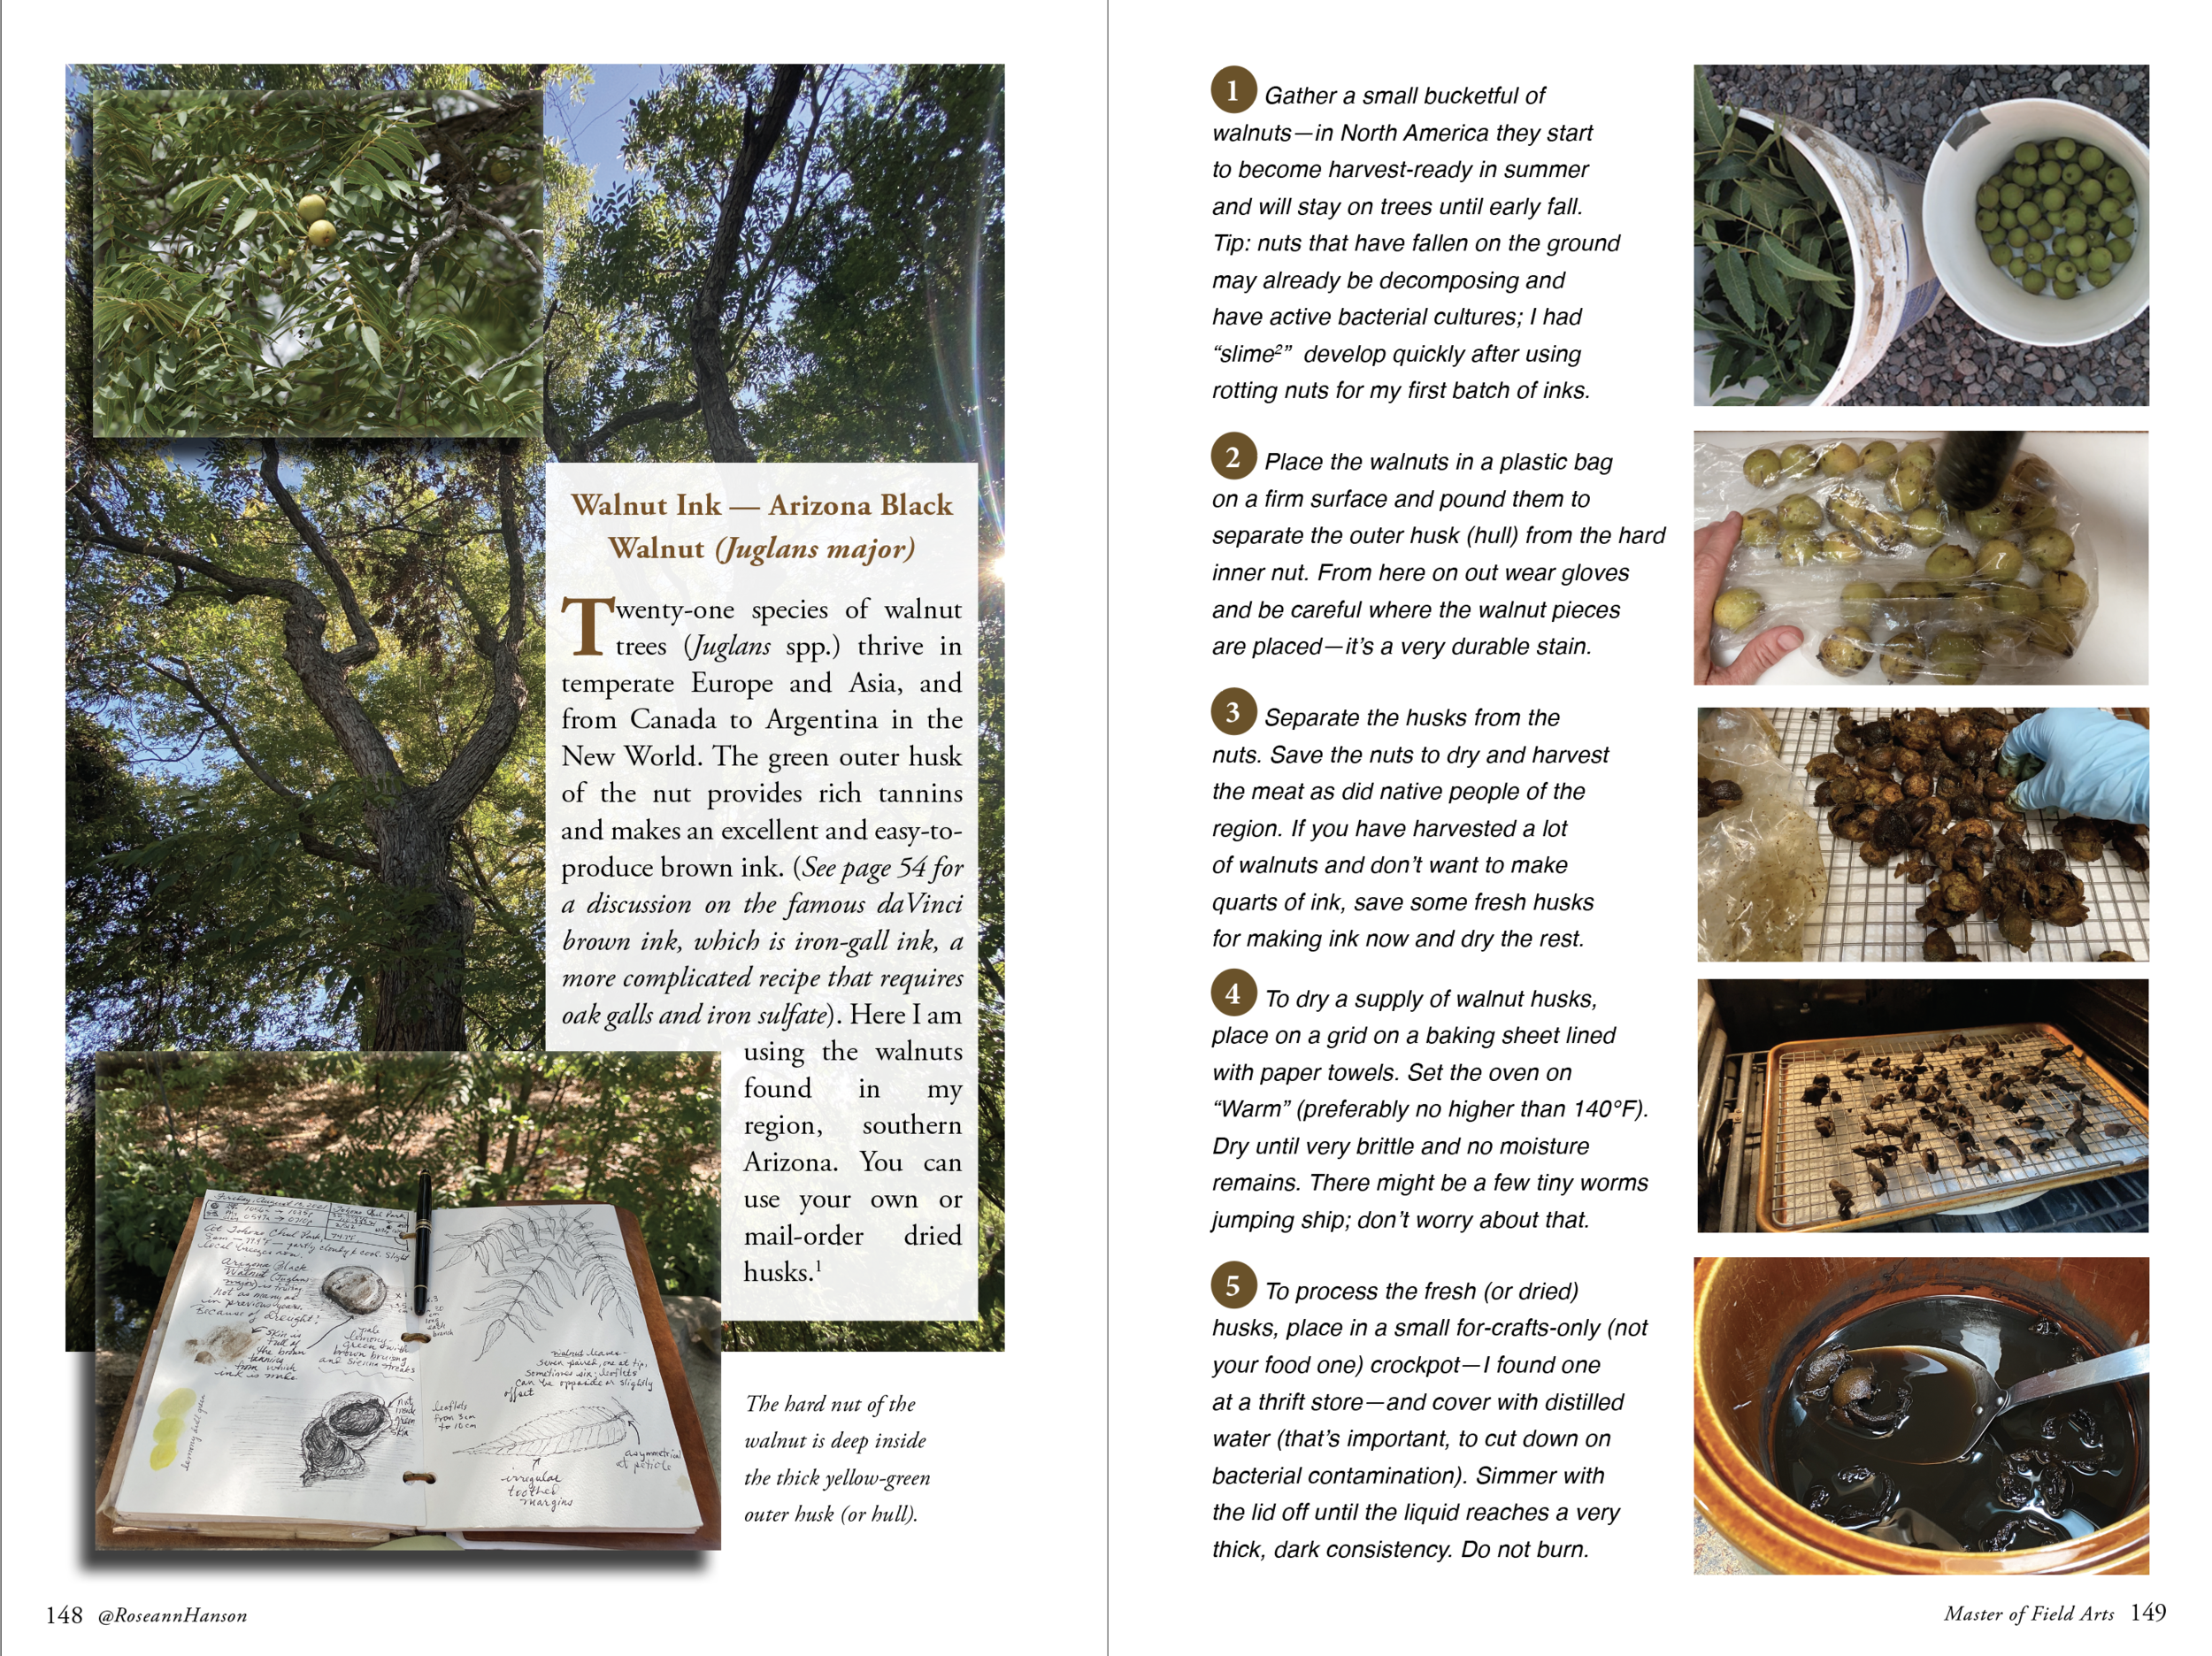
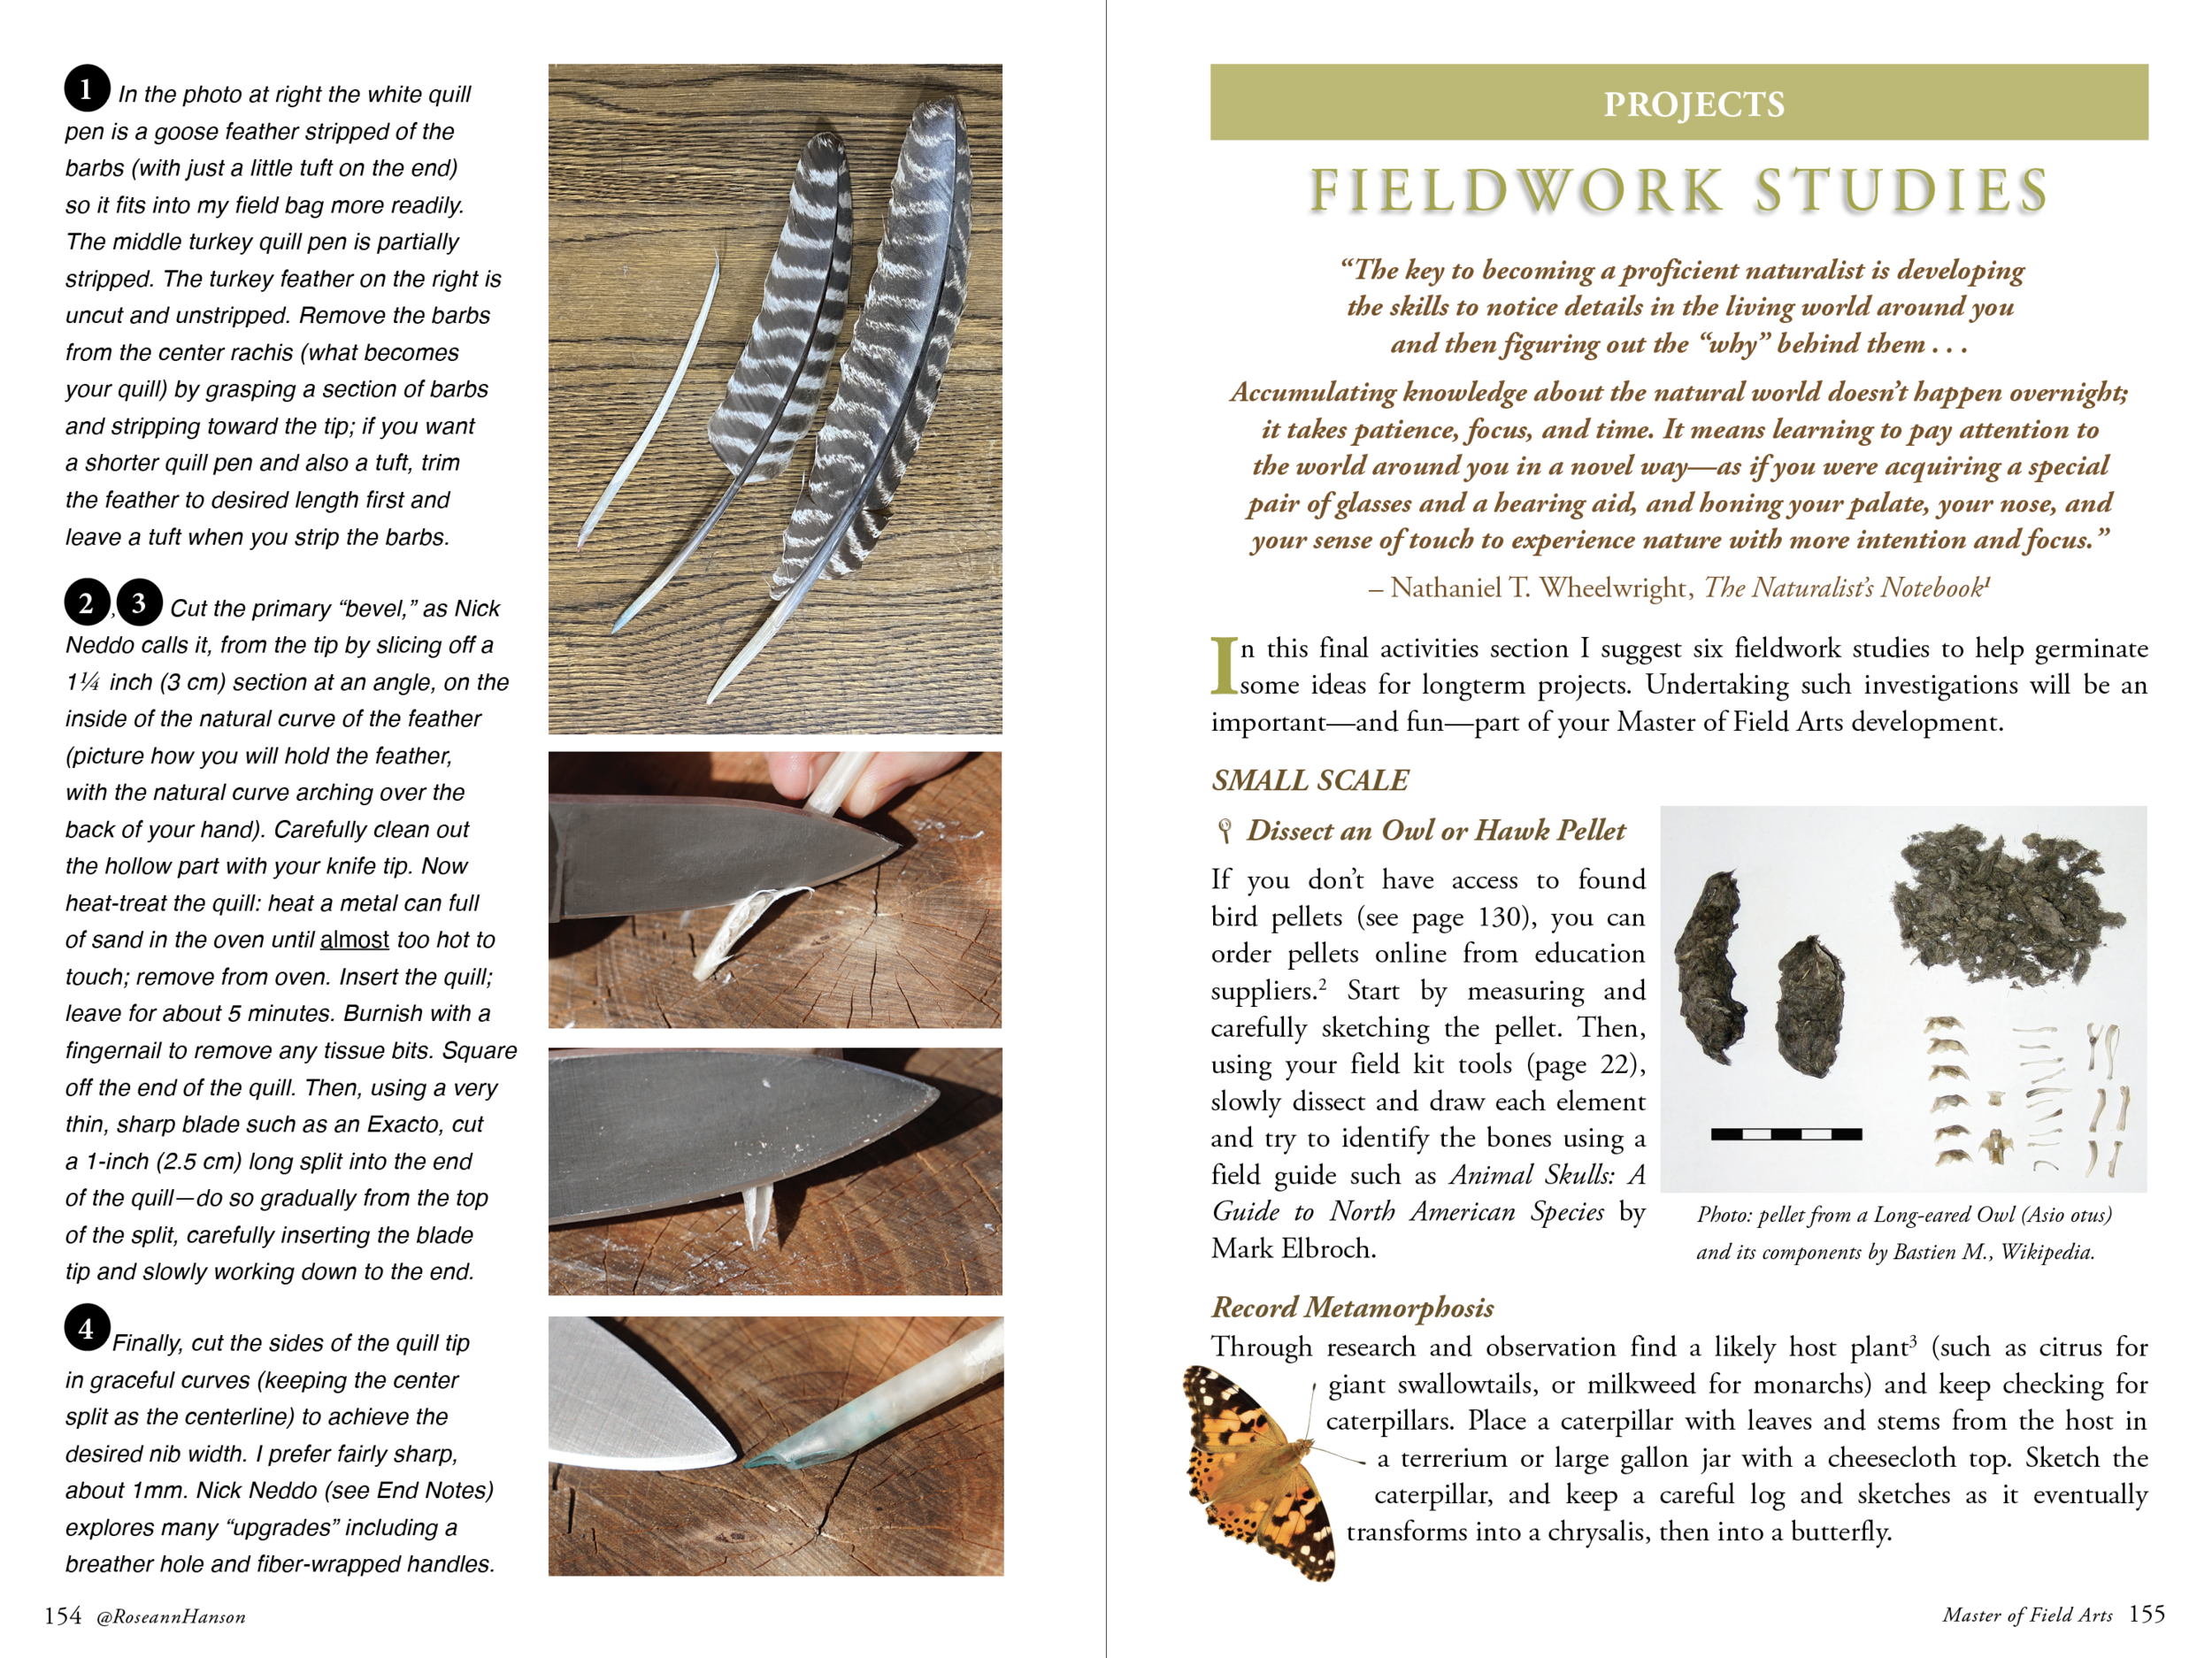
  • Bonus Workshop: Make Your Own Ink & Dip Pen

  • Projects, Templates, & Tools
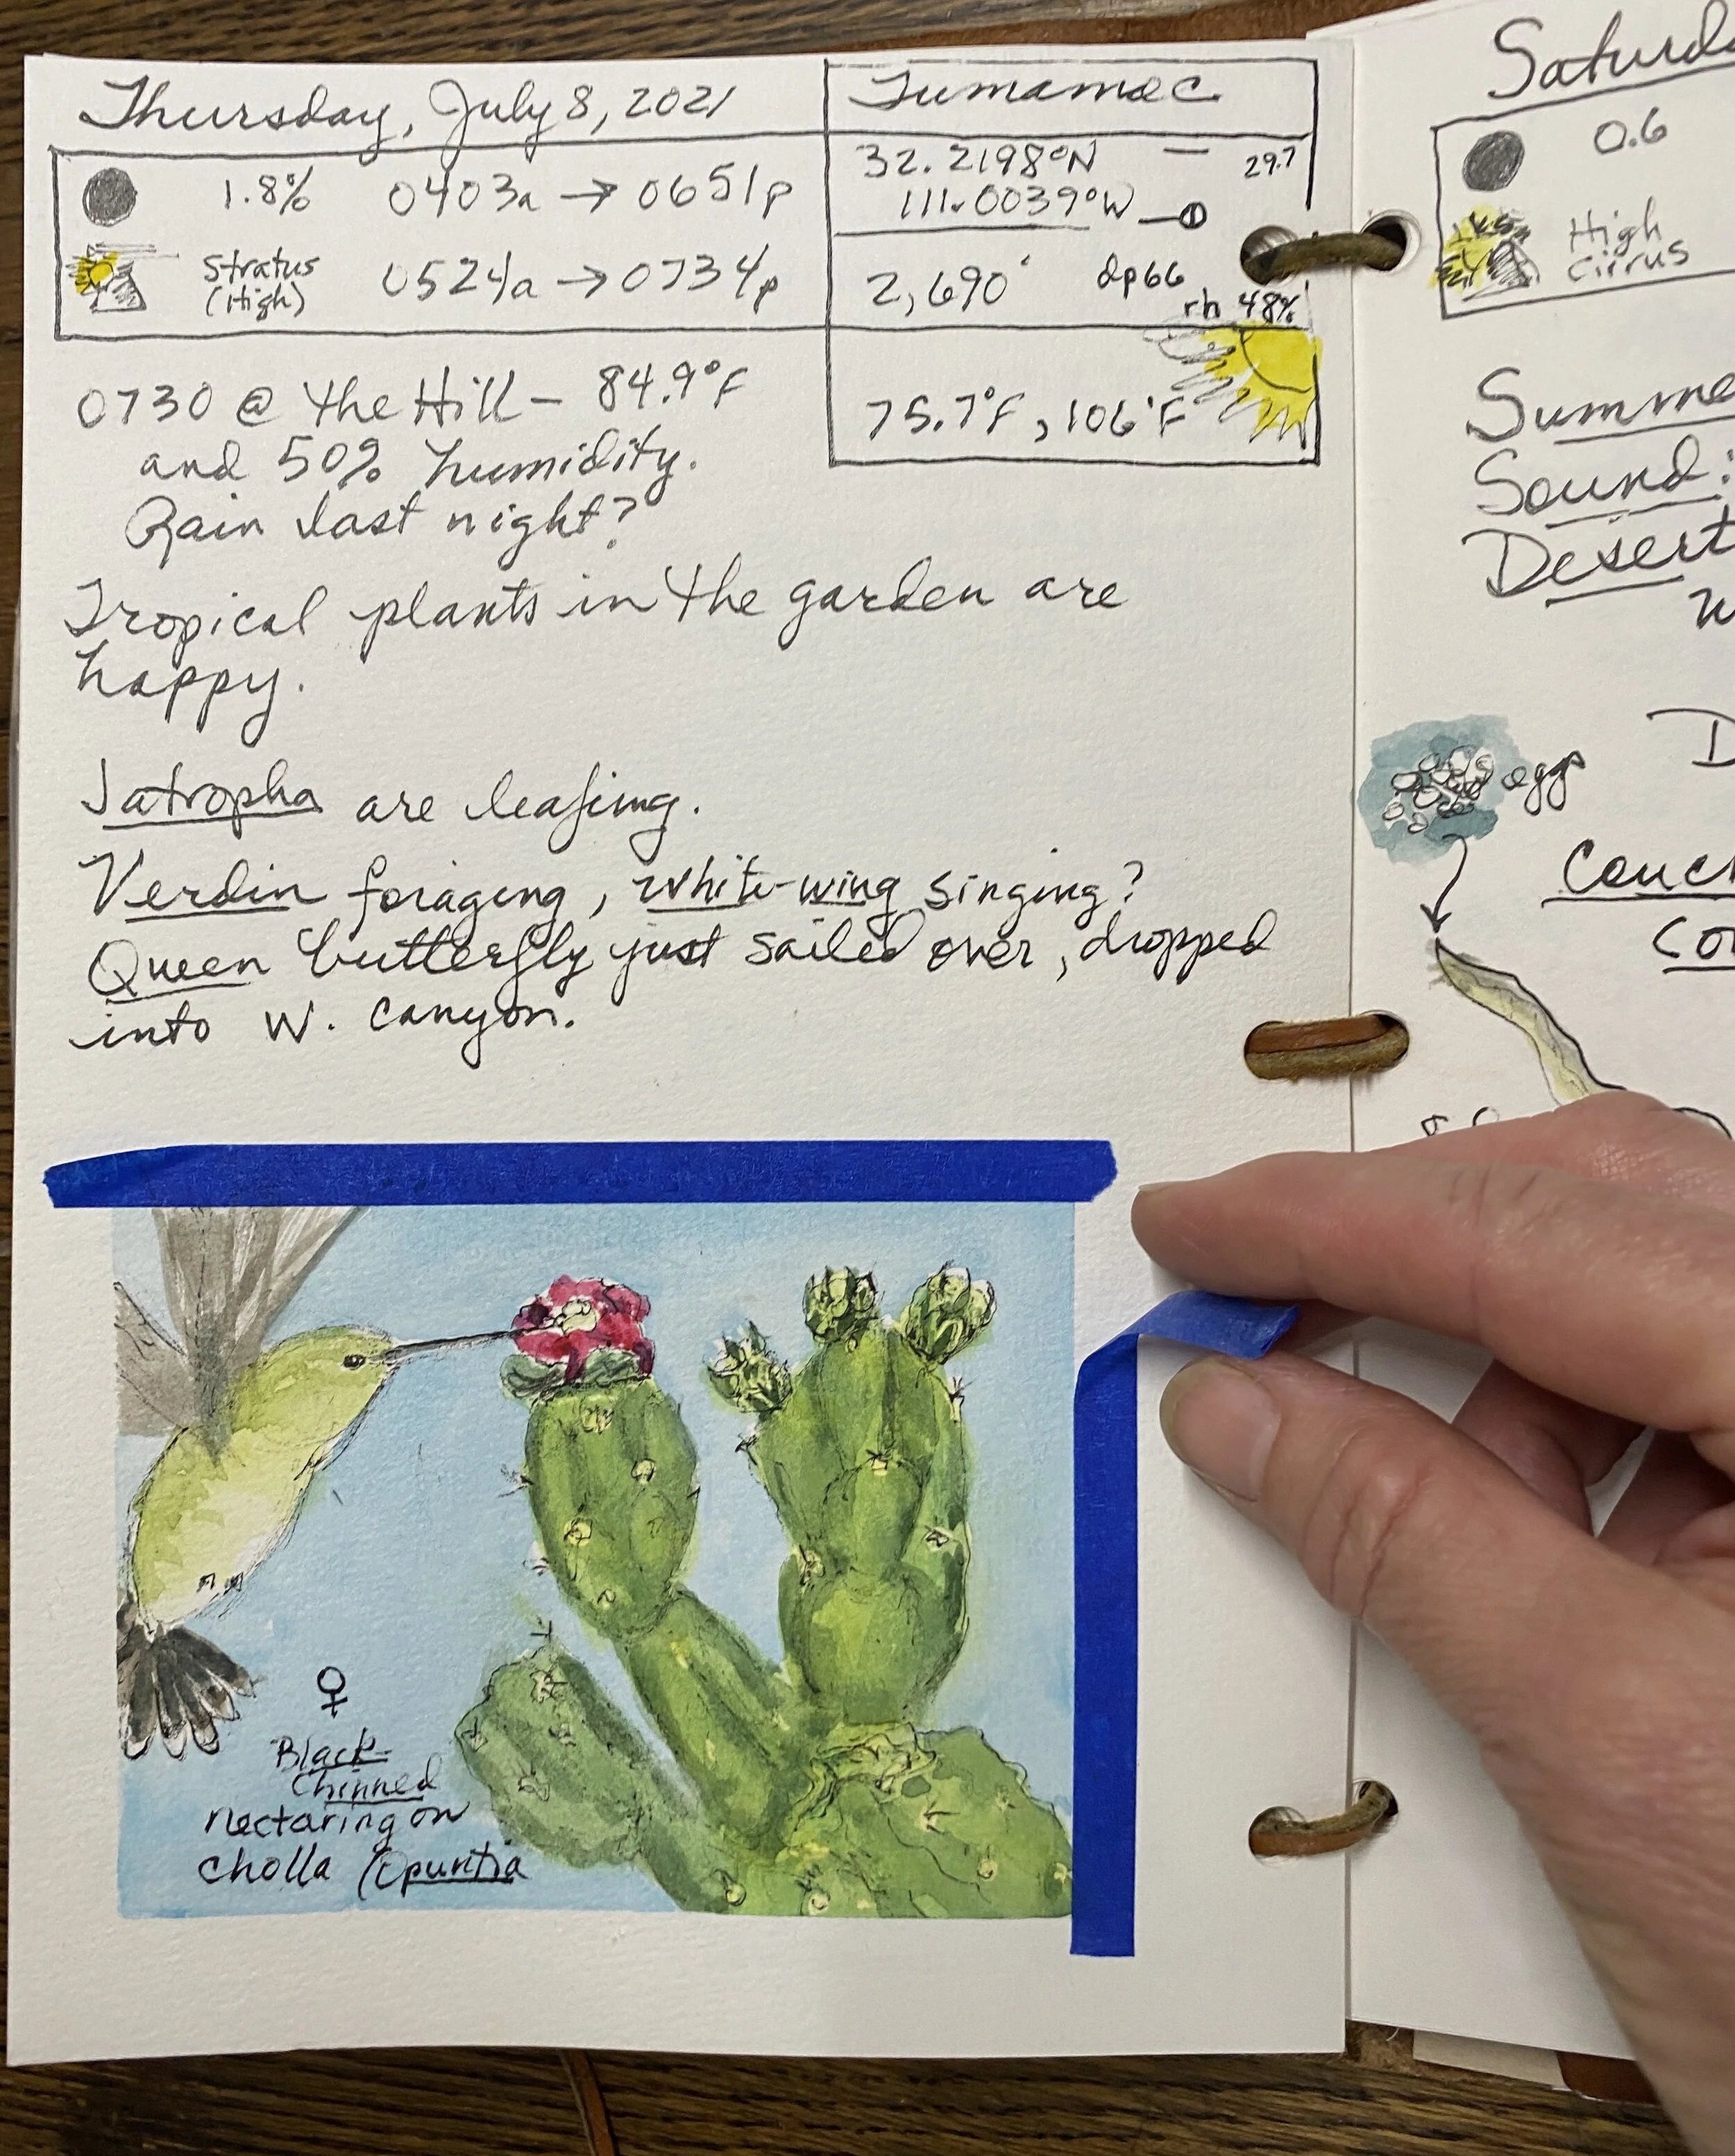
  • Fieldwork Studies

  • Removable Charts, Tips, & Reminders

178 pages

Spiral binding to facilitate workshop-style learning.

$35 (see below to secure a $5 off coupon)

also available bundled with Nature Journaling for a Wild Life, Field Journal Sketchbook, Field Arts Discovery Kit, or all of the above! Click the PRE-ORDER NOW button below.

This book is a perfect sequel to Nature Journaling for a Wild Life as you grow in your nature journaling practice, as well as for field researchers and expedition leaders who want to ensure their field notes are meaningful, accessible, and useful for their work.

Join us for a Book Launch Party

Saturday, February 19, 2022

10 am MST

  • Selected reading and sneek-peeks of the content

  • Attendees who already have ordered their copy will be eligible for special giveaways during the event—see below! (if you are on our email list you will also get a $5 off code; if you didn’t get it, contact me, or sign up for the email list for instant access (below)!)

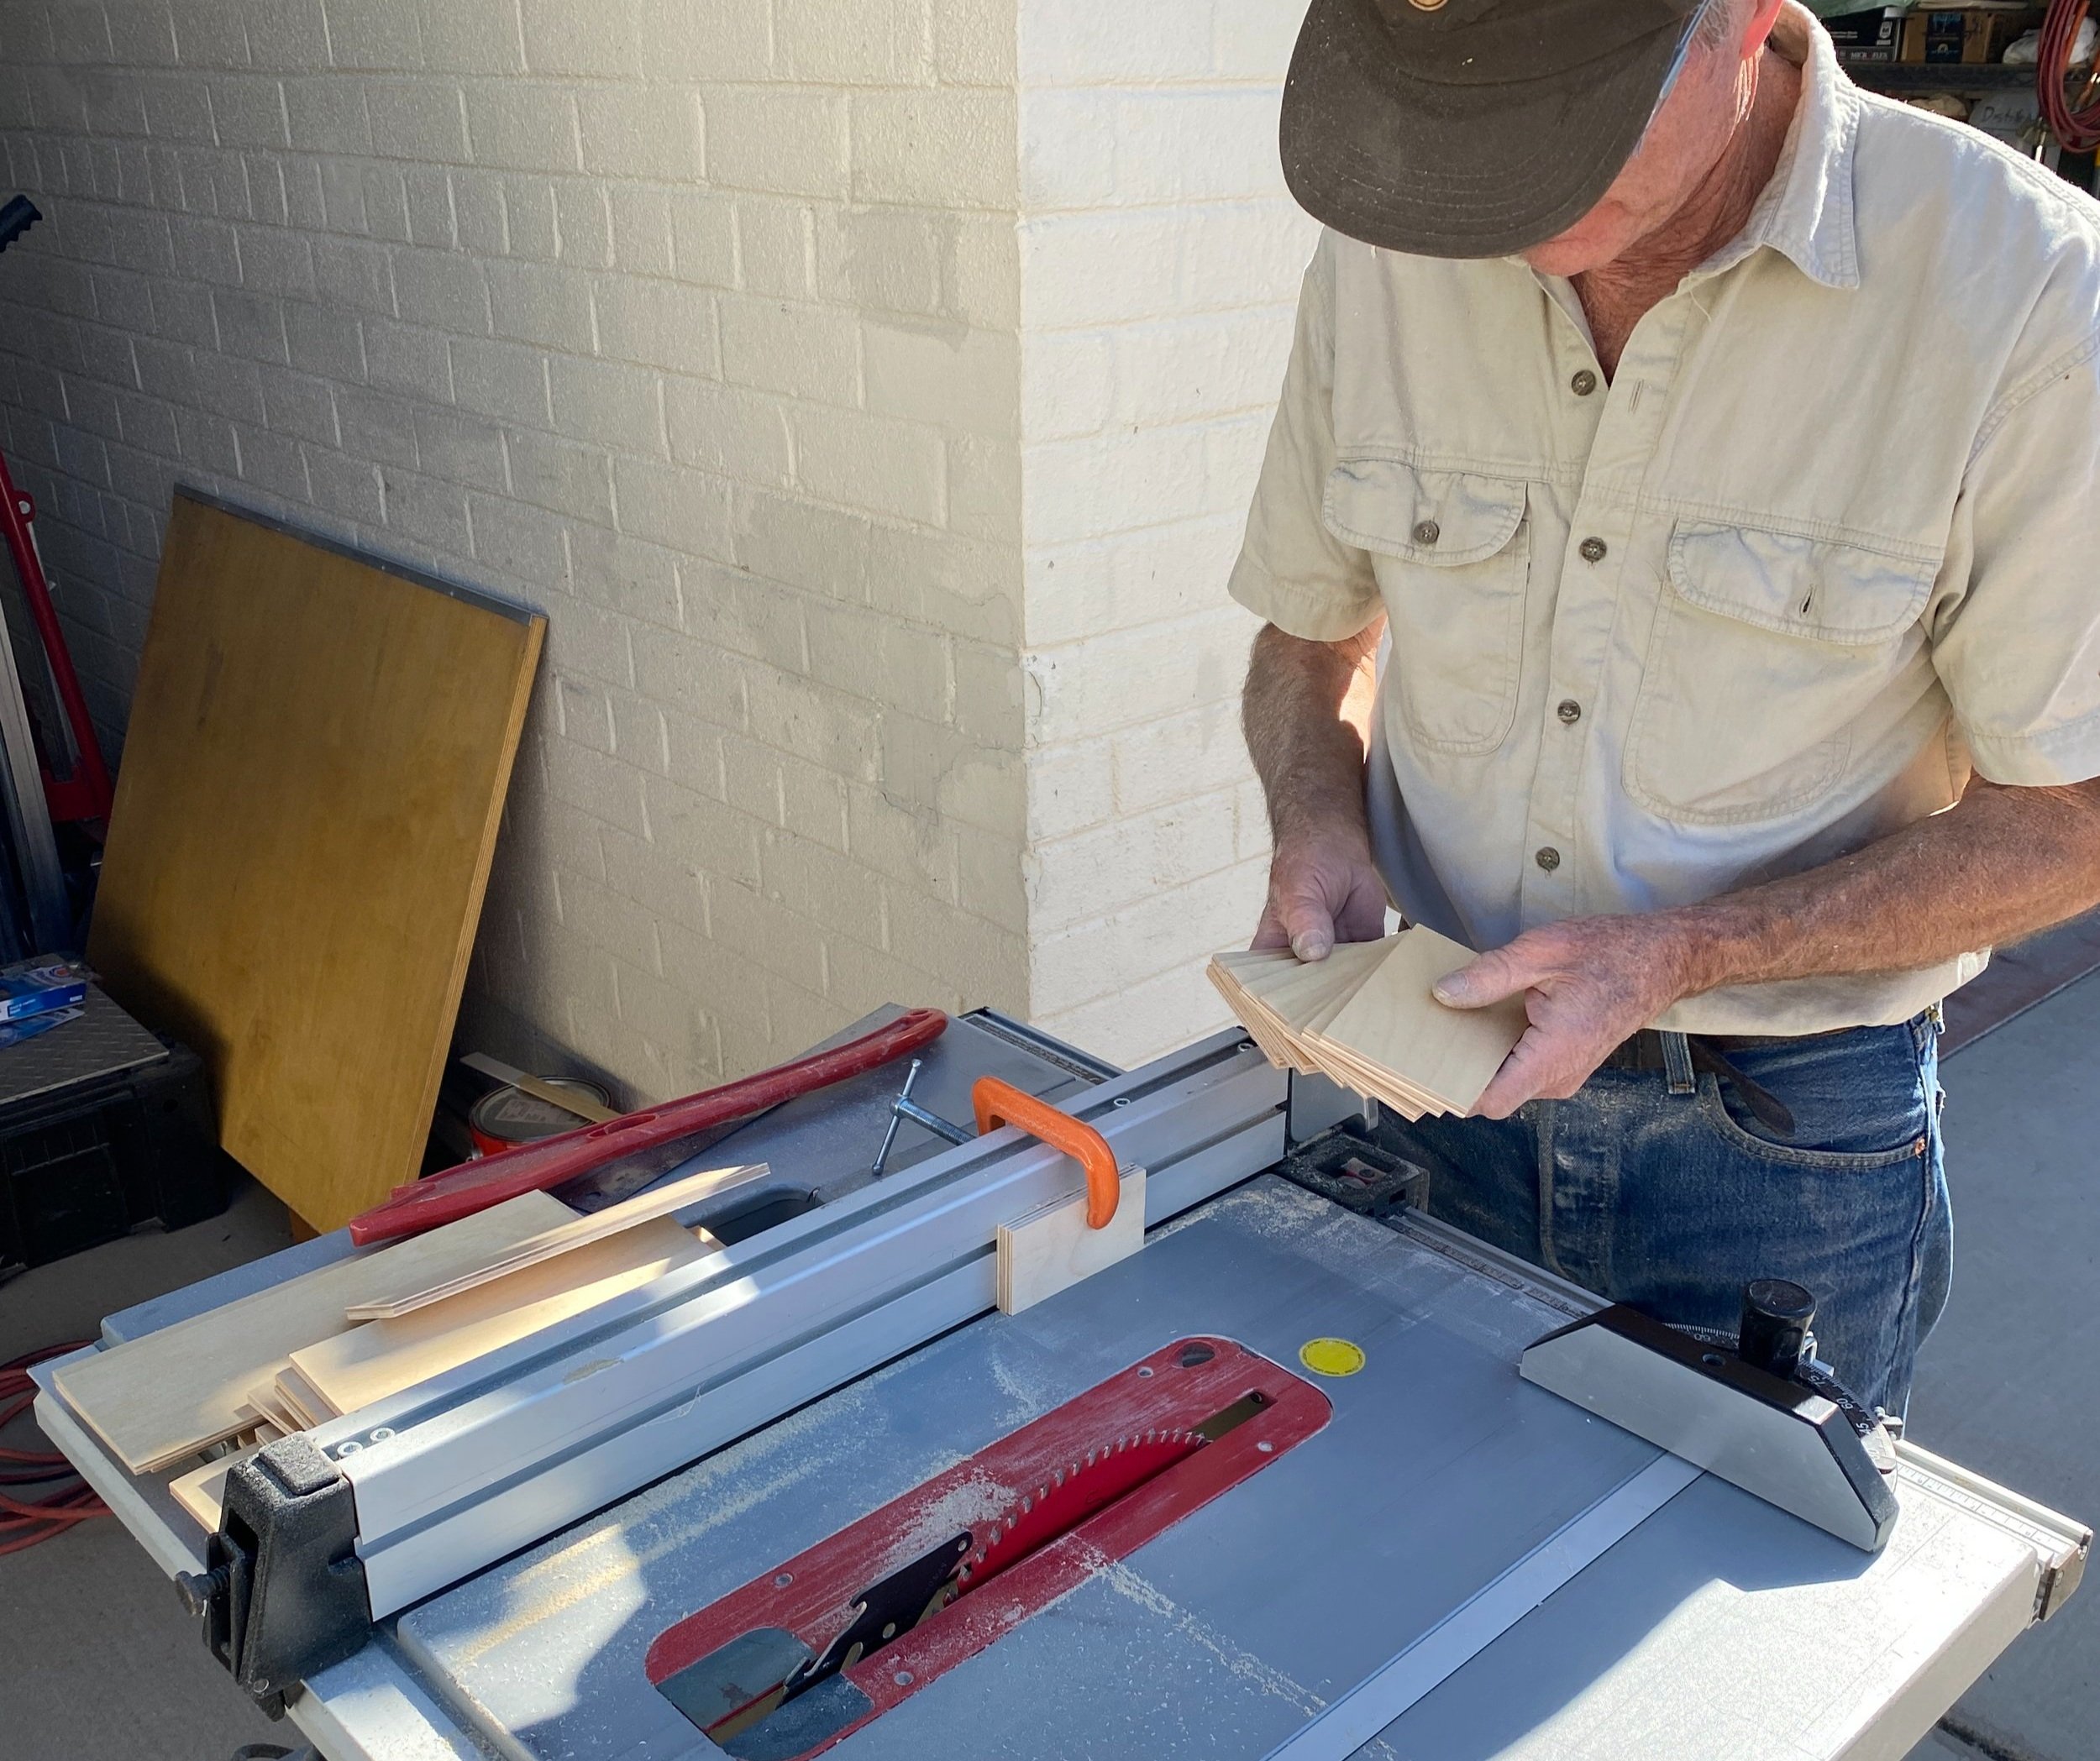
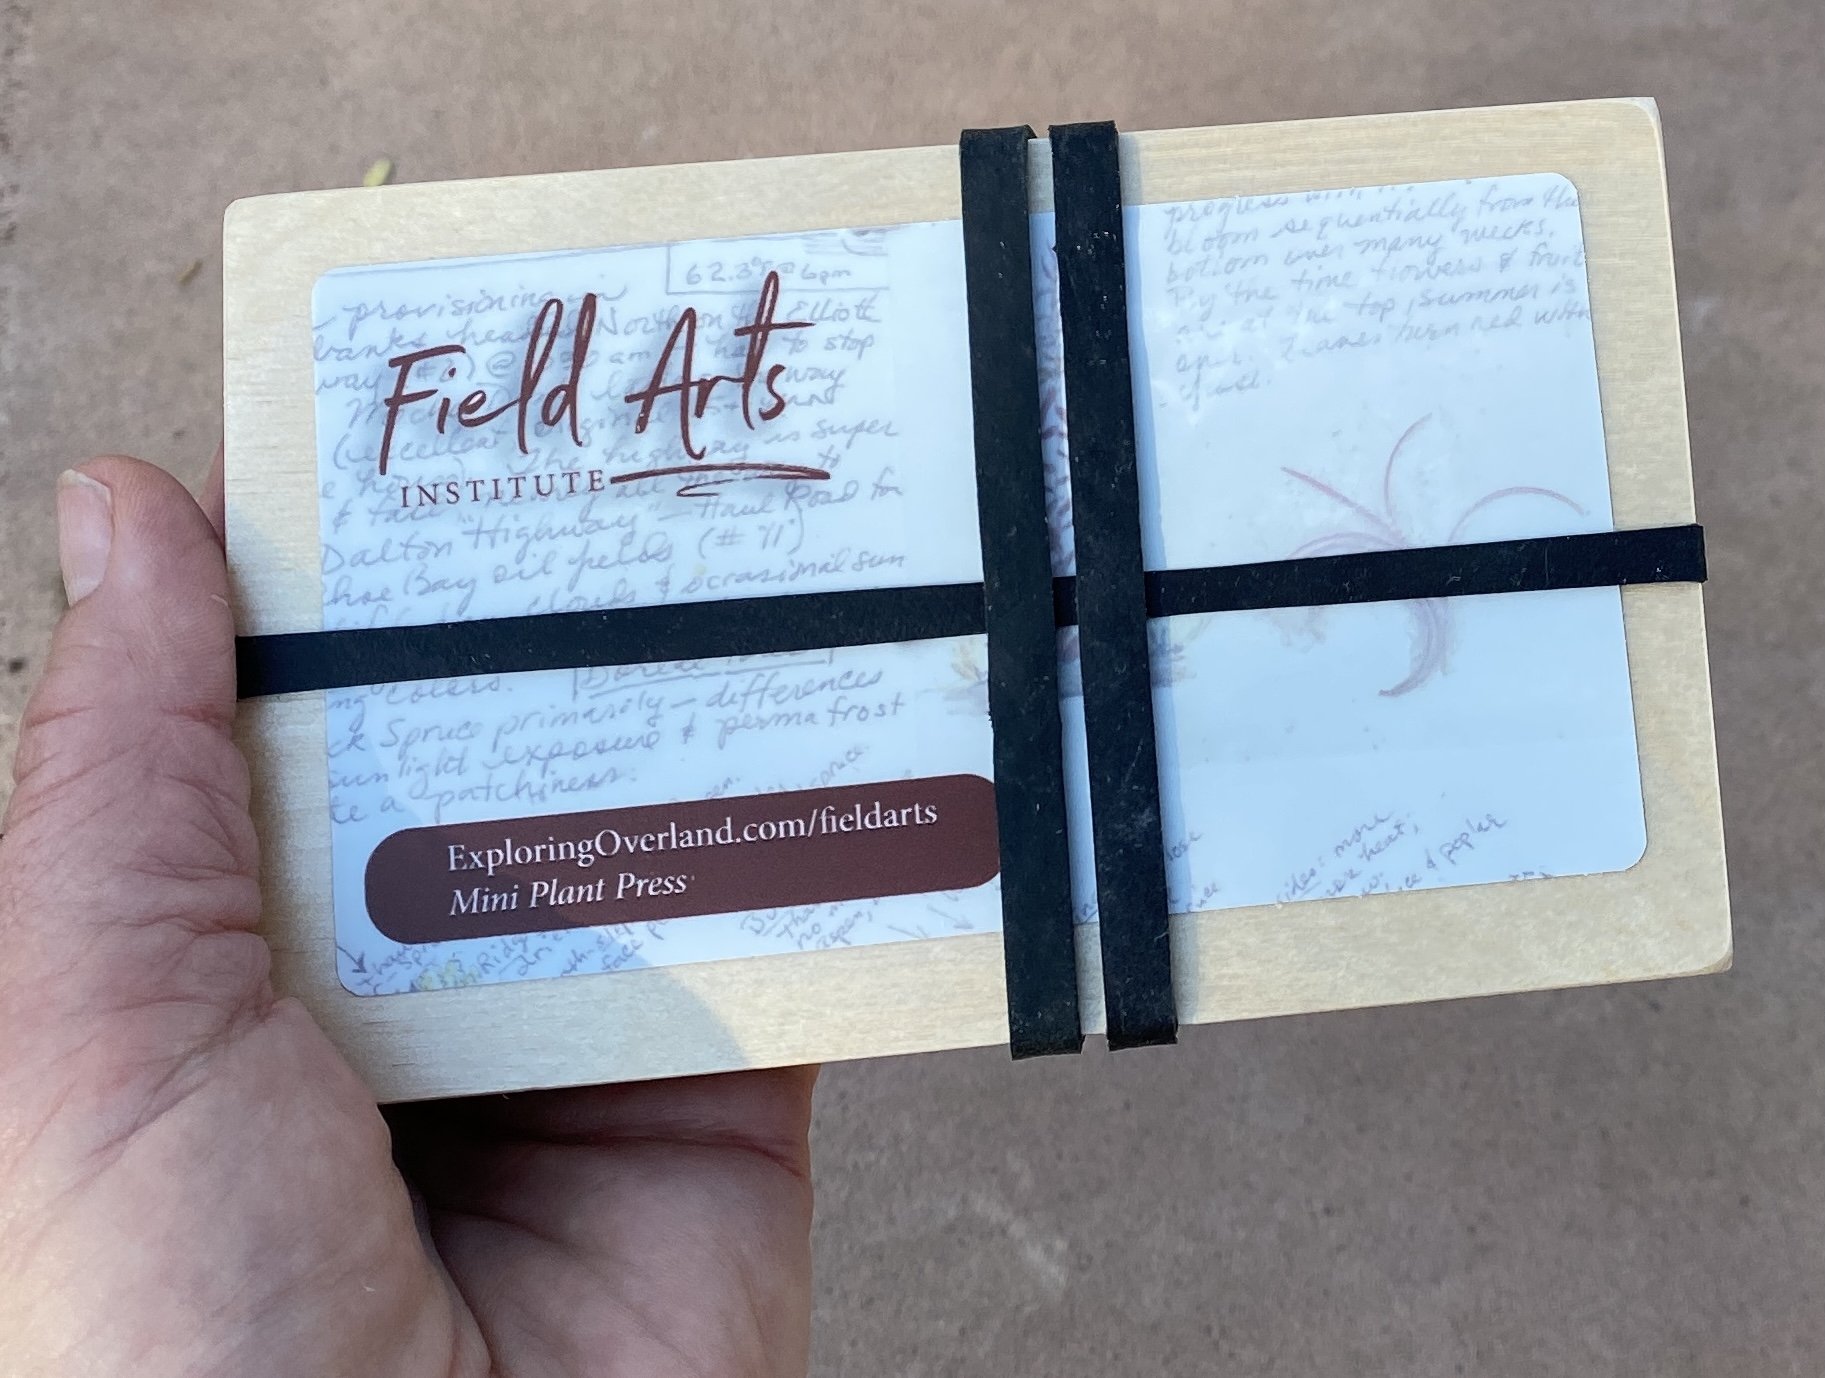
  • Giveaways—book customers will be eligible for free cool kit from the Field Arts shop (Discovery Kits, Mini Plant Presses, mini microscopes, and Field Arts Sketchbooks)!

  • Special preview of upcoming exciting new projects

Length:  45 minutes (maximum)

Start time: 10 am Mountain time / 9 am Pacific time / GMT - 7

(Having trouble figuring out time zones?Use this calculator: https://www.timeanddate.com/worldclock/converter.html)

Format: online via Zoom

Access: Registration not required for this event. Please use this link HERE to join the event!

Email list subscribers and current customers received a $5 off code for pre-orders in the launch party announcement. Not on the list? Sign up now to get your code instantly!
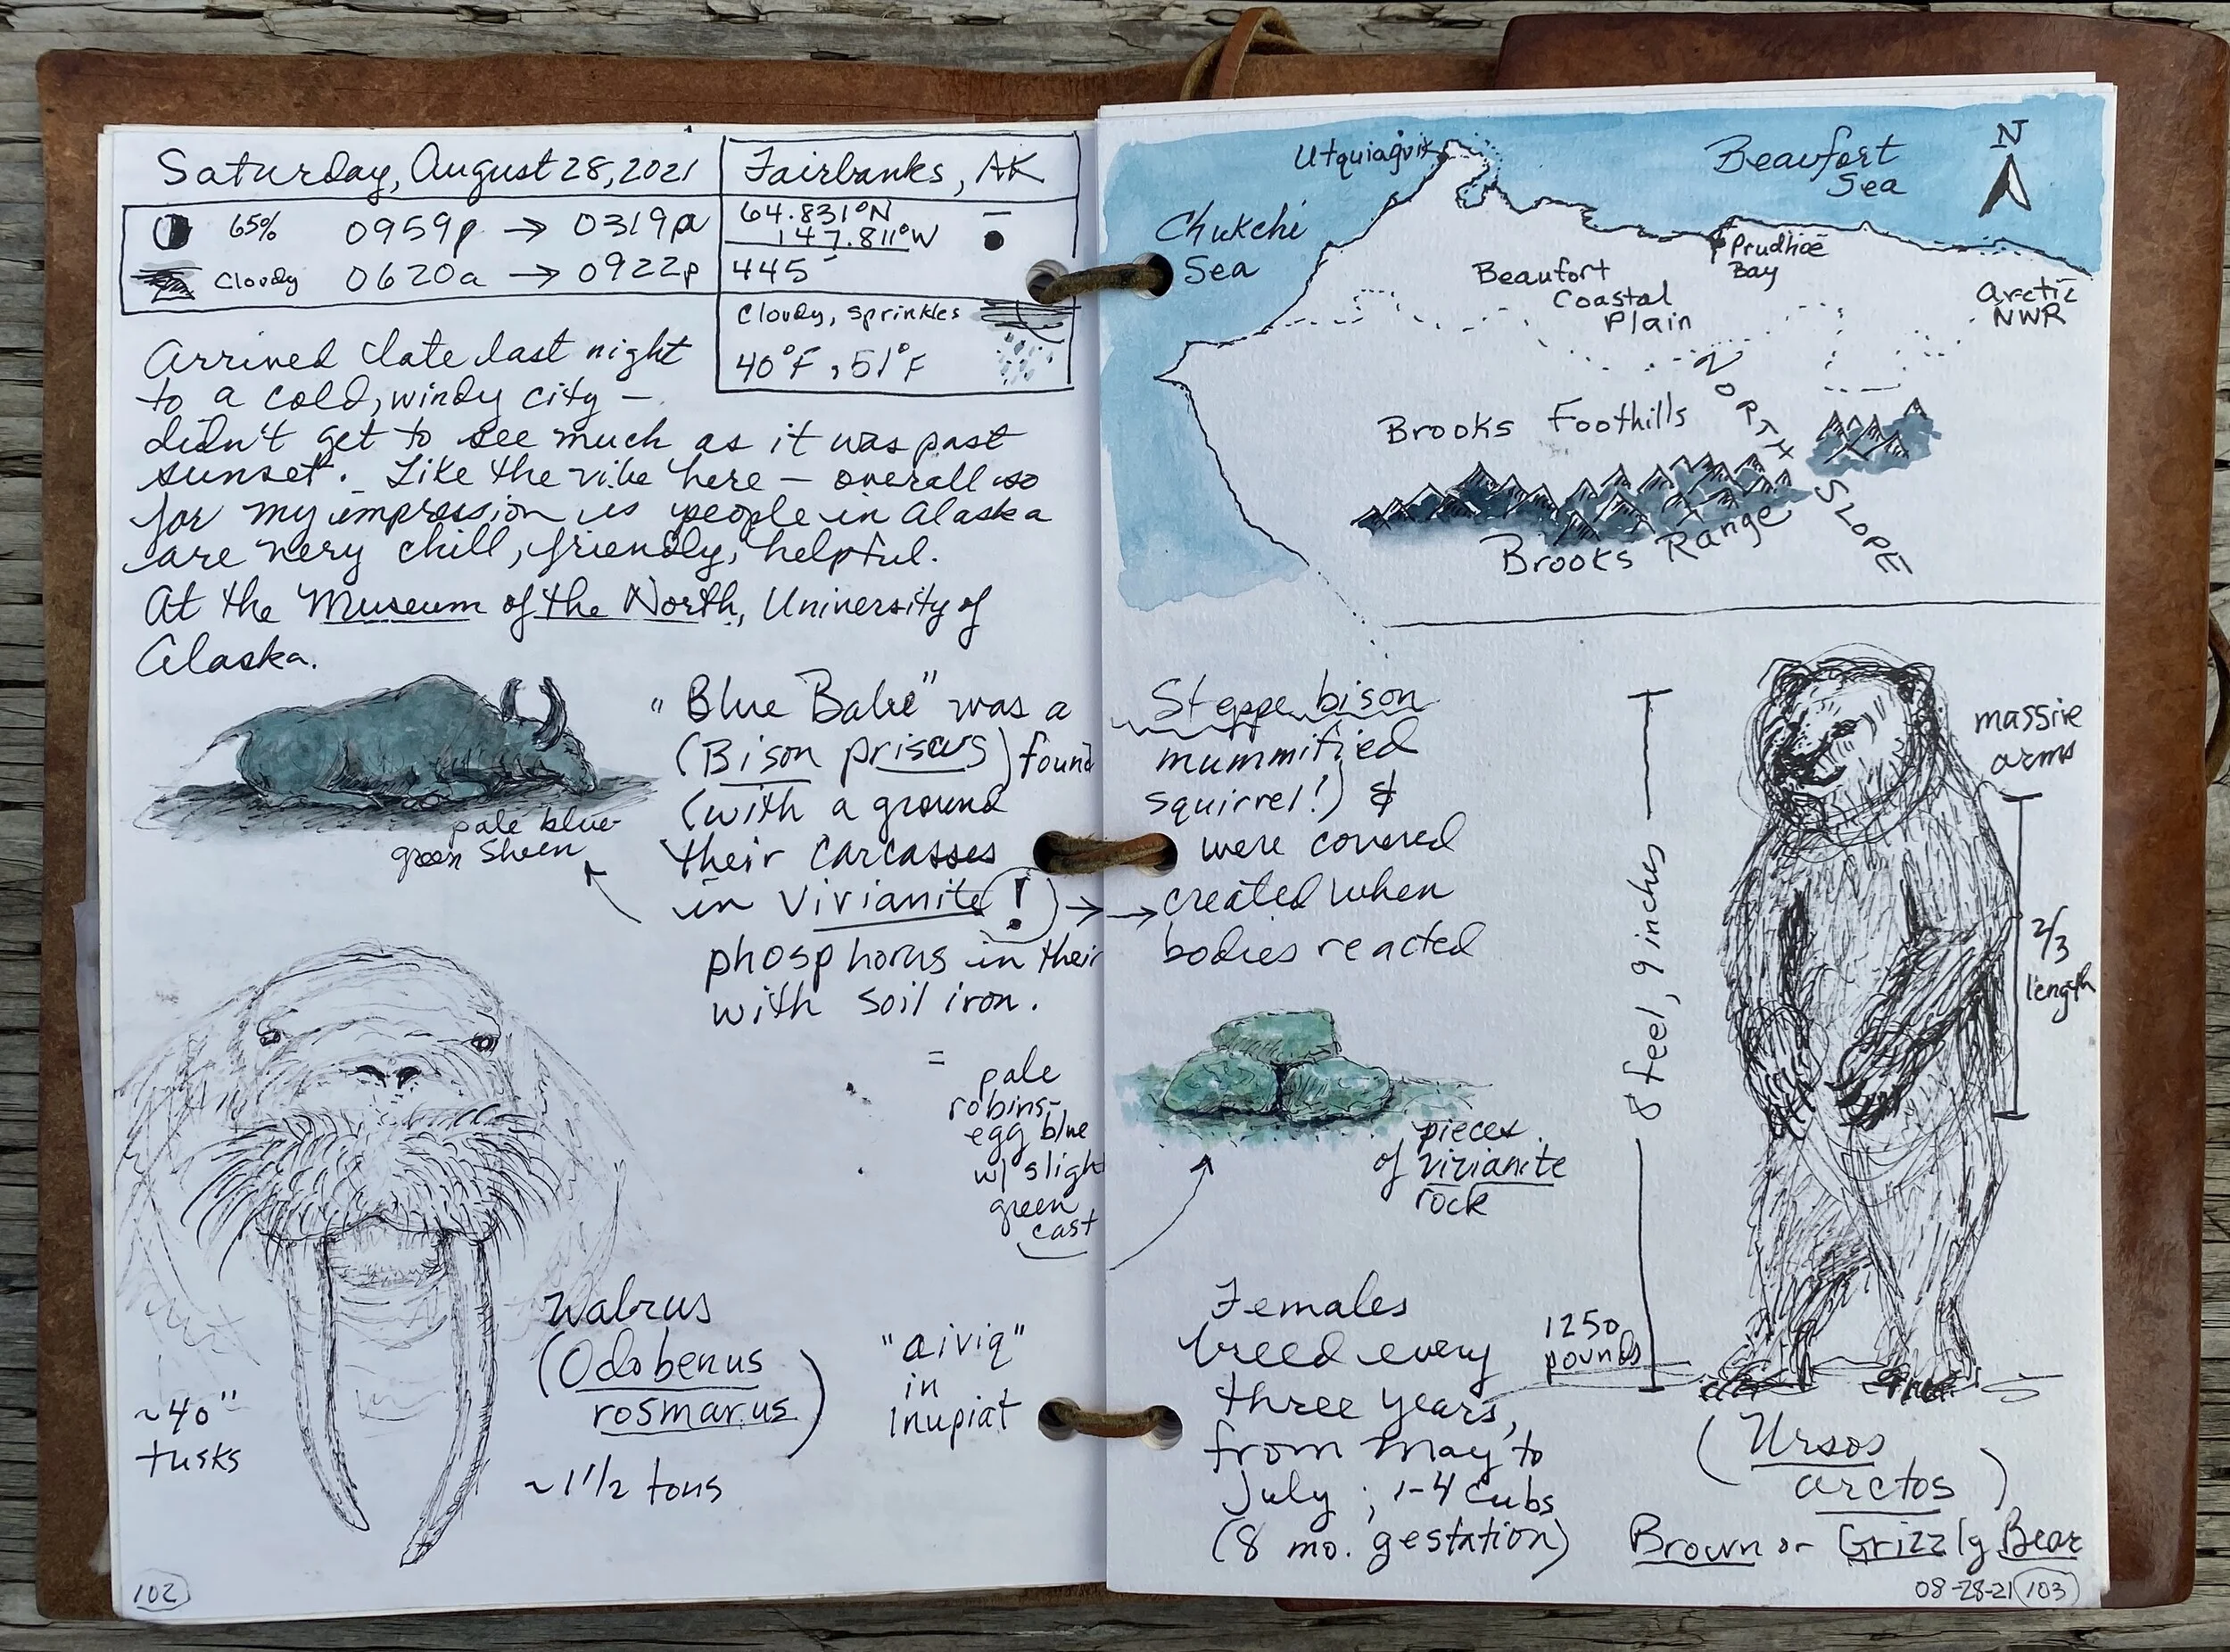
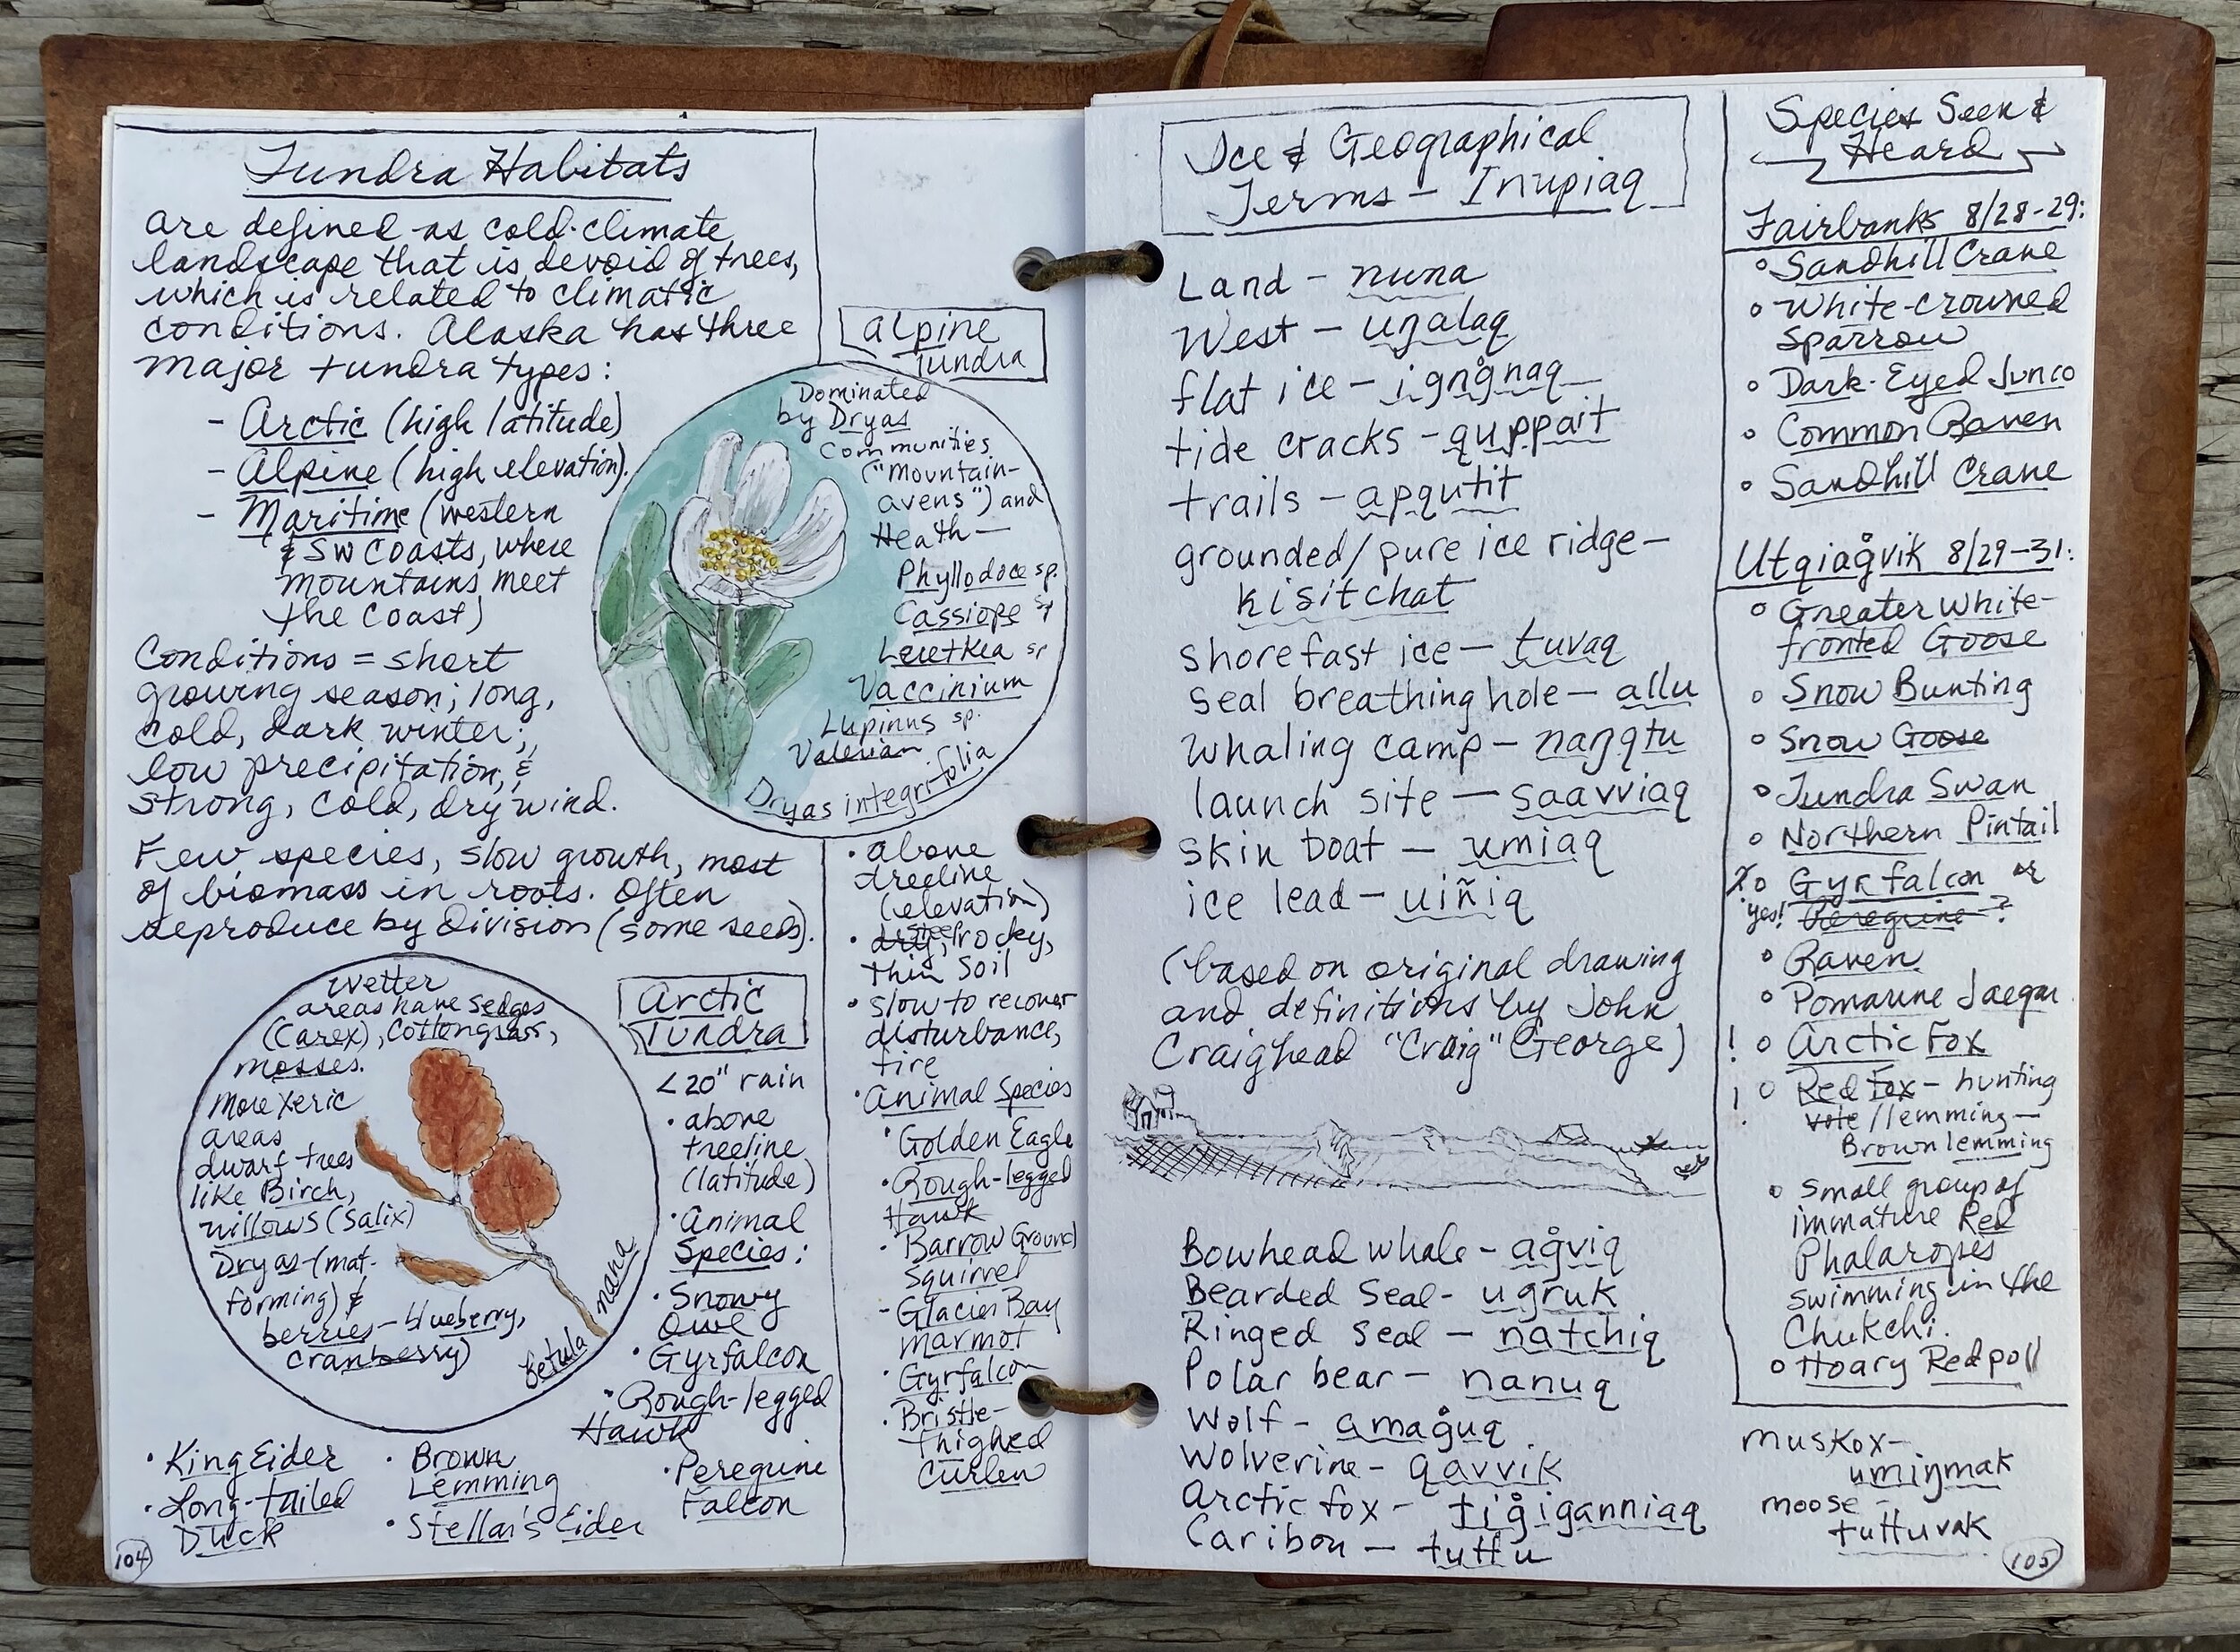
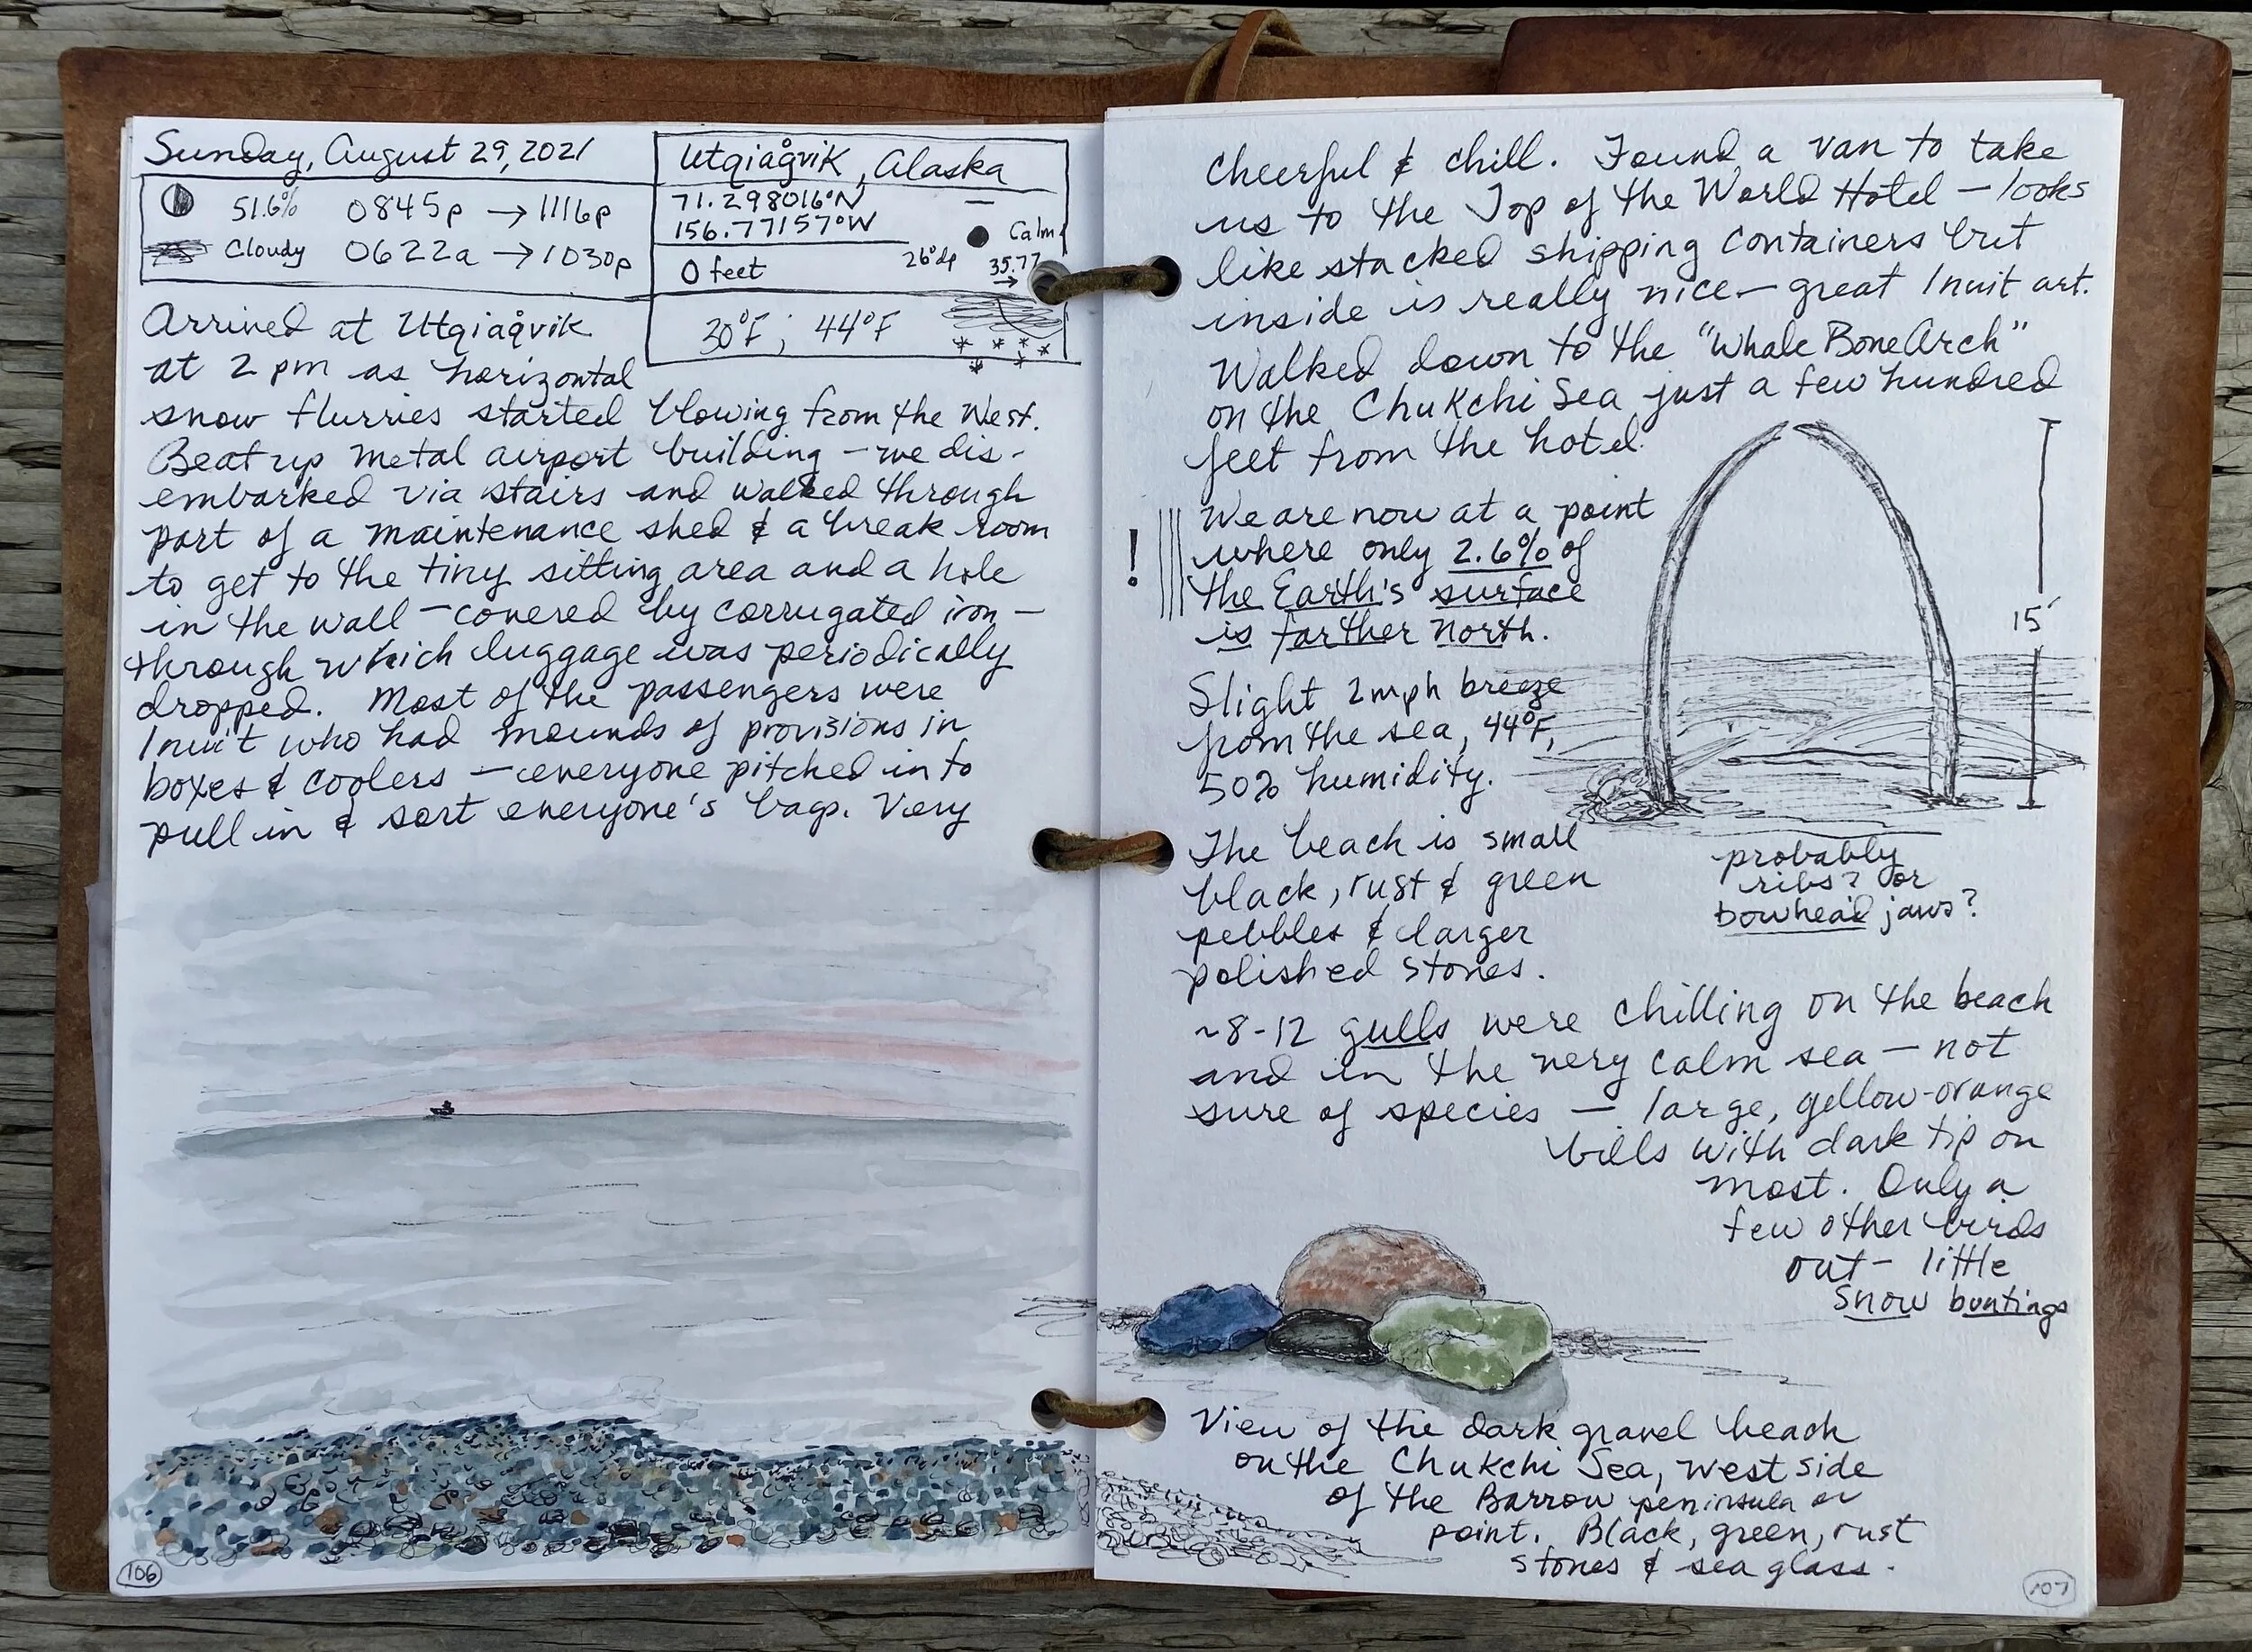
 
Master of Field Arts
from $35.00
Choose Your Option:
Quantity:
Add To Cart
 

Master of Field Arts is a welcome companion to Roseann Hanson’s 2020 book, Nature Journaling for a Wild Life. In this second book in her Wild Life series, Hanson gives us an accessible and practical guide to advanced naturalist and field journaling skills. The lessons provide the structure and details to enable you to think and see like a naturalist, and take your observation and ability to investigate nature mysteries to the next level.

“These methods connect you with old traditions of exploration and promote learning from experience. You will learn fundamental skills for journaling and recording, and ways to make your own art materials, a process that more deeply connects you to place. You will also dive deeply into reading the sky and tracks in the dust. As a bonus, Hanson gives us templates and field tools she uses in her own work. This book will help you take your nature discovery, inquiry, and journaling to mastery.

– John Muir Laws, The Laws Guide to Nature Drawing and Journaling (Heyday Books)

Layout Strategies for Beautiful Pages available on recording

Now posted to my Field Arts Tutorials page, you can enjoy the workshop on getting over design angst using design principles and an organic approach. You can access the recording, downloads, and sample images here:

https://www.exploringoverland.com/field-arts-tutorials-list/2021/11/14/layout-strategies

Tennis star Arthur Ashe famously said: “There is a syndrome in sports called ‘paralysis by analysis.’” The same is true for art. A study published in the Journal of Neuroscience found that the prefrontal cortex—which is housed in the cerebrum—is the part of the brain responsible for planning, executive function, and working memory. Further, the findings showed that overactivity in the prefrontal cortex can interfere with brain processes necessary to perform fluidly; simply put, this can cause people to “choke,” whether you are an athlete or an artist.

This fun and inspiring workshop is going to focus on how we “loosen up” and let go of Type-A-style planning so that our pages become beautiful in an organic way, enhanced by our science-oriented data—which is the most beautiful thing of all.

We’ll also have some fun with a few tools and tricks: a caliper to measure proportions (which happen to coincide with the “Golden Mean” . . . don’t worry we’ll cover that, too!) and a fun protractor for making perfect circles.

Fun New Field Arts Products Released

Just in time for the holidays I’m pleased to offer several fun new field arts tools for your toolkit—I’ve carefully curated the set to enhance your in-the-field discovery process: magnification lenses, measuring tools, a special light, tweezers, and a beautiful plant press. And don’t miss the limited-edition Sky Palette with the perfect colors for capturing skies and clouds.

Mini Plant Press

I’m most excited about the beautiful handmade Mini Plant Press, which is based on one that I bought from Vince Roth in 1985 at the Southwest Research Station, where he was director. My husband, Jonathan, hand-cut the lovely 3x5” birch plywood covers and I sanded and assembled them. They are light (4.5 ounces!) and will be a fun addition to your field kit (they are also come as part of the new Field Arts Discovery Kit). I’ve had my mini press for 36 years and it’s been all over the world with me.

Our Mini Plant Press is lovingly handmade by us just for your field kit.

^ Click the image above for more images, details, and to order.


Field Arts Discovery Kit

The new Field Arts Discovery Kit is really fun as well—a curated collection of fields arts tools that I find indispensable. You can choose between two options, depending on which optics you want (either with a classic triplet pocket loupe at $39, or with a mini-LED-microscope at $46). Each set includes:

  • Mini plant press (see above)

  • Stainless steel, bent-nose tweezers for dissecting or picking up small items to study under your optics

  • 2-inch hand lens magnifier

  • Mini UV light for looking at critters at night—scorpions and other arthropods (and some mammals!) fluoresce under UV light

  • Clear ruler with metric (15 cm) and English (6 inches) scales

  • Round protractor by Helix—measure angles and draw 21 different sizes of circles perfectly (see demonstration video on the product page)

  • 9x7” zippered cotton pouch with a clip ring; customize your pouch with fabric paint, ink, or embroidery

Click the image at top for more details, images, and to order, or click here.


Sky Palette

And in very limited quantities I’m offering Sky Palettes, a mini paint kit with six colors for making perfect skies and clouds. Click the image below for more details, images, and to order:

Three Field Arts offerings this fall

Virtual Field Trip: Explore the Alaskan Arctic with Roseann [FREE with registration]

Virtual Field Trip: Explore the Alaskan Arctic with Roseann [FREE with registration]

Fearless Watercolor for Field Sketching, a Desert Laboratory on Tumamoc Hill workshop with Roseann

Fearless Watercolor for Field Sketching, a Desert Laboratory on Tumamoc Hill workshop with Roseann

Introduction to Digital Nature Sketching on iPad with Procreate App, a Desert Laboratory on Tumamoc Hill workshop with artist Bill Singleton

Introduction to Digital Nature Sketching on iPad with Procreate App, a Desert Laboratory on Tumamoc Hill workshop with artist Bill Singleton

Are you ready for some great skills workshops and a virtual field trip?

  • Saturday, October 16 at 9 am Pacific: VIRTUAL FIEL TRIP: EXPLORE THE ALASKAN ARCTIC with Roseann. I just returned from two weeks exploring this amazing landscape; I’ll take you there virtually! See my field journal pages and narrative, here. For more details and to sign up (required, free), click here: https://arizona.zoom.us/meeting/register/tZIqdeCvqjkrGt2LJyrjXViL0Ztj-B1UlpQU

  • Saturday and Sunday, October 23 and 24, starting 9 am Pacific: FEARLESS WATERCOLOR FOR FIELD SKETCHING, a Desert Laboratory on Tumamoc Hill workshop with Roseann. This is an expanded version of a workshop I offered earlier this year, with the addition of more teaching time and a 2-hour live in-person session at the Desert Laboratory on Tumamoc Hill; if you aren’t in Tucson, you can dial in on Sunday remotely for consultation from your own field location! For more details and to sign up ($75 fee, with optional supplies to be mailed; you can also opt out of either day for a lower fee), click here: https://www.eventbrite.com/e/fearless-watercolor-for-field-sketching-tickets-181232299687

  • Saturday, November 20 at 9 am Pacific: INTRODUCTION TO DIGITAL NATURE SKETCHING ON IPAD WITH PROCREATE APP, a Desert Laboratory on Tumamoc Hill workshop with artist Bill Singleton. This is a rare opportunity for a live, online class with one of the masters of field sketching, either traditionally or on an iPad. For more details and to sign up ($55 fee, with optional supplies to download), click here: https://www.eventbrite.com/e/introduction-to-digital-nature-sketching-procreate-and-ipad-tickets-181333873497

Alaska Explorations – Reflections on "pencil miles"

We recently returned from the high and middle Arctic regions of Alaska—a research trip for Jonathan’s next fiction novel in his Clayton T. Porter series.

For two weeks solid I was able to explore new habitats, learn new species, and sketch and write extensively from early morning until late in the evening—a whopping 27 pages worth! And I can confidently say:

  1. Alaska is a superb natural treasure, as vast and wild and full of wildlife and rich cultural history as anywhere we’ve been in Africa . . . and . . .

  2. “Pencil miles” work, even in the short-term (thanks, Jack Laws).

I’ve posted below all the pages in chronological order.

It’s particularly interesting to note the changes from day one at the natural history museum at the University of Fairbanks, where I jumped into live sketching after several weeks hiatus from any journaling at all. I dove in (after writing the metadata, of course) with the 8-foot-tall stuffed grizzly . . . and it just went all wobbly wonky on me. Too many people around, too many people watching over my shoulder, I just couldn’t find my sketching ju-ju.

But I stuck it out. Then I took a deep breath and centered myself and concentrated on the walrus . . . and after zenning it out, I got it. My sketching started settling.

Over the course of the next 11 days watch how the quality progresses. I even tackled quite a few live-in-the-field animal sketches where I only saw the critter for a very short time. Into the second week, after struggling a little with pen-only live animal sketching, I adopted a purple-leaded pencil* to do these initial one- to two-minute gesture sketches, and left them as-is. Then later, using photos my husband shot as reference, I completed more detailed sketches in camp, using my gesture sketches as baselines. I really like the peregrine and muskox gestures.

I returned completely energized and excited to complete my next book (80% done), Master of Field Arts. I also will be offering several workshops:

* I don’t like graphite pencil for journal sketches because the soft pigment can smudge terribly on my pages. Jack Laws likes a non-photo blue pencil, which I tried but found I didn’t really like, perhaps because the blue pigment is rather hard and unexpressive. Recently I saw Jack using a purple-colored pencil, so I ordered purple refills for my mechanical pencil—and I really like it. Soft and expressive, light enough to not overpower the gestures but with enough character to create really pleasing gesture sketches.

DSC01476.jpeg
IMG_6156.JPG
DSC01665.jpg

Field Arts Skills Workshop: Elegant Ink [FREE online]

IMG_1216.jpg
IMG_2779 copy.jpg

Join me for a fun online workshop August 21 celebrating the art of elegant ink in our sketchbooks. While I do love color in my journal, I also love the beauty of well-wrought pen sketches.

We’ll cover types of pens and inks (from ballpoint to fountain pens, including the pluses and minuses of the types); practice mark-making and values; and work on a couple of different types of sketches using one image to create each, so we can see how different styles of linework each produce a different “feel” on your pages.

When: Saturday, August 21, 2021

Length: 2 hours

Start time: 9:00 am Arizona time / Pacific

(Having trouble figuring out time zones?Use this calculator: https://www.timeanddate.com/worldclock/converter.html)

Format: online via Zoom (you will receive a log-in link)

Cost: free

Access: To protect your privacy and security online and for us to find out how many students will be attending, registration is required. Please use this link HERE.

Cloud catcher

IMG_5609.JPG

Artist and author Eric Sloane (1905–1985) is said to be the finest cloud painter of his generation—his largest cloud painting is a 75-foot-long by 58-foot-tall mural that graces an entire wall of the Smithsonian Air and Space Museum. In one of his (many) books he mentions building a “cloud catcher box” to better study and paint clouds: a box or frame with a glass bottom that is painted black. Unlike a mirror, this won’t blind you when you try to look into it to see the reflection.

I realized I could try that using my Perspex Palette backed with black paper. Before ordering the black paper, I tested it (left) by holding a black vinyl sheet under the palette and it worked perfectly!

So now, for anyone ordering a Perspex Palette or Minimalist Paint Kit I will include a Cloud Catcher (a 9x6 black sheet of Canson artist grade paper, use tiny office clips to hold to the palette) so you, too, can catch and sketch clouds.

IMG_5643.jpg

Making a cyanometer to measure sky moisture through color

I love simple field arts tools for my kit, and a recent discovery (thanks to our Skyscapito Appreciation Society comprising weather and cloud nerds), is the cyanometer. Encompassing the word for the primary color blue, “cyan,” it is a simple manual tool for measuring a meteorological phenomenon.

The cyanometer was developed by Swiss meteorologist and geologist Horace-Bénédict de Saussure in 1789 to measure the blueness of the sky and thus its moisture (and particle) content. The paler the sky, the more water vapor is present in the atmosphere; clouds are dense with moisture and the blue visible spectrum we see in the sky is scattered in all directions by the water in these pockets of condensing moisture, making them appear white. The darker values mean there is less water vapor so more of the pure blue spectrum is visible (and it’s most blue straight overhead). This scattering of light is known as Mie scattering (or Raleigh scattering, depending on the atomic particle size).

cyanometer Bibliothèque de Genève Switzerland.jpg

Saussure’s original cyanometer (left, which resides at the Bibliothèque de Genève, Switzerland) had 53 values of Prussian blue. It was held up and compared to the color of the sky to select a value. Alexander von Humboldt used the cyanometer on his voyages and explorations in the Americas in the late 1700s.

Another use for this tool would be to use it to match blue values from the sky to your notebook for getting the hues just right for different parts of a sky.

You can make your own cyanometer, choosing a blue shade that best approximates your typical regional sky. A compass and ruler are helpful to create the circle and partitions. I made mine to fit into a pocket in my journal, so it is about 5.5 inches wide.

IMG_5617.JPG
IMG_5619.JPG

Create a disk using a pencil and compass. Use a ruler to divide into 16 spaces. Note that I added a third circle to demarcate a space for the scale, which starts at 0 for white.

IMG_5621.JPG
IMG_5624.JPG

To reserve a white line between values I added wax lines using waxed paper scribed with a pencil.

I chose cobalt blue, mixing a very pale wash for the first layer, covering 1–15.

IMG_5626.JPG
IMG_5628.JPG

First wash is very pale. Once dry, add another wash starting with #2 and ending with #15. Continue drying, adding layers (3–15, 4–15, etc.), until halfway, when the values are saturated. 

IMG_5631.JPG
IMG_5634.JPG

At that point, begin adding a wash of dark blue such as indanthrone, eventually ending with pure dark.  I used a white colored pencil to enhance the numbers and lines in the dark values.

IMG_5639.JPG

Cyanometer in use, showing a #6 value sky, which tracks well with the 42% humidity that day.

Bethan Burton, of Journaling with Nature, posted a short video of her process for making a cyanometer, which is a little different from mine. Both work really well.

You can also use this wheel to match colors in the sky to a painting in your notebook!

The next meet-up of the Skyscapito Appreciation Society is Friday, August 13 at 3 pm Pacific time, and we will be practicing making cyanometers. Details and registration link is on the Skyscapito page (link above) or in the Events and Workshops area of this website.

Customizing your kit: A sky and cloud palette

IMG_5309.jpg

I love my Minimalist Paint Kit, and for 95% of what I want to quickly add color to in the field it’s perfect.

But there are times that I want something a little more than my triad-plus-two colors won’t do well or at all. Examples:

  • When I’m practicing a lot more “skyscapitos” and I want more options in my blue range.

  • When I want an old-fashioned tinted look using ochres and turquoises and lapis (all earth pigments).

And so I’ve developed a few custom mini-palettes: my Clouds & Sky Palette, and my Earth Tints Palette.

Here I’m going to discuss the Clouds & Sky Palette; I’ll go deeper into the Earth Tints Palette in a future post.

As you can see from the topmost image, I settled on five blues and one warm red for my six-half-pan Minimalist Paint Tin (see below). These are tiny little palettes, and barely take up any extra room in your bag. Here are the colors (all Daniel Smith) and why I chose them:

  • Manganese Blue Hue — This is a bright, transparent cyan blue for those skies that are very “fair weather” and cool in tone. Mixed with the Burnt Sienna, its grays are neutral and very uniform.

  • Cobalt — Probably the perfect overall sky color —slight granulation makes great texture, and it’s a warm-ish blue, nearing neutral. Makes gorgeous grays, too.

  • French Ultramarine — A beautiful, rich warm blue that has tons of texture and makes the best granular (mottled) gray in stormy skies. (And why “French Ultramarine” and not just “Ultramarine?” manufacturers claim French Ultramarine is warmer and more granular than Ultramarine, but test by artists consistently show it’s pretty hard to tell them apart; see this excellent post by ParkaBlogs . . . so I use what I have, which is French).

  • Pthalo Blue — When I want a staining bright cyan blue, I use Pthalo (“green shade). You have to be confident when you use this one as once it’s on the page and starting to dry it’s permanent. So if you want a non-lifting under-color, this is a good choice.

  • Indigo — I’m experimenting with this one (usually my “dark” blue is Indanthrone but this is warmer and even darker blue made from Indanthrone Blue mixed with Lamp Black). If you want a quick night sky (use white gouache to make starts and planets) or use it as a light was for instant story cloud blue-gray).

  • Burnt Sienna — This is mixed with the blues to create blacks and grays. You can also use other reds such as Pyrrol but I love the slightly granular grays made with Burnt Sienna).

Make your own custom mini palettes with one of my Minimalist Paint Tins which come in two sizes and empty half-pans (link is below).

Interested in practicing your skyscapes? Join us for a “Skyscapitos Appreciation Society” Zoom meet-up, where you can share your skyscapitos, ask questions, and learn a lot from a whole community! (Click the event link below right.)

Studio trick adapted to the field

IMG_5329.jpg

After my Weather 101 workshop in June, and then enjoying Bethan Burton’s “Skyscapitos” class at the Wild Wonder Nature Journaling Conference, I’ve been tackling lots of little sky- and cloud-scapes in my journal. In fact we’ve started a semi-regular “Skyscapito Appreciation Society” for sharing our work and enlisting help with challenging skies (first meeting on Zoom July 16 at 4 pm Pacific / Arizona time).

But one of the challenges was how to cope with the speed with which you need to move to get nice sky washes and keeping your skies wet when dropping in darker colors . . . If I just drew a box, then I’d invariably slash outside the lines or go too slowly to try to get inside the lines and the washes would dry before I completed them, making blotchy skies.

So I started trying a studio trick: masking out my area with painter’s tape. It works like a charm! It creates a frame that you can splash up to and onto, and then when your are done, it peels off leaving lovely perfect edges.

I only had regular half-inch masking tape, and I found those rolls to be too big for my field kit (I’m all about keeping it minimal and light!). I found this .27” small rolls of tape on Amazon and they are perfect for field sketching. Small enough you don’t even know it’s in your bag, but super versatile and useful not just for skyscapitos but also marking out discreet scenes such as the hummingbird nectaring on a cholla blossom below.

IMG_5324.JPG
IMG_5326.JPG

Skyscapitos Appreciation Society – First online meetup!

IMG_5281.jpg
IMG_5266.JPG

Inspired by and in collaboration with Journaling with Nature’s Bethan Burton, we’re launching our own informal “Skyscapito Appreciation Society!” A “skyscapito” is a small skyscape we create in our nature journals, similar to the “little landscapes” (landscapitos) John Muir Laws loves to create.

Join me (Roseann Hanson, of the Field Arts Institute), Bethan, and Deborah Conn as we host an hour (or a little more, if needed) of sharing our skyscapitos and our favorite colors for sky-making.

We will be doing this semi-regularly so we can all get better at this difficult subject!

This will be interactive, not a lecture: we will each bring one or two skyscapitos from our journals and share with you what paints we used, and how we went about the process.

We would like you to do the same — you don’t HAVE to but we would greatly encourage you to!

FREE but registration is required, for security reasons.

WHEN: Friday, July 16 at 4 pm Pacific (which is 9 am on the July 17th on Australia’s east coast, where Bethan is located!)

WHERE: Zoom (we will record the session and share later if you miss it; register for notifications)

LENGTH: About an hour

TO PREPARE: Bring a skyscapito or questions about challenges you have!

TO REGISTER: >CLICK HERE<

Mother of pearl "noctilucent" clouds on Mars

Noctilucent, mother-of-pearl “dry ice” (carbon dioxide) clouds on Mars (NASA/JPL-Caltech/MSSS).

Noctilucent, mother-of-pearl “dry ice” (carbon dioxide) clouds on Mars (NASA/JPL-Caltech/MSSS).

Field artist Deborah Conn sent me a link to an astonishing set of images recently released by NASA from their Curiosity Rover (if you missed it, I took a group of Field Arts enthusiasts on a virtual field trip to Mars, where we sketched ancient deltas and “Mars blueberries . . .).

The NASA team began documenting “early” clouds from the moment they first appeared in late January:

What resulted are images of wispy puffs filled with ice crystals that scattered light from the setting Sun, some of them shimmering with color. More than just spectacular displays, such images help scientists understand how clouds form on Mars and why these recent ones are different.

In fact, Curiosity’s team has already made one new discovery: The early-arrival clouds are actually at higher altitudes than is typical. Most Martian clouds hover no more than about 37 miles (60 kilometers) in the sky and are composed of water ice. But the clouds Curiosity has imaged are at a higher altitude, where it’s very cold, indicating that they are likely made of frozen carbon dioxide, or dry ice. Scientists look for subtle clues to establish a cloud’s altitude, and it will take more analysis to say for sure which of Curiosity’s recent images show water-ice clouds and which show dry-ice ones. [From https://mars.nasa.gov/news/8956/nasas-curiosity-rover-captures-shining-clouds-on-mars/ ]

This is really great timing, since on June 12 I’ll be teaching a free workshop on Weather, including reading and recording cloud types—I guess I’ll need to add “noctilucent carbon dioxide” clouds! [To sign up and for details, please see https://www.exploringoverland.com/training-trips/2021/5/29/field-arts-skills-workshop-weather

In other news, NASA also released this impressive compilation of 4K video—some of the same places we visited on our virtual field tip.

Making paint and ink from wildfire-sourced charcoal

Fern and stump copy.png

You can definitely say I’m obsessed with making paint and ink from wild-crafted pigment sources—and this week I went a bit to an extreme, collecting ponderosa pine (Pinus ponderosa) charcoal from the 2020 Bighorn Fire burn area on the Santa Catalina Mountains north of Tucson.

IMG_5101.JPG

I'm co-producing a webinar on Tucson's Bighorn Fire for UArizona 's Desert Laboratory on Tumamoc Hill, where I'm art and science program coordinator, so I spent some time last week with scientists on the year-old, 119,000-acre burn. [Sign up for the free webinar, on June 2 at 6 pm AZ time: https://environment.arizona.edu/fire-on-the-mountain/]

I just processed the charcoal into paint / ink by grinding it in a small mortar and pestle, then added a little water to make it a medium-thick paint / ink consistency, then added a little bit of binder —about five drops (a mixture gum arabic, ox gall, and honey, but you could use just gum arabic).

Ink made from charcoal, or more commonly soot (the oily residue left on the walls of lamp chimneys, or your fireplace), is known as India Ink or Chinese Ink. Still in use today, it’s often sold in stick form, pressed into beautiful molds depicting scenes or animals; to use, you grind off some pigment and add water. Paint made from soot is called Lamp Black. More on India ink here.

To about 3 tsp. of charcoal powder, add distilled water to a milk-like consistency. Add about 5 drops of binder (see above) and mix well. Mix well.

To about 3 tsp. of charcoal powder, add distilled water to a milk-like consistency. Add about 5 drops of binder (see above) and mix well. Mix well.

Paint or write on paper and let dry. Rub a finger over to test for adherence (see test paper below). Add more binder if it smears, more pigment if it’s weak.

Paint or write on paper and let dry. Rub a finger over to test for adherence (see test paper below). Add more binder if it smears, more pigment if it’s weak.

It's really special to draw / paint with materials gathered right from a site—truly place-based journaling.

The solution smells just like a forest fire, which is startling and bittersweet.

Journal page, with watercolor sketch done in Bighorn Fire Black, made with Ponderosa Pine charcoal from the 2020 Bighorn Fire in Tucson’s Santa Catalina Mountains.

Journal page, with watercolor sketch done in Bighorn Fire Black, made with Ponderosa Pine charcoal from the 2020 Bighorn Fire in Tucson’s Santa Catalina Mountains.

IMG_5120.JPG

Strip Maps – History and Science

Britannia_Atlas_Newmarket_to_Wells_and_Bury_Edmunds_1675 - public domain wikipedia.jpg

Often on long overland journeys or expeditions, I draw a map of the route we are taking, running the map along the bottom of my pages or up the side (see right), adding little sketches of species or interesting landforms. The map is continuous from page to page. Until I started researching maps for a chapter on cartography in my forthcoming book, Master of Field Arts, I didn’t know that linear or “strip maps” were a thing.

Strip maps are linear route-maps that one follows along a strip, with key landmarks, features, and times it takes to travel between points. One of the earliest was by Matthew Paris, a London-to-Apulia strip map from the 13th century (and more likely an allegory than something you would use to travel), but the one shown at top is a massive work by John Ogilby, his 1675 Britannia Atlas. The traveler starts in the lower left, travels up, the come down the next strip, then up the next, down the next.

One day’s journey in 2018 as we explored the Victoria Desert in central Australia.

One day’s journey in 2018 as we explored the Victoria Desert in central Australia.

Ribbon Map of the Father of Waters, by Coloney &amp; Fairchild (St. Louis, 1866). Wrapped on a wooden scroll and lined with linen, it shows all 2,600 miles of the Mississippi River. Courtesy of the American Antiquarian Society, Worcester, Massachusetts. From http://commonplace.online/article/one-mississippi/

Ribbon Map of the Father of Waters, by Coloney & Fairchild (St. Louis, 1866). Wrapped on a wooden scroll and lined with linen, it shows all 2,600 miles of the Mississippi River. Courtesy of the American Antiquarian Society, Worcester, Massachusetts. From http://commonplace.online/article/one-mississippi/

Artist Carol Morris recently shared a 1984 paper by John Emlen, professor of zoology at University of Wisconson Madison, who employed strip maps and a mathematical model for censusing songbirds. Very simple and yet the clever thing here is a formula for calculating territories for breeding birds—this would be a great project for our nature journals.

"The method provides a continuous record, divisible into segments of any desired length, of the density, song activity, and distribution of individuals of each species through its breeding season. The detection-threshold distance and song-frequency values obtained can be used as species-specific conversion factors for translating simple detection counts to bird densities." Click on the image to enlarge.

Link to PDF of article from the Auk: https://sora.unm.edu/.../jour.../auk/v101n04/p0730-p0740.pdf

IMG_4957.jpg
IMG_4960.jpg

Here is another way I am now using strip maps—I cut long pieces of watercolor paper and fold them accordion-style. The map can be just one side or continue on the back side; it can run top to bottom or turn the strip on its side and run it from left to right. Glue or tape the map onto your page, or glue an envelope in which to tuck the map.

IMG_4957 copy 2.jpg

If you missed my free workshop on cartography, you can find it on my tutorials page, >HERE<.

Virtual Field Trip: Let's Explore Mars! (Free Field Arts Workshop)

Screen Shot 2021-04-07 at 4.36.52 PM.png

This workshop is over, but you can watch the recording on my Tutorials page, here:

https://www.exploringoverland.com/field-arts-tutorials-list/2021/4/17/virtual-field-trip-lets-explore-mars

Join me on a truly out of this world virtual field trip sketching the Martian landscape!

Let’s see how many different reds we can use to depict the Red Planet as we explore the astrobiology of Mars aboard the Mars Curiosity and Perseverance Rovers. We’ll also dive into the natural history of the dunes and weather, and learn about space travel . . . all from the comfort of your Earth studio!

Sketch along or just observe, I’ll narrate as I go to demonstrate why I choose to focus on what subjects and how to quickly capture them in your field notebooks and nature journals.

If you’re shy, don’t worry—we don’t require anyone to share their work and you can remain completely anonymous and worry-free!

Length: 1.5 hours (although it might go a little over)

Start time: 10:00 am Arizona (Phoenix) / GMT - 7 

(Having trouble figuring out time zones?Use this calculator: https://www.timeanddate.com/worldclock/converter.html)

Format: online via Zoom (you will receive a log-in link)

Cost: free

Access: To protect your privacy and security online and for us to find out how many students will be attending, registration is required. Please use this link HERE.

Screen Shot 2021-04-07 at 3.58.22 PM.png
Screen Shot 2021-04-07 at 4.08.19 PM.png

In Praise of Pencils

IMG_4879.JPG

Yesterday, March 30, was National Pencil Day, and coincidentally I've been researching pencils for a new book due out this summer. I’ve learned so much, and now I’m a huge fan of pencils.

Here are some of the facts about this humble, inexpensive, indispensable instrument:

  • More than 14 billion pencils are made globally every year—laid end-to-end they would circle the globe 62 times.

  • The average pencil can be sharpened 17 times and can draw a line 35 miles long or write 45,000 words—compare that to a ballpoint pen, which might cough up 1.5 miles worth of ink.

  • Pencils didn’t have erasers on them until about 100 years ago because teachers felt they would encourage mistakes.

  • The best quality pencils are made with cedar sheaths.

  • Despite the popularity of phones, tablets, and personal computers for writing, pencil sales in the United States increased 6.8% in 2018.

I found this wonderful wooden pencil box at a thrift store—and amazingly, the key was inside, along with several mummified erasers and half a dozen well-loved old pencils that date to around the time period of this box, which I estimate early 20th c…

I found this wonderful wooden pencil box at a thrift store—and amazingly, the key was inside, along with several mummified erasers and half a dozen well-loved old pencils that date to around the time period of this box, which I estimate early 20th century (and based on the pencils, pretty sure from England). The Faber-Castell tin was also an earlier thrift store find.

Myth-busting: The interior of a pencil is not, nor has it ever contained, lead—although it’s called a “lead.” There are a number of reasons for this. First, one of the earliest writing instruments was the stylus or silverpoint, used throughout the Roman Empire to etch markings into wax tablets or to scribe dark marks on papyrus. The stylus was made from lead, tin, or silver.

What is inside pencils is graphite, a stable form of carbon (not to be confused with charcoal, which results from burning wood under low-oxygen conditions, called pyrolysis, and which humans have used over many thousands of millennia to mark on various substrates). Large deposits of very pure graphite were discovered in Cumbria, England, in the early 1500s. This was sawn into crayon-like sticks and used for writing, making writing instruments affordable for the first time. Because of its color and the fact it made a soft gray mark like a lead stylus, people thought it was lead and thus was it named. (The word “pencil” comes from the Old French pincel, from Latin penicillus, a “little tail”—also the same root for penis—which originally referred to an artist’s fine brush of camel hair, also used for writing.)

In the late 1500s someone had the brilliant idea to place the graphite inside wood sleeves and glue them together—which is essentially how they are still made today.

image0.jpeg

Many of the pencils made in the 19th and early 20th centuries had shafts made from cedar wood from Cedar Keys, Florida (and graphite from Siberia and England). One of my blog readers, Dorothea Malsbary, explored the region in 2019. The images above and below are from the Florida State Parks’ Cedar Key State Museum.

Compare the lower Faber-Castell pencil box with mine (photo at top).

Compare the lower Faber-Castell pencil box with mine (photo at top).

Lineage of pencils, from top: green J &amp; H Bell Ltd. (Nottingham, England); tan Rexel “Office Pencil HB” (Cumberland, England)—Rexel became Derwent and the brand is still made in England; unpainted Rexel Cumberland; blue F. Chambers “Universal No…

Lineage of pencils, from top: green J & H Bell Ltd. (Nottingham, England); tan Rexel “Office Pencil HB” (Cumberland, England)—Rexel became Derwent and the brand is still made in England; unpainted Rexel Cumberland; blue F. Chambers “Universal No. ? HB” (Nottingham, England); black with silver ghosts J.R. Moon “Moonbeam 7851 No. 2 (Lewisburg, Tennessee); unknown maker, unpainted “Central Railway Company” branded pencil; new Dixon Ticonderoga No. 2 (Heathrow, Florida); new Field Notes Brand No. 2 (maker origin unknown; California incense cedar casing); new Blackwing 602 “Palamino” (originally made by Eberhard Faber Pencil Company; resurrected in 2007 by an independent company). Shown in second photo from top: Eagle Pencil Company “Adriatic No. 20 (pre-1969, England and New York).

The first six pencils in the photo, plus the Eagle, were all inside the wooden pencil box (see images at top).

Of note: Graphite was discovered in Borrowdale in England’s Lake District in the 1500s, which is why so many pencil companies originated there.

IMG_4881.JPG

How to Sharpen a Pencil

In 2012 artist David Rees published How to Sharpen Pencils, a Practical and Theoretical Treatise on the Artisanal Craft of Pencil Sharpening for Writers, Artists, Contractors, Flange Turners, Anglesmiths, and Civil Servants. He is the world’s number one #2 pencil sharpener and shows us how to do so properly—the manual way. (See video, below.)

Grasping your pencil with your non-dominant hand, brace it against a table or log. Holding your well-sharpened bush knife in your dominant hand, steady the blade by placing your thumb on the spine and begin shaving off flakes of the cedar pencil shaft.

IMG_4884.JPG

You want to aim for about a 2 cm-long cone tapering to the tip where the graphite will be exposed. Go slowly and shave small flakes at a time so that you don’t break out chunks or damage the graphite.

As you get down to the graphite core, expose about 5 mm, and then lightly shave the graphite into whatever point shape you desire (see below). You can get creative with the shape, for example a wide, flat chisel shape would be good for shading. 

This is now the only way I sharpen all my pencils—it’s a revelation how much more useful a tip you can create, with much less waste.

Backstory on the Okapi knife: nearly every Maasai moran (warrior) and elder that I worked with in Kenya in the early 2000s when I was with African Conservation Fund carried one of these inexpensive folding knives, sold at every “Maasai market” in th…

Backstory on the Okapi knife: nearly every Maasai moran (warrior) and elder that I worked with in Kenya in the early 2000s when I was with African Conservation Fund carried one of these inexpensive folding knives, sold at every “Maasai market” in the country. The steel is 1055 hard carbon and takes a nice, sharp edge. The slipjoint Okapi was originally produced in 1902 in Solingen for export to Germany's colonies in Africa. The knife takes its name from the giraffe-like central African okapi, and today are made in South Africa. The Moorish-looking markings are enigmatic; I can find nothing on the current company’s website explaining the origin of the design. My Okapi is kept clipped to the outside D-ring of my field bag.

How to add captioning to your online teaching—for free!

For those of us who teach online, accessibility is an important service for our attendees. But “real” closed captioning services start at $1.50 per minute (and up drastically from there).

Here, I share several tips for providing free captioning for hearing-impaired viewers when presenting on Zoom.

First up is Powerpoint, by Microsoft—huge props to Microsoft for pioneering this excellent service embedded in presentation software. Apple isn’t even close to providing this yet. All you need to do is turn on “Always Use Subtitles” under Slide Show settings and choose your language. Once the show is playing, the captions keep up really well.

and

Webcaptioner.com a free web-based captioner. You must use Google Chrome to take advantage of the API for voice transcription. Donations are suggested and well worth it if you use this service.

The only thing I have not yet figured out is free captioning for spoken portions of Zoom presentations when you are not using a slide show or screen-share.

Check out my tests in the video—I think you’ll be impressed!