
Overland Tech and Travel
Advice from the world's
most experienced overlanders
tests, reviews, opinion, and more
Compact versatility: The roller carabiner

For years I’ve repurposed climbing gear, both my no-longer-used stuff and new equipment, for travel duty—especially for load-control purposes. For example, quick-draw slings are perfect for temporary attachment points on roof racks, trailers, and truck beds, from which I can create a criss-cross web of rope perfectly suited to the load. By threading the rope through carabiners attached to the slings I can tension the system simply by pulling on one end. Since slings and carabiners generally have an MBS (minimum breaking strength) north of 20 Kn or 4,500 pounds, they’re capable of safely securing virtually any load.
The same equipment can be used for hanging food out of bear reach, hoisting tarps or awnings or portable shower stalls—dozens of uses. You can rig the stoutest clothesline on the planet. And of course, if necessary, carabiners and slings comprise part of a rescue system to retrieve persons stranded on a cliff or in fast-moving water.
Recently I discovered the roller carabiner, available from Petzl as well as the Welsh company DMM, among others. At first glance it looks like an ordinary carabiner, until you notice the roller incorporated in one end, which transforms the carabiner into an ultra-compact pulley. Suddenly all the tasks that involve tightening or tensioning a rope laced through carabiners become nearly effortless.
In fact, given the strength and force-multiplication characteristics of the roller carabiner, I could envision using it in certain vehicle-recovery situations, for example—using the correct rope—as rigging to stabilize a vehicle tipping hazardously, while a winch recovery is arranged. The roller carabiner certainly won’t substitute for a proper, full-size pulley block or other heavy-duty pulley, but given the compactness and light weight having a few in the kit might prove extremely useful.

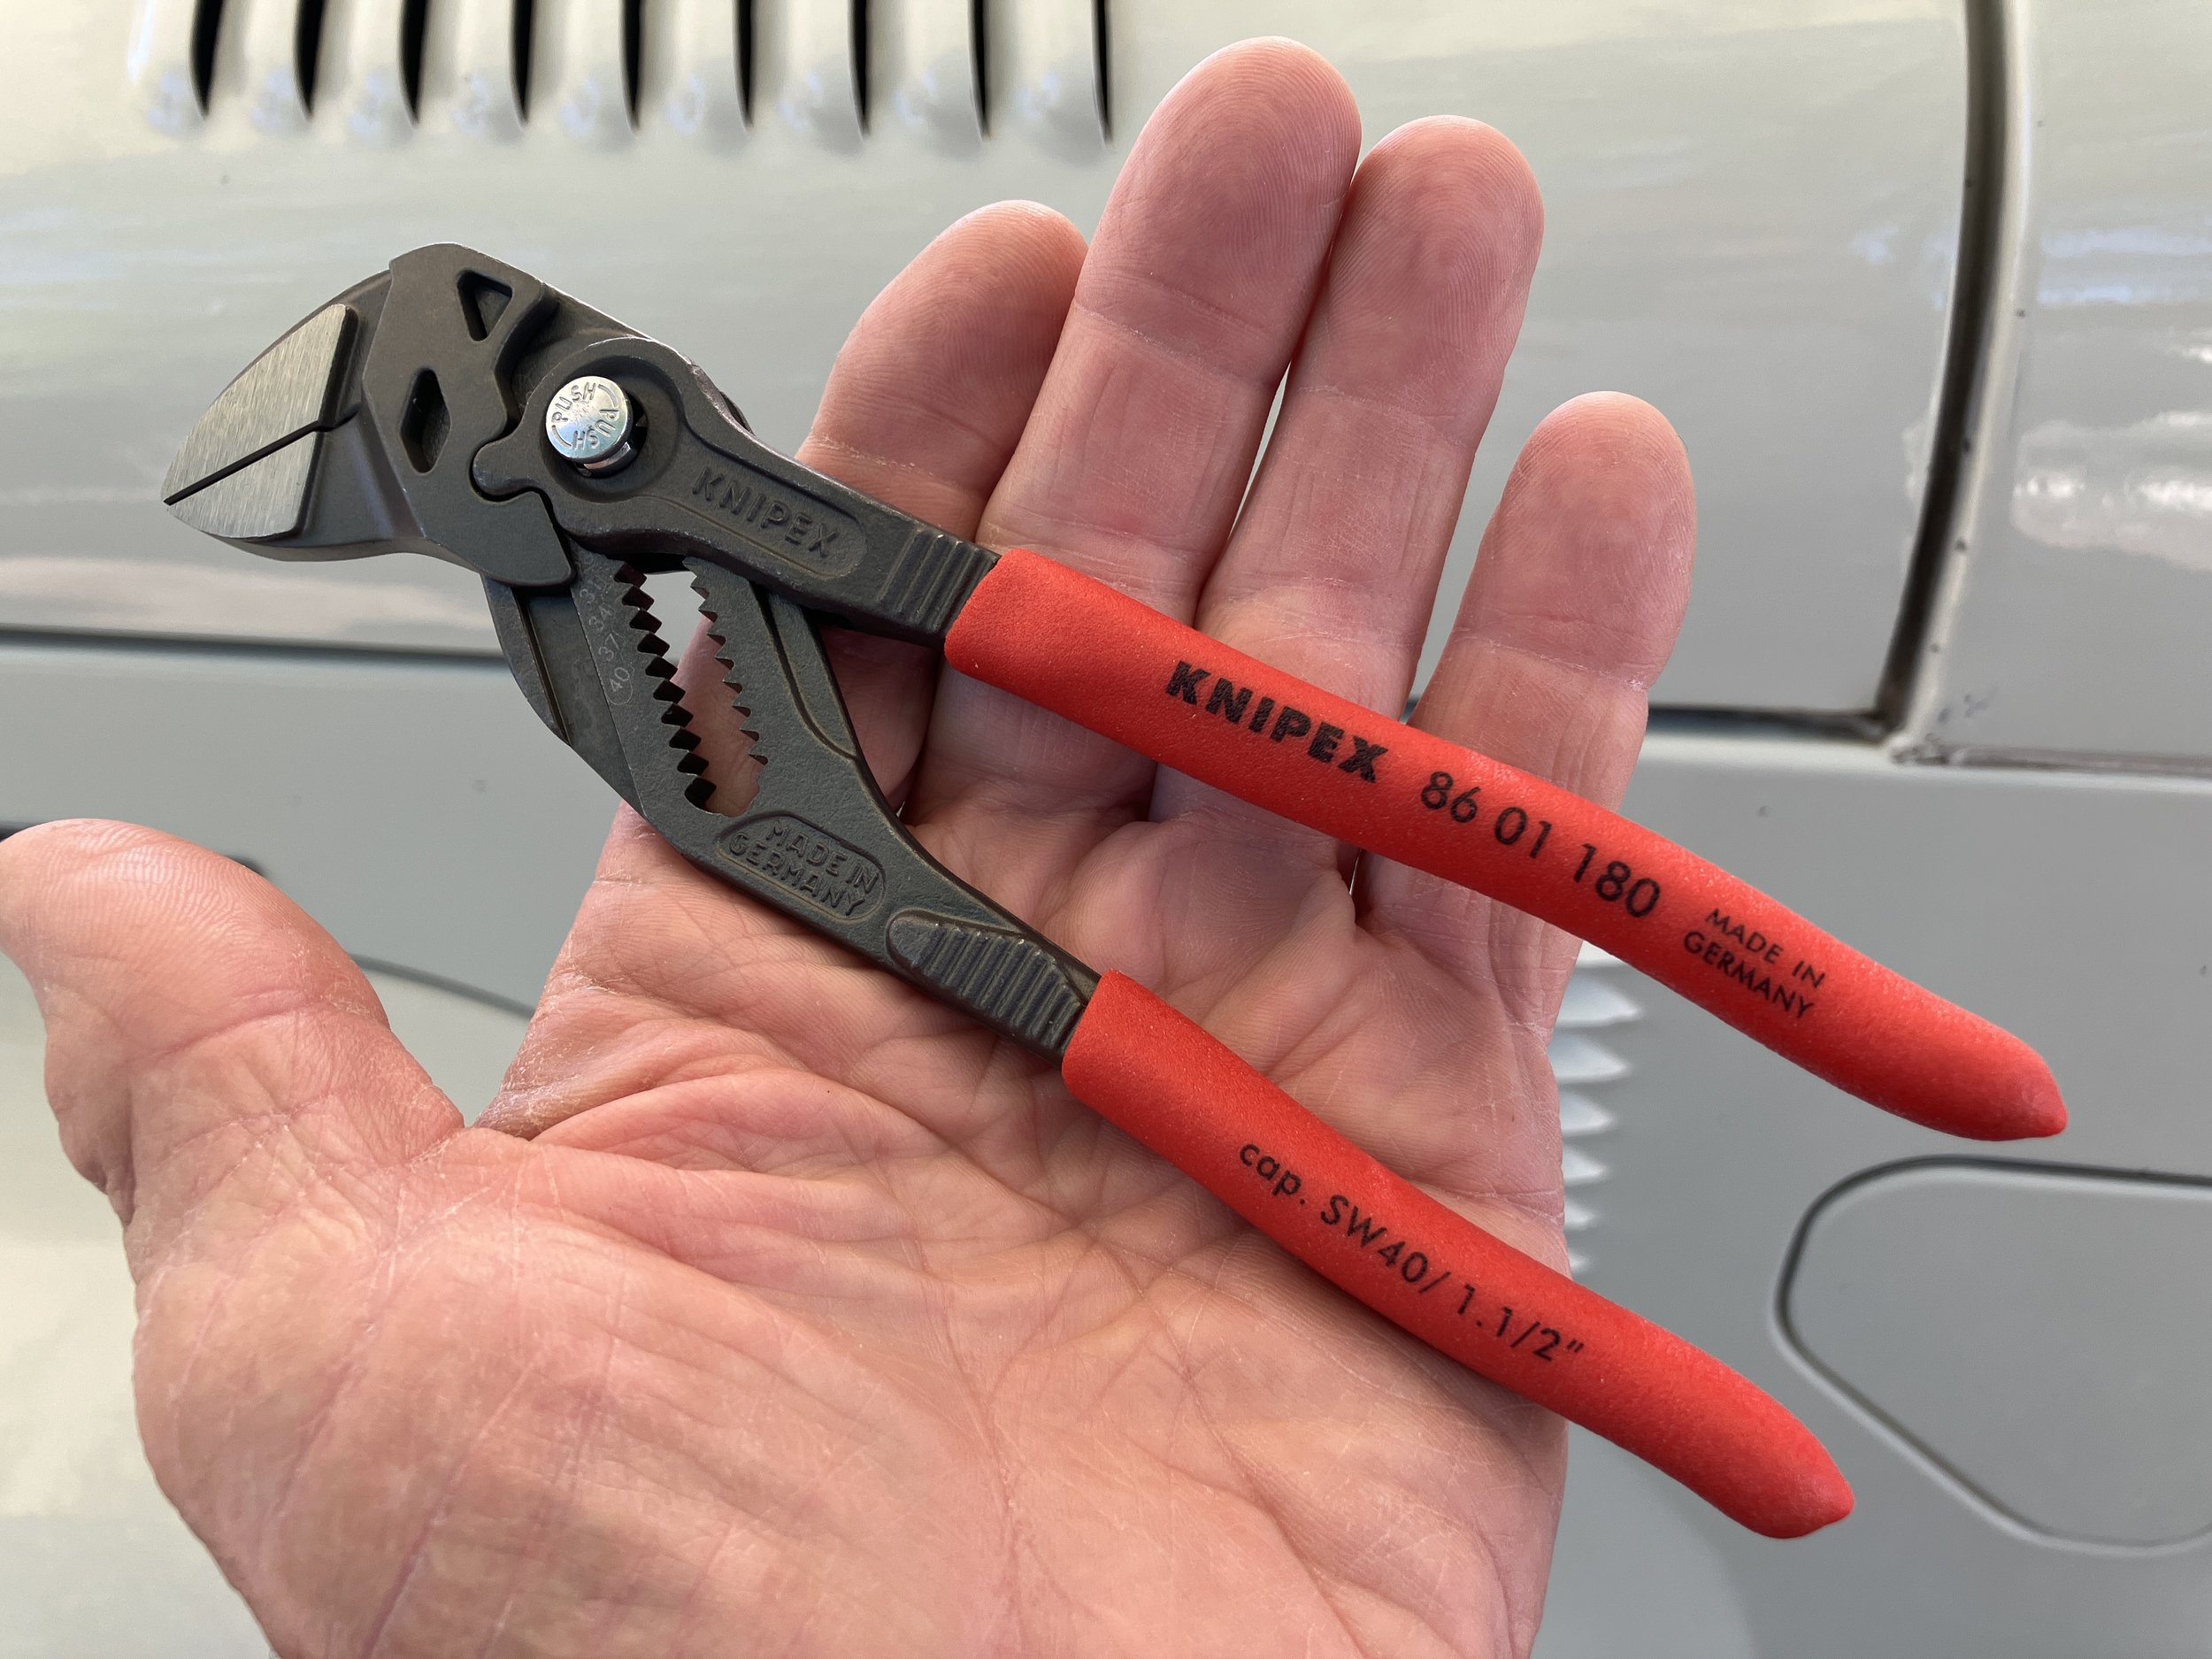
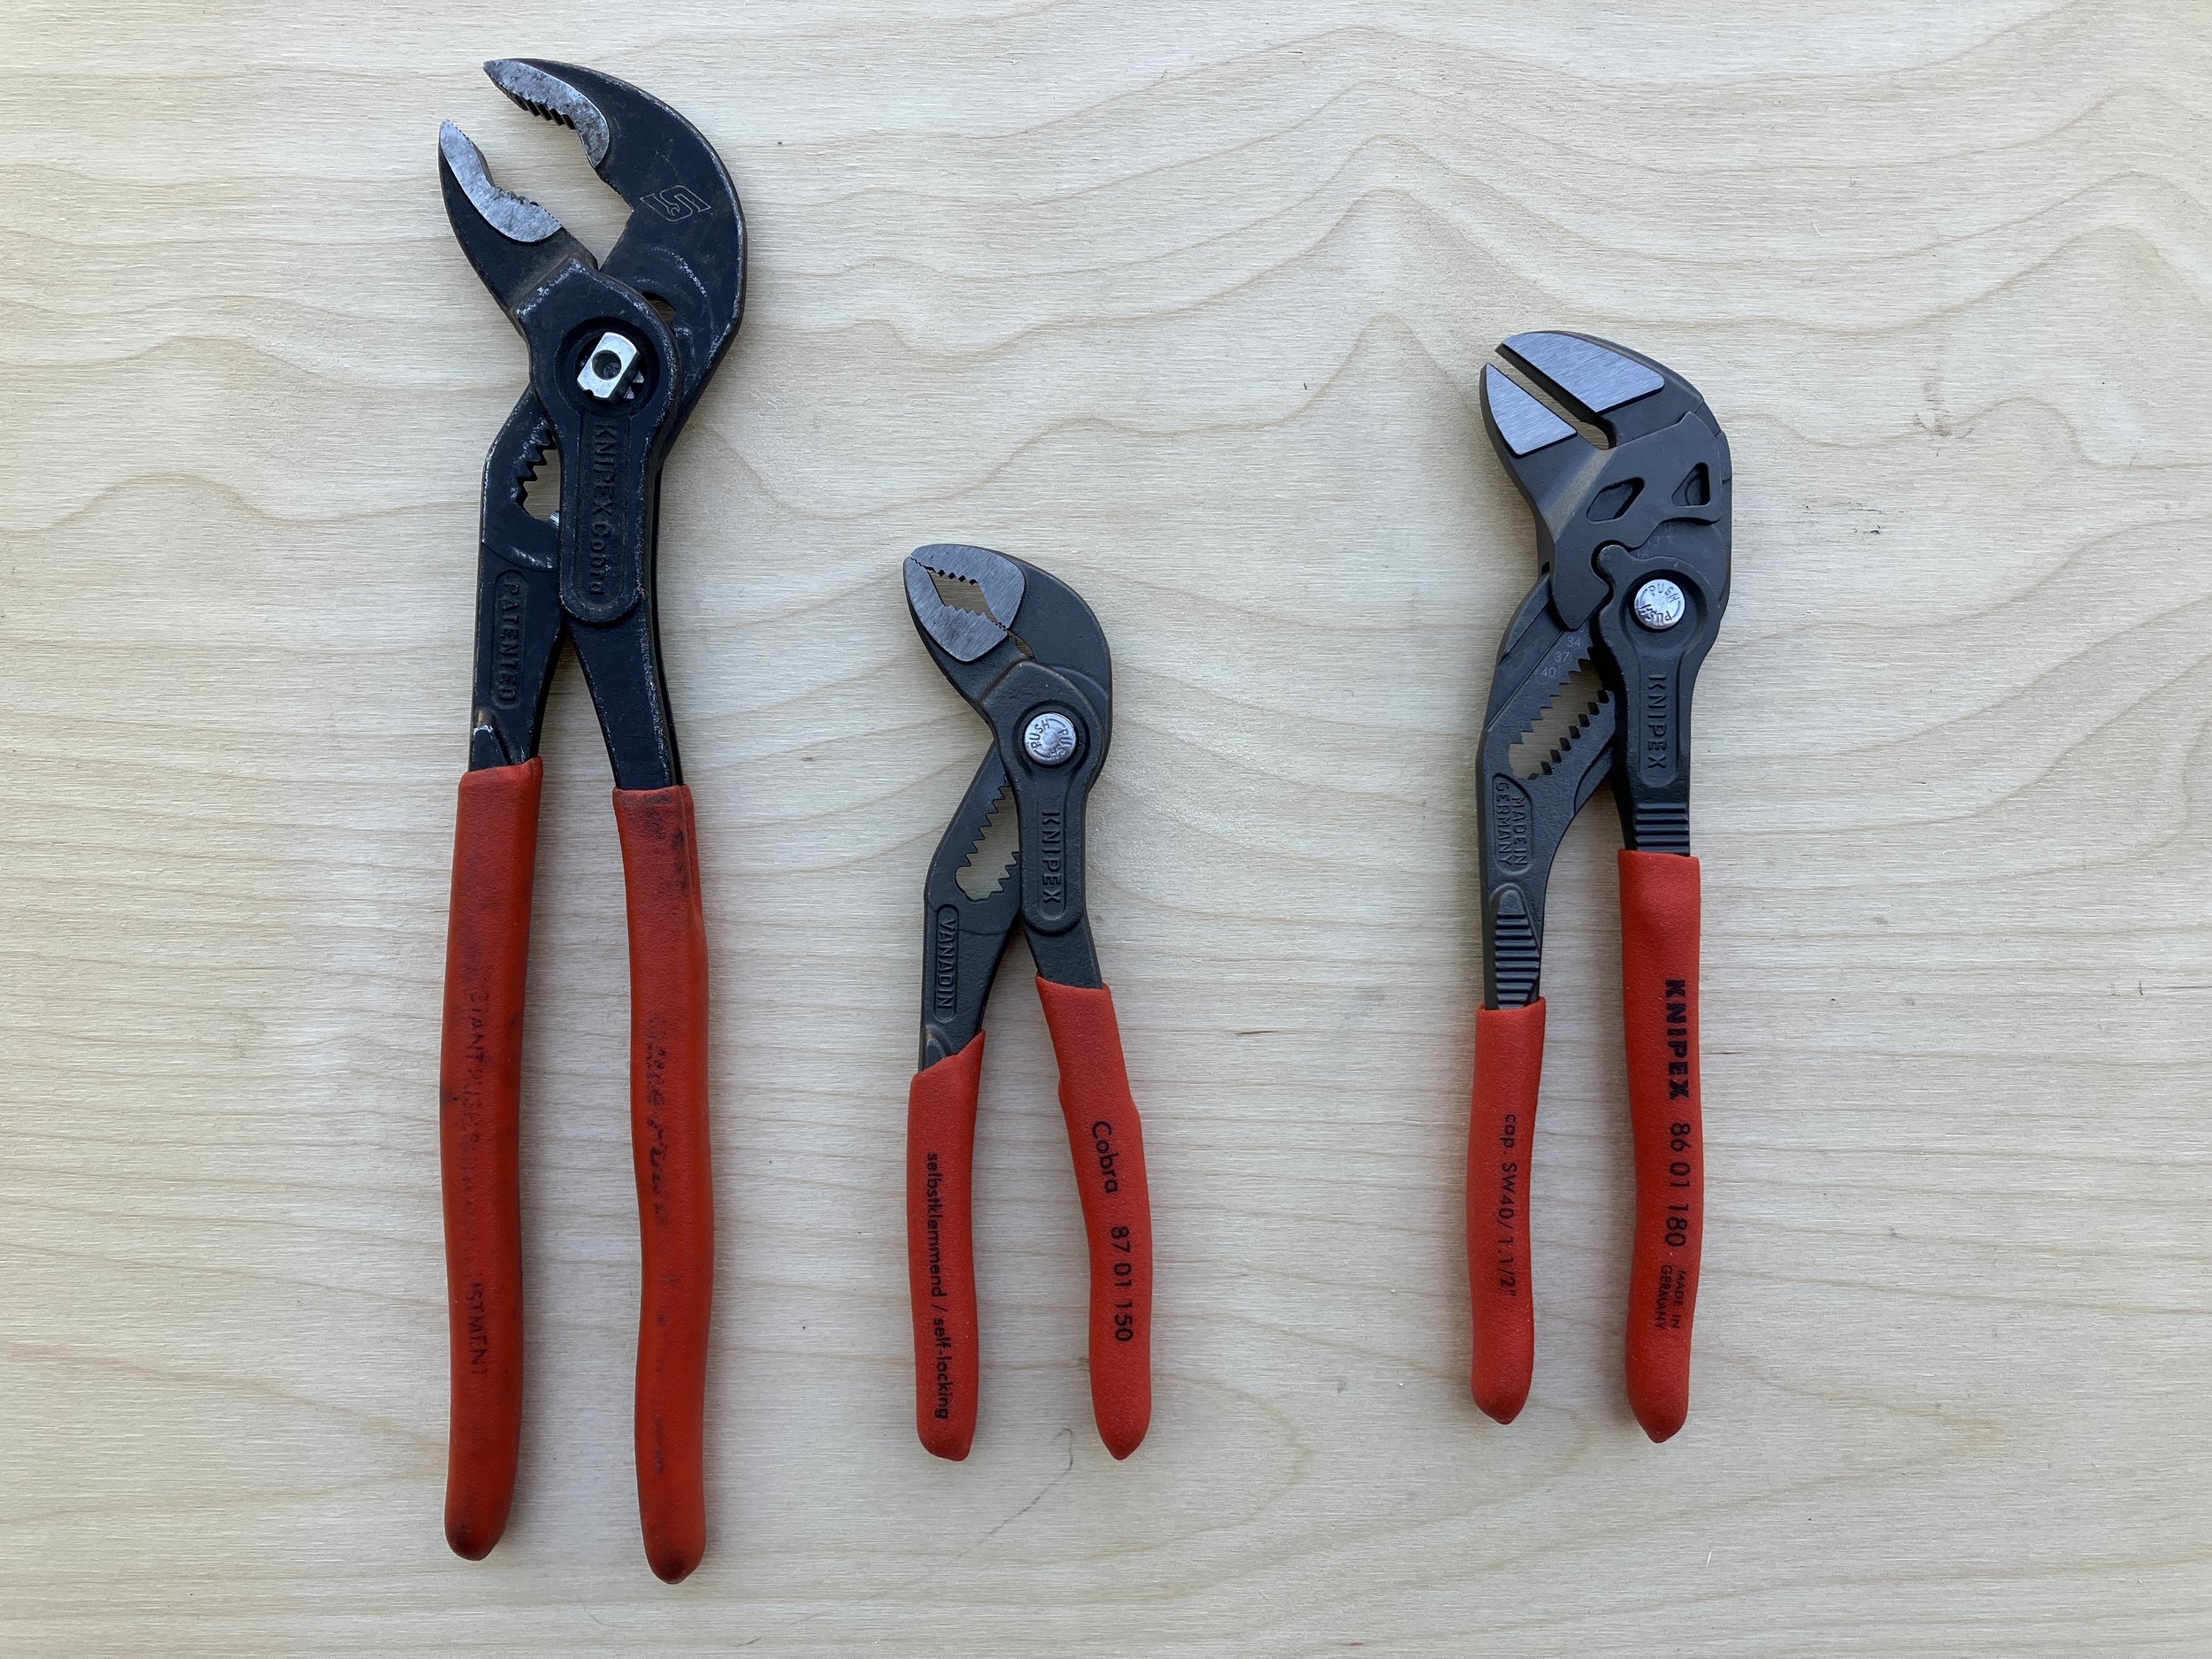
Knipex parallel-jaw pliers
Despite their occasional usefulness—in some cases serving a purpose no other tool can fill—pliers get little respect in the automotive tool world. Possibly the only tool more scorned is the adjustable (or “monkey”) wrench with its sloppy fit on almost any fastener.
Pliers can at least grip properly; their main drawback is the tendency of the teeth to scar the flats of nuts and bolts, and to slip and subsequently round off fasteners if not gripped tightly enough to risk that scarring.
Enter the Knipex parallel-jaw pliers, or as the company refers to them, pliers wrench.
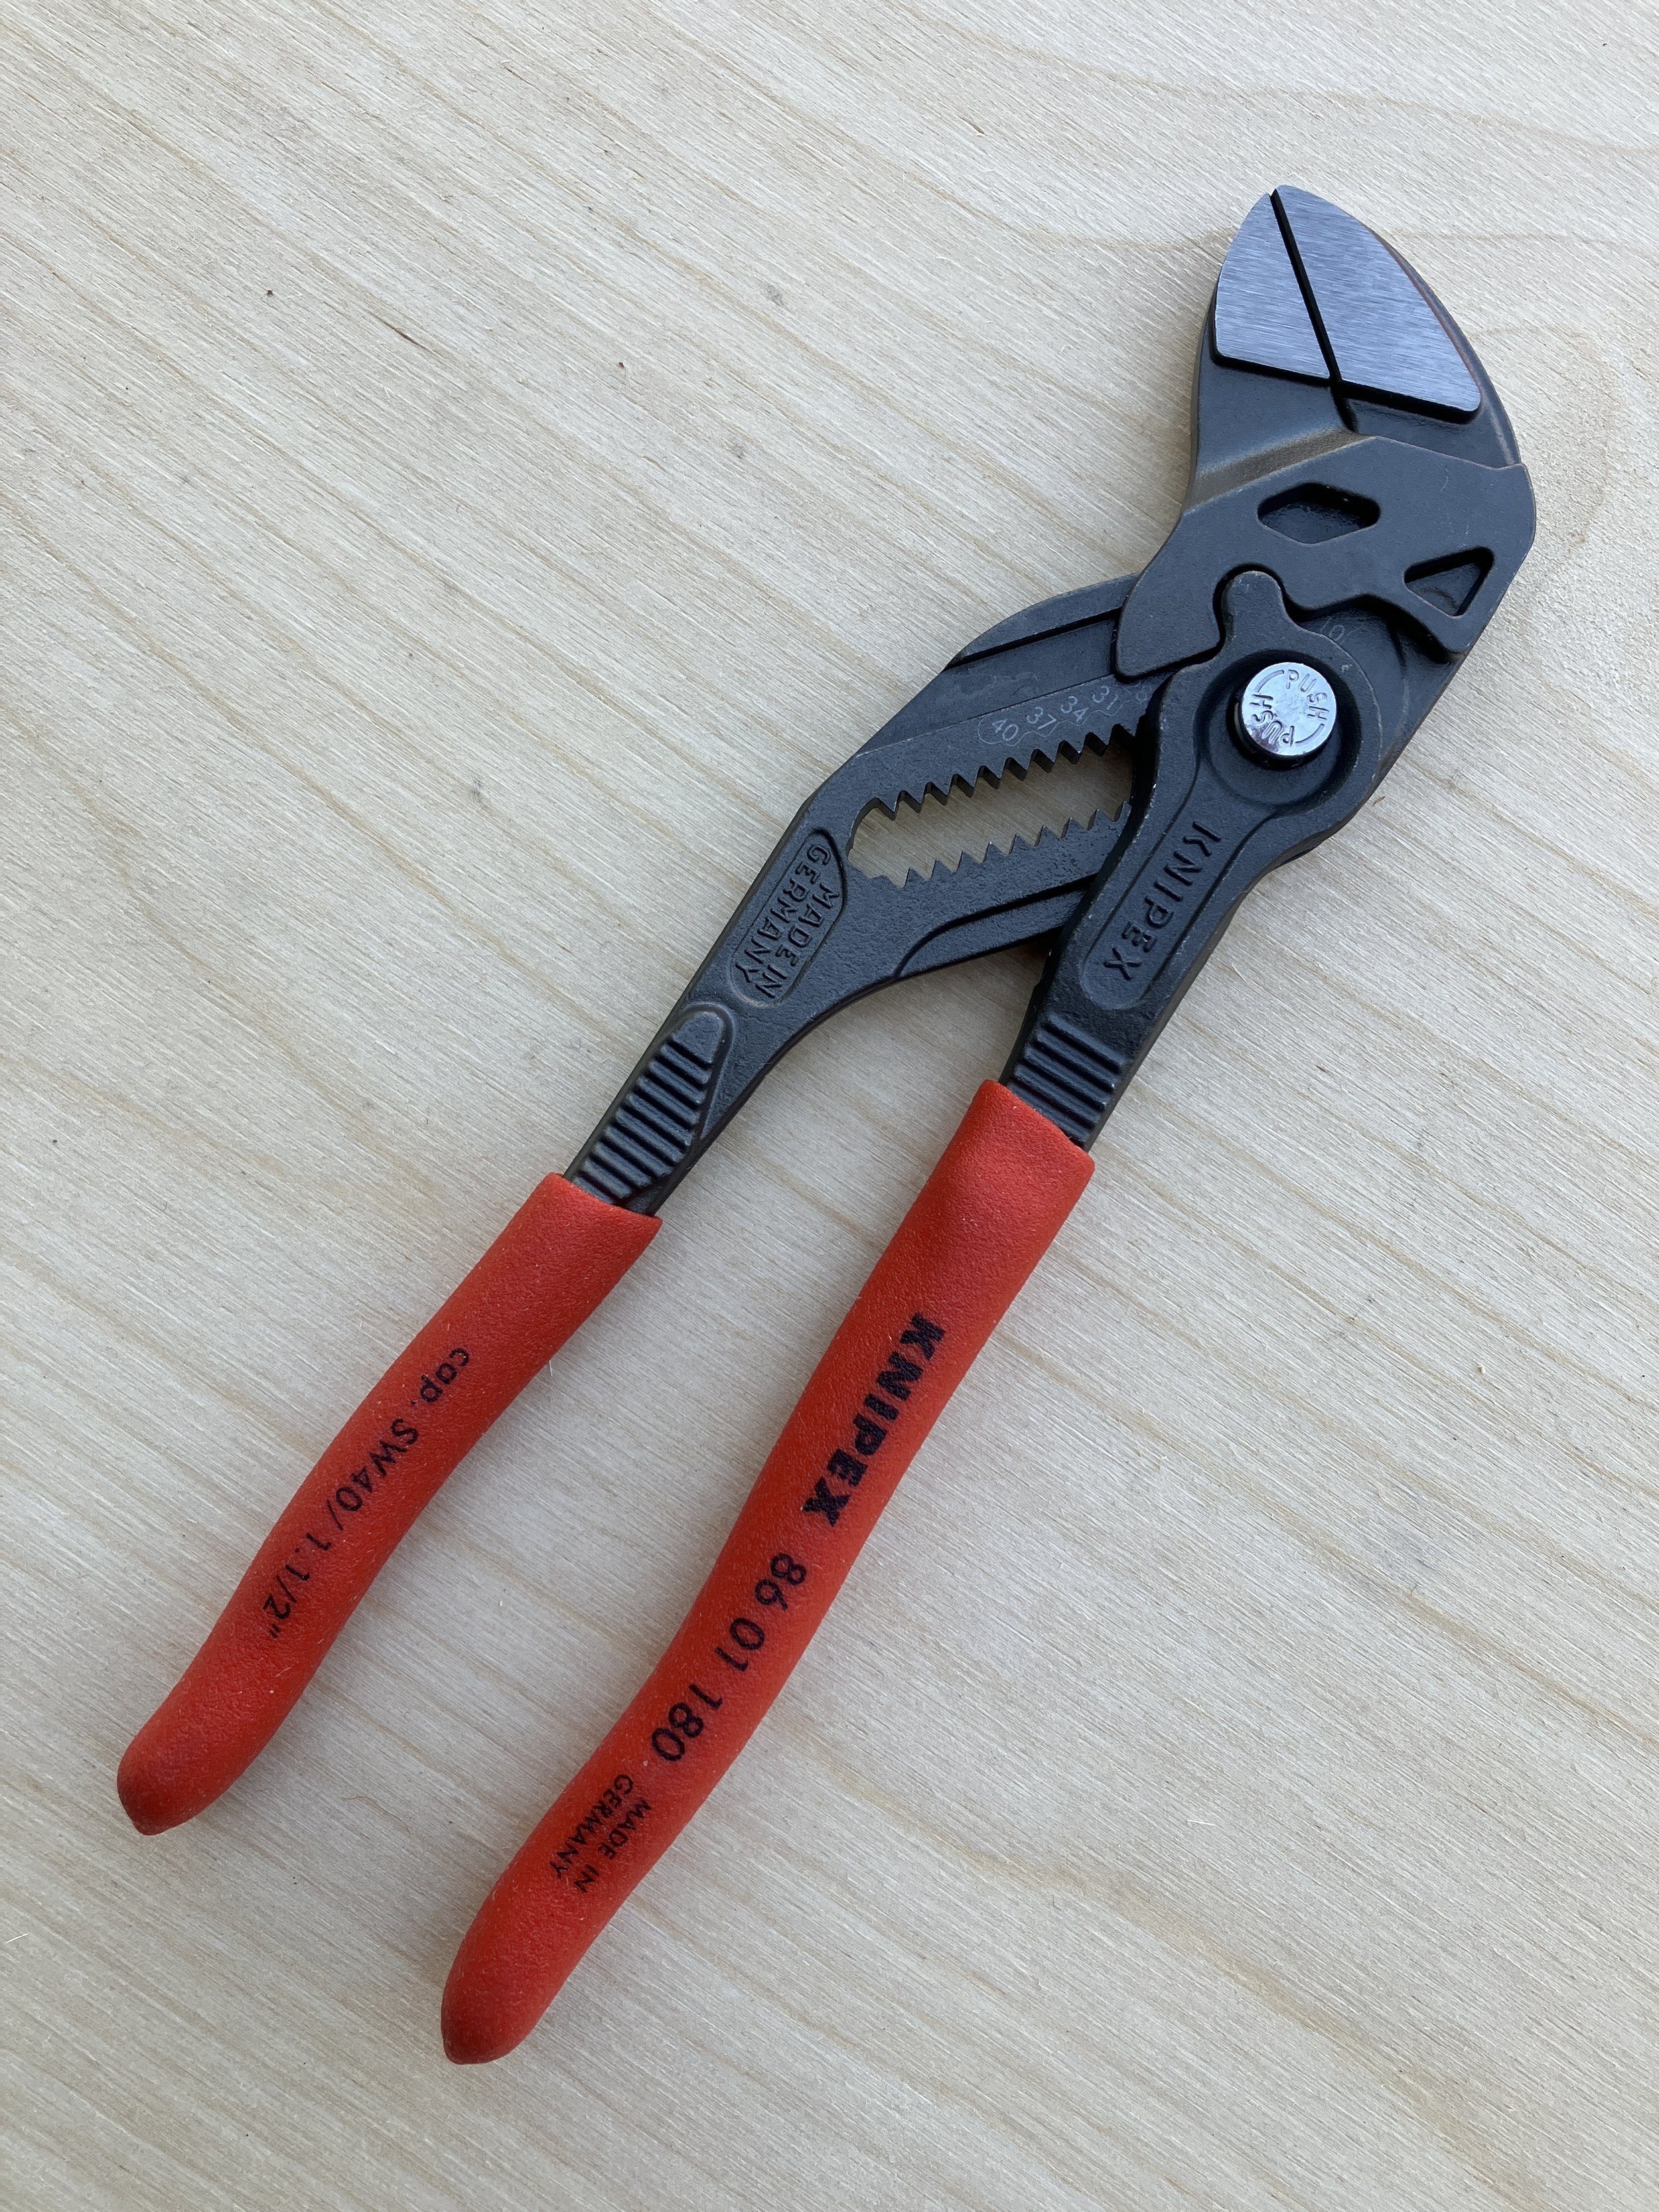
The lower jaw of the Knipex PJ pliers (my nickname) does not pivot about a central axle; instead it moves straight up and down in a track, and is adjusted with a separate handle on a pivot. The coarse adjustment is accomplished by sliding the handle up or down a toothed track, and the overall range is impressive: The compact 180mm model shown here can adjust its grasp from zero—i.e. gripping a piece of paper or sheet metal—up to a full 1 1/2 inches or 40mm. That means a pair of these could, in a pinch, substitute for a full ratchet/socket and wrench set from 3 or 4mm all the way up to 24mm or so (beyond that their leverage might be insufficient). Add the 250mm model for even more versatility.
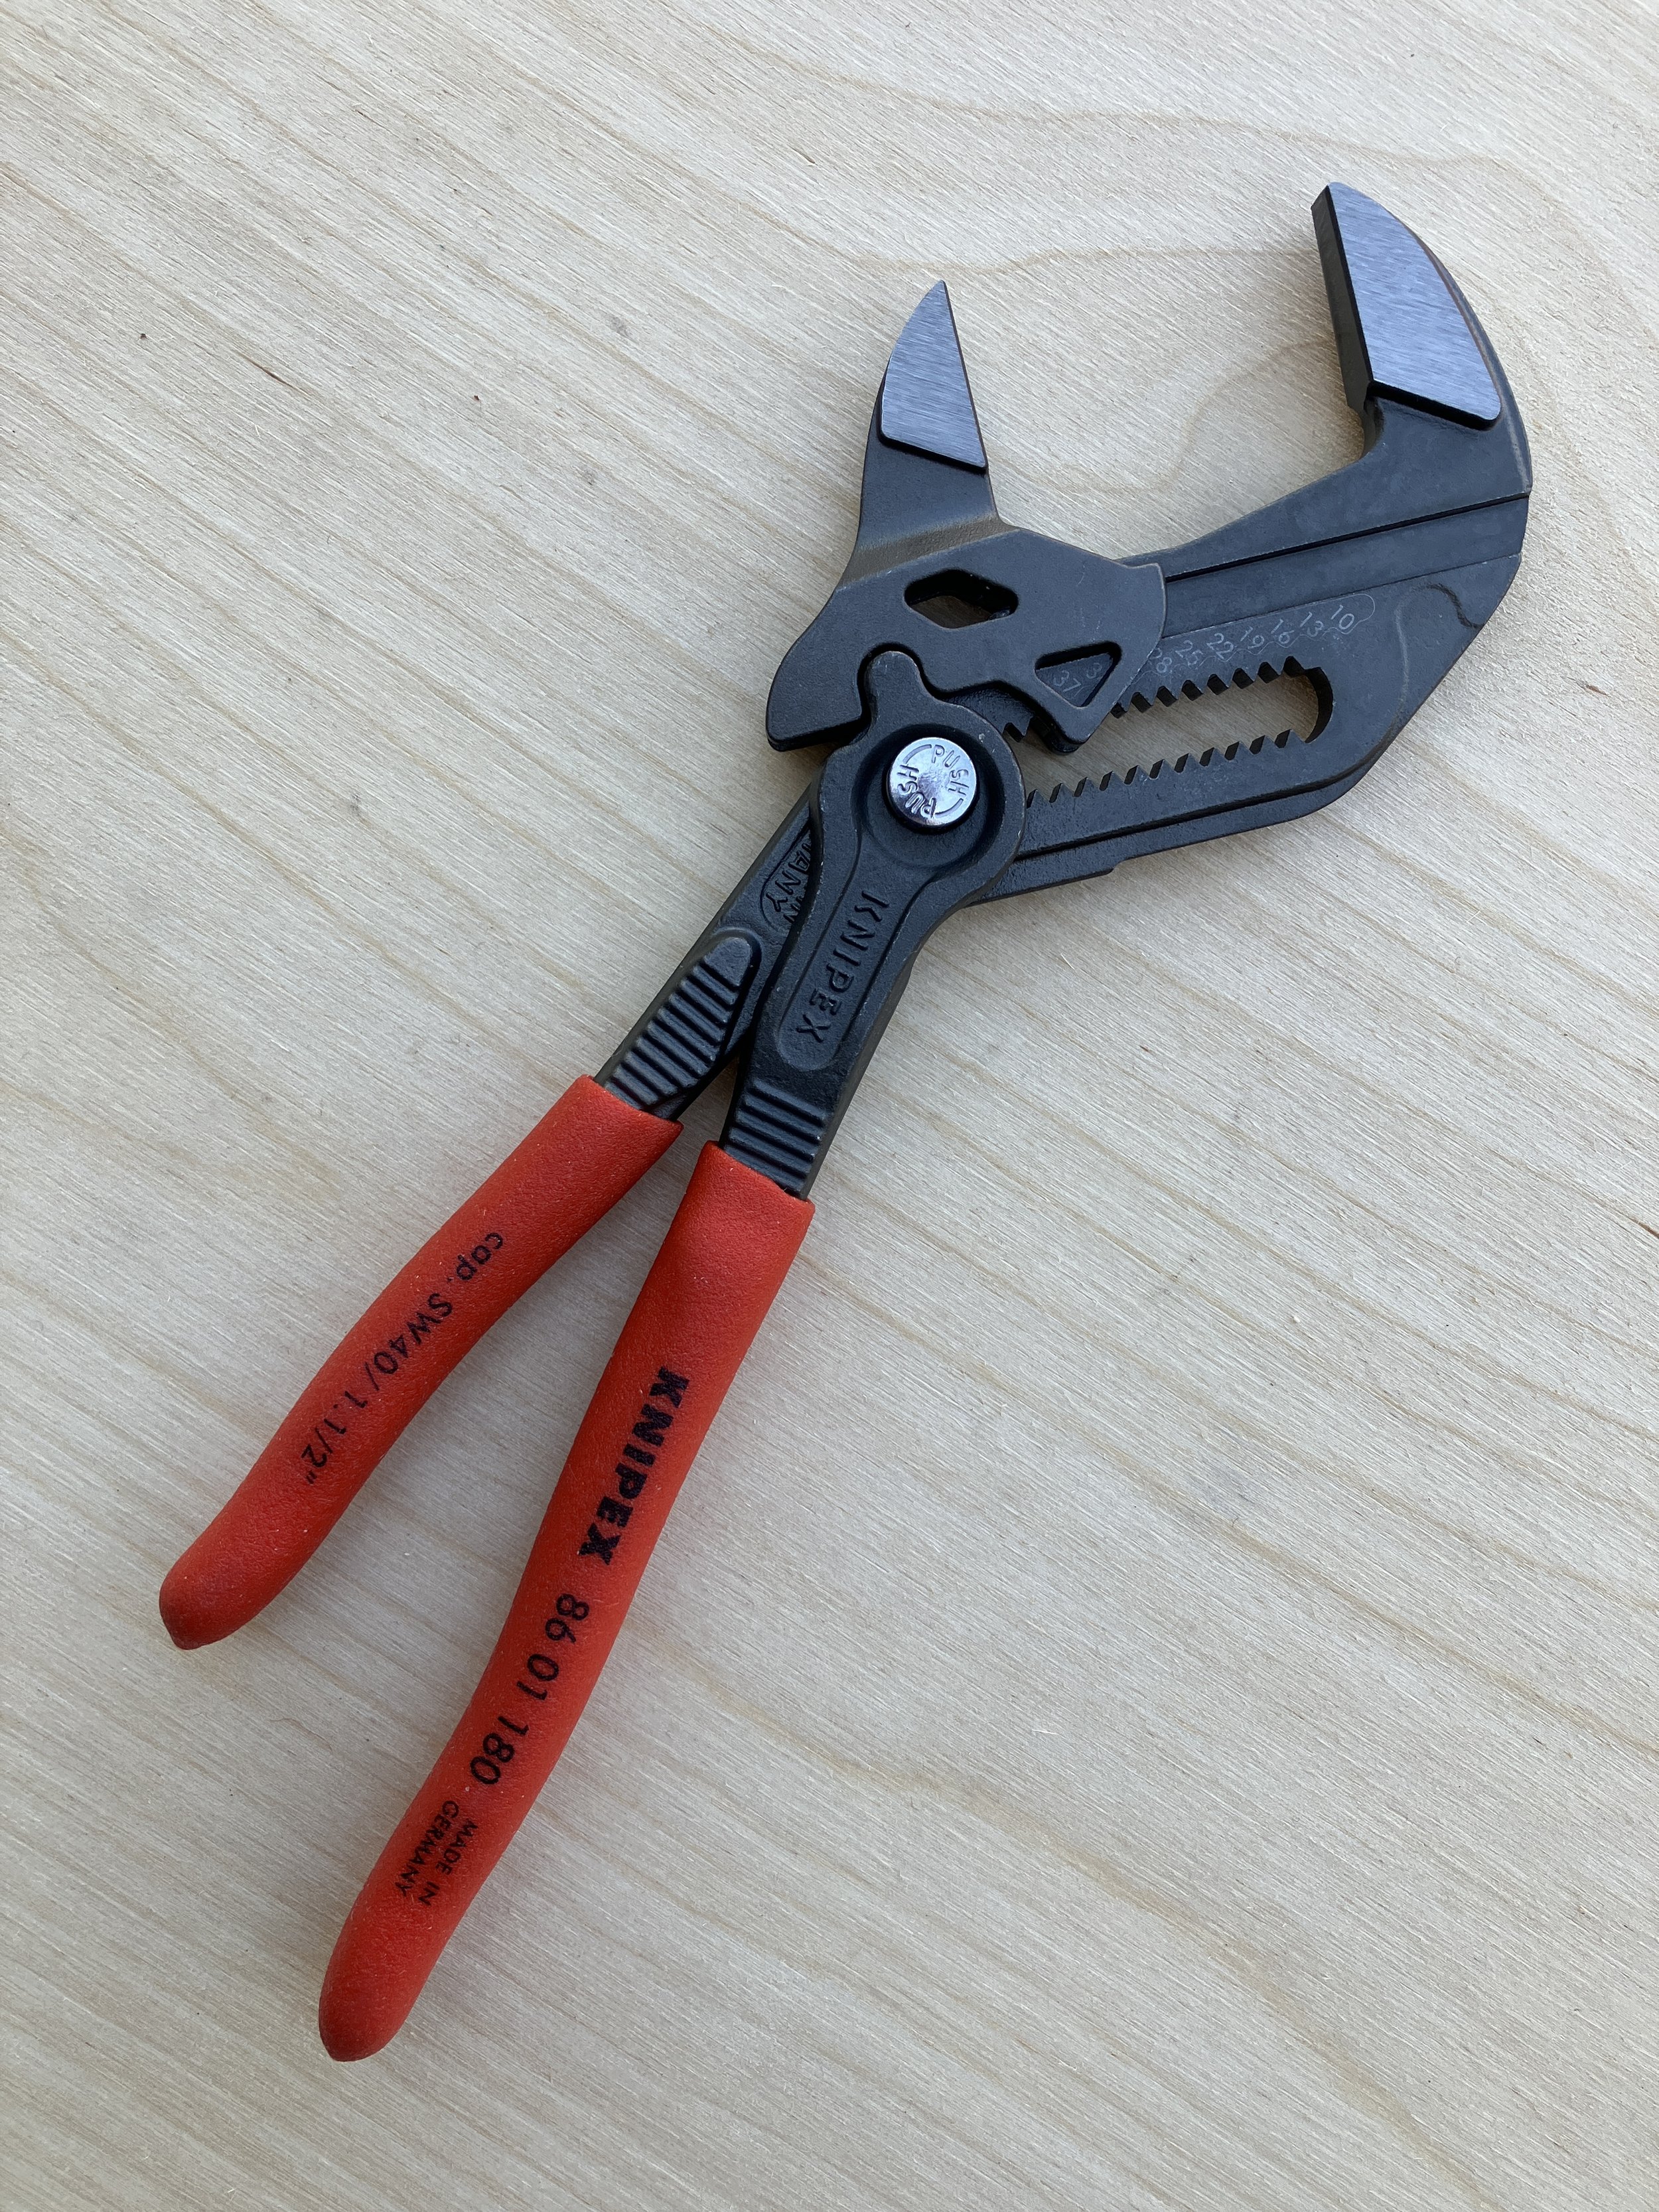
One advantage of using the PJ pliers to, say, hold a nut while one unscrews a bolt from it, is that you actually grip the nut, which you cannot do with a standard wrench. This would be extremely useful in tight spaces were dropping the nut might mean a five-minute search in the bowels of the engine compartment—or the mud underneath. Likewise, when trying to thread a nut onto a bolt in a tight space you can retain a firm grip on it. Like all Knipex (pronounced “kineepex,” incidentally) pliers, due to the superior steel used the jaws are quite narrow, further enhancing their usefulness.
Disadvantages? The lack of teeth renders the PJ pliers useless at gripping round things—axles, the shaft of a bolt, etc.—which is why I also carry the company’s excellent standard sliding-jaw pliers. A very useful addition to a home or field tool kit.
Knipex is here.
The difference between a good tool and a bad tool . . .
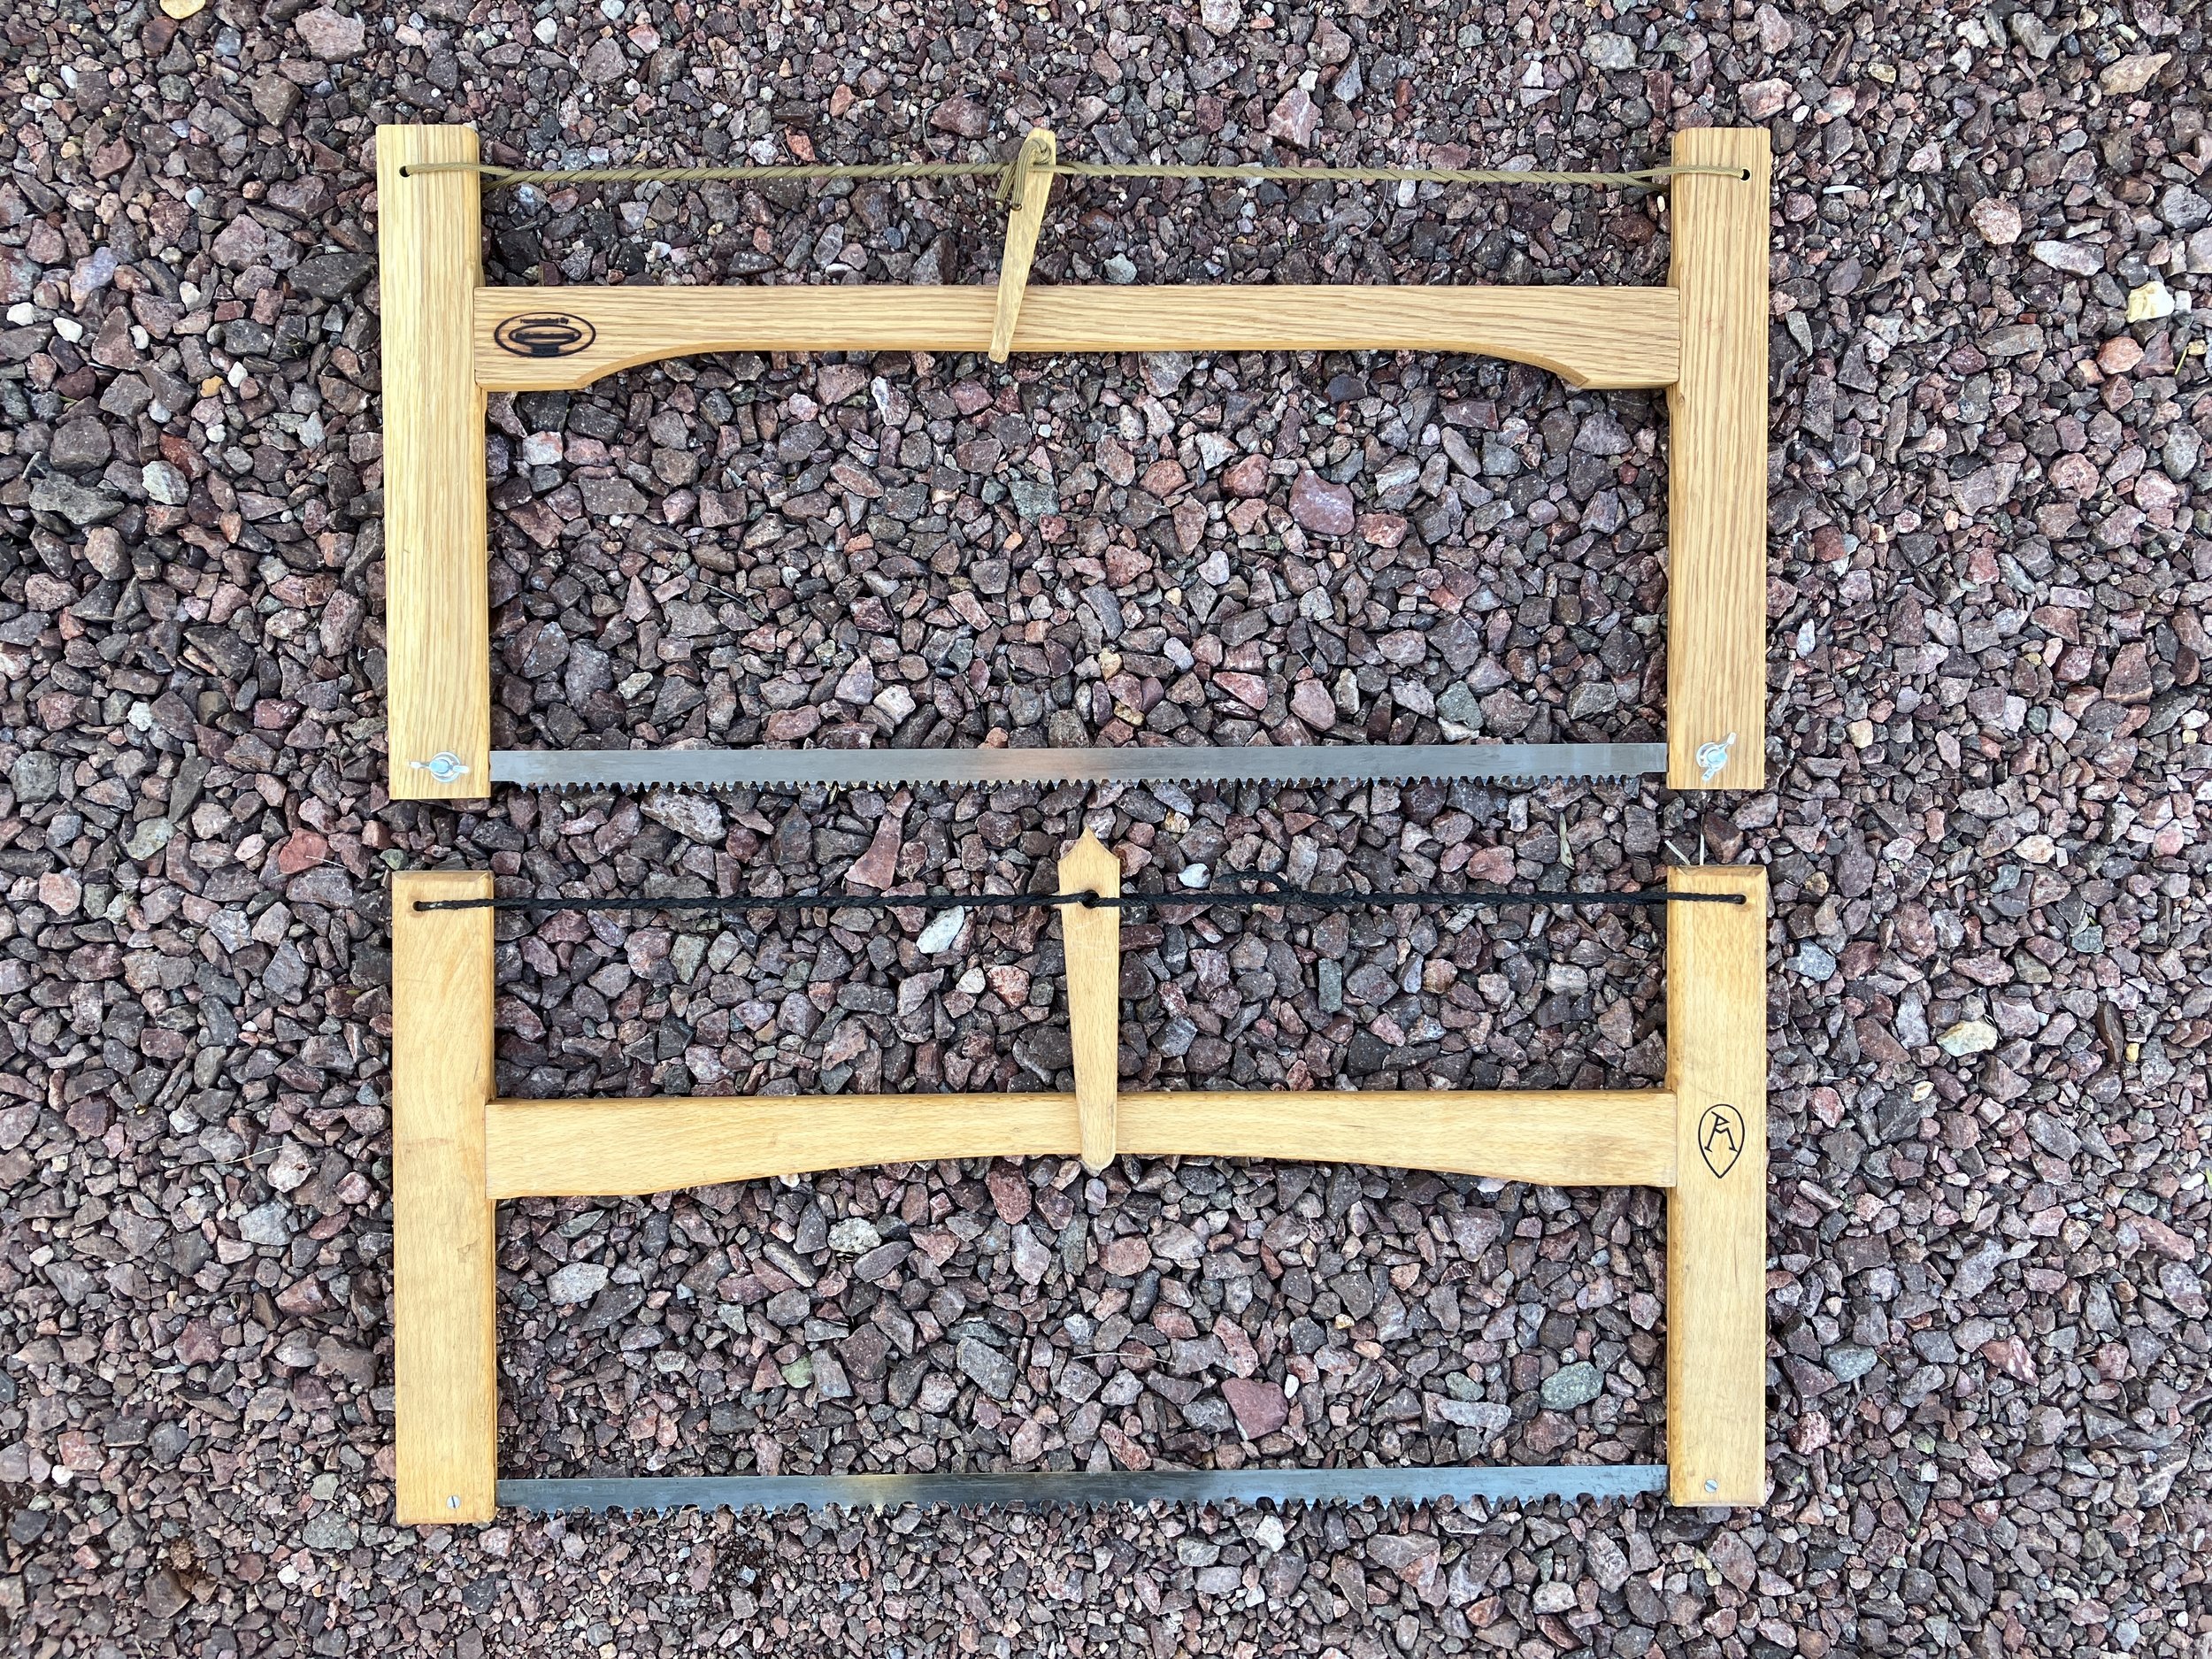
. . . can sometimes be measured in millimeters.
I bought the lovely, collapsible wood bow saw on the bottom from the Ray Mears Woodlore shop in England some years ago. Made for Mears by a local bowyer, it quickly became a favorite—so much so that last year I decided to buy another as an extra. However, the product had disappeared from the site.
A quick search located a seemingly identical product from another English online shop, so I ordered that one, and then set it aside for over a year. A few months back, however, I thought I’d try it out to compare to the “original.”
And . . . it compared poorly. In fact, no matter how much twisting I applied to the “Spanish windlass” tensioning mechanism, the blade torqued and bound maddeningly in every cut. A brief side-by-side comparison revealed why: The crossbar on the new saw was positioned significantly higher than on the Woodlore model, vastly reducing leverage and the resulting tension applied to the blade by the windlass.
Theoretically, the copy should be able to saw through a thicker log, given the extra clearance above the blade; in reality this is a moot point since the thing can barely get through any log.
At some point I might try to modify the new saw by drilling and chiseling a new mortise for the crossbar lower on the frame, but for now it sits idle.
If you’re intrigued by the beauty and efficiency of the Woodlore saw, I did find another here that appears to be constructed properly, and an even more beautiful model here.
There are chocks . . . and chocks (I needed the latter)

Inadequate . . .
Now and then it’s good to be reminded of the laws of physics.
A few weeks back I conducted a training weekend for a lovely couple who had recently purchased a very well-optioned Sportsmobile. They wanted to become familiar with its capabilities (and theirs), to learn recovery techniques, and especially to learn the use of their winch, an accessory new to them both.
We spent the first day, Friday, driving and marshaling, and I think hugely improved the confidence of both of them, in addition to opening their eyes as to just how capable a Sportsmobile can be despite its size.

Saturday was winching day. I’d picked a dead-end bit of trail where we wouldn’t be in anyone’s way who happened to pass. It was a hill steep enough to actually work the winch, but not so steep as to be intimidating. The Sportsmobile was equipped with a Warn 12,000-pound winch and synthetic line. For an 11,000-pound vehicle that’s marginal if one applies the standard one and one-half times GVW formula for speccing a winch’s capacity, but we discussed ways to ameliorate this by running out more line and, especially, rigging a double-line pull whenever possible.
The only trees available were both marginal in size and behind a barbed-wire fence, so I set up my FJ40 as an anchor, facing down the hill at the top of the slope.
It was then I realized I’d forgotten my set of Safe Jack chocks, the substantial ones I normally use for winching. All I had with me were the smaller folding chocks I keep in the vehicle for tire-changing duty and the like. No problem, I figured—I set the folding chocks in front of the front tires of the Land Cruiser, and we lugged a couple substantial rocks to put in front of the rear tires. I was in low range, reverse selected, engine off and parking brake pulled out stoutly.
The first, single-line pull proceeded without drama. The winch did not seem to be working over hard (although I remarked that it was one of the loudest winches I’d ever heard). So we re-rigged for a double-line pull, running the Sportsmobile’s line through a 7P recovery ring linked to one of the 40’s front recovery hooks, and back to the Aluminess bumper of the van. I stood to one side and directed while Emmett sat in the Sportsmobile’s driver’s seat and operated the winch remote. He began to spool in and the van crept slowly up the hill.
For about five feet. Then a front tire happened to hit a bit of a rock ledge I’d failed to notice, perhaps eight inches high. The Sportsmobile came to a halt—but the winch, of course, didn’t.
Even as I was raising my fist to give the “stop!” signal, I turned to see my 40 pulled gently but inexorably over the folding chocks, which collapsed as if they’d been soda cans. Behind them the rocks in front of the rear tires had held, but were themselves being dragged with the vehicle.
The winch stopped, and I signalled Emmett to apply the brake and shift to park, then let out some slack in the winch line.
The Land Cruiser had only moved about eight inches. Had we for some reason continued to power the winch, it would simply have kept on being dragged slowly across the ground; there was no chance of it careening out of control. Nevertheless, it was a good lesson in the force an 11,000-pound vehicle and a roughly 24,000-pound-equivalent double-lined winch can put on a 4,000-pound vehicle, even on a moderate incline. The math is pretty simple.

These would have been better. From Safe Jack.
What could I have done differently? Having the larger and sturdier chocks would have made a difference, as might using big rocks instead of the little chocks. Even putting the rocks we used in front of the front tires, and the small chocks under the rear tires, might have made a difference, as the front of the Land Cruiser was being pulled slightly downward in addition to forward. However, a more secure option would have been to daisy-chain the 40 by its back bumper to the base of one of the trees on the other side of the fence with the endless sling I had on hand, then pull forward until the sling was tensioned, then chock.
A good lesson that there’s no such thing as “enough” experience, and there’s never a time to stop learning.
For much more on the forces involved in winching, please read this.
Safe Jack’s heavy-duty folding chocks are available here.
A guide to recovery jacks, for the beginner . . . or procrastinator

A few years ago I was helping lead a group trip along the Continental Divide, when one of the participants badly sliced a tire on his Tacoma on a back road in Wyoming. Roseann and I were riding tail gunner, and as we pulled up the driver had already chocked the wheels, retrieved the factory scissors jack, and placed it under the rear axle. But he was failing completely in his efforts to raise the axle and tire, straining mightily but futilely on the crank handle. Why? Because mounted on the back of the Tacoma was a Four Wheel Camper, which was in turn loaded with water, food, and supplies for a two week trip. We stopped, I got out my four-ton hydraulic bottle jack, and we effortlessly lifted the truck and swapped the tire.
With very few exceptions—such as the superb Italian-made hydraulic bottle jack supplied with solid-axle Land Rovers for some time—factory-supplied jacks are designed to minimal specs to lift the vehicle, on pavement, just high enough to change a tire. Load that vehicle up with bumpers, winches, roof racks, camping gear—or a camper—and you might find that jack whimpering under the load. Actually it would be you who were whimpering.
If you want something that can handle a tire change on a loaded vehicle, as well as recovery duties—for example to lift the vehicle off a high-centered situation, or to shovel substrate under a bogged tire, or insert MaxTrax—you need to step up the game with something rated to at least half to two-thirds the GVWR of your rig.
And then you have a major decision to make: Do you want to lift from up top, via a bumper or slider, or from below, via an axle or the chassis?
The advantage to a bumper jack is, first, you don’t have to crawl under the vehicle to lift it—nice for staying clean but also possibly critical if your 4x4 is buried right to the axles in sand or mud. Or water. Disadvantages? First, your vehicle must be equipped with sturdy, recovery-capable bumpers front and rear—and preferably with rock sliders as well—that will accept the jack’s tongue. Second, to lift a tire off the ground with a bumper jack to change it you have to cycle through the vehicle’s full suspension travel first, which can mean a foot or more of wasted elevation and leave the vehicle precariously tippy. Finally, bumper jacks tend to be heavy and bulky.
The axle/chassis jack is compact (with the understandable exception of the Pro Eagle here), doesn’t waste lifting height to raise a punctured tire, and with a few accessories can perform a variety of recovery tasks. But access to the underside of the vehicle is mandatory, and bottle jacks in particular tend to have limited lifting range—often only six or seven inches unless you buy a double-extension model, which will increase that by another four or five inches. Still paltry compared to the 30 inches or more of a bumper jack.
My suggestion: If you mostly need a sturdy jack for tire changing and occasional recovery work, look at the chassis jacks here. If you like to challenge yourself and your vehicle and frequently find yourself a bit buried, consider making room for the Hi-Lift or one of the ARB jacks.

Hi-Lift jack ($100 48” all-cast)
How many products survive a century virtually unchanged? Yet the antediluvian Hi-Lift still scores points in this group with its low price, rugged simplicity, ease of refurbishment, and versatility—it’s the only product here that will also function as a clamp or a (very slow) winch.
The Hi-Lift’s 4,660-pound rating has become the de facto standard for competitors, and in this group its range of lift is second only to the ARB Jack. Downsides include the Hi-Lift’s 29-pound mass and jam-prone lifting mechanism (the latter usually rectified with a dousing of almost any lubricant, including, according to my nephew, Keystone Light). Also, while proponents always bring up those “clamping and winching” functions, the number of times I’ve done either except to demonstrate it is exactly zero. (On the other hand, I once successfully sleeved a broken tie rod with a Hi-Lift handle and a bunch of baling wire.)
To lift a vehicle by a bumper with the Hi-Lift, you must raise the lifting tongue—along with the entire lifting mechanism—up the main beam to the height needed. Thus if you’re using the common 48-inch model and your bumper is 36 inches off the ground, you’re left with just a few inches of travel (since the mechanism can’t go all the way to the top).
The big red flag in the Hi-Lift’s manual of arms, as anyone who’s used one knows, is what I call the ZoD: the “Zone of Disfigurement” circumscribed by the arc the handle makes. Let your head stray inside this arc—whether you’re raising or lowering—and you’re asking for a broken nose or jaw if you lose your grip. When lifting a heavy vehicle—especially if the operator isn’t heavy—it can be difficult indeed to apply enough force to accomplish the task while simultaneously staying out of the ZoD. And lowering a load takes exactly as much force as raising it, so don’t let down your guard just because you’re letting down the vehicle. Losing control of the handle while lowering can trigger a feedback loop that results in the handle slamming against the beam and rebounding wildly, ratcheting the vehicle down all on its own.
I know experiencedbackcountry drivers who wouldn’t leave home without a Hi-Lift, and equally experienced backcountry drivers you couldn’t pay to carry one. Over the years I’ve migrated between both camps, so I’ll be no help—except to slyly point you to the product below.
Bloomfield Manufacturing is here.
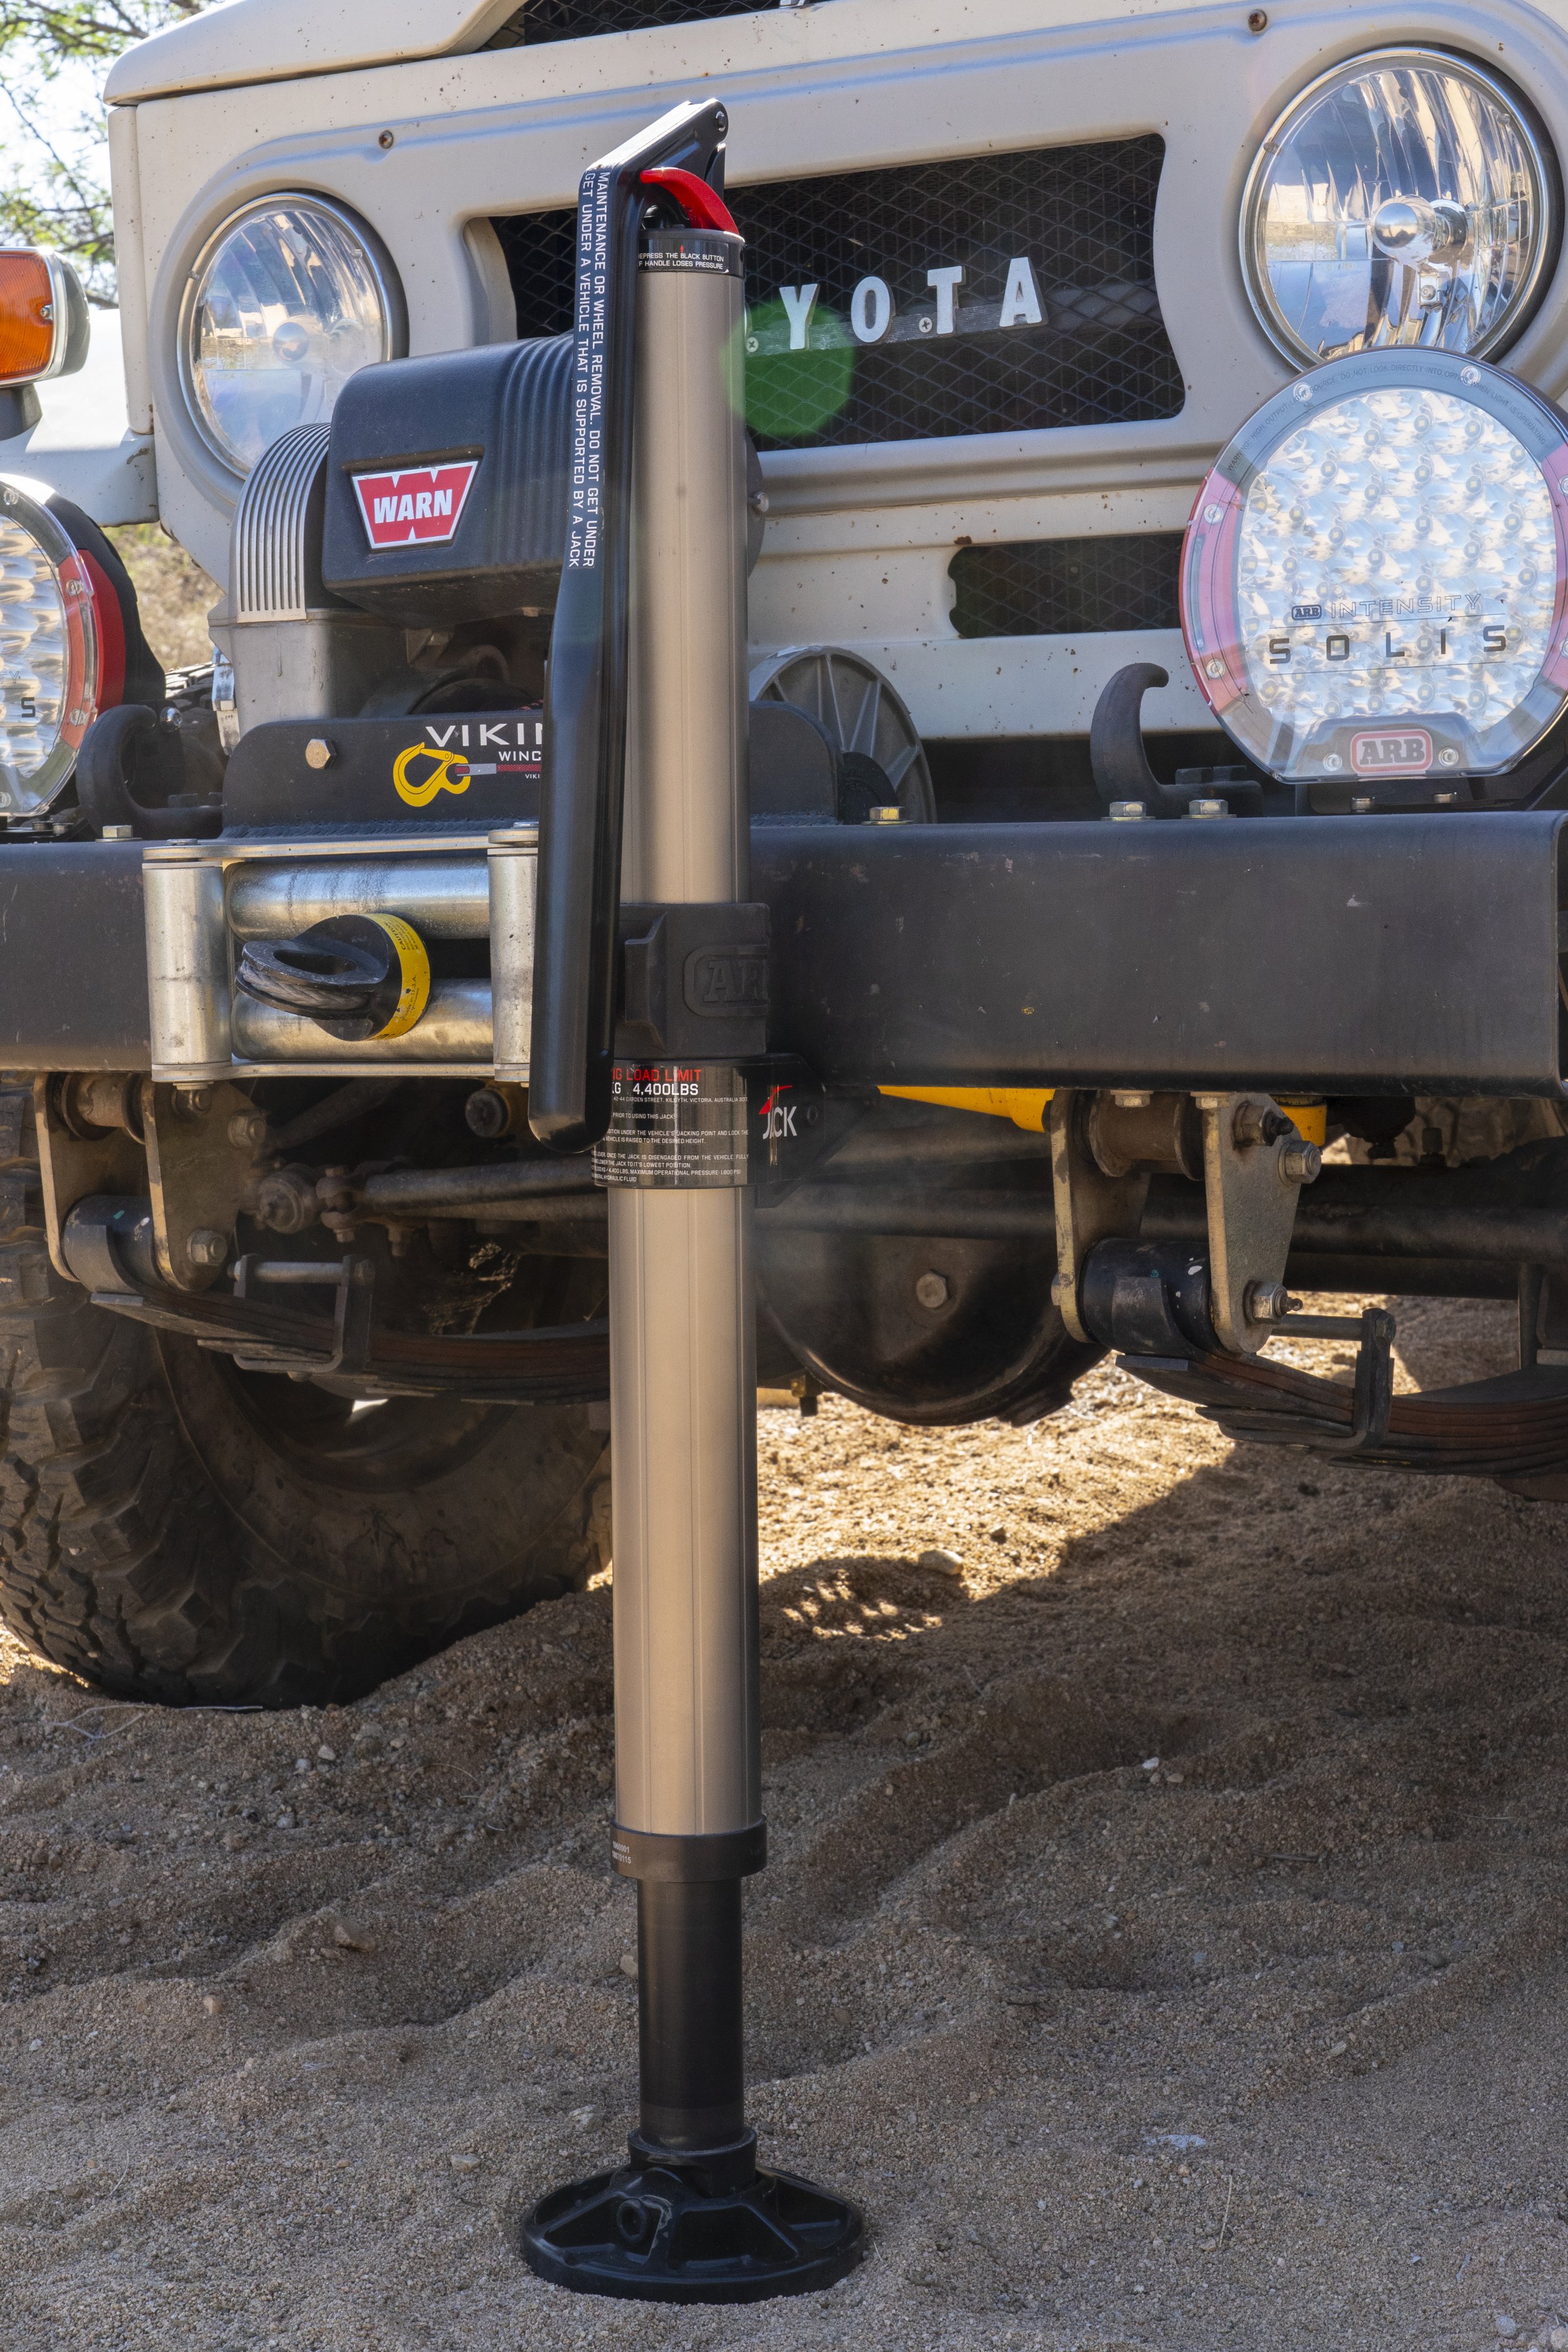
ARB JACK ($833)
Think of the ARB Jack as a Hi-Lift that went to a very expensive finishing school. The coarse mechanical mechanism is gone, replaced with smooth and powerful hydraulics—my 115-pound wife can lift the entire loaded rear end of our 70-Series Troop Carrier. At one demo I gave at the Overland Expo using the front of an FJ40, a lifelong Hi-Lift user walked up and gave the handle exactly one pump, said, “That’s all I need to see,” and headed for the ARB booth. There’s zero possibility of face-altering kickback—let go the handle and it simply sits there waiting for you to get back to work—and lowering is quite literally a one-finger operation via a little red lever. While a Hi-Lift can only lower the vehicle in increments of an inch, the ARB can gently ease it down millimeters at a time.
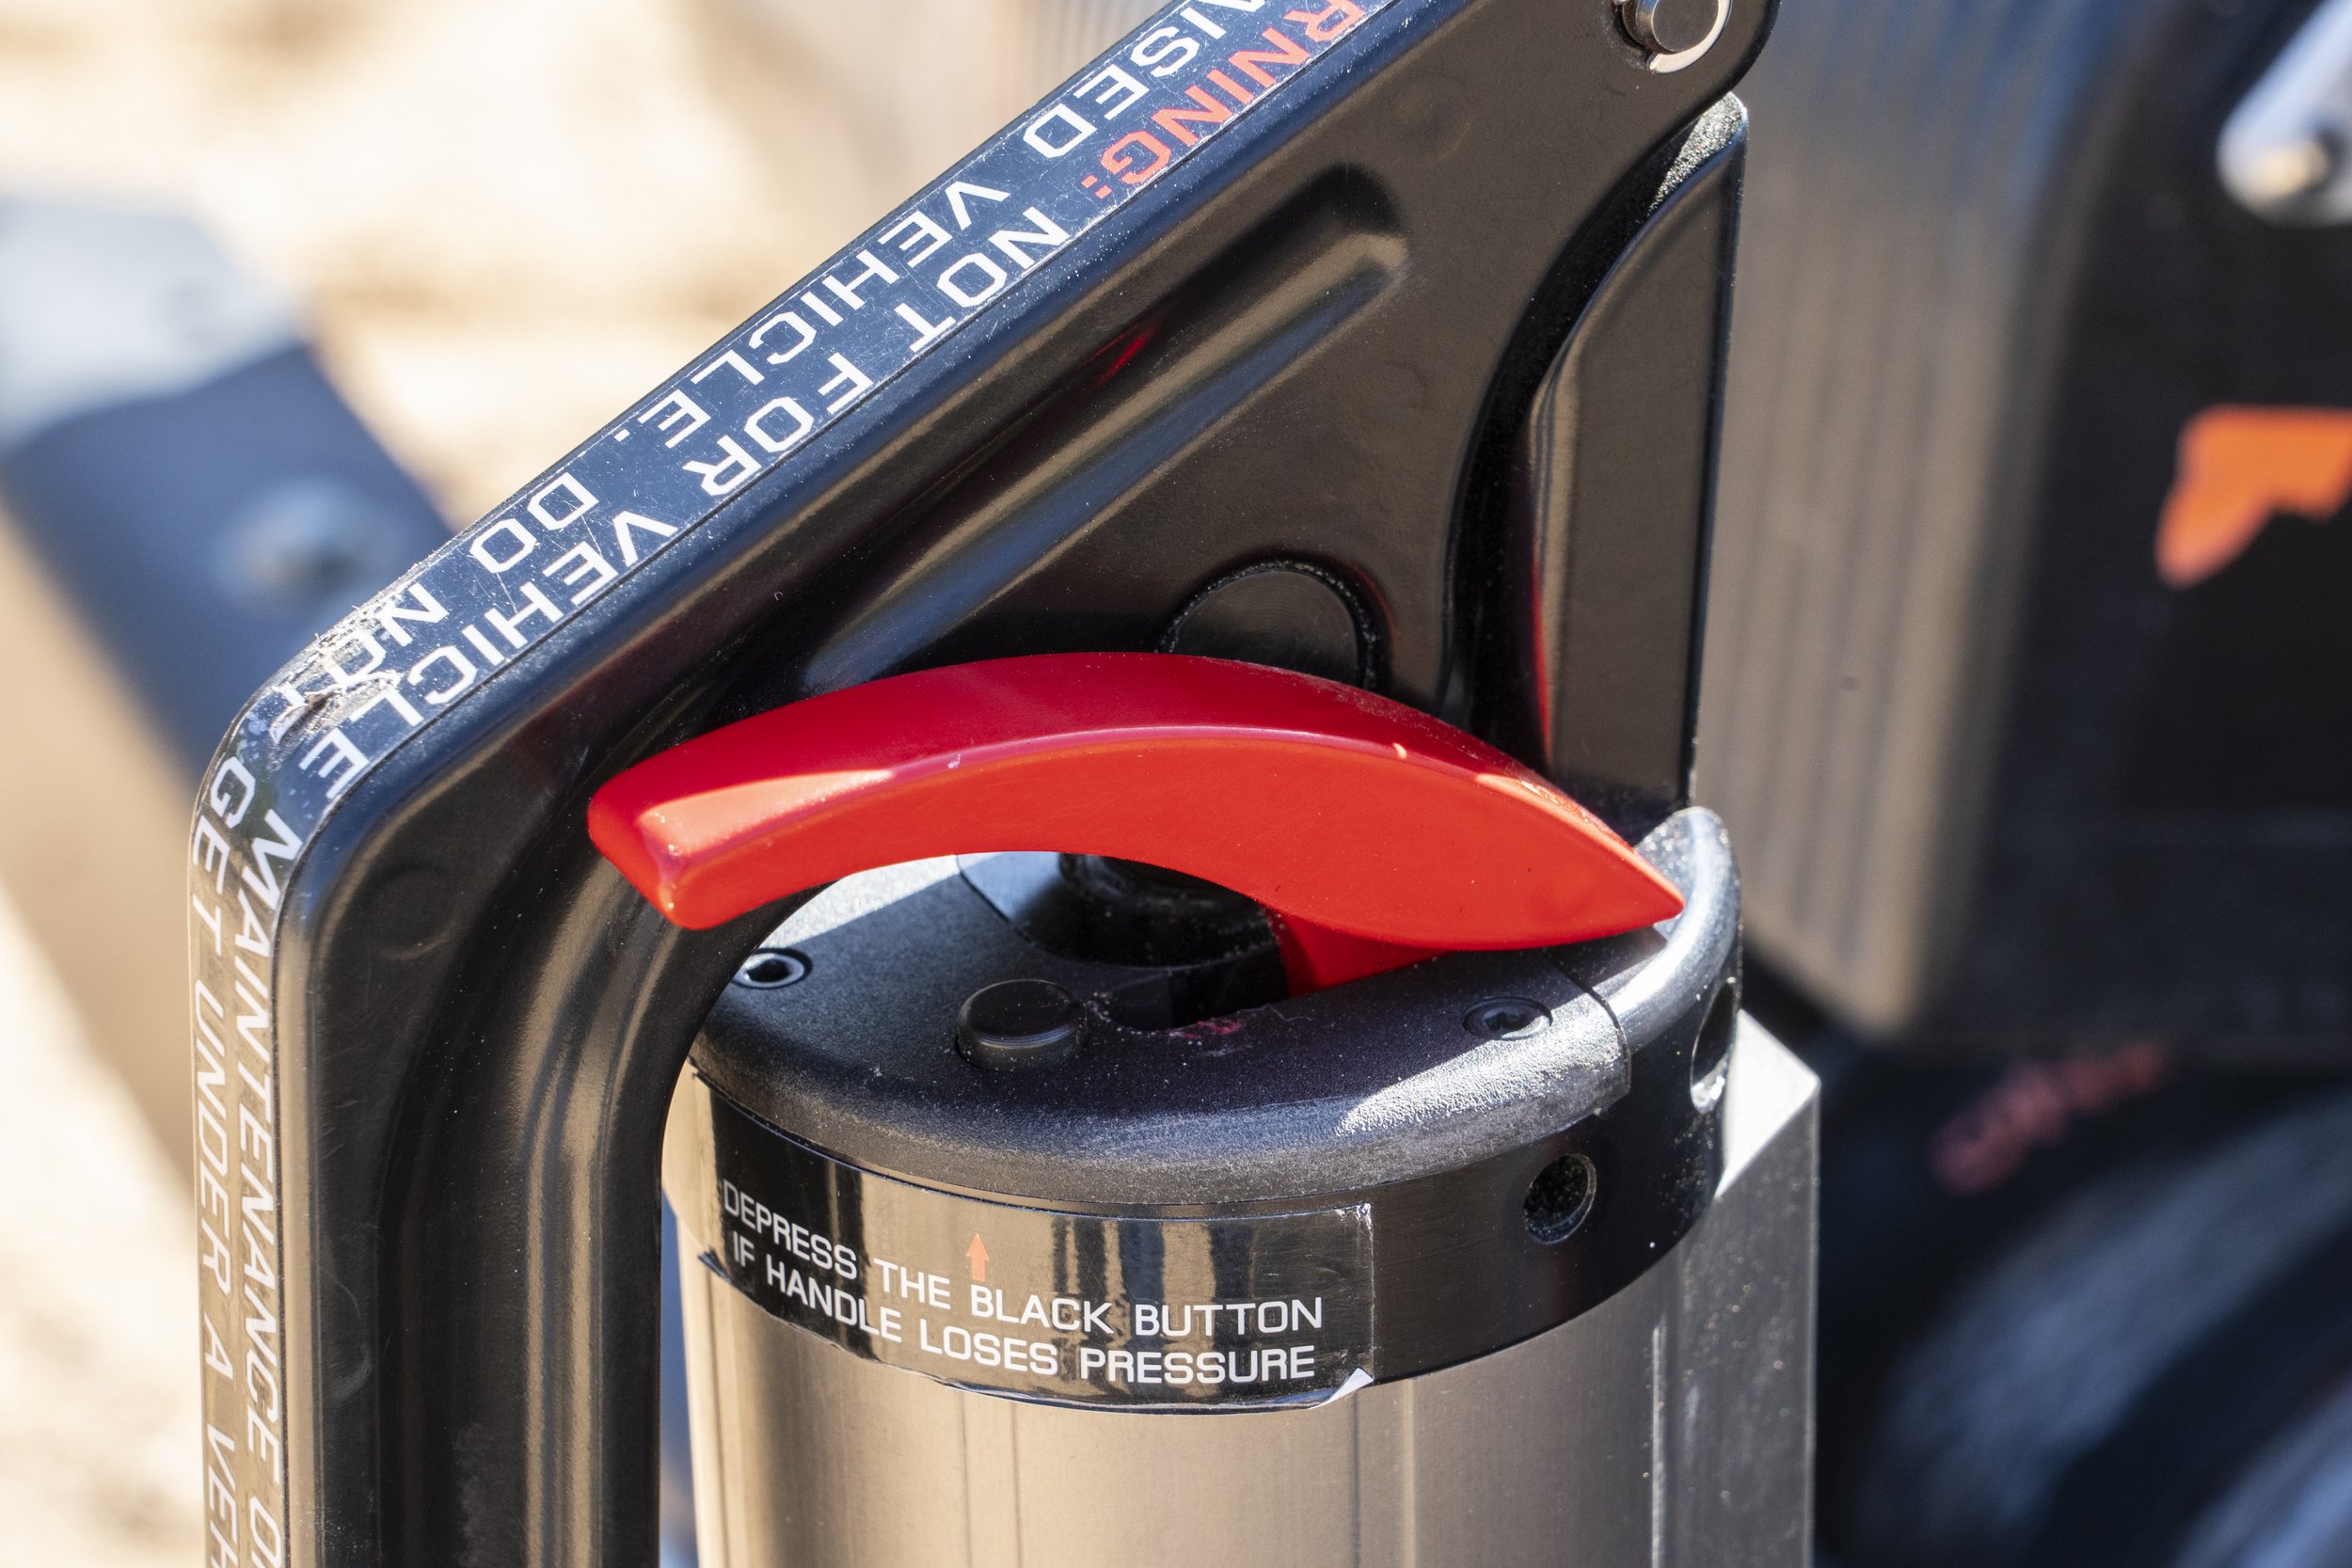
In another sharp contrast to the Hi-Lift, to adjust the lifting tongue of the ARB Jack to bumper height, you only have to lift the tongue itself to the appropriate slot on the aluminum body, leaving the full lifting range of the jack intact—up to 48 inches. One quirk: Once the weight is off the ARB Jack when lowering, it does not drop free like the Hi-Lift; there is still a considerable amount of hydraulic resistance. You need to keep the red lever pressed and really lean on the jack to compress it. A separate compression-release button (suitably guarded to avoid inadvertent activation) would be a handy future modification.

The ARB Jack is 15 percent lighter than a Hi-Lift, and only 36 inches long in its carrying case. The sealed mechanism won’t jam in dusty conditions, and the base even has a clever cutout to facilitate breaking the bead on a tire. What’s not to like? I just hope you were sitting down when you saw the price. If you can rationalize—and afford—the difference, I will say that the ARB Jack is hands down superior to the Hi-Lift, and, while accepting that this aspect is in large part a function of the user, a far safer one as well. Also check out the ARB jack base, which smartly accommodates either the ARB or Hi-Lift jack foot.

One caveat: ARB recommends the Jack be stored upright to protect the seals. I store mine upright at home, but carry it horizontal in the vehicle. So far I’ve had no issues.
ARB is here.

Safe Jack Bottle Jack kit ($269)
There may be more versatile jack systems around, but none that also fits in a .50-caliber ammo can. The 27-pound Safe Jack “Sergeant” kit comprises a six-ton hydraulic bottle jack, a flat (chassis) and a curved (solid axle) lifting attachment, and three extension posts, one of them adjustable. Other Safe Jack kits, from “Private” to, yes, “General,” include fewer or more extras (all of which are available separately).
The range of extensions allows you to lift from an axle, the chassis, or a bumper, as needed. Its compact size limits the included jack to six inches of lift; however, as long as the post is compatible, you could pair the Safe Jack attachments to any bottle jack you like, such as the double-extension model I already owned. My Safe Jack kit hasn’t yet met a vehicle it couldn’t lift. A suggestion: Have a blackmsith make you a “wheel claw” similar to the one Tom Sheppard had made and carried in the Sahara for decades (configured for a specific wheel type), and your bottle jack will easily lift one wheel to allow the insertion of a MaxTrax or other recovery mat.
Safe Jack is here.

Tom Sheppard’s bespoke folding wheel claw lifts one wheel for insertion of traction mats.

Surplus M998 scissors jack ($75) and Agile Off Road chassis adapter ($90)
Gotta love military surplus. The heavy-duty (3.5-ton) scissors jack configured to lift the front or rear A-arms of the High Mobility Multipurpose Wheeled Vehicle—Humvee to most of us—is available by the score on eBay with case, ratchet handle, and extension rods, for around 75 bucks. Add Agile Off Road’s reversible billet-aluminum adapter and it will securely support your non-combat vehicle at either the axle or chassis. A reversible ratcheting handle means you don’t have to crank in a complete circle in a confined space—a brilliant idea—and as long as your truck weighs less than an up-armored HMMWV this jack will lift it easily to a height of 20.5 inches with the adapter in place. A generous 7 by 12-inch base plate ensures support in Middle-Eastern-theater sand, or any other kind. The lifting post on the jack has a bit of wobble built in; Agile Off Road recommends tack-welding this to increase stability. However, I used it as is and had zero problems. I now carry this setup permanently in my FJ40.
Agile Off Road is here.

Pro Eagle Off Road jack ($440)
A floor jack with off-road tires—why didn’t someone think of this before? Take a two-ton hydraulic floor jack—the easiest way ever to lift a vehicle on a concrete driveway—add solid axles and burly composite wheels, and you’ve got an all-terrain floor jack. The Pro Eagle rolled over my gravel driveway effortlessly, and lifted the entire front end of my FJ40 in a sandy wash without digging in more than a couple inches. Given the fat tires plus a full-length underbody “skid plate,” it shouldn’t sink in any substrate that doesn’t have a current. Pop on the adjustable extension post for a full 26 inches of lift height. I certainly wouldn’t carry this bulky, 52-pound jack for field duty in the FJ40, but if you’ve got a full-size truck or Sprinter (there’s also a 3-ton version) or are traveling with a group, it will make any recovery a breeze. And, of course, at home it’s an excellent shop jack (I sold my old standard floor jack). One operational note—like all such jacks, the lifting pad moves through an arc as it rises. If you employ the extension, and both the jack and vehicle are held stationary by the substrate, the extension can wind up tilted significantly at full height. Plan ahead.

A full-length bottom plate prevents sinking even in sand.
Pro Eagle is here.

ARB X Jack ($270)
Some of the jacks here are easy to operate; some are difficult to operate—but only one is effortless to operate. Situate the deflated X jack under the chassis of your 4x4, hold the inflation cone over the exhaust pipe or connect an air compressor to the Schrader valve, and the expanding bag will lift up to 4,400 pounds up to 30 inches in the air.
Truck buried to the bumpers with no way to get a bottle jack or Hi-Lift underneath? All you need is four inches of scooped clearance for the X jack to slide underneath. Stuck in rocks with no secure base for a bumper jack? The X Jack molds itself around virtually any substrate, and the hard rubber “teeth” on the bottom help prevent slippage. Included is a thick square of guard material to protect the already-stout envelope, but it’s best to remember this thing is still a heavy-duty balloon, and keep it away from bolt ends and hot exhaust pipes. I’ve seen two punctures resulting from (extremely) careless placement, although the envelope can be patched effectively with the included kit.
Another possible issue with the X Jack is compatibility with your exhaust opening. The jack’s connector is a simple rubber cone, and if your exhaust tip is rectangular you might not be able to achieve a tight seal, critical for inflation. In that case an air compressor will work, but it’s much slower—the X Jack likes a lot of volume and low pressure, the opposite of what most compressors produce.
Finally, remember that at full height your vehicle is supported on air inside a flexible casing; expect a bit of squidginess.
But then, you wouldn’t get under a vehicle supported only by any if these jacks, right?
ARB is here.

A final note: None of these jacks should be employed unless the vehicle is securely chocked. Among the best of that breed I’ve seen are the Safe Jack nesting chocks. One is slightly smaller than the other and so fits inside when folded, yet the pair is substantial enough to serve as chocks for winching duty.

A version of this article originally appeared in Tread magazine.
The Pro Eagle Off Road jack

A floor jack with off-road tires—why didn’t someone think of this before?
A floor jack is the easiest way ever to lift a vehicle on a concrete driveway. But most will be stopped in their tracks by a quarter-inch-diameter pebble. Pro Eagle took a two-ton floor jack, beefed up the chassis and added fat tires, and invented the all-terrain floor jack. The Pro Eagle rolled over my gravel driveway effortlessly, and lifted the entire front end of my FJ40 in a sandy wash without digging in more than a couple inches. Given the fat tires plus a full-length underbody “skid plate,” it shouldn’t sink in any substrate that doesn’t have a current.

The Pro Eagle barely sank lifting the front of the FJ40 in sand.
An adjustable extension post (stored near the base of the handle) pops on for a full 26 inches of lift height. I certainly wouldn’t carry this bulky, 52-pound jack for field duty in the FJ40 (although a convenient carrying handle helps moving it around), but if you’ve got a full-size truck or Sprinter (there’s also a 3-ton version) or are traveling with a group, it will make any recovery a breeze.
And, of course, at home it’s an excellent shop jack. I’ve abandoned my standard floor jack because the Pro Eagle is so much easier to move around—even in urban settings—and because of its greater lifting capability.
One operational note—like all such jacks, the lifting pad moves through an arc as it rises. A floor jack on concrete will roll slightly to compensate for this. If you employ the extension on the Pro Eagle, and the jack is immobilized in sand or rock, the extension can wind up tilted significantly at full extension. Plan ahead.
Pro Eagle is here. The two-ton model retails for $430.
There are tent stakes, and tent stakes . . .

This . . . is the latter.
If you’ve read my work for more than a few weeks, you probably know how much I hate cheap tents (see here if not). It should be banally axiomatic that your tent is your home away from home, your last refuge from wind, rain, snow, and insects. It makes no sense to economize on a piece of equipment that, at the very least, can mean the difference between a peaceful or sleepless night, and at the worst, could be your key to survival.
The same goes for the stakes with which you secure that tent (or awning). The finest, most aerodynamic four-season tent on earth is worthless if it’s secured with flimsy, undersized stakes, and the same goes for the expensive batwing awning on your overland truck, which can pluck inadequate stakes out of the hardest substrate when a bit of a blow lifts its sail-like surface area. During every Overland Expo Roseann and I ran we struggled with and cajoled and threatened vendors to tie down their blue EZ-Up awnings with something more than the flimsy aluminum toothpicks they came with, which I could—and did, as a demonstration—bend between my teeth.

These stakes will not bend between my teeth.
We already own a set of very decent stakes for the Eezi-Awn Bat 270 awning on our Troopy—one set of thick round steel pegs for hard ground, and another of wide, curved aluminum for sand.

Recently, however, I was browsing the Major Surplus site and came across a pack of six French military steel stakes for $29.95. They looked awesome, so I ordered a set. And they are indeed awesome: cruciform steel, seventeen inches long and 1.45 pounds each, with a welded hook. I immediately ordered another set. They should suffice for any kind of substrate.
These stakes will secure any tent not capable of enclosing a trapeze act. No, I won’t carry them on my bicycle for use with my Hilleberg Anjan GT, but for bigger shelters? Take my advice and get a set; you’ll sleep better.
Be your own optics expert

What could be more magic than an invention that brings the world seven, eight, even ten times closer? A shy bird, a dangerous animal, the moon and planets, a distant and questionable 4x4 route (or, in the above photo, a possible poacher): a thousand things can be enjoyed, evaluated—or apprehended—with binoculars.
I’ve used binoculars for fun for many decades, and I never tire of simply sitting and looking through them at anything that catches my fancy. However, I’ve also used them professionally, as a sea kayaking, natural-history, and birding guide, and the latter experiences in particular have taught me a lot about both choosing and using them the most efficient way. Like many products, to a large extent you get what you pay for—but there are ways to ensure you get the best instrument for your needs regardless of how much you plan to spend.
(I’ll note here our weird misuse of the term “binocular,” which means, of course, two oculars. So technically we look through a binocular, rather than a “pair of binoculars,” which would be something both you and a friend could look through at the same time. However, the term is so ingrained you’ll probably catch me using it in the next paragraphs.)

Binocular anatomy
The single most visible diagnostic component of a binocular is the front, objective lens. All other aspects of construction being equal, the diameter of this lens determines, 1) how much light the binocular gathers and how bright the image appears, 2) how much magnification the binocular can effectively deliver, 3) how bulky and heavy the binocular will be to carry and use, and 4) how much it will cost. Small—e.g., 20 or 25mm—objectives equal low light-gathering, low power, light weight, and lower cost. Larger—30 to 60mm—objectives gather more light, allow higher magnification, are heavier and bulkier, and cost more.

Objective lenses. Left to right: 20mm, 32mm, 42mm
Remember that as objective diameter increases linearly, objective area increases geometrically. The 32mm objectives in the middle in the photo above have two and a half times the light-gathering power of the 20mm objectives on the left.
Binoculars are referred to by their magnification factor (the number of times they make an object appear closer) followed by the objective diameter—6x20, 8x42, 10x42, 10x50, etc. The compromise between objective-lens size and magnification is one of the main decisions you’ll need to make when selecting a binocular. So let’s look at the relationship.
Hold a pair of binoculars a foot or so from your face. See the little circle of light in the eyepiece? That’s called the exit pupil.
The diameter of that exit pupil is a function of the objective lens diameter and the magnification of the instrument: objective diameter divided by power gives you the exit pupil diameter—in any binocular, regardless of construction or cost. A 10x40 binocular has a 4mm exit pupil; so does an 8x32 binocular. An 8x40 binocular has a 5mm exit pupil, in a compact 8x20 binocular it is 2.5mm.
Why is this important? It has to do with the variable diameter of your own pupils as they react to light. In bright sunlight your pupils will contract to just 2mm or so, but near dusk they will expand to 5, 6, or even 7mm, depending on your age (as we age our pupils cannot expand as much). Consider that compact 8x20 binocular and its 2.5mm exit pupil. Looking through it in bright sunlight, with your own pupils constricted to 2mm or so, you’ll see a full, bright view. But look through it near dusk, when your pupils have expanded to 5mm or more, and you’ll see dark clouding around the central image, because your pupils are larger than the exit pupil. This vignetting means that binoculars with small exit pupils don’t perform well in low light (which can also include a shaded forest, for example). Thus binoculars with larger exit pupils are better for viewing near dawn and dusk. Years ago I had a pair of 7x50 binoculars with a stupendous 7mm exit pupil. Despite otherwise modest optical quality they excelled at low-light viewing.
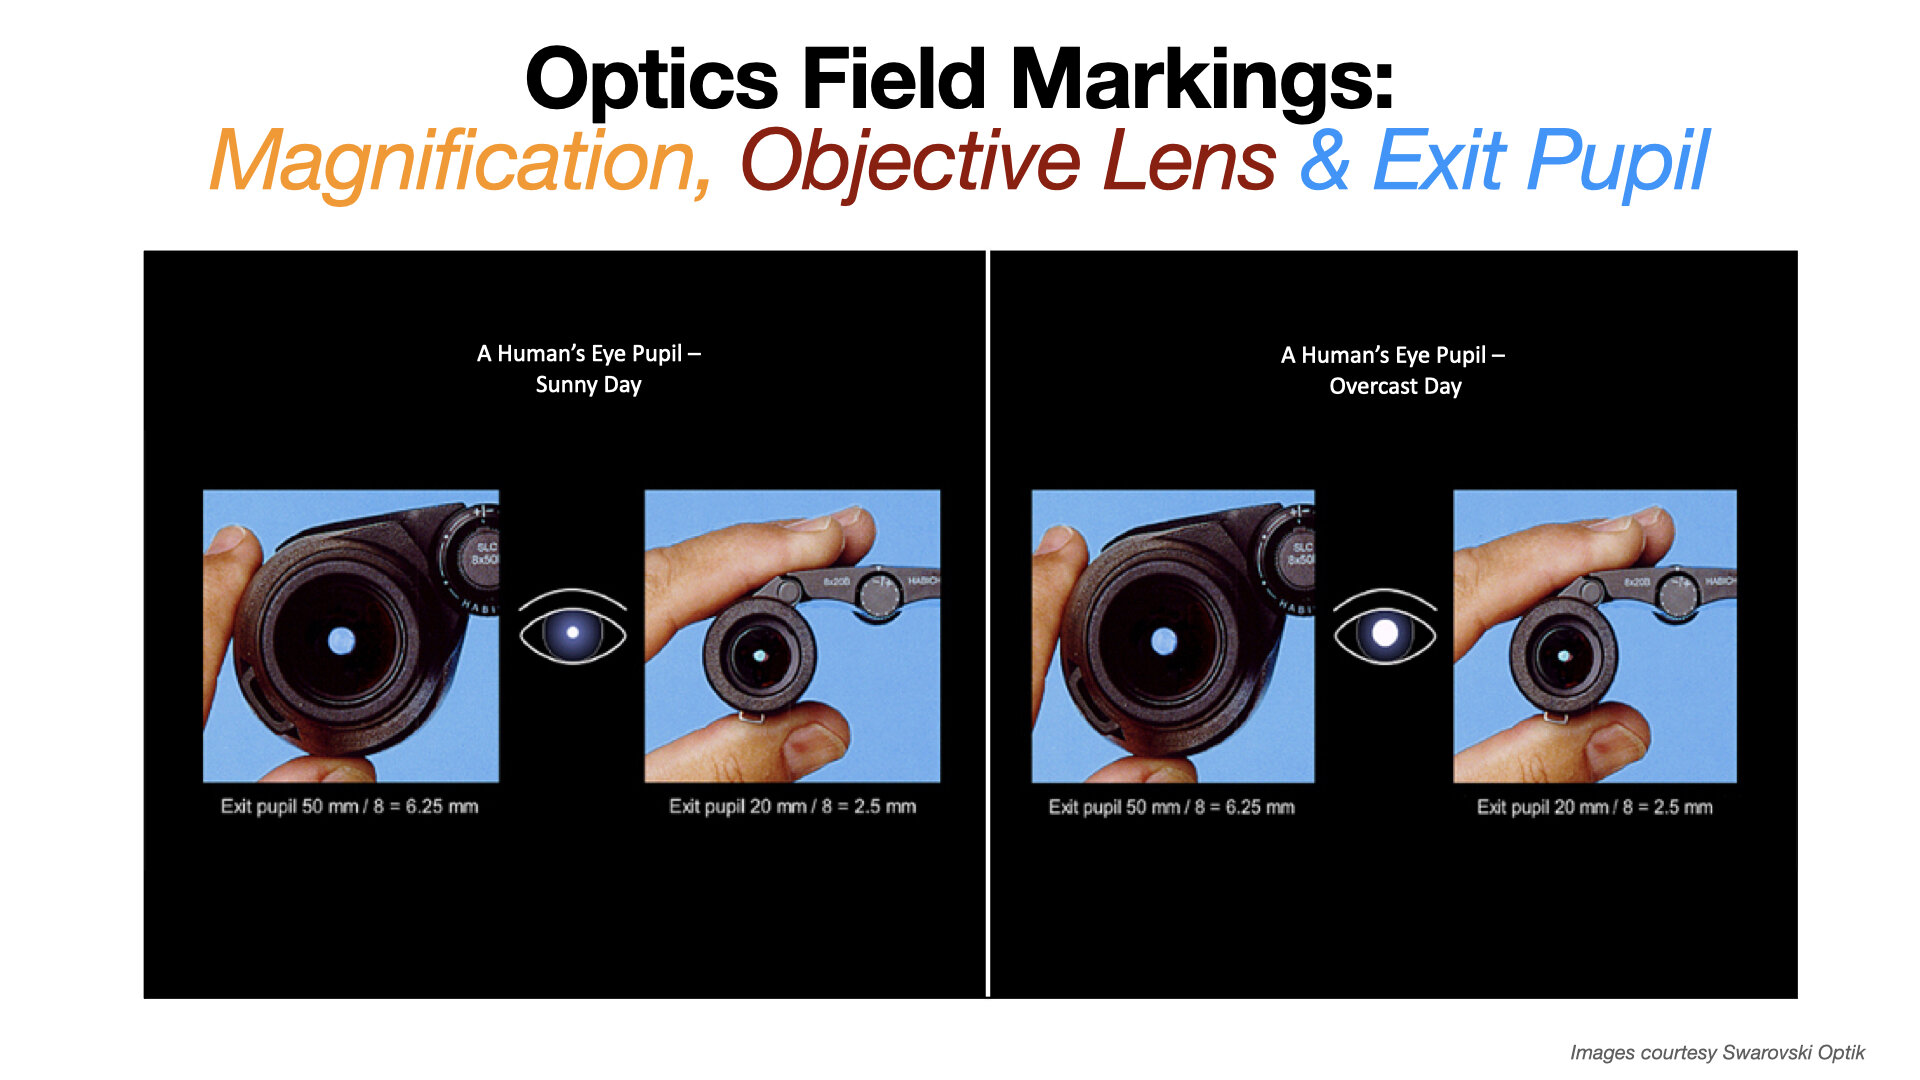
Comparison of the exit pupil of an 8x50 binocular with an 8x20.
So, all else being equal, a larger exit pupil equals better low-light viewing. However, magnification has an effect as well. Note the 10x40 and 8x32 binoculars I listed above. Despite identical 4mm exit pupils, the 10x40 will perform better at dusk due to the greater magnification. (As we’ll see, many other factors also contribute to brightness.)
Herewith my first guideline: For all-around use I do not recommend a binocular with an exit pupil smaller than 3mm, and 4mm is notably better. Those 10x25s in a company’s catalog might seem like a wonderful combination of high power and compact size, but their 2.5mm exit pupil will be a serious hindrance in low light.

The same binoculars, showing relative size. These are all roof-prism instruments—note the oculars in line with the objectives.
Now let’s look at the next most important feature of binocular construction: the prisms.
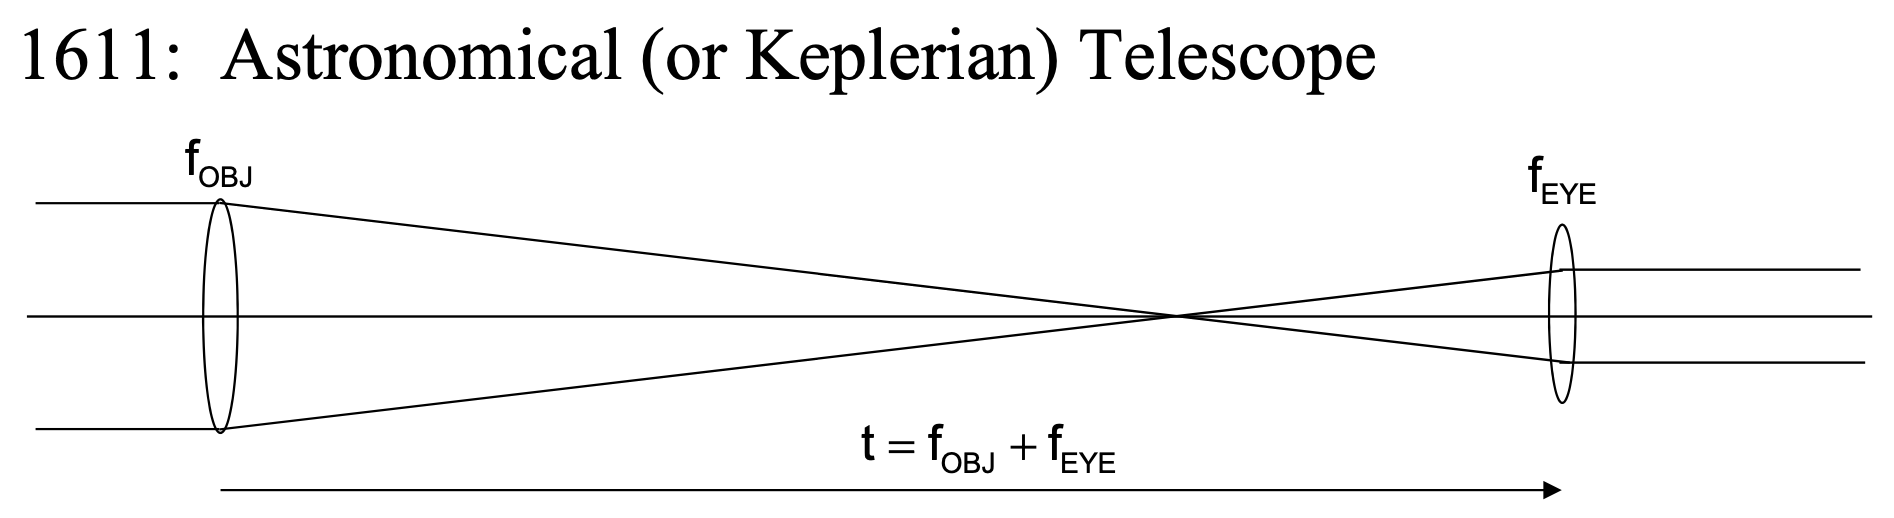
All modern binoculars except a few toys and cheap opera glasses employ prisms as part of their optical system. There are two reasons for this. The first is to correct the image orientation, which as it comes through the objective lens is turned upside down and reversed. The second is to allow the binocular to be shorter than it otherwise would be to gain sufficient magnification.
You can make a simple telescope—as Galileo did—with nothing but a convex objective lens and a concave eyepiece that can be moved back and forth to focus. The image will be erect and the right way round with this simple arrangement, and those toy binoculars and opera glasses are made this way. But the Galilean telescope and binoculars are extremely limited in magnification, and the image blurs quickly toward the edges.

The Keplerian telescope (for Johannes Kepler) was an improvement in that it used two convex lenses, allowing longer focal lengths and much higher magnification. However, the image in the eyepiece or ocular was reversed and upside down—not an issue for astronomy, but definitely so for terrestrial viewing. Adding an additional convex lens rights the image, and the classic collapsible “spyglass” of pirate movies and highland stag hunts is made this way. They are, however, necessarily long for their magnification. A binocular made this way would be unwieldy to say the least—thus the prism.
Prisms can be used to do different things. We’ve all seen dispersive prisms—the triangular versions that break up white light into its lovely constituent colors. Binoculars employ reflective prisms, which at their most basic work on the principle of internal reflection—light entering perpendicular to one surface is reflected and redirected off the angled surface behind it. As long as the light hits the back surface at what’s called a critical angle, no mirrored surface is needed; perfect reflection is achieved at the glass/air interface. You can see this effect by looking up at the surface of an aquarium at an angle that turns it into a mirror.

The first prisms used in binoculars (by a smidgen) were porro prisms, named after their inventor, Ignazio Porro; they’re still employed today. In binoculars, two porro units are cemented together at right angles to each other in each optical tube, which gives binoculars in which they are used the classic offset configuration, where the objective lenses are set outboard of the oculars (or, in some compact binoculars, inboard). The advantage to porro prisms is that they obtain perfect internal reflection using nothing but glass—no mirrored surfaces are needed. This gives them intrinsically better light transmission and clarity than Schmidt-Pechan roof prisms (see below). Additionally, porro-prism binoculars with objective lenses set outboard of the oculars can render a slightly better three-dimensional view. Disadvantages include poor close focusing ability ( also an artifact of the wide-set objectives) and more difficult weather sealing, along with greater bulk and, frequently, weight.
A porro prism unit as used in a bincocular
Roof prisms overcome those bulk and weight issues. The most commonly used roof prism configuration in binoculars, the Schmidt-Pechan, comprises two prisms separated by a minuscule air gap. In part because incoming light rays are “bounced” more times in a tighter space than in a porro-prism instrument, roof-prism binoculars are more compact. Note in the diagram how the incoming and outgoing rays are in line; thus roof-prism binoculars can be configured as straight tubes, saving the weight as well as the bulk of the offset tubes.
But there are downsides. Collimation—that is, the internal alignment—of roof prisms is critical and expensive to replicate consistently and durably. Also, every time light is reflected it loses a tiny bit of brightness, and one of the prism surfaces in the Schmidt-Pechan design reflects at less than the critical angle, so it must have a reflective coating applied. Finally, the internal reflections of the Schmidt-Pecan design first separate the light beams, then recombine them, which causes slight polarization of the beams, reducing contrast. Manufacturers counter these issues with phase-correction coatings, which porro prisms do not need, and by using either a silver or, much better, dielectric coating on the reflective surface. Schmidt-Pechan prisms employing phase-correction coatings and a dielectric reflective surface come very close to the performance of a porro prism. Nevertheless, making a high-quality roof-prism binocular is more complicated and more expensive than making a high-quality porro-prism equivalent.

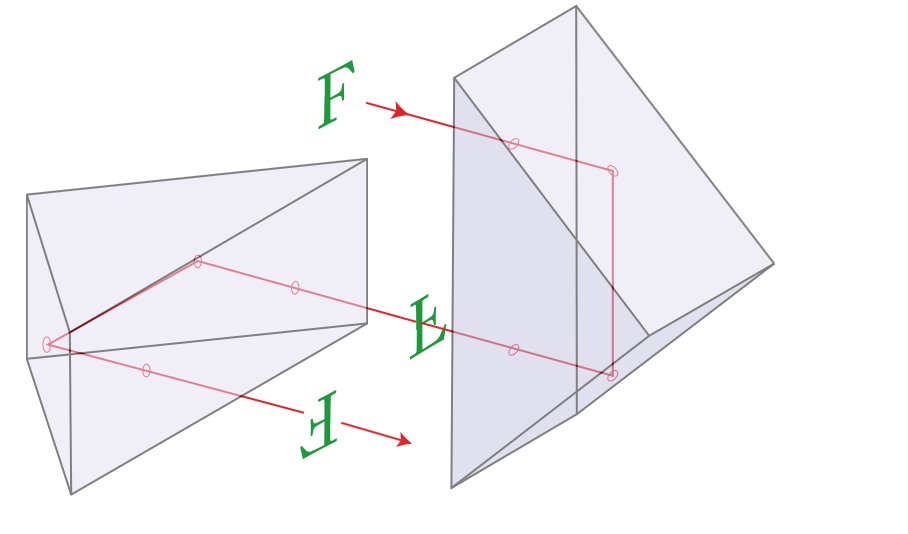
Another type of roof prism, the Abbe-Koenig, does boast perfect internal reflection and has no need for reflective coatings (although it still requires phase correction). However, as you can see in the diagram here, Abbe-Koenig prisms are significantly longer than Schmidt-Pecan prisms, and are rarely used except on large binoculars such as an 8x56, where light weight and compact size are less important than ultimate light-gathering power.

The two binoculars on the left employ Schmidt-Pechan roof prisms; the two on the right, Abbe-Koenig roof prisms.
So far this sounds like an open-and-shut case for porro-prism binoculars. However, if you’ve ever carried full-size binoculars around your neck for an hour or two, or looked through them for more than a few second at a time, you’ll be well aware of how much difference a few ounces can make in preventing fatigue and image shake. A roof-prism binocular of the same objective and magnification can weigh several ounces less than an equivalent porro-prism instrument, in addition to its reduced bulk. Roof-prism binoculars are generally easy to use one-handed when necessary—often impossible with porro-prism instruments. For this reason (in addition to their easier weather-sealing and close-focus capabilities), virtually all ultra high-end field binoculars are roof-prism models. And manufacturers have developed roof prism technology to the point that the differences between high-quality examples of each type would be difficult, if not impossible, for a casual viewer to detect. In fact, given the relative lack of development in porro-prism technology in the last couple of decades, I’d wager that the best current roof-prism binoculars are equal or superior in terms of light transmission and clarity to the best available porro-prism binoculars.
With that said, do keep in mind that manufacturing a bright and durable pair of roof-prism binoculars is significantly more difficult than doing so with porro prisms. If you are on an extremely limited budget, you might find you can get noticeably better quality out of the latter than the former, for the same price.
Not all prism glass is equal. The very best we have today is called BaK4, for BaritleichKron or Barium Crown, a glass made by the German company Schott AG. It has a very high refractive index (1.569 if you want to know, which is, like, really high, to be technical). Many cheap binoculars claim to be made from this glass when in fact they are not; there is essentially zero enforcement of such marketing lies. The manufacturer’s reputation—and price—is nearly the only way to be sure you’re getting Schott BaK4. And even given that, manufacturing tolerances, coatings, and a dozen other parameters will make or fail to make a high-performing prism.
The next critical aspect of binocular design is the lens coatings. Look at the objective lenses of your binoculars and you’ll notice a definite tint—purplish, greenish, reddish, more or less of each depending on the brand. Why is this?

All glass reflects some light—look at a piece of window glass and you’ll see this. Furthermore there is a reflection both when the light enters the sheet of glass—or a lens—and when it exits the back of it. This reflection can reduce the amount of light making it all the way through a lens by ten percent or more. Multiply that by the several lenses in a binocular and the light fall-off is severe. In 1886 the 3rd Baron Rayleigh, John William Strut (who would win the Nobel prize in physics in 1904), found to his surprise that old, slightly tarnished glass he tested transmitted more light than new, clear glass. This led to the development of specialized anti-reflection coatings, introduced by the Carl Zeiss company just prior to WWII. In one leap of technology, the total light transmission through a typical 8x30 binocular increased from 50-60 percent to 70-80 percent. Today’s high-end binoculars are fully multi-coated—that is, every glass surface has an anti-reflection coating comprising up to seven layers—and total light transmission is well over 90 percent. However, like BaK4 prisms, “fully multi-coated” can mean a lot or not very much at all. Simply put, a $150 Chinese binocular with “fully multi-coated optics and BaK4 prisms” will not have the same stuff inside as a $2,000 binocular with “fully multi-coated optics and BaK4 prisms.”
Next in line is the clarity and contrast of the image controlled by the objective lens or lenses, the focusing lens behind it, any field-flattening lenses behind the prisms, and the lenses comprising the ocular. Careful grinding/polishing of high-quality glass will ensure a crisp image, but color rendition raises its own issues.
Remember the dispersive prism and its colorful rainbow of colors? To some extent this happens with light passing through any lens. The different colors of the spectrum bend at slightly different angles, and if they are not brought together somehow by the time they reach the eyepiece, the image will display a fringe of spurious color around it—almost invariably blue, because blue light is more sharply diffracted then yellow or red.
Chromatic aberration, as this is known, can be reduced using an achromatic objective lens, comprising two layers of different types of glass that together reduce diffraction, and/or with aspheric lenses, which accomplish the same thing by altering the shape of the lens, and/or with extra-low-dispersion (ED) glass, which doesn’t diffract as much to begin with. As with everything we’ve discussed, this adds to the cost of the binocular as well as the quality of the image.

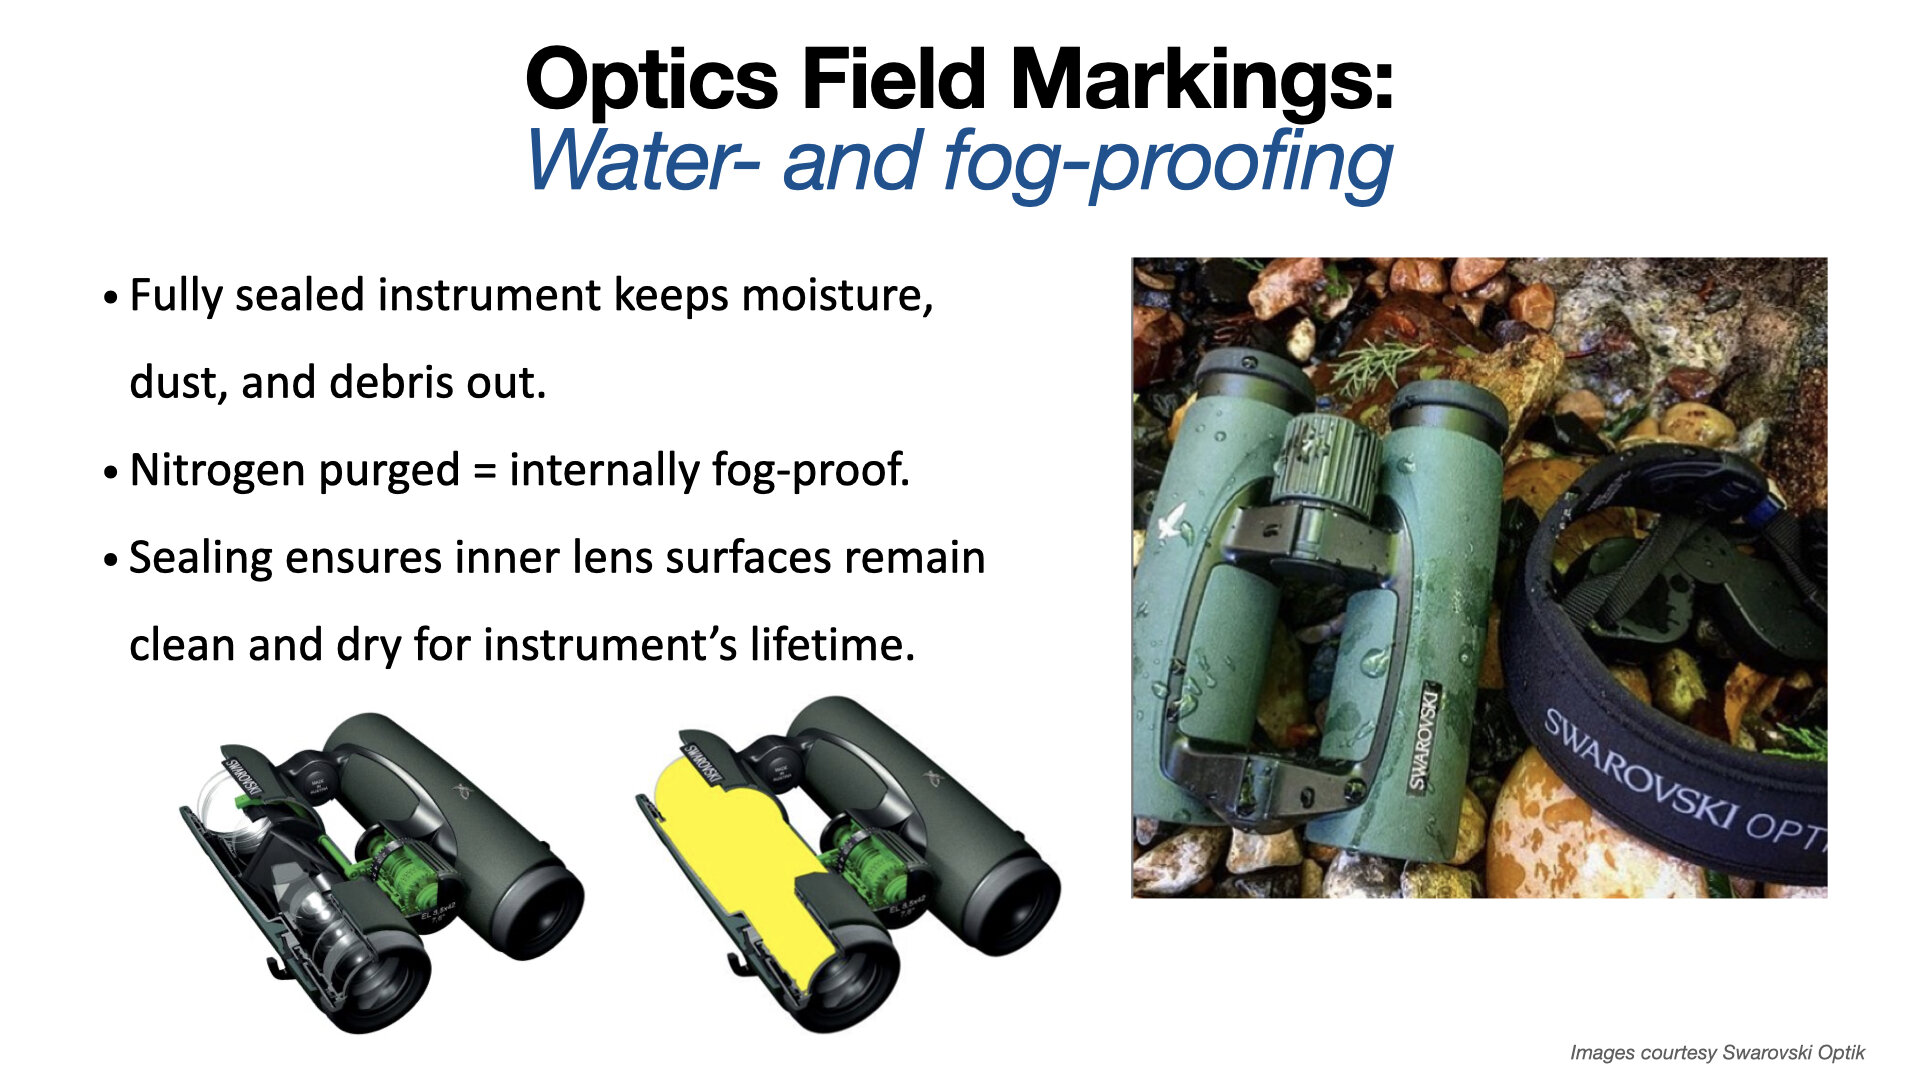
The best binoculars in the world can be ruined if any moisture is allowed inside. Fogging obscures the image and damages coatings, and fungus or mold will completely destroy the instrument, necessitating a complete disassembly and restoration at best. For this reason good binoculars are fitted with O-rings to seal out moisture, and then purged of air with pure nitrogen (sometimes argon) at slightly higher than atmospheric pressure. These gasses are dry, cannot fog, and do not support mold or fungus. Better binoculars incorporate better seals yet retain ease of focusing (the focusing mechanism is one of the most vulnerable entry points for moisture).
Many high-end binoculars now incorporate a field-flattening lens behind the prism, designed to increase edge-to-edge sharpness. This is especially useful for those who use binoculars on a tripod for long periods, scanning the entire field of view rather than moving the binocular around.
Is there anything else? Oh yeah, a lot of it. Proper internal baffling to prevent flare; shielding and blackening of the sides of the prisms to prevent spurious light entering them; reinforced housing of the prisms to prevent de-collimation; proper size of the prisms to capture all available light; grooving the hypotenuse face of the prism to control abaxial rays. Construction of the housings—aluminum, or lighter and more expensive magnesium? Hydrophobic objective-lens coating? You get the picture, and perhaps begin to see why the price of two binoculars that are to outward appearances identical might have price tags that differ by an order of magnitude.

The best binoculars available today offer brilliant, sharp, true-color views comfortable for hours of viewing without eye strain; complete weather sealing; shock-proof construction; light weight, and a lifetime guarantee—often transferable. A premium binocular represents a considerable investment that will repay itself every time you use it, and continue to do so for decades.
Next up: Choosing the best for your needs.
Companion workshop: View our Field Arts workshop on optics, with Swarovski’s Ben Lizdas joining us for a Q&A, here or view below.

Hint: When using “Search,” if nothing comes up, reload the page, this usually works. Also, our “Comment” button is on strike thanks to Squarespace, which is proving to be difficult to use! Please email me with comments!
Overland Tech & Travel brings you in-depth overland equipment tests, reviews, news, travel tips, & stories from the best overlanding experts on the planet. Follow or subscribe (below) to keep up to date.
Have a question for Jonathan? Send him an email [click here].
SUBSCRIBE
CLICK HERE to subscribe to Jonathan’s email list; we send once or twice a month, usually Sunday morning for your weekend reading pleasure.


Overland Tech and Travel is curated by Jonathan Hanson, co-founder and former co-owner of the Overland Expo. Jonathan segued from a misspent youth almost directly into a misspent adulthood, cleverly sidestepping any chance of a normal career track or a secure retirement by becoming a freelance writer, working for Outside, National Geographic Adventure, and nearly two dozen other publications. He co-founded Overland Journal in 2007 and was its executive editor until 2011, when he left and sold his shares in the company. His travels encompass explorations on land and sea on six continents, by foot, bicycle, sea kayak, motorcycle, and four-wheel-drive vehicle. He has published a dozen books, several with his wife, Roseann Hanson, gaining several obscure non-cash awards along the way, and is the co-author of the fourth edition of Tom Sheppard's overlanding bible, the Vehicle-dependent Expedition Guide.