Mistaken mystique: myths of tire repair
 Despite significant advances in technology and huge reductions in the frequency of failure (certain infamous Firestone models excepted), tires remain the number one cause of vehicle trouble, whether you’re driving your minivan to Disneyland or a Defender to Dodoma.
The minivan can get by with a single spare tire. For an expedition vehicle you need to think a little more comprehensively. A second spare is a good start, but the very best strategy is to combine that with the means to accomplish your own tire repairs. Fortunately there are many products available to make the job easier, if not always effortless.
A surprising number of the Land Cruisers Roseann and I see and use in Tanzania and Kenya still ride on stout, tube-type, 10-ply-rated bias-ply tires mounted on split rims (or, more properly, retaining-ring or locking-ring rims). I even ran this type of rim (with BFG All-Terrains) on my FJ40 for several years while guiding in Mexico. Such rims can be disassembled with hand tools to remove the tire and tube, but I found I experienced more flats with tubes, and the process to repair a simple puncture involved the same complete disassembly of the rim as a major sidewall split. I got really good at it, but it was still a pain, and the romance of having clients marvel at the procedure soon wore off.
Given todays’ availability of high-quality compressors, comprehensive tire-plug repair kits, and, for extensive sidewall repairs, various bead-breaking tools, there’s really no reason any more to use tubes or locking-rim wheels. Most simple punctures can be repaired with a plug while the wheel is still on the vehicle—I’ve repaired such holes before the tire had a chance to completely deflate.
It’s easy to become proficient at plug repairs with just a practice session or two, and that skill will handle probably 90 percent of tire problems you’ll encounter. But when presented with a tire that has popped its bead off the rim, or a serious sidewall split that demands repair from inside the tire carcass, most of us still become gripped with angst. Doesn’t reseating a bead involve flammable liquids and YouTube-prone explosive effects, or at the very least an air compressor or tank capable of producing a really big volume of air? Hundreds of posts on dozens of forums will tell you so. Even a video I recently watched from someone who should know better reinforced the idea that you need a big compressor and/or air reservoir to successfully reseat the bead on a tire.
The truth is, it just ain’t so. To prove it, I once reseated the bead on a 255/85 R16 tire using an Extreme Outback ExpeditionAire compressor, a clever product that employs a pair of toy-like AtomAire pumps each capable of no more than .9 cfm (cubic feet per minute) flow. Doing the same with any decent compressor is easy (although I won’t vouch for the $29.99 Costco variety).
 Any quality compressor, such as this Quick Air X (sadly no longer available), is capable of reseating tire beads
Let’s imagine you’ve put a nice two-inch split in the outboard sidewall of a tire, but it’s still seated firmly on the rim. You need to get behind the split to apply a patch, which means you need to pop the bead off the rim first, then pry the edge of the tire off the rim. This is also a procedure viewed as black magic by many, but it’s easily done. (Before you attempt any of the following, don a pair of gloves and eye protection.) The most elegant way I’ve found is with a set of Tyrepliers, which comprise a lever system that angles between the bead and rim and pries the former off the latter with little fuss. The next most elegant way is with a product called a Beadbuster, a plate incorporating a curved spade that bolts to the bottom of a Hi-Lift jack. To use it, you place your tire and rim under the bumper of your vehicle, position the jack with the curved spade next to the rim against the bead, and use the jack with pressure against the bumper to force the bead downward and off.
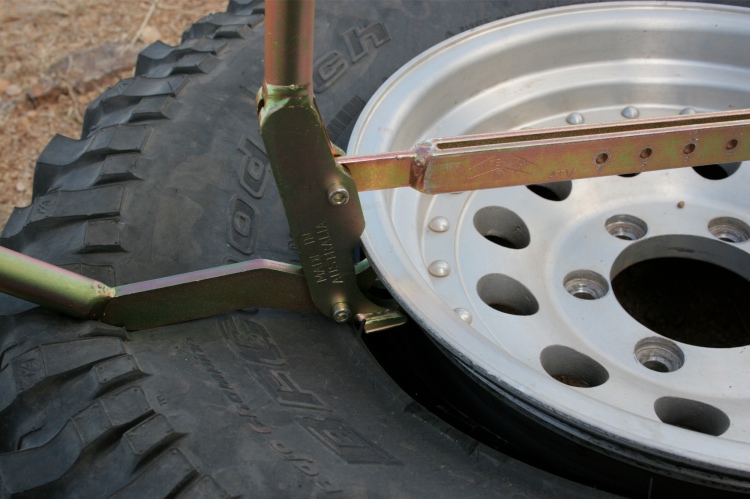 These Tyrepliers, from Australia, make quick and elegant work of breaking a bead
Failing either of these accessories, the base of the Hi-Lift by itself will do the same thing; it just puts a bit more stress on the tire’s sidewall than you do with the Beadbuster. In fact, people have unseated beads by simply driving over the edge of the tire with another vehicle. Whatever technique you use, be sure to mark the tire and rim first so you can reposition the tire in the same place, preserving the balance. (If you’ve popped off both beads through overzealous hooning this obviously won’t be possible.)
Once the outside bead has popped off, it’s much easier to get the inside bead off. You’ll want to do this so you can position the inside bead in the center groove of the wheel. With that done, a pair of tire irons will enable you to pry the outside bead over the edge of the rim, at which point you can patch the split by reaching inside (taking the tire completely off the rim is possible, but much more difficult and rarely necessary).
 The Beadbuster works in conjunction with a Hi-Lift jack
Once you’ve applied the patch and pushed the bead back over the edge of the wheel, it’s time to reseat the beads (if you’ve just popped one off while driving you’ll begin here). First, remove the valve core—once you’ve seated the tire you’ll re-install the core to completely inflate the tire.
Virtually all experts recommend running a ratchet strap around the circumference of the tire and cranking it tight. The theory is that this pushes the beads out against the rim to assist sealing. But when I compared the ratchet technique with using nothing at all during the course of mounting eight BFG tires on four Land Cruiser and four Land Rover steel rims, I could detect no difference whatsoever in effectiveness. If anything, I found it easier to position the tire correctly without the strap. Your results might vary (and if your wheels are too wide for your tires it could help), but I’ve stopped bothering with the strap.
Now comes the important part. Stand the tire and wheel upright so you can inspect both the inside and outside of the rim. You want the wheel centered as perfectly as possible inside the tire, so the gap between the edge of the rim and the tire is as even as possible all the way around, on both the inside and outside of the rim. If the rim sits cockeyed so that one edge is right against the tire and there’s a big gap opposite, it won’t matter how big a compressor you have; the air will simply escape.
Next, you’ll want some sort of liquid to lubricate the tire so it can pop over the rim’s grooves more easily. The very best is water mixed with some liquid soap or detergent, but plain water will do in a pinch (so will, my nephew reports, Keystone Light beer, which is certainly the best use to which you could possibly put that stuff). A squirt bottle makes it easy to wet the entire circumference on both sides, but just splashing it on works too. Be generous with the solution. Especially if it's the "beer." Next time bring liquid soap and better beer.
Connect your compressor’s chuck to the valve. The clamp-on style makes things easier, but it’s not mandatory. Get the air going in, and watch both sides of the tire. The soap solution will help locate any bad gaps; if you see one and the tire refuses to expand, stop and realign the rim. If you have everything right, though, you’ll see the tire start to expand outward on both sides. It won’t happen symmetrically, but as long as there’s a seal it won’t matter. One bead will snap on first—it almost always seems to be the outside one for me, but that might just be happenstance. In any case, you won’t miss it happening—it can make an alarmingly loud pop. As soon as the second bead pops on, remove the compressor. Air will come rushing back out through the coreless valve, but that’s of no consequence—the beads won’t come back off once they’re on.
Reinstall the valve core, inflate to normal pressure, and you’re finished. No fuss, no big compressor or air tank needed—and no YouTube-prone pyrotechnics.
If you’d like some excellent hands-on instruction in all facets of tire repair, sign up for the two-hour tire-repair class at the Overland Expo. Adventure motorcycle attendees will find equivalent classes from the qualified folks at RawHyde Adventures.