

Who, you might ask? Ross Lowell was an Academy-Award-winning lighting expert. But what overlanders will be interested in is the fact that he invented gaffer tape—also known as duct tape—the cloth-backed holder-together of millions of parts on vehicles and a million other things. Read more here.
A different Dormobile

Most people reading this are familiar with the iconic Land Rover Dormobile and its clamshell pop-up roof, which converts a long-wheelbase Series II into a stylish camper with full standing headroom. But I didn’t realize that Dormobile modified other vehicles as well, such as this 1961 Bedford CA van. Very practical if you didn’t need the four-wheel-drive of a Land Rover. Read more about it on Silodrome, here.
The truth about aftermarket "high-performance" brakes.

Few people reading this would argue that the single most important component of your vehicle is the braking system. Everything else—engine power, handling, comfort, fuel economy, off-pavement capability, number of USB outlets—is secondary to the critical need to be able to stop that vehicle safely and quickly, time after time.
Yet despite that single-purpose, critical function, there are a lot of myths circulating about brakes, how they work, and how they can be improved—and a lot of those myths originate from, or are promulgated by, companies trying to sell you something.
In terms of physics, brakes do exactly one thing: They convert the kinetic energy of the moving vehicle into thermal energy, i.e. heat. All brakes function this way, whether disc, drum, or Fred Flintstone’s feet. In fact, even the parachute on a top-fuel dragster converts the kinetic energy of the vehicle into heat, through friction with the atmosphere; it is simply dissipated more diffusely in the dragster’s slipstream.
The energy those brakes must convert does not increase linearly with speed; instead it increases with the square of speed (kinetic energy equals mass times velocity squared). Thus a vehicle moving at 50 mph requires four times as much energy conversion to stop as one moving at 25 mph, and one moving at 100 mph requires sixteen times as much. Given the same speed and the same vehicle weight, the heat produced by stopping is also the same, whether it is done via cast-iron drum brakes on a Series 2 Land Rover or the carbon-ceramic discs on a Porsche GT3.
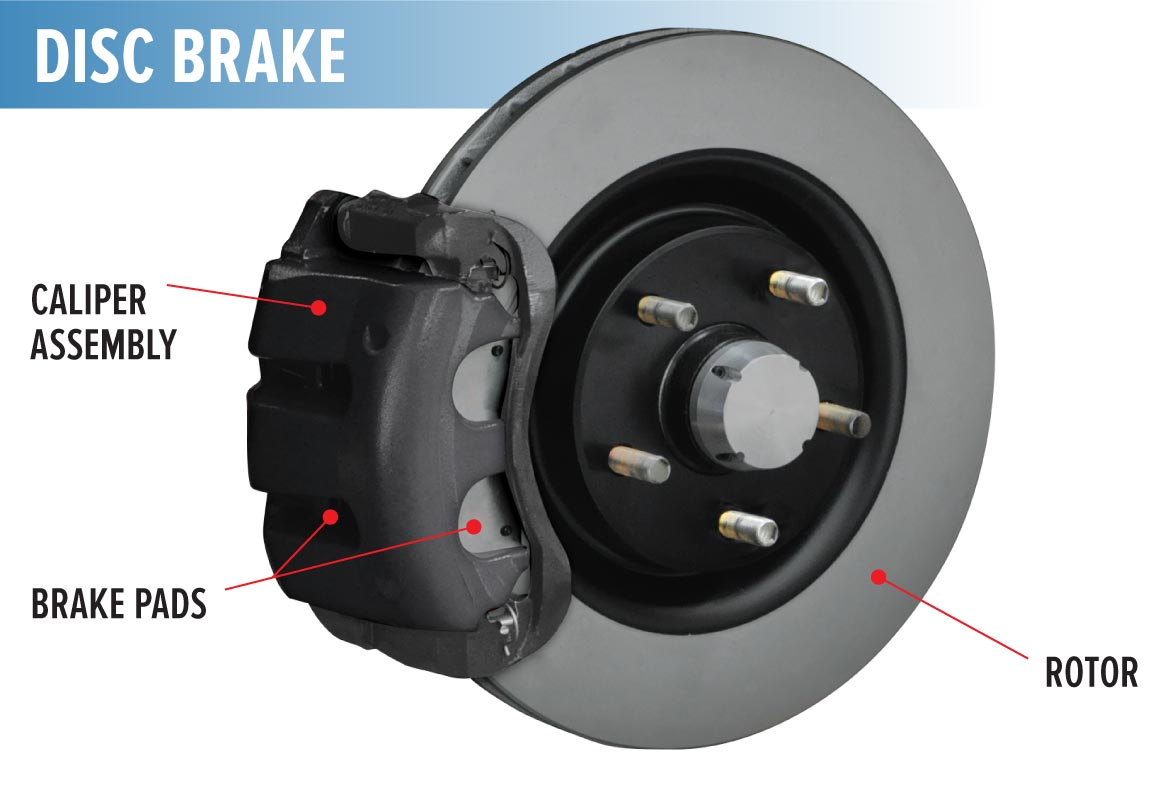
The basic operation of a brake goes like this: When the driver presses the brake pedal, the pedal pushes a plunger into a hydraulic cylinder filled with brake fluid—a viscous substance resistant to heat. The cylinder, called the master cylinder, is connected to a brake caliper in each wheel via tubes. The caliper wraps around the perimeter of the brake disc, and incorporates a piston on each side (sometimes several), which bear against brake pads made of friction-resistant material. The master cylinder forces the brake fluid, which is essentially incompressible (more about that later) through the tube and against the pistons in the caliper, which in turn push the brake pads against the disc, squeezing the disc (also called the rotor) with tremendous force, creating friction and slowing the vehicle.
The drum brake, which has virtually disappeared except on the rear axles of the cheapest economy cars and Toyota Tacomas (see here), is different. Instead of a flat disc there is a cast-iron drum shaped like a flat pan with vertical sides, turned vertically so it rotates with the wheel. The master cylinder pushes against a slave cylinder (a quaint term, no?) which in turn pushes a friction-resistant brake “shoe” against the drum. Drum brakes have (mostly) gone the way of flathead V8s and carburetors because they retain more heat (more on that soon) and don’t work well when wet.
There have been many advances to the basic hydraulic braking system. Originally (and still in a few applications) each caliper employed only one piston and the caliper could slide slightly back and forth. The piston pushed one brake pad against the disk while simultaneously pulling the opposite pad against the other side. This was much less efficient than the later multi-piston calipers. Modern brake calipers on high-performance sports cars can employ six or even eight opposed pistons.
Virtually all brakes today are power-assisted via a vacuum-operated device incorporated into the master cylinder. This reduces braking effort, sometimes hugely in the case of a heavy truck. Also, all brake systems are now (by law) dual-circuit: The master cylinder is essentially two master cylinders combined in line, each of which operates on both front brakes and one rear brake. This redundancy insures that if one circuit fails, the vehicle will still retain reasonable stopping power.
A big advance in the efficiency of brakes arrived with anti-lock braking systems (ABS), which use a simple sensor at each wheel to monitor revolutions of the wheel. If a sensor detects a wheel locking up (i.e. turning slower than the others or stopping altogether), the ABS computer pulses power to that brake so that it unlocks. This system reduces braking distances and increases the driver’s control over the vehicle. (To see why a turning tire stops shorter than a skidding tire, look here.)
As vehicles have become heavier—and wheel diameters larger—manufacturers have been installing larger and larger-diameter discs in their brake systems. Most disc brakes are now ventilated—the disc comprises two discs joined by a vaned center section to dissipate heat more effectively. Thanks to such advances—as well as better tire compounds—average braking distances have been steadily shrinking.
Mostly.
Obviously it’s easier to stop a light vehicle than a heavy one. By extension we can state categorically that it is easier to stop, say, a stock FJ60 Land Cruiser than one that has been modified with an ARB winch bumper and a Warn 9,000-pound winch, a rear spare/jerry can rack, a roof rack, a 60-liter fridge, a drawer system, an auxiliary fuel tank, and . . . you get the picture. With surprising suddenness your 5,000-pound Land Cruiser x velocity squared can become a 7,000-pound Land Cruiser x velocity squared.
I discovered the results on our own FJ60 on a biological survey in Mexico’s Sierra Madre some years back. This 60 had a turbodiesel engine conversion plus most everything on the list above. And on a steep, winding descent of about 3,000 feet, the brake pedal began to feel mushier and mushier, even as I downshifted to use engine braking. By the time we reached the plains the brakes had seriously deteriorated, and only regained effectiveness after ten minutes of cooling down.

I had experienced classic brake fade.
Brake fade can occur essentially two ways. First, a brake pad can overheat from extended application—such as a long descent—and form a slick glaze on its surface. When this happens the brake pedal will still feel firm, but increased pressure will have little or no effect. Second, the brake fluid itself can heat to its boiling point. When this happens, the fluid turns to a gas—and gas, unlike the fluid, is compressible. So your desperate standing on the pedal just compresses the gas in the calipers and does little to squeeze the brake pads. This is what we experienced. The condition can be aggravated if you don’t regularly flush your brake system. Brake fluid is hygroscopic, meaning it absorbs water, and since water has a much lower boiling point than pure brake fluid, old, contaminated fluid can cause premature boiling and fade.
Of course even stock vehicles with no weighty accessories bolted to them can be subject to brake fade, and even if no calamities ensue when it occurs it is a deeply unsettling experience. The logical first response is, “I need better brakes!” Indubitably true, but the path to obtaining them is fraught with hype and numerous ways to spend lots of money for very little if any gain.
Let’s start with that brake fluid. Brake fluid is graded on a DOT scale, based on its minimum boiling point, both dry (uncontaminated with water), and wet (contaminated). Most braking systems come from the factory filled with DOT 3 fluid, which has a minimum boiling point of 401ºF dry and 284º wet (see now how much water can degrade your brakes?). Dot 4 fluid is rated at 446º and 311º minimum, respectively, and DOT 5.1 fluid carries a 518º and 374º rating. So simply spending 20 bucks or so upgrading your brake fluid can give you a full 100-degree margin over DOT 3 before gassing occurs. Note that these standards are minimums; many premium brake fluids will perform well above that and will say so on the label. And what happened to DOT 5 fluid? That’s a silicone-based fluid as opposed to the glycol base of DOT 3, 4, and 5.1. You can mix glycol-based fluids all you like, but cannot mix glycol and silicone fluids.
It will do little good to install better, high-temp brake fluid if your brake pads are sub-standard. Most vehicles come from the factory with organic-compound pads, or NAO (non-asbestos organic). These are sufficient for most use—they are quiet, don’t create much brake dust, and are easy on the discs—but if overheated can be subject to the glazing we discussed earlier. Semi-metallic pads, which are a mixture of iron, copper, steel, and graphite in an organic matrix, are significantly more resistant to glazing, at the expense of (sometimes) more noise, more dust, and faster disc wear—and of course slightly higher cost. A third type of brake pad, ceramic, attempts to solve the noise and dust issues of semi-metallic pads, and is resistant to fade, but less aggressive and generally not recommended for heavy-duty use, especially in cold climates—although the technology is still advancing..
So if your braking system is in good order, you’ve upgraded your brake fluid and switched to semi-metallic pads, and you’re still experiencing brake fade, what then? (I’ll refrain from suggesting, “Leave some of that crap at home.”) It might be time for a more drastic upgrade.
And that’s where marketing hype gets really tricky.
Many commercial kits (as well as a whole bunch of do-it-yourself threads on forums) “upgrade” the front brakes—where most braking occurs—simply by means of replacement calipers with more and/or larger pistons and larger pads than the originals. More pistons equals more squeeze and better braking, right?
Not so fast.
Remember all that kinetic energy we’re turning into thermal energy every time we stop? That energy (heat) has to be dissipated to enable repeated stops—or a safe descent down a mountain grade—without overheating the pads or brake fluid. And the way that heat is dissipated is through the brake disc. So if you install more powerful calipers on your existing discs, here’s what’s likely to happen: You’ll take the vehicle out for a trial run around town, and be impressed at the increase in stopping power. Those new four- or six-piston calipers grab that disc right now. Awesome. So you’ll then head confidently to that long downhill that resulted in a scary spongy brake pedal last month, and . . . oh. Whoa. Halfway down, the pedal feels like it’s got an entire bag of Sta-Puft marshmallows between it and the calipers. That’s because you’ve installed the means to inject more heat into the braking system without installing the means to get rid of it. As long as you’re just trundling around town you’ll get some benefit from the more powerful calipers, but under prolonged application all they’re likely to do is make your fade problem worse.

Okay . . . plan B then. Let’s install a set of those fancy (and awesome-looking) cross-drilled brake discs. You know, like Porsches and Ferraris have? Cross-drilled discs stay cooler, right, with all those holes?
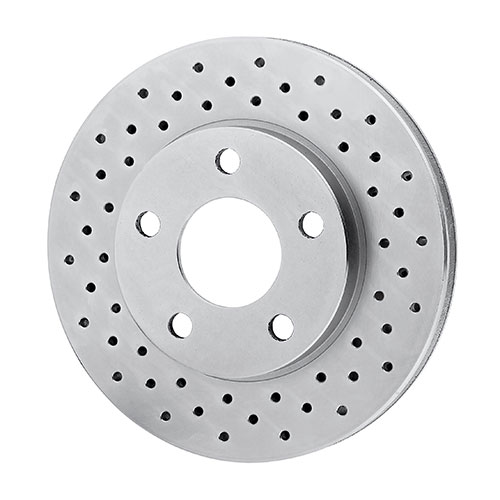
Sorry . . . wrong again.
Cross-drilling of brake discs began in the early days of disc brakes, when existing pad materials and adhesives tended to outgas strongly when heated. Cross-drilling relieved the fractional layer of (compressible, remember) gas the pad would exude between it and the disc. But modern brake pads exhibit virtually none of this outgassing. More importantly, a cast-iron brake disc relies on its mass to absorb and dissipate heat. When you drill a bunch of holes in it, you are reducing that mass. (One company actually boasts that its drilled discs are 16 percent lighter than non-drilled discs.) Some arguments—especially from those who sell them—still maintain that the ventilation and added surface area of cross-drilled discs provide enough cooling to offset the loss of mass. But the further I investigated, the more testimonials I read from objective experts in the field who called nonsense. At best, many referred to any cooling effect as a wash, and several pointed out how often cross-drilled discs wind up plugged with brake dust—a giveaway that not much air flow is occurring through those holes (unlike the well-documented radial flow through the center vanes of a ventilated disc). Add to that the fact that, even when properly cast in and chamfered rather than simply drilled, cross-drilling can introduce stress risers into the disc that promote cracking, and you have a powerful argument against it, no matter how stylish it looks. (And if you look at the ads from companies who sell them you’ll be amused at how many mention the style factor as an actual reason to spend your money.)
The sole theoretical advantage to drilled discs mentioned by those same experts was a slightly enhanced initial “bite” in wet conditions, when the holes might provide an exit for surficial water on the disc. But brake pads quickly squeegee water off that surface anyway, so even this attribute is of questionable value in the face of the expense and loss in mass of a drilled disc.
Thus we can say pretty confidently that replacing your plain brake discs with cross-drilled discs of the same size will probably result in no reduction in fade, and could conceivably exacerbate it.
(Incidentally, the above does not apply to disc brakes on motorcycles, since a motorcycle disc is a solid rotor rather than a vented, double-sided unit. On a solid rotor, cross-drilling does at least theoretically create some turbulent cooling flow.)
What about the more recently popular slotted discs? Slots actually perform a different function than drilling. The edges of the slots perform a microscopic scraping function on the pad, keeping the pad surface fresh and possibly forestalling glazing. While they won’t in themselves enhance cooling or prevent heat-related fade, they might help forestall the fade resulting from overheated pads of inferior composition. Be advised, however, that slotted discs, as you might expect, will wear out pads more quickly than solid discs, and are likely to exacerbate any brake-dust issues.
Inevitably, aftermarket manufacturers are now offering discs that are both cross-drilled and slotted. At least the slots will provide some function, and where the slots are there is less room for the pointless holes . . .

All this leads to a logical conclusion. Once you’ve optimized your brake fluid and brake pads—and assuming the rest of your braking system is operating as it should—the only sure way to add braking power and reduce the chance of fade is to install, surprise, larger brakes—specifically discs of larger diameter and/or width, with calipers to match. Sometimes this is possible within the constraints of your existing wheels and front end design, sometimes it is not.
Automobile manufacturers are perfectly aware of this. To give you a random example—outside the realm of overland vehicles but one with which I’m familiar—when Porsche upgraded the 1983 911SC to the 1984 Carrera, including a 15-percent bump in power, they improved the braking by increasing the width of the front brake discs from 20 to 24 millimeters, while keeping the diameter the same at 289mm. For the significantly more powerful Turbo of the same era, they increased both the diameter and the width of the discs, to 300 and 32mm respectively. Those were the largest brakes that could fit within the factory 16-inch-diameter wheels. When Porsche added even more power, they switched to larger-diameter wheels as well to accommodate larger discs.
There is one minor exception to the only-bigger-is-better rule. If you look at different aftermarket discs, you’ll notice significant variations in the spacing of the center cooling vanes. Inexpensive discs will be made with more widely spaced slots, which means there is both less mass in the disc to radiate thermal energy, and less radial air flow as well. The one way an aftermarket disc of the same dimensions as the stock disc might outperform it is if the aftermarket disc has a higher density of vanes, and thus weighs more than the stock disc. StopTech, for example, makes a replacement disc for the Tacoma that is stock diameter, but weighs over a pound more, thanks to more closely spaced vanes. That translates to more thermal capacity.

A comparison of vane spacing on a vented brake disc.
Looking at our own class of vehicles, it is all too easy to find “high-performance” brake kits comprising nothing but inexpensive stock-sized replacement discs that have been cross-drilled and/or slotted. Some of the claims for these border on outrageous.

Note that line, “Improves stopping power up to 30 percent over stock brake rotors.” Seriously? Thirty percent meaning 30-percent shorter stopping distances? Or thirty percent less fade? I’d love to see an independent test of that claim. Also, there is simply no chance that their “custom slots” do any cooling, and they will more than likely increase dust due to the scraping function. Finally, check the “reducing heat” claim at the top, which we know from physics is impossible. The only component in this kit likely to modestly improve braking performance is the semi-metallic pads, if they are replacing stock pads—and those certainly won’t “reduce noise.” That’s a stunning amount of misinformation in a single ad.
Finding kits to actually upgrade brakes is much, much harder, in part because it so often requires installing larger-diameter wheels as well. TRD offers a front disc upgrade kit for Tacomas that increases the disc size from 319mm to 332 mm but still fits within the stock wheels. That’s a worthwhile enhancement.
Redline Land Cruisers offers a Big Brake kit for the front of FJ40s, 55s, and 60s that increases the disc diameter from 12 inches to a full 13.3 inches and includes calipers from a later 100-series Land Cruiser—a significant upgrade. But the kit requires a switch to 17-inch wheels for clearance (the company also wisely recommends rear discs, a larger master cylinder, and a proportioning valve to correctly balance front-to-rear braking force). They also mention a big brake kit for 16-inch wheels, but I’ve not received any more information on that one.
I’ve seen a few other legitimate kits for various vehicles, but there is far more in the way of chaff to wade through to find it. The good news is, I suspect for the majority of us a simple upgrade to better pads and fluid will solve anything but chronic brake fade. If that won’t do it, at least now I hope you’ll be better able to distinguish hype from fact.
And if you really want to drill holes in something, maybe you could take up carpentry . . .
Quality . . .

It’s no secret that I’m a believer in high-quality gear, whether it’s the vehicle, accessories, tools, camping equipment, or personal accoutrements. I also try to buy American-made products when possible (and when they meet my standards, which is not always the case).
But for certain products there simply is no longer a U.S.-made (or even North American-made) choice.
Recently I was in the market for a new Gore-Tex parka, and turned to Arc’Teryx, a company I can modestly claim to have helped publicize in their early days, when I reviewed gear for Outside magazine. I was impressed with the quality of Arc-Teryx’s products—even among a suite of superb contemporaries such as Marmot—and at the time they were making their clothing in Canada.
Sadly, that no longer seems to be the case. The Beta AR jacket I bought was made in, of all places, Myanmar (Burma to many of us).

But my initital disappointment more or less evaporated when I examined the jacket closely. Try as I might, I could find not a single flaw in its construction—indeed, the closer I looked the more impeccable were the details and stitching. In the end I had to admit it was fully the equal of any of the company’s early efforts.
That doesn’t mean I’m happy that the manufacturing of so many thousands of products has shifted overseas to save labor costs here—and, make no mistake, that is the sole reason to do so—but it did serve as a reminder to me that quality is not intrinsic to any geographic locale. So perhaps it’s now more important than ever for consumers to actually pay attention to what they buy, and evaluate it on its merits rather than any arbitrary prejudice.

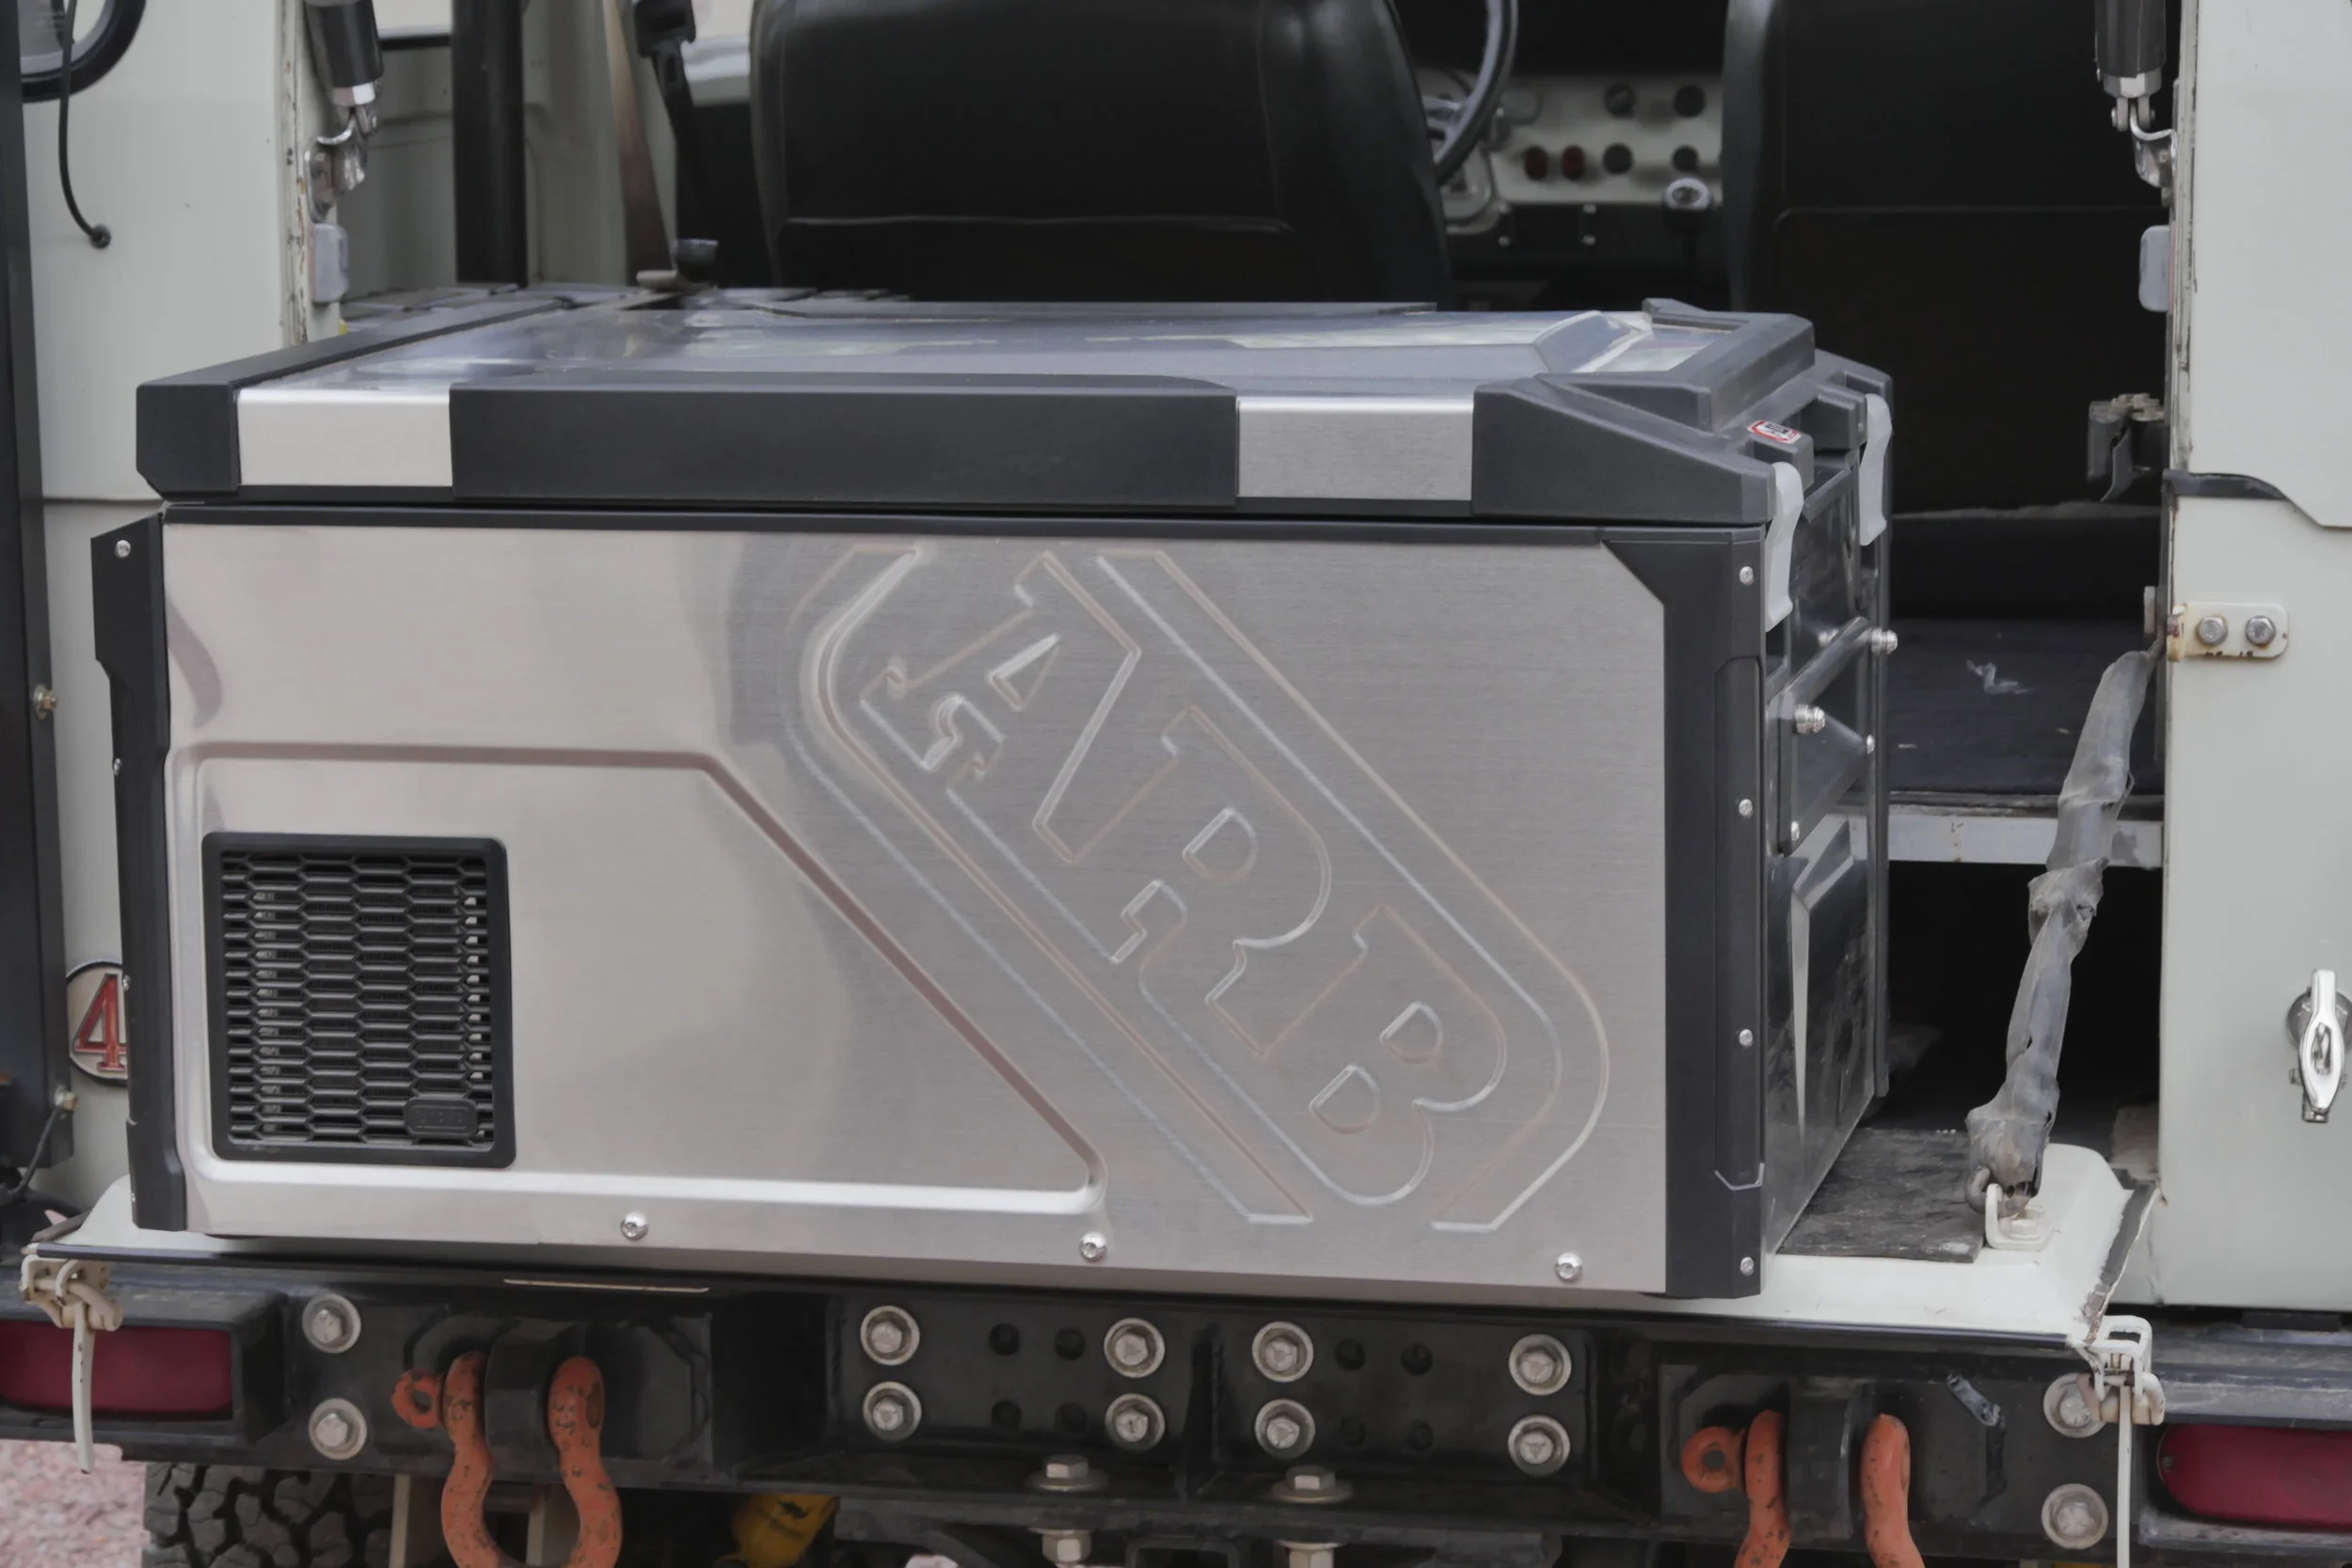
The new ARB Elements fridge/freezer

The call came from our commercial mail service. “Hi Jonathan. You have a really big box here, and it’s heavy!” I knew it could only be one thing: the new ARB Elements fridge I’d been assigned to review for OutdoorX4 magazine.
Even back home and excised from its substantial packing, the Elements fridge is an impressive piece of equipment at 70 pounds, 32 inches long, 19 inches wide, and 17 high. It’s strikingly handsome as well in its cladding of 304 stainless steel and black trim. You might or might not go for the huge embossed ARB logo on each side, but the formed panel increases rigidity so it’s not purely cosmetic.
More important is the substantial redesign—a complete re-envisioning, actually—that ARB undertook three years ago when conceptual work reportedly started on this fridge. In an increasingly crowded and sophisticated market, a simple tweaking of the previous model, introduced in 2008, wasn’t going to cut it. So the Elements (available for now only in a large 60-liter version) incorporates a bunch of innovative features.
First, as the name implies, is the weatherproofing. You can leave this fridge strapped down in the bed of your pickup all year (preferably using the available tamperproof bolts). Precipitation won’t hurt it, and the black ASA (acrylic-styrene-acrylonitrile) trim is similar in strength to ABS resin but significantly more resistant to UV degradation. The hinges are stainless-steel castings; the twin aluminum latches are a huge improvement over the previous generation’s single plastic catch, which always felt fragile. (However, one disadvantage compared to the old fridge is that there is no easy way to quickly strap this one down without purchasing the optional tie-down kit or mounting base. The carry handles are comfortable but provide no way to loop anything over them.)

The three icon buttons lower left control the electronic combination lock
There’s a slot to secure a padlock, but a far more stylish way to prevent your friends pilfering your Samuel Smith’s ale is the electronic lock incorporated into the (weatherproof) control panel. Program in your own code using the three icon buttons, or leave it disabled as you wish. With the lid locked closed, the recessed temperature buttons cannot be accessed, so your stymied and jealous friends can’t secretly warm up the beer. The lock projects a pin into a fitting in the lid, and would clearly not withstand a crowbar, so if serious antitheft capability is needed (i.e. steaks, lobster, Veuve Clicquot, etc.) I’d default to a shackled lock.

Open the lid and the first thing you’ll notice is the clever single hydraulic strut, which magically holds the lid open at any position you wish. An LED lights up the all-white interior, which is massive if you’re used to the standard 40-liter-size fridge. There’s a big bottom compartment and a high shelf, which can be blocked off as a produce shelf by turning the basket around so its high side is toward the shelf. Turned the other way, the basket allows long items to be laid horizontally. One feature that might be an issue for some vehicles: There is no way to convert the lid to side-opening.

Mechanically, the Elements uses an industry-standard Nidec/Secop (formerly Danfoss) BD35F compressor, with a three-stage low-voltage cutoff. Of the two standard 12V fridge compressors—this and the Sawafuji swing-motor compressor—the Secop tends to run more quietly at the expense of a more complex mechanism. The Secop can also be run at different speeds to optimize power use. Both compressors have proven reliable over the years, and both will operate at significant angles, unlike the cheap absorption-type fridges still found in some RVs and campers. ARB enhanced the performance and efficiency of the Elements by incorporating a full-height evaporator; this should keep temperatures more uniform throughout the fridge. Those temperatures can be dialed down to 0º Fahrenheit (-18ºC) if you choose, even in 90º (35ºC) weather. The walls on the Elements are noticeably thicker than those on my old ARB fridge, which will also help keep power consumption down.
Options for the Elements include a remote temperature monitor, various bases, and a tie-down kit. If you buy the latter, a word of caution: The slots on the metal buckles of mine were razor sharp and would have severed a strap in short order; I had to file them smooth.
I was a bit surprised that ARB’s initial release of the Elements was in the larger, 60-liter model rather than the more common 40-45-liter size, but perhaps the decision was driven by their own sales figures of the previous version. I’m certain other sizes will follow, and I’m curious if the company will eventually add a model with separate fridge and freezer compartments.
Overall, I think ARB has built a fridge that is several genuine steps forward and will carry on the sterling reputation of the company.
Measure first! The Elements barely fit in the back of my FJ40
ARB USA is here. Retail on the Elements fridge, for some strange reason known only to the marketing department, is $1444.49
This is awesome.

If you can’t laugh at yourself, I’ve always said, you should never, ever laugh at anyone else.
So, you think your Zarges cases are stylish?

How about an aluminum-clad explorer’s trunk from Louis Vuitton?
Apparently only a few of these trunks were produced in 1892, and of that few only two known examples survive. This one was recently auctioned by Christie’s for the astounding figure of £160,000 ($206,000). For that price you could buy 412 similarly sized Zarges cases.
But they wouldn’t say Luis Vuitton on the label.
Apparently this one spent much of its life in the UK basement of a family who had no idea of its value.
More here.
New MAXTRAX Xtreme

It’s well-known that I’m a fan of the original MaxTrax, and have defended them against cut-price copies. I’ve also noted that I refuse to use the company’s all-caps MAXTRAX spelling, which as a grammarian I find wincingly annoying (I compromise with MaxTrax). Now . . . sigh . . . the company is torturing me again with their new product, named the Xtreme. Ugh.
I grit my teeth and continue, because the new product, a prototype of which I received recently, looks to be a significant leap in the technology of composite recovery mats. Why? Because the teeth, or studs, of the new mat are made from hard-coated aluminum rather than molded-in nylon. And . . . they are user-replaceable.
As anyone who has used them knows, the salient disadvantage of composite recovery mats is that, if you allow too much wheel spin while attempting to climb onto them, the studs can melt, significantly and permanently reducing the effectiveness of the product. Recent mats using harder plastic studs helped but did not cure the issue. The Xtreme might just do so.
The composite base of the new mat is the same reinforced nylon material as the original MaxTrax, which I and many other testers have found to be superior to the polyethylene used by some lower-priced competitors. There is also extra reinforcement in the bottom webbing. Combining that with the aluminum studs should provide vastly improved durability.
As you might expect, the Xtreme is a bit heavier than the standard MaxTrax—8.9 versus 7.4 pounds each. But at 18 pounds per pair that’s still lighter than even perforated aluminum sand mats.
They are not, however, cheaper. Retail on the Xtreme will be $449 a pair. I remember being scandalized at the idea of the original $300 MaxTrax—until I used them. I suspect our perspectives will continue to evolve as long as such price increases are backed up by such meaningful improvements.
