Tech

The best spout for the NATO jerry can

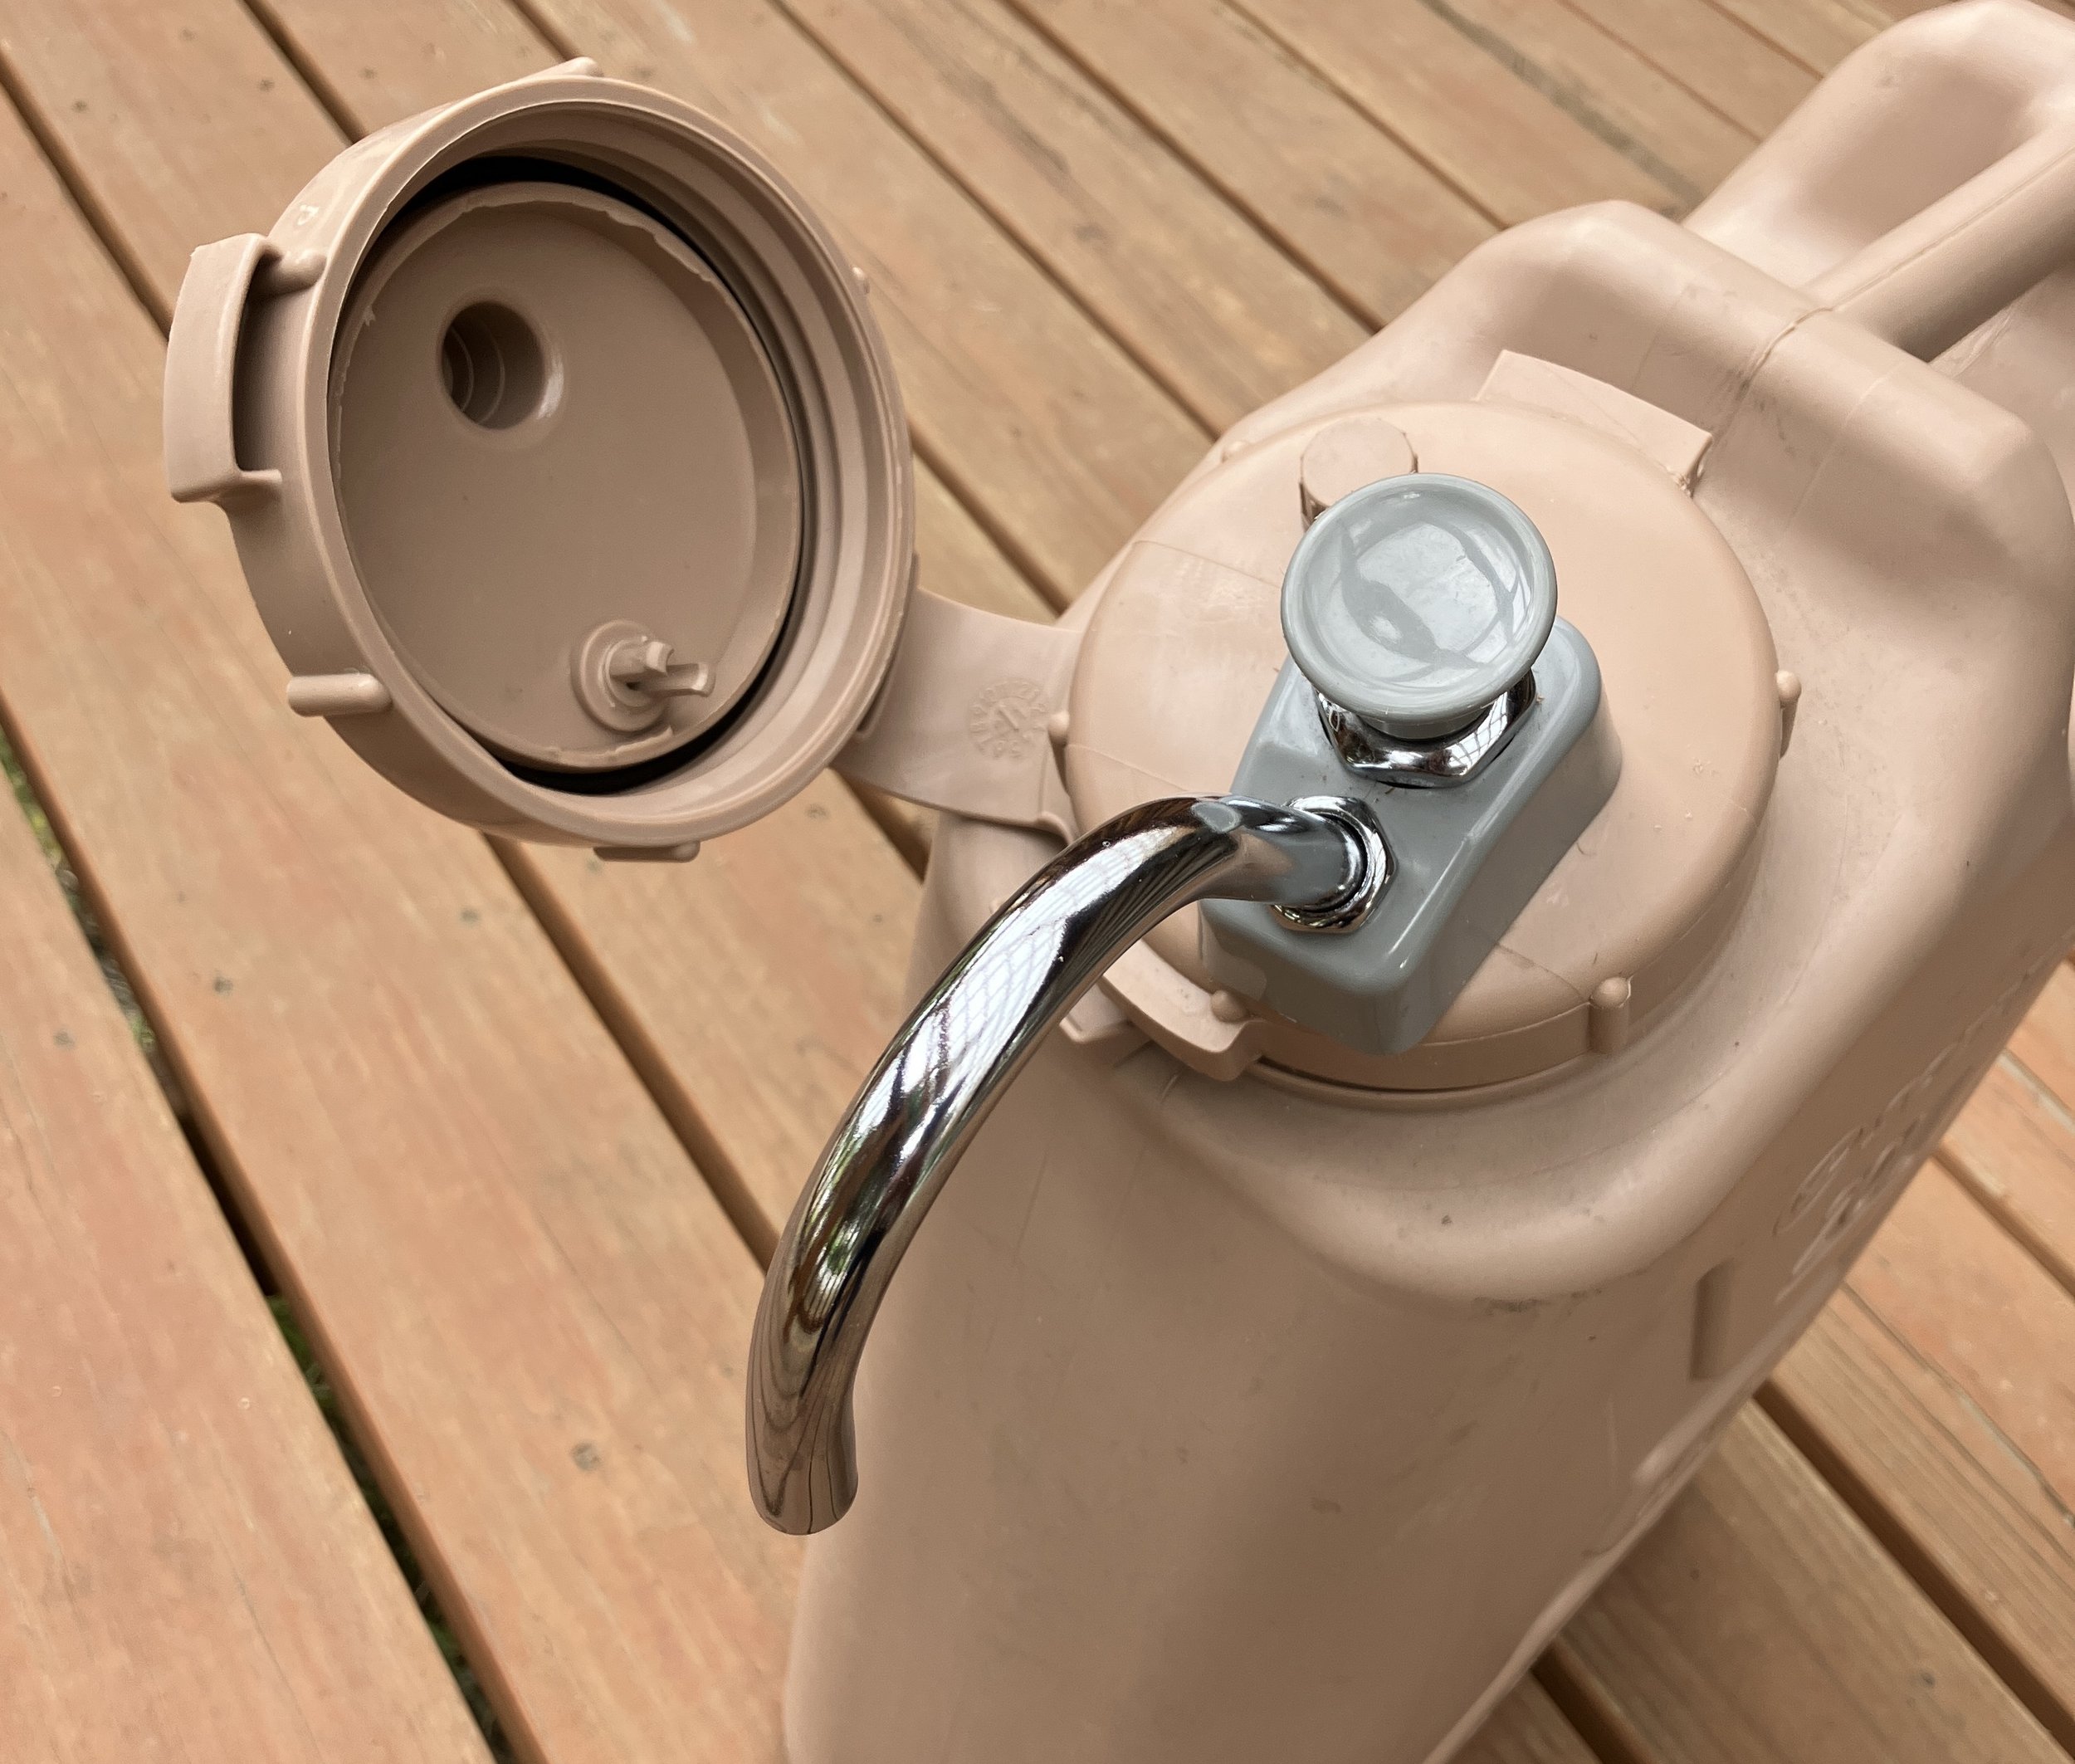
Most readers here are aware of my strong preference—some might say worship—for the NATO-style steel fuel container over the various plastic alternatives. (Please read this and this.) If asked to justify my choice in five seconds or less, I’d just point to this photo of a friend’s British MOD (Ministry of Defense) can, marked with its date of manufacture—1966—and still perfectly usable. Do you think any plastic fuel containers will still be usable in 60 years? Nope—they’ll all be taking up landfill space.

One of the many advantages of the genuine NATO can is how quickly it decants, thanks largely to an effective breather tube that siphons air into the can as fuel or water pours out. But that advantage can be completely negated by using the wrong spout.

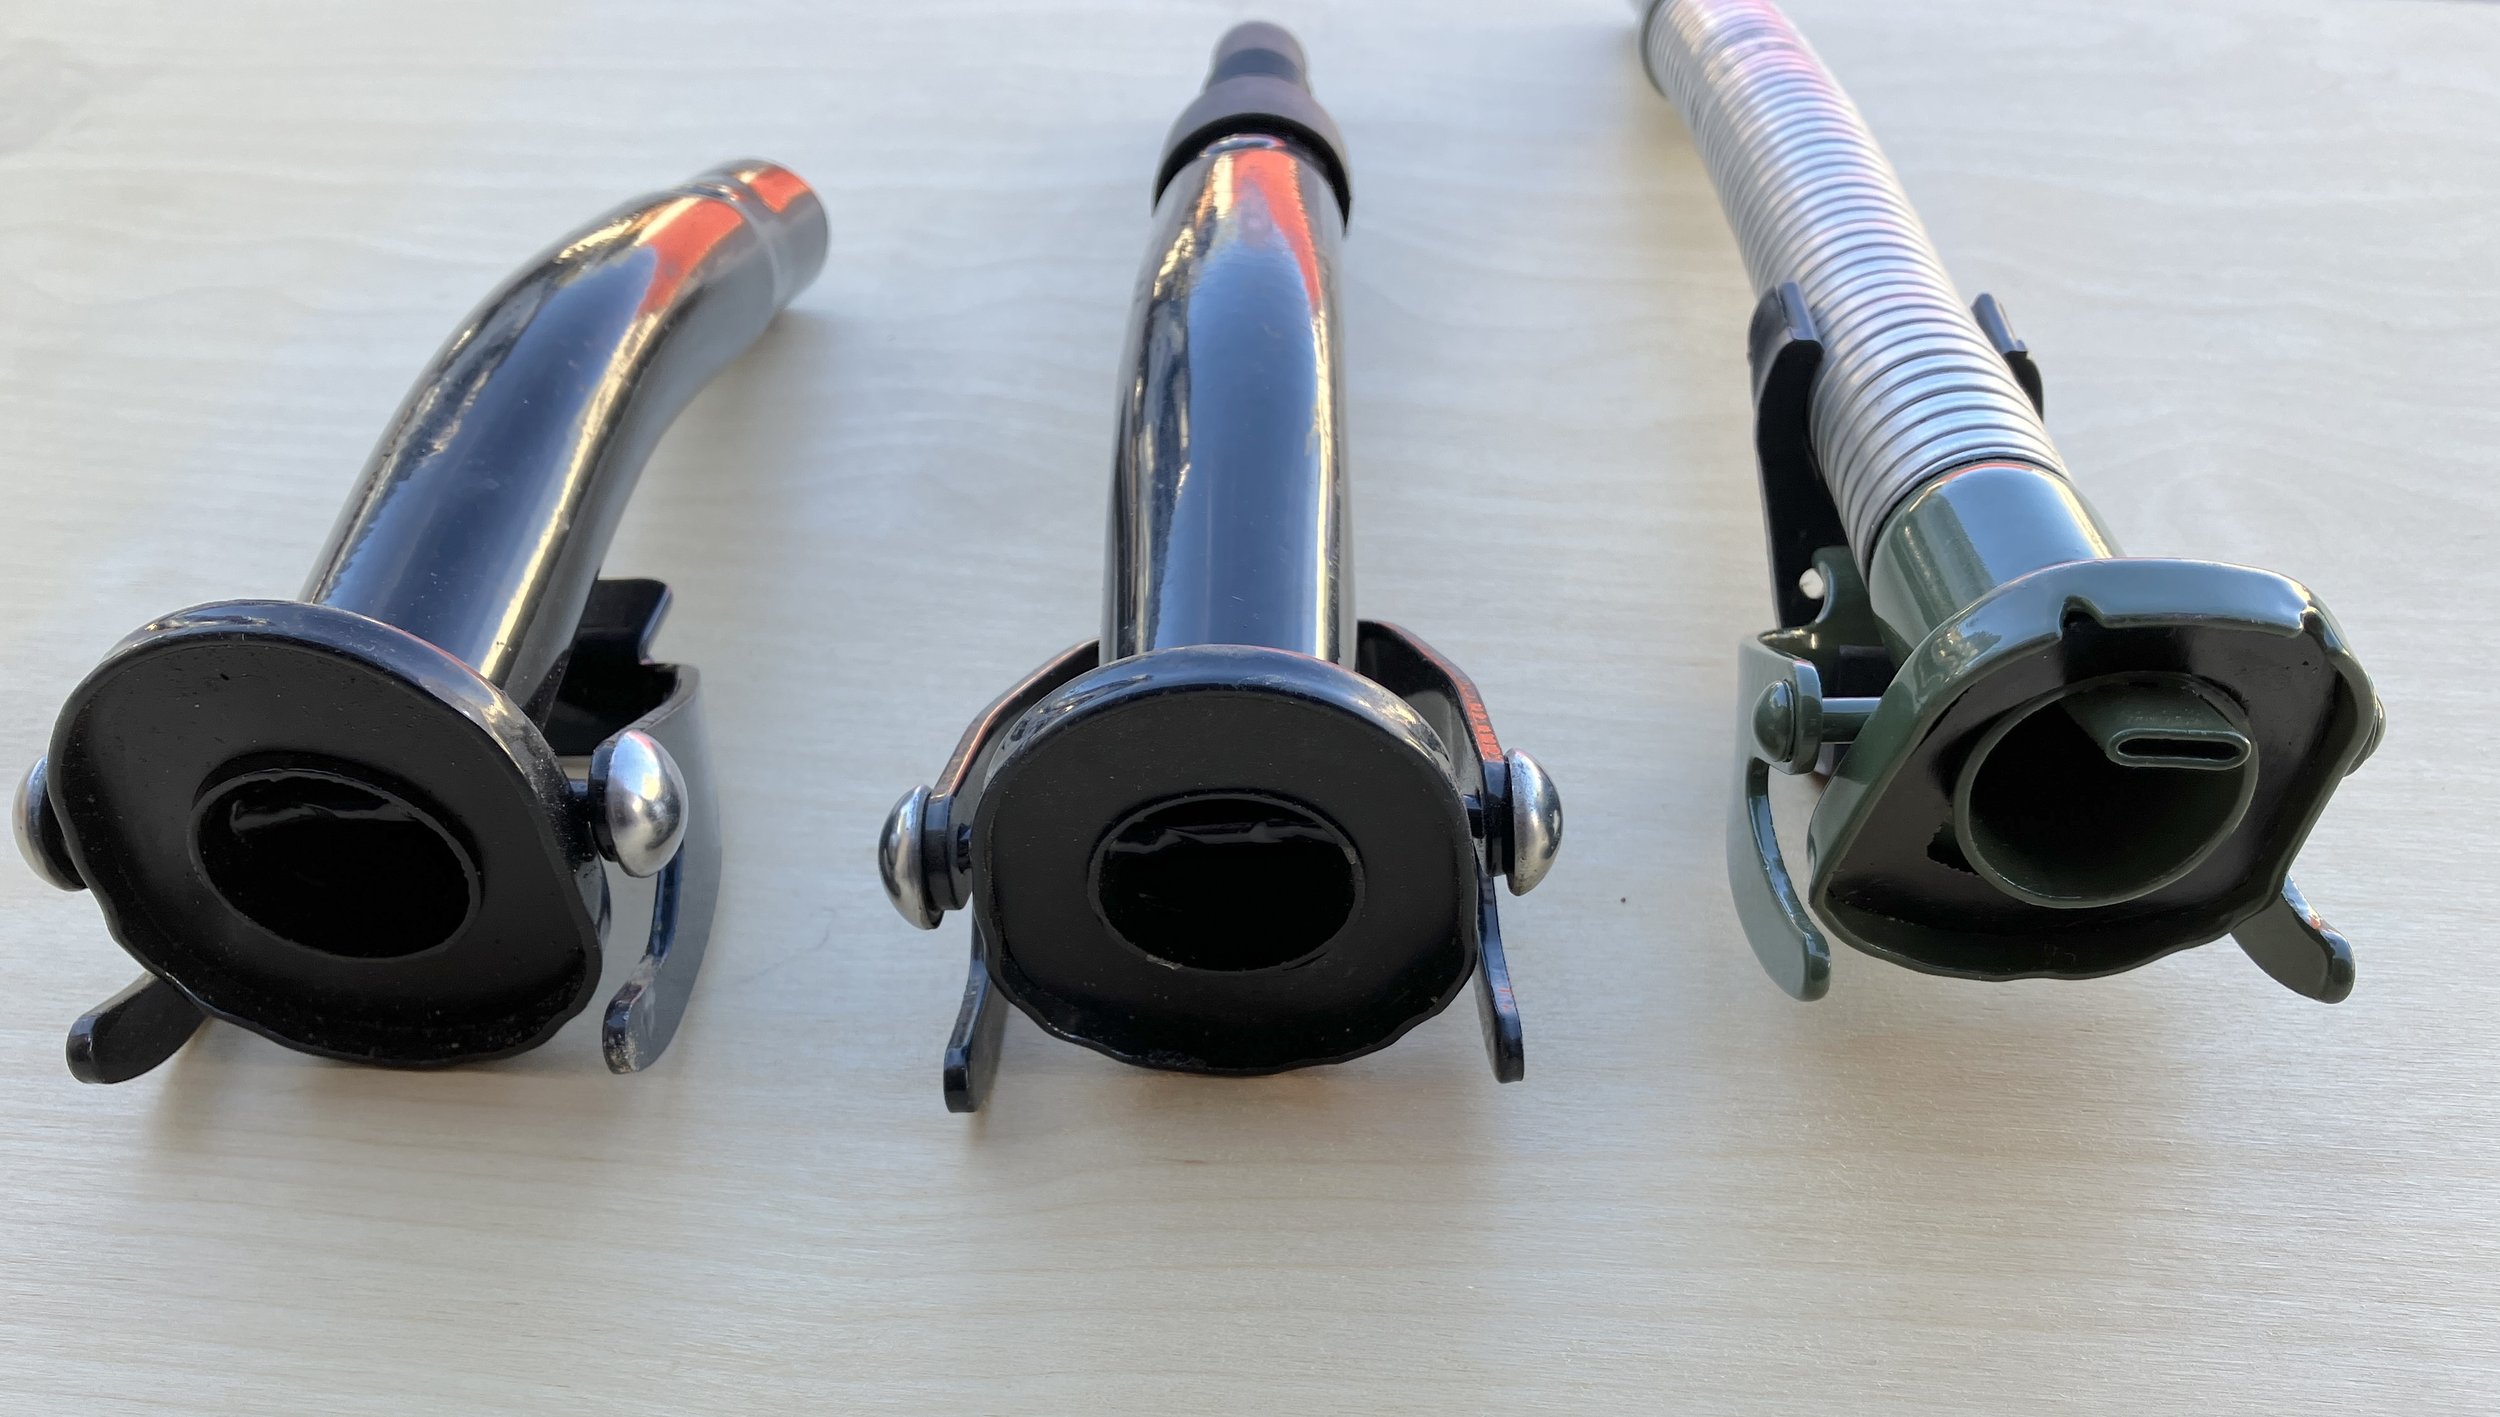
Look at the three spouts shown here—two generic units on top (identical except for the flexible unleaded-friendly extension on one) along with a proper Valpro-made spout.

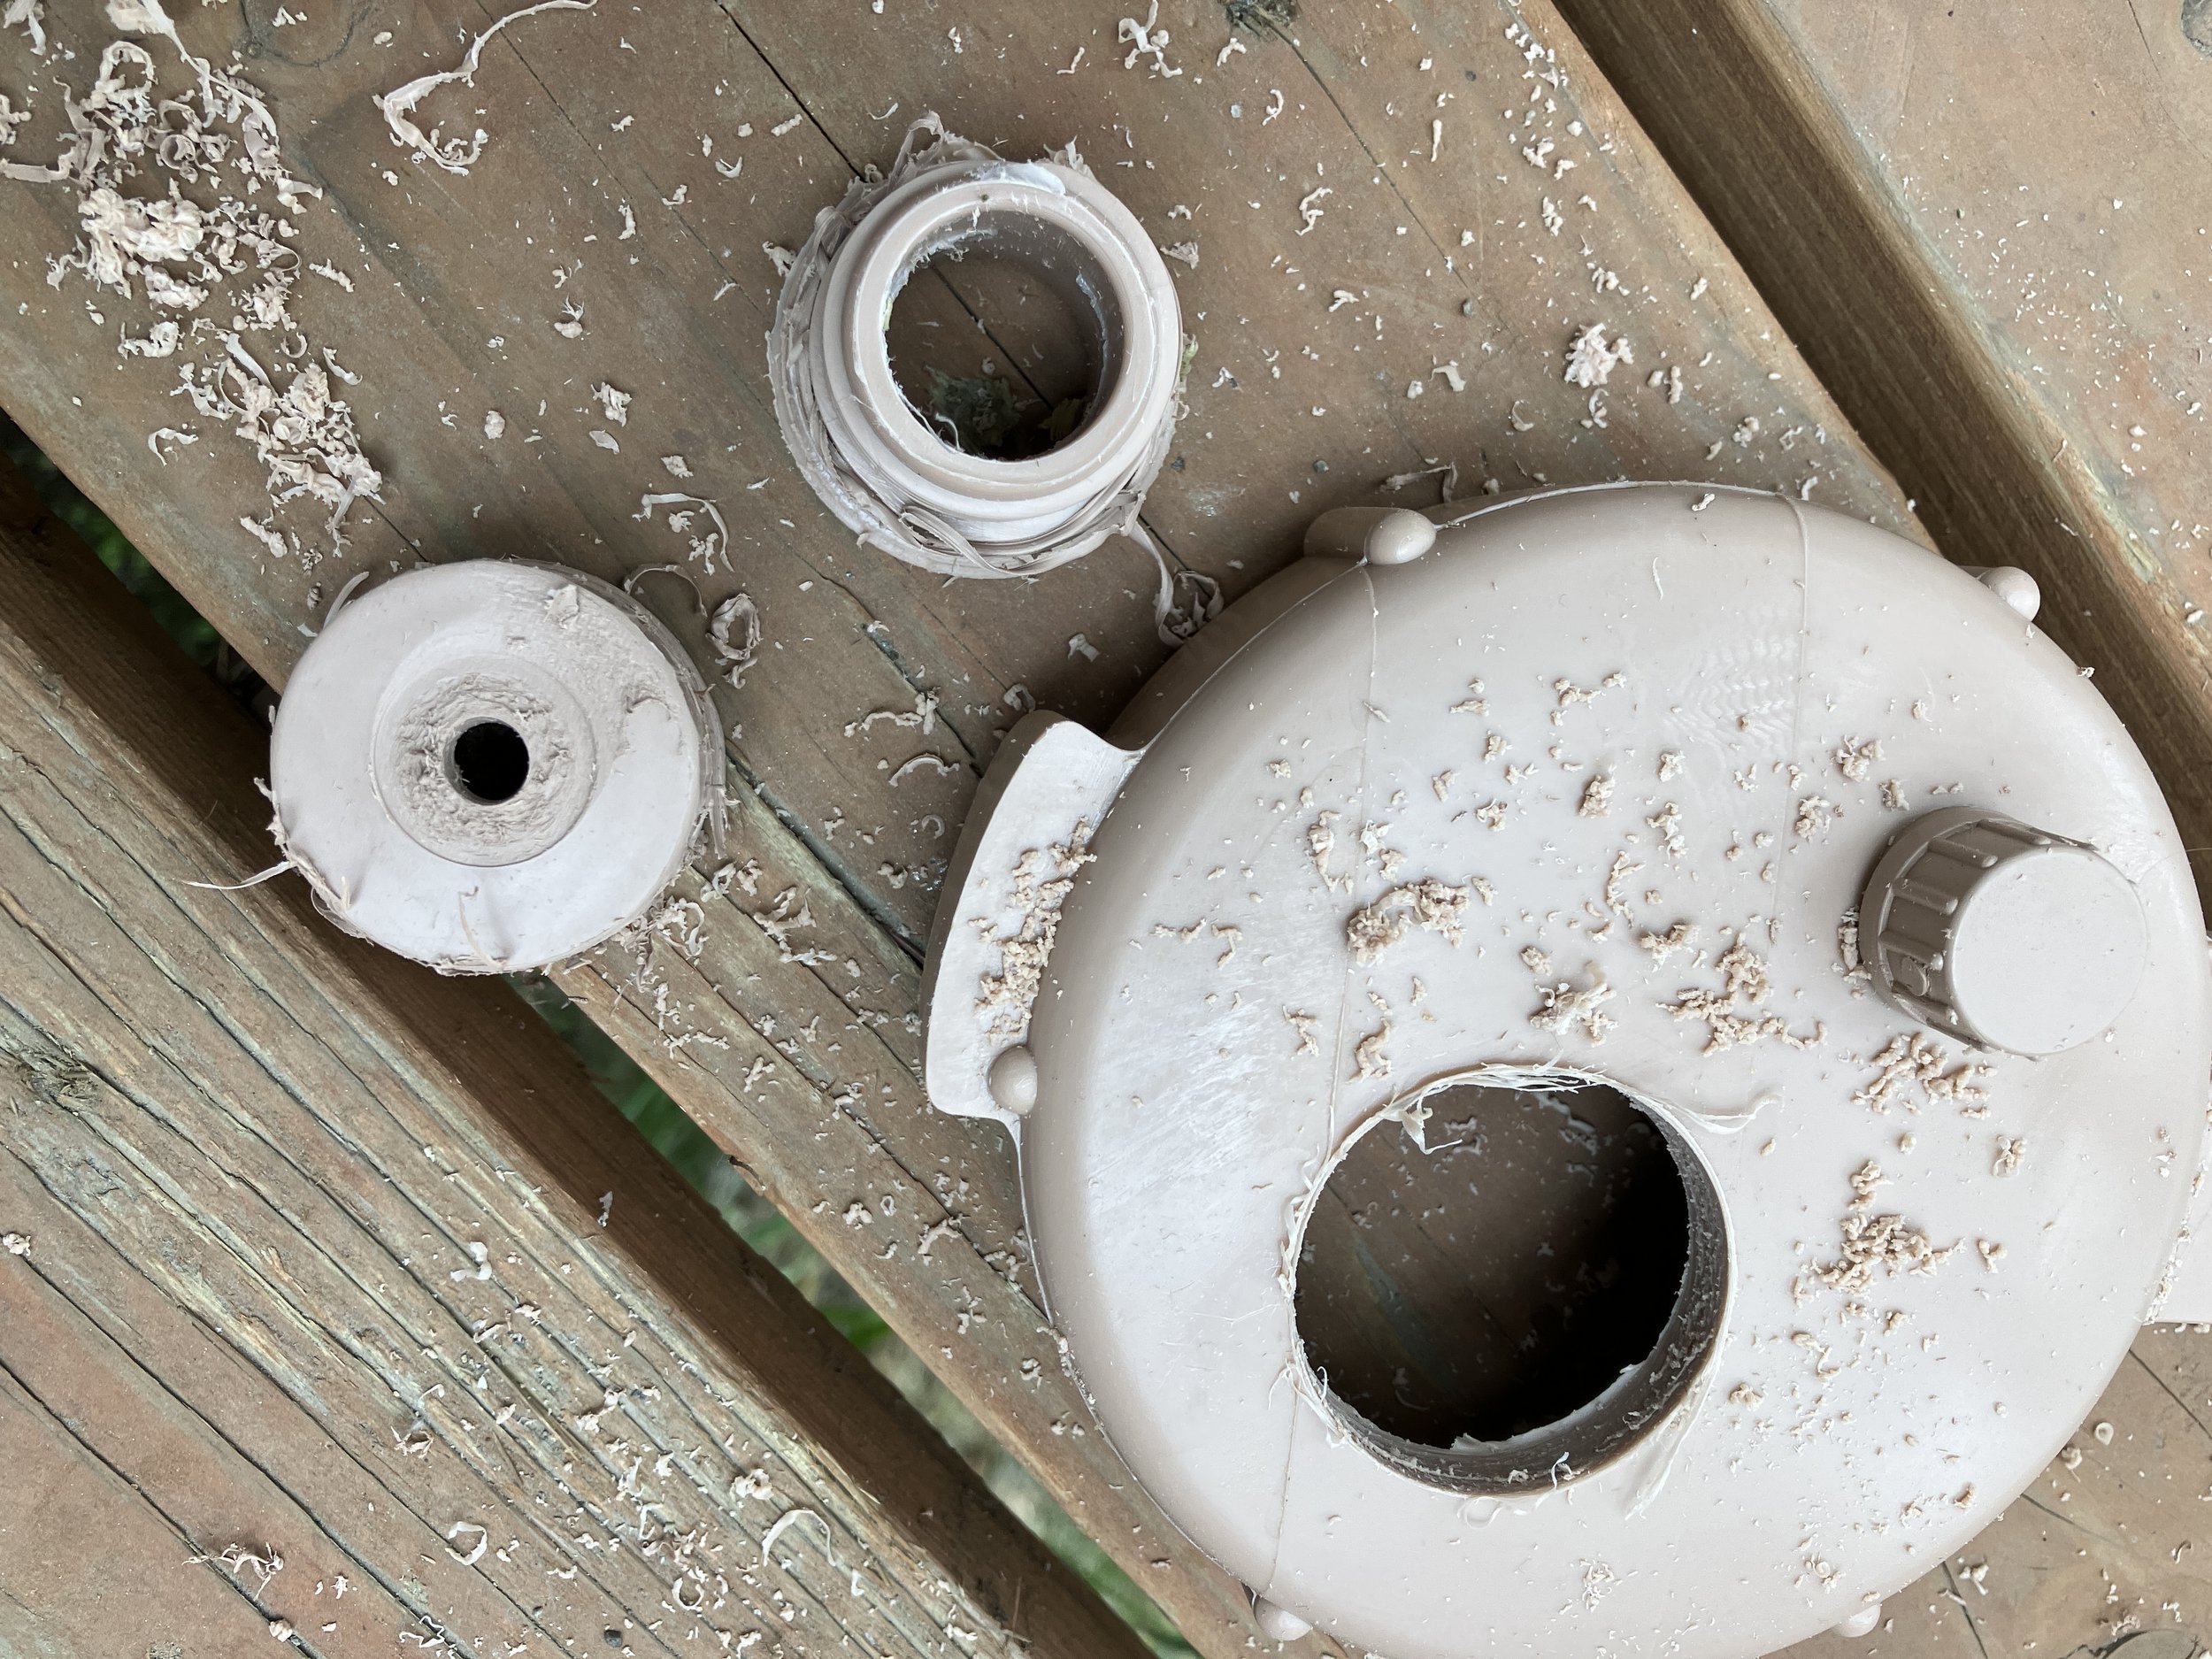
Notice in the photo below that only the Valpro/NATO spout incorporates the correct breather tube and high-position air intake. The generic units make do with a simple punched hole near the end of the nozzle. (Furthermore, in this sample, the spout on the left wouldn’t even cam closed tightly enough to prevent seepage around the gasket.)

The Valpro includes an excellent, all-metal flexible nozzle with an unleaded-filler-compatible tip. Its cam secures perfectly, and the included rubber clip secures the cam from rattling when stored.

Wavian makes an excellent spout as well, functionally identical to the Valpro, although I’m not fond of the flexible plastic end piece. Chalk that to personal preference.

Wavian also produces a push-to-pour “safety” spout if your local laws require one.

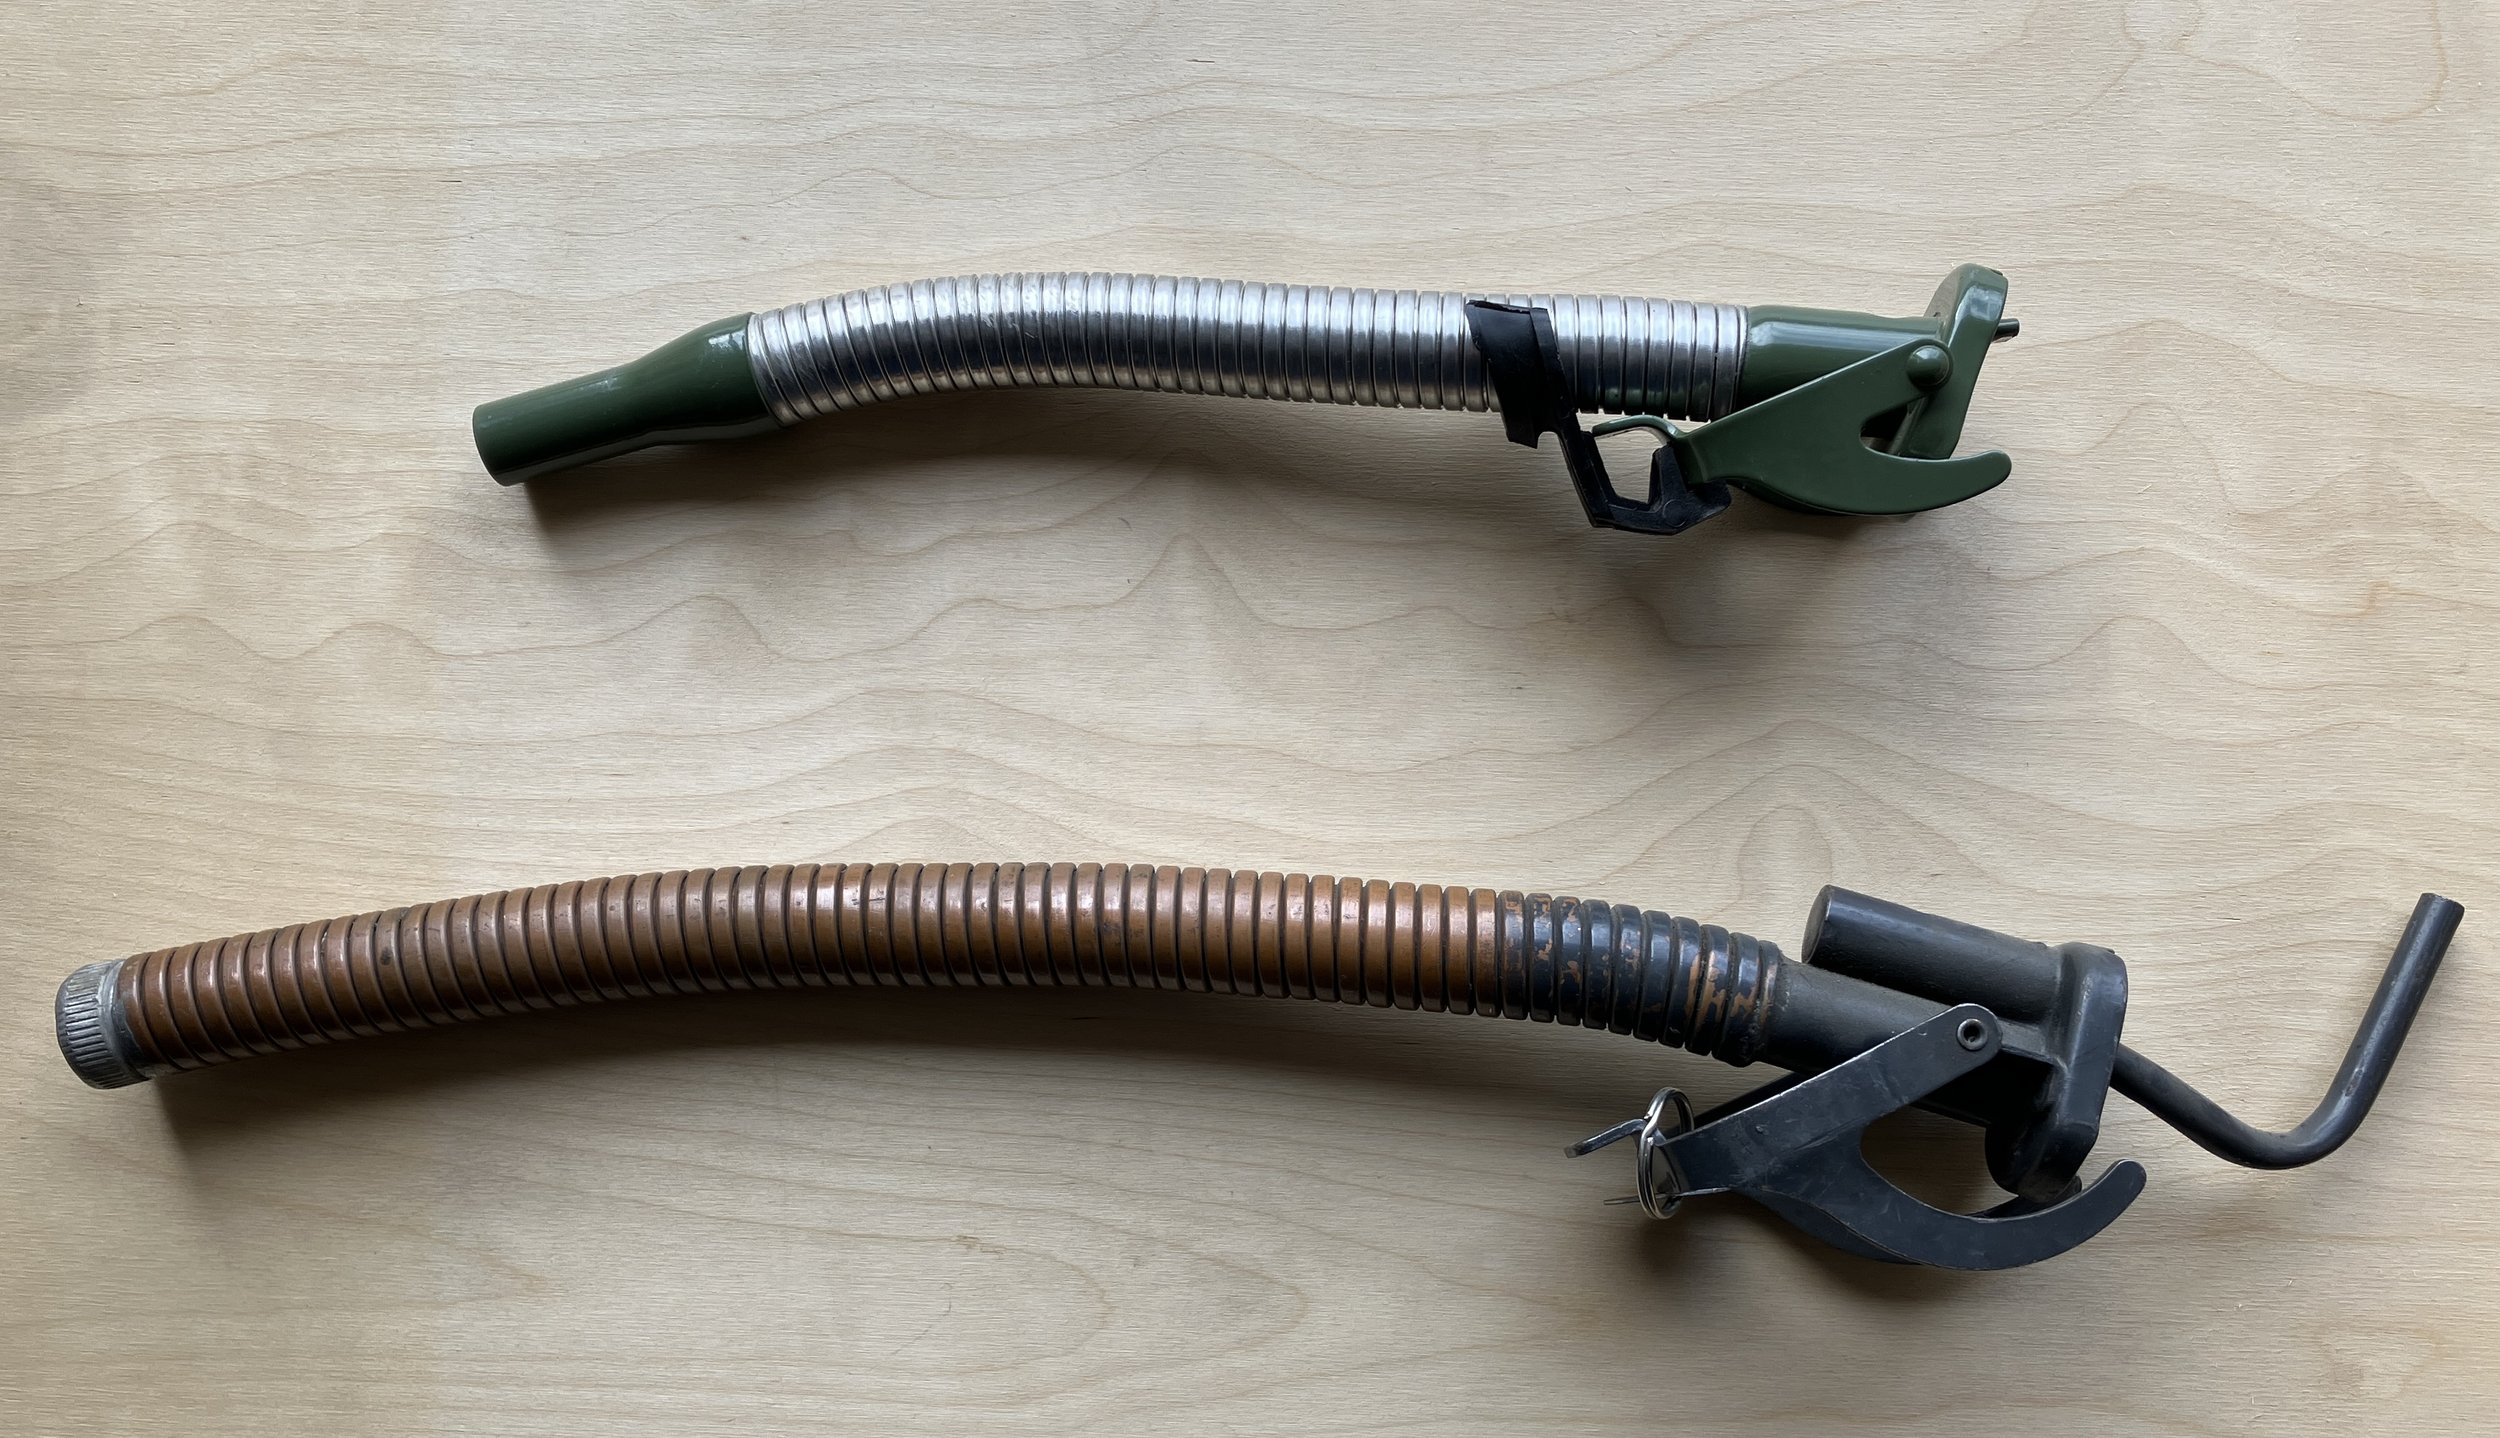
There is, however, another spout—one that some consider the Holy Grail of NATO can spouts. It was made for the Swiss Army, and incorporates a significantly extended breather tube and a larger intake plenum. Legend has it these will empty a full 20-liter jerry can in under 20 seconds. Here’s one with the Valpro spout. The Swiss unit is significantly bulkier, and the nozzle—solid copper to reduce the risk of sparking—is too large for the standard unleaded fuel tank filler, although I know of people who have hacked them to fit.

I decided to put them all to the test.

I started with the Valpro, which along with the Wavian is the high-quality standard. I timed how long it took to empty a full 20-liter water can into another can. In 52 seconds, accompanied by enthusiastic gurgling as the breather kept air flowing into the interior, the can was empty—a commendable performance.

Next up was the Swiss Army unit. Its breather seemed to aerate even better, and indeed emptied the can in 41 seconds. Neither the Valpro or the Swiss spout leaked a drop of water through the breather. A second test with each produced results within two seconds of the first.

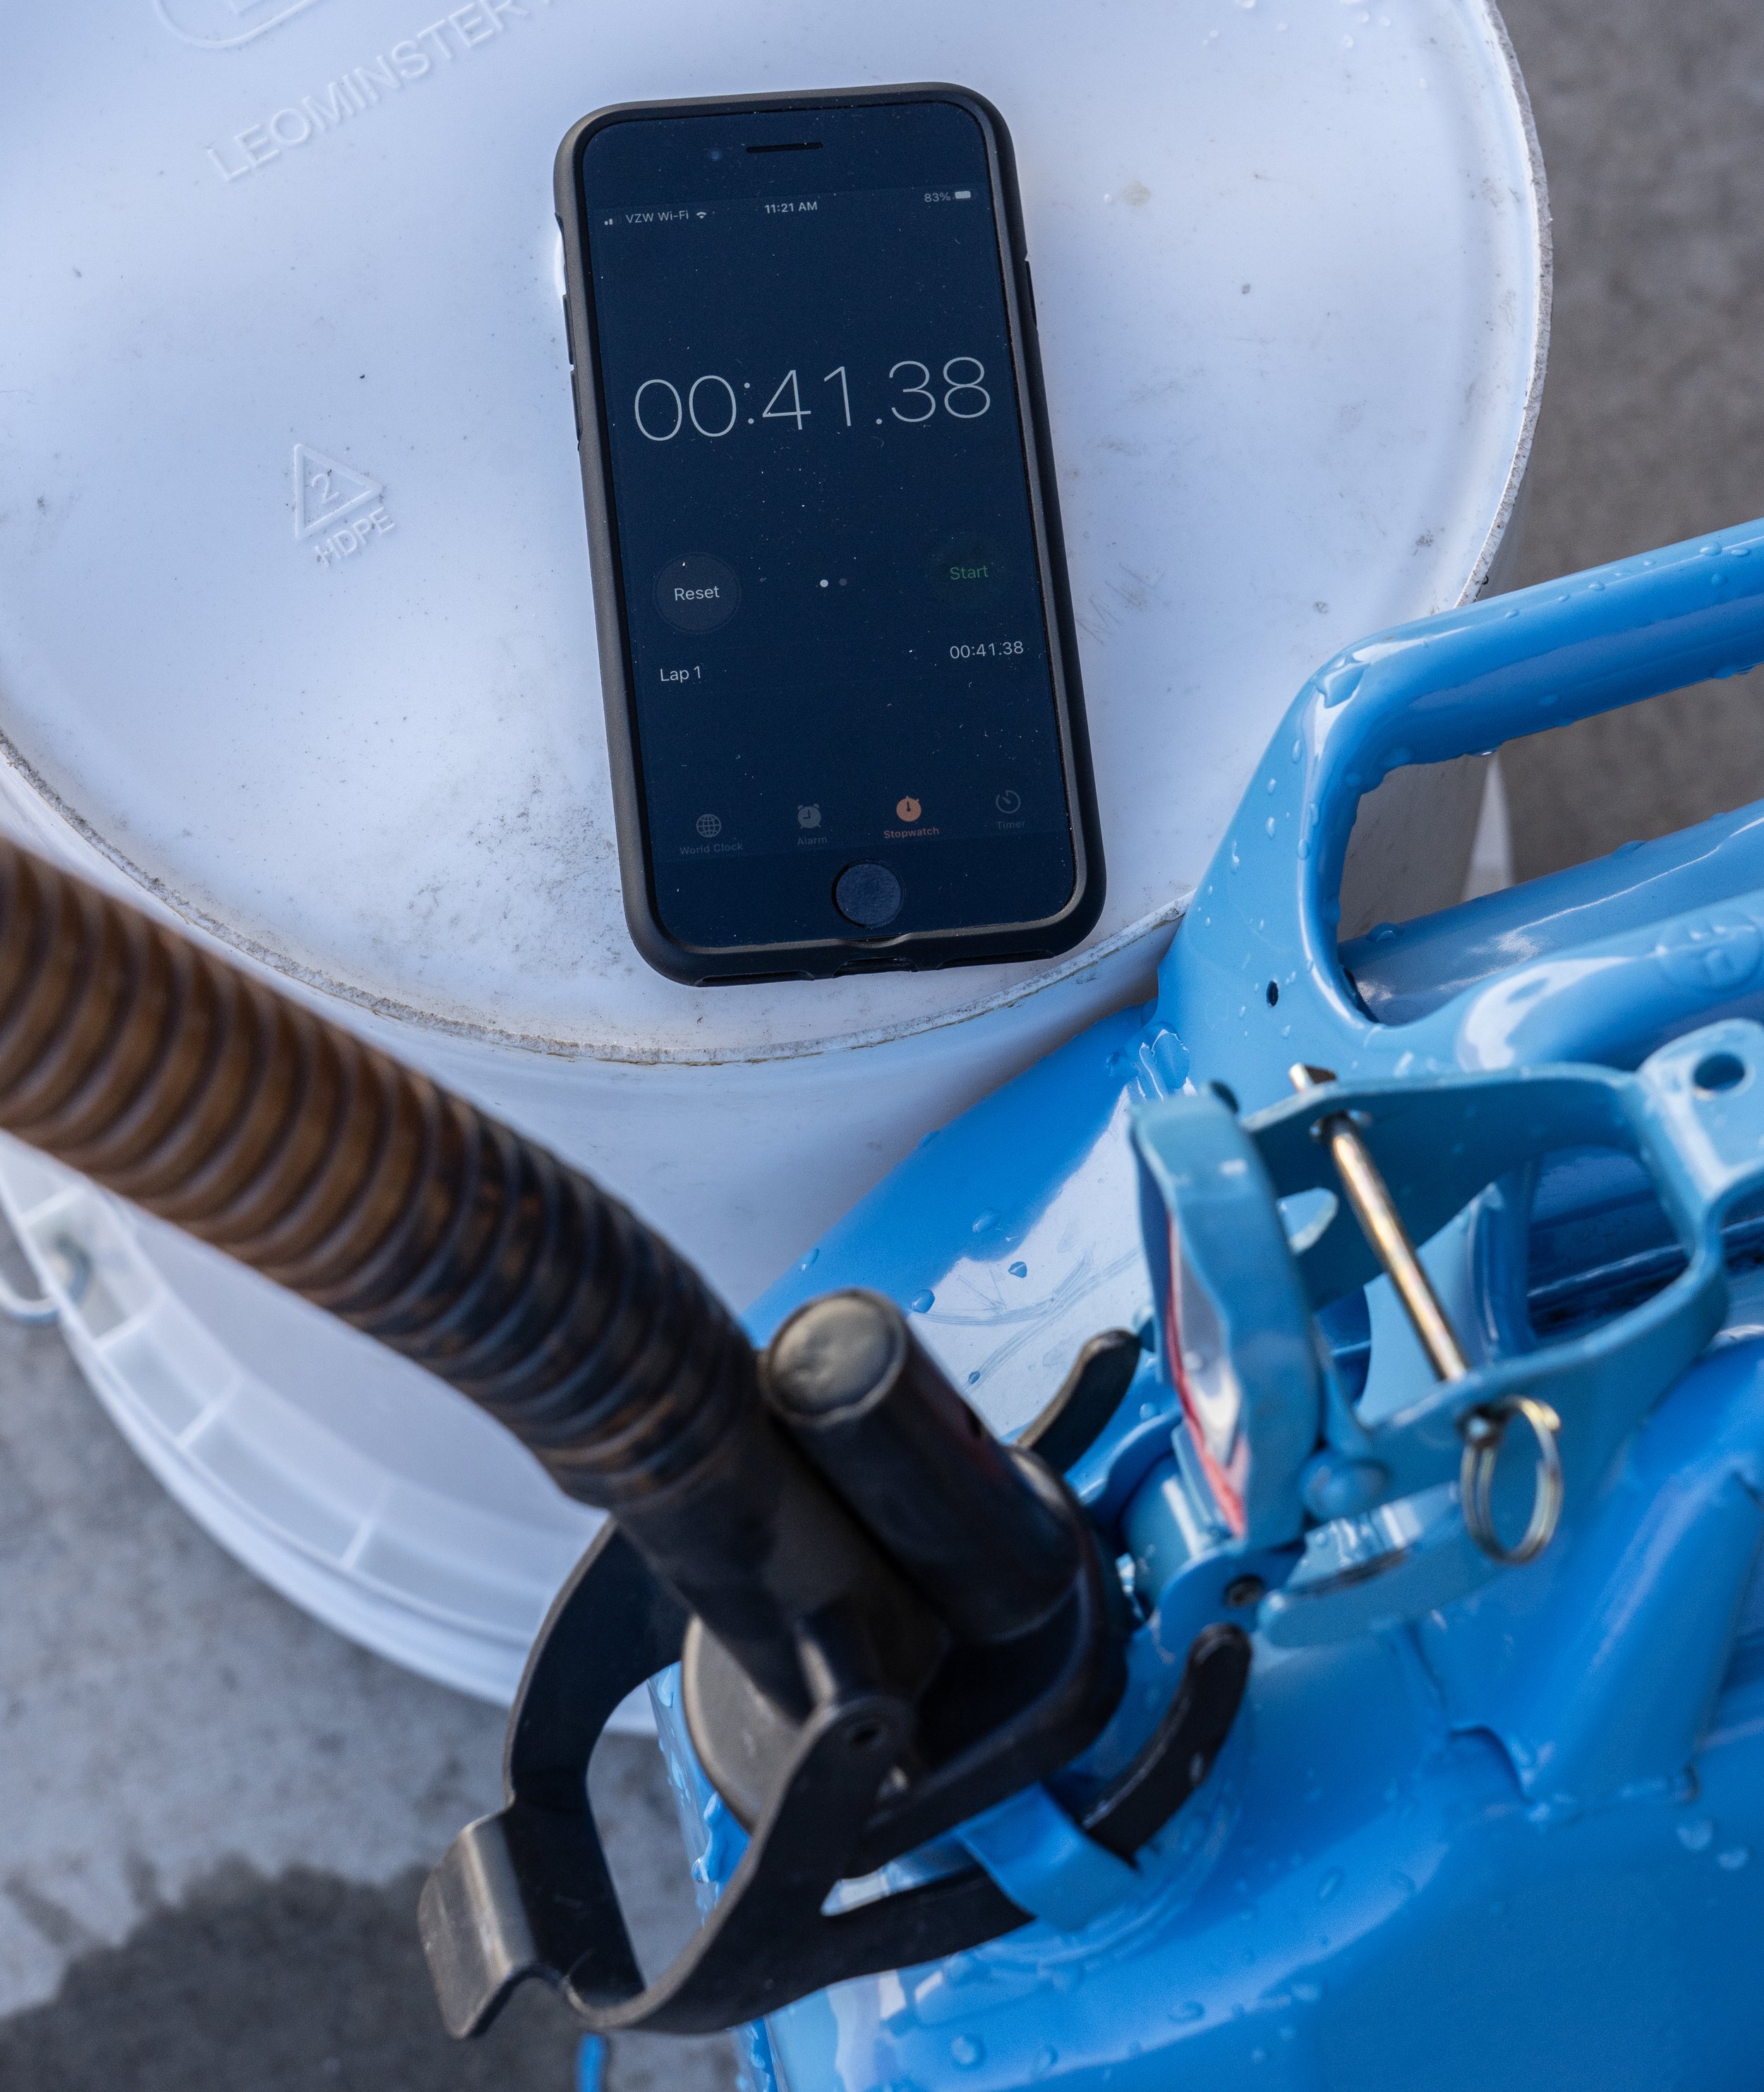
The Swiss Army spout was definitely the fastest.

And the generic unit? I only tested the one with the flexible spout, since they were otherwise identical aside from the fact that the second one leaked. I tipped up the can and water began flowing, accompanied by an anemic slurping noise from its punched breather—along with steady spatters of water. Had I been decanting fuel instead of water it would have made a significant mess.

As to time: The last drop of water trickled into the second container five minutes and six seconds after I started.

Seriously?

Let’s parse those results. The generic spouts are around $9 on Amazon; the Valpro is $37 or so. The Wavian, with its simpler nozzle, is around $27. No contest there, unless you like the idea of holding up a 40-pound fuel container for five minutes while it slooooowly loses weight.

As to the Swiss spout; while it was about 20 percent faster than the Valpro, the difference between 52 seconds and 41 is not huge in the real world, and demolishes the legend of sub-20-second dump rates. Note, too, that the Swiss spout had the advantage—at least for decanting—of the larger, non-lead-free-friendly nozzle, although I did leave in the (very useful) fine mesh filter in the end, which might have slowed the rate a bit.

Given that the Swiss spout is a genuine unicorn, only appearing for sale now and then through surplus outlets at $60-$75, I think the Valpro (or Wavian) spout is the clear winner on balance of speed and cost.

Now I’ll sit back and wait for the smirky comments from early Land Rover and G-Wagen owners, whose vehicles incorporated cunning extendable filler necks that rendered the use of a spout completely unnecessary. (Looking at you, T.S.)

A thought occurred to test the dump rate of a—shudder—Scepter can. I do own a couple of Scepter cans (which I think are fine for water if miserable for fuel), so I might obtain a spout for one and try it. I’d even test a Blitz can if someone will loan me theirs; I’m not spending money on one.

A gullwing hatch for the Troopy

Considering most of it was overseen from 6,000 miles away, the modifications to our 1993 Troop Carrier significantly exceeded our expectations. Mostly.

The Mulgo pop top conversion, installed at the Expedition Centre in Sydney before we ever saw the vehicle, was exactly what we wanted. Full standing headroom, a full-size drop-down bed, excellent ventilation. The roof was strong enough to walk on, and the modification added just two inches to the Troopy’s stock height. A 100-watt solar panel (which I later upgraded to 200 watts) provided power to the auxiliary battery for the fridge, lights, etc., and a bracket held a pair of MaxTrax.

The extensive internal plywood cabinetry, which Roseann had designed and a provider to the Expedition Centre had built from CAD plans, worked out just as we’d hoped. We still haven’t run out of storage space.

However. As a reasonably proficient carpenter, I was less than satisfied with the quality of the plywood, which appeared to be a better grade of standard five-ply big-box-hardware-outlet stuff. Worse, though, were the numerous nail and screw holes, which had been filled in with badly contrasting white wood putty, even on drawer fronts. Some day I plan to pull the entire unit out and replicate it in Baltic birch, with dovetailed drawers and invisible fasteners. But for now, as I mentioned, it’s perfectly functional.

One spot, though, is worse than the rest. The back of the tall sink cabinet backs up against the big front rear window on the driver’s (i.e. right) side—and it is peppered with nail and screw holes that aren’t even spaced consistently. It made me cringe every time I walked past it.

Ug. Ly.

Fortunately I came up with a solution that was both aesthetically pleasing and practical as well.

There is a bit of clearance between the back of the cabinet and the glass, varying between one and a half and two and a half inches. The plywood offered a tempting place to mount things such as a hatchet, Silky saw, and jack components. And Graham Jackson had recently sent me a link to the German company Explore Glazing, which makes extremely high-quality glass and aluminum gullwing hatches for 70-Series Land Cruisers, as well as for Jeeps, Land Rovers, G-Wagens, and, recently, the Ineos Grenadier. I got back with Graham and we each ordered one—I of course specified solid aluminum to better hide that wood work, even though the glass versions are quite dark.

Graham and I were both impressed with the quality of the hatches when they arrived. He installed his first, and his emails saved me some extra work.

The first task is to remove the factory window, which is not difficult. The hardest part is getting all the butyl sealant off, and I found that Gorilla tape worked very well to peel it off cleanly. Then comes the violent bit: The vertical lips of the 70 Series factory window opening are slightly curved, and the hatch frame is flat. So you need to use something like a short section of 2x4 and a small sledge to pound the edges of the frame reasonably flat. It take some real force (and wincing) since the sheet metal there is doubled. Once that’s done you can line up the hatch frame to drill the mounting holes. The frame uses a thick foam gasket as a seal, so if you haven’t got the window from perfectly flat it won’t matter.

I ran into one issue that was unique to our situation: The very nice pop-out latches of the Explore hatch ran into the back of the cabinet. So I had to drill and cut out two little rectangular holes in the cabinet for clearance. Access for tools was limited, so the openings are not as neat as they could be. I console myself with the thought that they match the rest of the “woodwork.”

With everything in place you can mount the dual hydraulic struts, which hold the hatch open firmly, even in a strong wind. At this point the hatch is usable and, according to the company, “99.9 percent waterproof.” However, they include a tube of Dow Corning 721 with which to caulk around the perimeter of the frame, thus completely sealing it and adding a finished look as well. The instructions say to apply the sealant, then brush the excess with a soap and water solution to remove it. But an email from Graham said, “Don’t do it! It just makes a mess.” So I simply applied the bead very carefully (using a zero-drip caulking gun) to be flush with the edge of the hatch frame, and cleaned the excess with a razor and scrubbing pad once it had cured.

To say I’m happy with the result would be an understatement. No longer do I have to look the other way when I walk past that window. And there was enough area on the cabinet to mount a hatchet, a Silky saw, the Troopy’s jack extensions, and a breaker bar mounted with the correct 21mm socket for the vehicle’s wheel nuts. There’s actually still a bit of space to consider.

If you don’t have an ugly cabinet to cover up, there are at least a couple of alternative functions for the Explore gullwing. If you like the idea of having a few tools quickly available behind the hatch, the company has an optional molle panel that provides ample opportunities for attaching odds and ends. Or, of course, you can simply use the hatch to access items in the interior of the vehicle without the need to open the rear doors and swingaways. One friend with a Troopy installed his fridge where it can be accessed either from the interior when camped with the roof up, or through the hatch for lunches or drinks.

The Explore Glazing hatch is expensive (around $500 plus shipping), but the quality is impeccable.

Explore Glazing is here.

Pelican Air 1535: The best carry-on for adventurers?

Left and right: same weight.

Does anyone else reading this think there should be a law that commercial airliners be built with overhead storage space actually equivalent to the number of seats?

Until there is such a rule—and, to be fair, until airlines start cracking down on passengers who heave on board bulging suitcases laughably larger than the little trial box next to the gate desk—the struggle to snag overhead space during boarding will continue to resemble trench warfare. And if, like me, your carry-on holds such critical equipment as cameras (plus associated lithium batteries), lenses, and binoculars, you do not want to be forced at the last minute to have it stuffed (“Free of charge!” as they always say, gee thanks) in the cargo hold. That’s why you have a carry-on.

If you are lucky or quick or vicious enough to successfully place your bag in the overhead bin, you know you cannot expect that any care will be given to it by subsequent aspirants to the space. It needs to be as crush-resistant as a bathyscaphe (ooh . . . too soon?).

Twenty five years ago I bought my first Pelican case, a 1500 with a padded camera-organizer interior made by Lowe Alpine systems, and used it on my first assignment to Africa. On one game drive in Zambia it was on the back seat of an open Land Rover, and while I was in the front seat and the vehicle was moving at a good pace down a track, another passenger tried to move it and wound up tipping it over the back just as I turned and watched in helpless horror. The (fortunately closed and latched) case cartwheeled end over end for about 20 feet before coming to rest in a pile of elephant dung. It, and the cameras inside, emerged unscathed, and I’ve been a Pelican disciple ever since.

Thus, several years ago I settled on a 1510 Protector as my carry-on—actual, legal, carry-on size. It was, like all Pelican cases in the line, completely water- and dust-proof, and laughed off the efforts of fellow passengers to abuse it. It rolled on two wheels with an extendable handle (I hate the “walk-the-dog”-style four-wheeled cases, which render their owners nearly two humans wide on a crowded concourse), it was lockable, and, set upright, served nicely as a perch at airport gates equipped with fewer seats than the aircraft parked outside (don’t get me started on that one). It served me flawlessly on many flights to several continents.

The only problem with the 1510, at least for flying, was weight. It scaled at exactly 12 pounds empty, thus contributing significantly to its total load. Given the recent habit of some carriers—looking at you, New Zealand Air—to limit (and check) carry-on weights, this was an additional drawback.

A few years ago Roseann bought one of the then-new Pelican Air cases, a 1535, virtually identical in dimensions to the 1510 but a full three and a quarter pounds lighter. Pelican says it’s made from “HPX” polymer, which is up to 40 percent lighter than their regular material. I admit to being skeptical that the Air could hold up, but Roseann’s proved—at least for the purposes of air travel—every bit the equal of the 1510. Crush-proof, sit-on-able (although I wouldn’t stand on the lid as I do with the 1510). It still incorporates stainless-steel padlock protectors and a pressure-equalization valve, and is IP-67 and MIL-SPEC certified. The wheels roll on stainless-steel bearings, as in the heavier case.

I wondered what that three-pound, four-ounce weight reduction represented in terms of contents, and discovered that my Sony A9, mounted with a 24-105 zoom, weighs three pounds two ounces. So call it the camera, lens, and an extra battery. That’s an impressive savings. We’re now a two-1535 family.

One of the things I like most about Pelican is that they constantly look for ways to improve. The newer 1535, for example, has the effortless push-pull latch system, which Roseann’s does not, and also a center handle on the vertical top of the case, for more versatile handling. Finally, there’s a nifty business-card holder/ID case only accessible with the lid open.

Perhaps my sole, niggling reservation is the plastic issue. However—remember my original 1500? It’s still perfectly functional and used regularly, and is likely to last at least another quarter century. At least that sets it apart from single-use plastic bags and water bottles. Here’s hoping Pelican eventually develops a completely recyclable polymer.

That aside, the Pelican Air 1535 comes highly recommended.

Reinforced padlock eyes, effortless push-pull latches, pressure-compensation valve, and sturdy business/ID card holder.

Pelican is here.

Parabolic springs: What exactly are they?

ARB/Old Man Emu recently announced, with great fanfare, a rear suspension kit for the 70-Series Land Cruisers that includes a two-leaf parabolic spring for each side, plus adjustable air bags to compensate for overload conditions. It can replace a standard semi-eliptic spring pack that might require 12 or more leaves to support an equivalent load.

Other manufacturers, such as Terrain Tamer, have also introduced parabolic springs kits for 70-Series Land Cruisers, as well as Series II and III Land Rovers.

But what exactly is a parabolic spring? And is it really better than a standard leaf spring?

The individual leaves of a standard, semi-eliptic, multi-leaf spring pack are stamped and then bent from strips of heat-treated, medium- to high-carbon steel, more or less rectangular in cross section, and of consistent thickness and width the length of the leaf (except for, in some cases, when the ends are rounded or have the corners relieved). When attached to a simple pivot at one end, with the other free to rotate a movable shackle, a single leaf resists bending in a fairly uniform fashion throughout its travel. To increase strength—that is, load-carrying ability—and add progressive resistance, progressively shorter leaves are added beneath the top leaf, held loosely in place with floating brackets that do not restrict movement. As the spring pack is compressed, each leaf slides against the adjacent leaves. This inter-leaf friction results in a self-dampening effect—unlike, for example, a coil spring, which has little internal resistance and relies almost entirely on a shock absorber (damper) to control oscillations.

However, that inter-leaf friction also degrades the ride quality of a leaf spring as well as its compliance—the ability to compress or extend fully. And this effect worsens as the spring gets dirty and/or rusty. Some manufacturers (such as OME) install replaceable anti-friction pads at the leaf tips, which help noticeably but do not eliminate the problem.

Years ago a few manufacturers—among them Nissan—attempted to create a progressive-rate leaf spring by making the leaves thicker in the middle, tapering in a linear fashion to the tips, as in the (very) simple schematic below. This involved a relatively easy manufacturing process. However, these “taper-leaf” springs proved less than ideal as bending stresses were not evenly distributed through the length of the leaf, resulting in weak points and failures.

Enter the parabolic spring.

While it’s difficult to discern looking at it from the side, the thickness taper of a parabolic spring follows a complex mathematical formula. Rather than simply tapering straight from the center of the leaf to the end, a parabolic spring looks like an extremely stretched-out version of the illustration below. As you might imagine, it’s significantly more difficult—i.e. expensive—to design and manufacture than simply stamping out flat lengths of steel and piling up enough of them to support a load.

The results, however, are worth it. Not only is a parabolic leaf progressive in its operation, it is also nearly as compliant as a coil spring due to the lack of internal friction and stress. Theoretically a single parabolic leaf would be sufficient to function as a spring; however, due to the ramifications if the leaf did break, most parabolic spring kits for vehicles comprise at least two leaves, and the lower leaf will have a full military wrap on each eye, to contain the upper spring should it break. These leaves touch only at the spring seat in the middle, and at the ends, so there is virtually no interleaf friction. Most kits also include a free-floating overload leaf that only engages under high load or compression. The illustrations below are from a (densely technical) Researchgate-published paper on leaf spring design, available to read or download here.

There’s more: A parabolic spring equivalent in load-carrying capacity to a standard multi-leaf spring weighs at least 30 percent less, drastically reducing unsprung weight and further improving ride and handling. Convert an all-leaf-sprung vehicle to parabolics and you could take 80 pounds off its total mass.

The conversion job is straightforward, no more complex than changing out standard springs, although the vehicle will almost certainly require new, firmer shocks to compensate for the loss of inter-leaf friction. Series Land Rover owners I know who’ve converted describe it as “transformative.” This diagram shows the magnitude of travel possible with a parabolic spring system, as well as the longitudinal “S” deformation any leaf spring undergoes during severe braking.

While it’s easy to find parabolic spring kits for Series Land Rovers and the 70-Series Land Cruisers, diligent searching revealed no such kits for my FJ40, although I heard that one company did offer them for a while years ago. Damn.

Incidentally, there is no relation between the terms “semi-elliptic” and “parabolic” in leaf spring terms. Semi-elliptic refers to the shape the entire spring pack assumes from the side; if one were to draw this shape out into a connected oval, it would be roughly elliptical. A parabolic vehicle spring pack assumes this same profile and is thus also semi-elliptical.

ARB is here. Terrain Tamer is here.

OME MT64: OME's answer to Bilstein?

My FJ40 has sat atop ARB’s Old Man Emu suspension for over 20 years, and our HZJ75 Troop Carrier is equipped with it as well. OME leaf springs—selectable for varying permanent loads from stock to heavy-duty—improve on the ride offered by factory springs while offering more load-carrying ability. And OME’s twin-tube, low-pressure nitrogen-charged Nitrocharger shock absorbers—or dampers to use the technically correct term (not “dampener”)—have never failed us or shown signs of fade, even on day-after-day-long stretches of Australian corrugations.

So I am understandably an OME fan, and I pay attention to new developments. I wasn’t surprised when the company introduced their ultra-premium, internal-bypass, BP51 shock—it made sense to go head to head with such brands as Fox and Icon, with a shock that incorporated high-performance technology to better the Nitrocharger’s ride at low to moderate speeds while also bettering its high-amplitude damping. If the BP51 were available for our Troopy I would seriously consider spending the cash to upgrade.

I was surprised, however, to learn about OME’s new shock, the MT64 (MT64 referes to monotube construction and the shock’s stout 64mm diameter piston). I’ve watched in the past as companies diluted their product lines with so many choices that consumers simply gave up trying to understand the differences and switched to another brand. ARB descibes the MT64 as sitting between the Nitrocharger and BP51 in performance and price.

Hmm. I looked at the specs. Indeed the MT64 splits the difference in price. But is there really a need for a shock that is “halfway” between the two in performance? I looked at the construction, which is neither the twin-tube, low-pressure design of the Nitrocharger nor the internal-bypass (or any bypass at all) of the BP51, but a monotube, high-pressure gas-charged format. In its front strut configuration it offers adjustable ride height.

Then it hit me: The MT64 is OME’s alternative to Bilstein.

Bilstein shocks have long been a popular upgrade to factory shocks—they’re reasonably priced, offer definite performance gains, and carry a storied name to boot. The Bilstein 5100 is a common swap; more recently, the beefier 6112 front strut assembly has become the go-to shock for those with typically overloaded overland rigs.

Consider the MT64 front strut assembly alongside the 6112: Both are monotube, high-pressure gas-charged units with enlarged oil/gas capacity, a floating piston to contain the nitrogen gas, and adjustable ride height. For fans of high-pressure gas-charged shocks, the MT64 offers an obvious alternative to Bilstein. So how do they compare in terms of specifications?

The MT64’s piston is 64mm in diameter (it’s actually 63.5 but that’s not very catchy); the shaft is 22.2mm in diameter. The (monotube, remember) aluminum body is 71mm across.

The Bilstein 6112 has a 60mm piston and an 18mm shaft, in a steel body 67.3mm in diameter.

I see what you did there, OME. The MT64 is just a bit beefier in every dimension, a contrast that will play well in comparison tests—and likely on the trail as well. Visually, the MT64’s forged aluminum body caps also appear sturdier than those on the 6112. I liked the plastic guard over the shaft, which should help protect it from grit blasting (although not as well as the full cover on the Nitrocharger), and the natural rubber bushings rather than wear-prone heim joints.

There’s one other important difference: The MT64 is fully rebuildable; the Bilstein 6112 is not.

The MT64 is offered in both strut and standard configurations, so you can run the same basic shock on strut or conventional front suspensions, and the rear as well. The Bilstein 6112 is only offered as a strut assembly for front suspensions; for rear shocks most will choose either Bilstein’s B8 5100, a significantly smaller unit with a 14mm shaft and a 46mm piston, or the B8 5160, essentially the 5100 with the advantage of a remote reservoir.

Perhaps what is more important than the differences between these two shocks is what they share in common: their target audience.

High-pressure gas-charged shocks such as these and similar models are marketed toward those who want more of a sporting—i.e. firmer—initial response in ride and handling, compared to a typical twin-tube, low-pressure design. Advertising descriptions usually include references to “spirited” driving, and promo videos rarely fail to show at least a few scenes with two if not all four wheels in the air. It is, sadly, a typical approach: Manufacturers make lots of noise about “treading lightly” while overtly encouraging just the opposite.

Not too long ago I watched a (very well-filmed) video about a group of guys playing Ivan Stewart with several overland-kitted vehicles on a (public) dirt road in Baja—a route I know well. Lots of whooping and flying gravel, and inset frames boasting their current speed. One of them finally managed to stuff his friend’s Jeep Gladiator into the desert and fold the chassis into a notable inverted V. Incredibly, rather than slinking home and considering a different approach to traveling in a foreign country, they went right on partying as if this were an unfortunate but completely normal contingency for a bro excursion. Sadly, this video—and the attitude—is far from unique.

Sorry, where was I? Right: If you travel like I do, with mechanical sympathy for your vehicle uppermost in your mind, enjoyment of your surroundings second, and preservation of the environment and the trail a close third, you don’t need shocks that can shrug off repeated jumps. If you prefer the slightly sharper on-road handling high-pressure gas shocks provide, that’s great. But for comfortable, reliable, long-distance travel, a well-built twin-tube shock such as the OME Nitrocharger, properly specced to your constant load, will serve you well. If you want a more sophisticated ride, as well as the ability to adjust both compression and rebound damping—and you have the funds—then by all means spring for the superb BP51.

ARB is here. Retailer Vivid Racing is here.

Redarc's new Alpha150 lithium battery—potent and pricey.

So, you’ve become used to the concept of a $1,000 battery. How about a $2,300 battery?

It makes perfect sense that Redarc, the premier Australian maker of battery-management systems, would produce their own lithium battery. It also makes sense that it would debut at the very top of the heap in both performance and price.

In addition to its impressive 150Ah storage capacity, the Alpha150 boasts a continuous discharge capability of 200 amps, allowing it to power a 2,000-watt inverter. Even more impressive is its massive 135-amp charge rate, which allows a full recharge (if your system has that much input capability) in 1.1 hours.

The Alpha150 incorporates a cell heater, which helps expand its operating range to between -4ºF and 140ºF (-20ºC to 60ºC) for discharging, and between -22ºF to 113ºF (-30ºC to 45ºC) for charging. Note, however, that last figure, which still precludes placement in an engine compartment.

Redarc claims a cycle life of 5,000 discharges at 100 percent DoD, which is by some distance the highest cycle life of which I’m aware in a Lithium battery, and should go a long way toward amortizing that painful initial outlay.

Despite that capacity (and keep in mind the much higher energy density of lithium cells compared to AGM batteries) the Alpha150 weighs just 34.2 pounds (15.5 kg).

Note, however, that the warranty on the Alpha150 is just five years. By comparison, for example, an X2Power Group 31M 100Ah AGM battery from Batteries Plus, with a list price of $550, includes a four-year free replacement warranty. By now we’re all aware of the advantages of lithium technology—even at a theoretical 200Ah, two of those X2Power units wouldn’t match the capacity of a single Alpha150, wouldn’t charge a fifth as quickly, and would weigh a hundred and fifteen pounds more.

Nevertheless, it’s my opinion that if lithium battery manufacturers are going to boast about lifespans ten times longer than AGM batteries, and charge a premium price for it, they need to start offering commensurate warranties. I would not want to spend $2,300 (or $1,000 for that matter) on a deep-cycle battery, have something go wrong six years later, and have the manufacturer shrug and say, “Sorry,” when I complain.

I’m waiting eagerly for the day when the makers of lithium batteries become confident enough in their own products to offer consumers warranty protection as durable as they assure us those products are.

Scepter water can/Fynspray pump—the easy way

The New-Zealand-manufactured Fynspray galley pump is the best way to turn a Scepter water can into a convenient and fast dispensing system. The normal procedure, shown on several sites, involves cutting off the base of the larger of the two small sub-caps on the main Scepter screw-on lid, then drilling a one and one-half-inch hole around the remnant hole, which is only about three-quarters of an inch in diameter. You can do this on the lid that came with the can, or on a spare, which is what I did.

If you have a drill press and can secure the cap, this is an easy task. However, if you try to do it with a hand drill and a one and one-half inch hole saw, you won’t have any guide for the hole saw and can wind up really buggering the job. I found an easy work-around.

Instead of cutting off the screw base for the small cap, I left it in place, including its cap. I then used a cheap hole saw with a protruding guide bit, and drilled straight down through the top of the cap. The hole saw is slightly smaller in diameter than the cap, so it will shave off the circumference as you go. However, it will perfectly center the drill bit. If your hole saw is deep enough you can go all the way through. Mine wasn’t quite deep enough, but it scored the cap deeply enough that, by unscrewing and discarding the small cap, it cut the rest of the way through with zero walking. Cut off the unneeded securing ring, and . . . done.

The Fynspray pump works on both the up and down stroke, so it’s very fast. And you can leave the can upright, even secured in a holder if desired. The smaller cap on the lid serves as a vent for full flow.

The Fynspray mod is infinitely better than the insultingly ineffective Scepter hose and nozzle, which requires you to lay the can on its side, and has no provision for venting, so you must constantly tip the can up to relieve the resulting vacuum. Tip: If you’ve already bought the Scepter nozzle, you can repurpose its hose to make the extension for the Fynspray pump.

Fynspray pumps are available at Fawcett Boat Supply, among other places.

The new ARB Earth Camper

In what is surely a natural progression, ARB has just announced its very own “adventure” trailer, which they’ve named the Earth Camper. At first glance, it seems to live up to the ARB reputation in terms of build quality and innovation.

It’s built around a massive, mandrel-bent and welded tubular chassis, which should provide absolutely flex-free support to the composite body panels. The trailer is supported by long-travel independent suspension employing, of course, Old Man Emu shocks. Electric brakes, alloy wheels (with Toyota lug spacing), and Maxxis all-terrain tires with spare are standard.

The salient feature of the trailer is the enormous clamshell back, which folds down at the push of a button to provide a raised, hard floor. A door then provides access to a queen-size bed. For quick overnight stays you can be tucked away inside a couple minutes. For a full camp, a tent erects around the floor to provide a completely sheltered dressing, sitting, and eating space. A dining table unfolds from the base of the bed area.

On the left side of the trailer is a full-pull-out kitchen, including a 96-liter dual-zone fridge freezer, a three-burner stove, and sink. There’s plenty of storage above and to the side. Internal tanks provide a full 140 liters (36 gallons) of water, and an additional storage nook holds a 20-liter jerry can. That’s more water than most full-size trailers and campers provide. Well done ARB.

Electrical power is provided by a 120-watt solar panel and a 100-amp-hour lithium battery—that’s right: standard LiFePO4 power. Again, well done—and there is room in the battery compartment for a second 100AH battery. You can also easily plug in portable solar panels for extra input. Charge control is via a high-quality Redarc system.

On the opposite side of the camper is an optional en-suite toilet and shower enclosure of luxurious proportions, and a Hot Tap water heater and shower system.

There are numerous other features, and optional awnings and side curtains that will transform the Earth Camper into the full epic Aussie quarter-acre encampment. The versatility—from two-minute crash pad to let’s-stay-a-month homestead—will be one of the trailer’s most attractive features.

I have no word yet on price or weight, but I suspect ARB will sell every one of these they can produce. find out more here.